Set action levels: failure thresholds and functions to invoke
Description
The action_levels() function works with the actions argument that is
present in the create_agent() function and in every validation step
function (which also has an actions argument). With it, we can provide
threshold failure values for any combination of warn, stop, or notify
failure states.
We can react to any entering of a state by supplying corresponding functions
to the fns argument. They will undergo evaluation at the time when the
matching state is entered. If provided to create_agent() then the policies
will be applied to every validation step, acting as a default for the
validation as a whole.
Calls of action_levels() could also be applied directly to any validation
step and this will act as an override if set also in create_agent(). Usage
of action_levels() is required to have any useful side effects (i.e.,
warnings, throwing errors) in the case of validation functions operating
directly on data (e.g., mtcars %>% col_vals_lt("mpg", 35)). There are two
helper functions that are convenient when using validation functions directly
on data (the agent-less workflow): warn_on_fail() and stop_on_fail().
These helpers either warn or stop (default failure threshold for each is set
to 1), and, they do so with informative warning or error messages. The
stop_on_fail() helper is applied by default when using validation functions
directly on data (more information on this is provided in Details).
Usage
action_levels(warn_at = NULL, stop_at = NULL, notify_at = NULL, fns = NULL) warn_on_fail(warn_at = 1) stop_on_fail(stop_at = 1)action_levels(warn_at = NULL, stop_at = NULL, notify_at = NULL, fns = NULL) warn_on_fail(warn_at = 1) stop_on_fail(stop_at = 1)
Arguments
warn_at |
Threshold value for the 'warn' failure state
Either the threshold number or the threshold fraction of failing test
units that result in entering the |
stop_at |
Threshold value for the 'stop' failure state
Either the threshold number or the threshold fraction of failing test
units that result in entering the |
notify_at |
Threshold value for the 'notify' failure state
Either the threshold number or the threshold fraction of failing test
units that result in entering the |
fns |
Functions to execute when entering failure states
A named list of functions that is to be paired with the appropriate failure
states. The syntax for this list involves using failure state names from
the set of |
Details
The output of the action_levels() call in actions will be interpreted
slightly differently if using an agent or using validation functions
directly on a data table. For convenience, when working directly on data, any
values supplied to warn_at or stop_at will be automatically given a stock
warning() or stop() function. For example using
small_table %>% col_is_integer("date") will provide a detailed stop message
by default, indicating the reason for the failure. If you were to supply the
fns for stop or warn manually then the stock functions would be
overridden. Furthermore, if actions is NULL in this workflow (the default),
pointblank will use a stop_at value of 1 (providing a detailed,
context-specific error message if there are any failing units). We can
absolutely suppress this automatic stopping behavior at each validation
step by setting active = FALSE. In this interactive data case, there is no
stock function given for notify_at. The notify failure state is less
commonly used in this workflow as it is in the agent-based one.
When using an agent, we often opt to not use any functions in fns as the
warn, stop, and notify failure states will be reported on when using
create_agent_report() (and, usually that's sufficient). Instead, using the
end_fns argument is a better choice since that scheme provides useful data
on the entire interrogation, allowing for finer control on side effects and
reducing potential for duplicating any side effects.
Value
An action_levels object.
Defining threshold values
Any threshold values supplied for the warn_at, stop_at, or notify_at
arguments correspond to the warn, stop, and notify failure states,
respectively. A threshold value can either relates to an absolute number of
test units or a fraction-of-total test units that are failing. Exceeding
the threshold means entering one or more of the warn, stop, or notify
failure states.
If a threshold value is a decimal value between 0 and 1 then it's a
proportional failure threshold (e.g., 0.15 indicates that if 15 percent of
the test units are found to be failing, then the designated failure state
is entered). Absolute values starting from 1 can be used instead, and this
constitutes an absolute failure threshold (e.g., 10 means that if 10 of the
test units are found to be failing, the failure state is entered).
Examples
For these examples, we will use the included small_table dataset.
small_table
#> # A tibble: 13 x 8
#>    date_time           date           a b             c      d e     f
#>    <dttm>              <date>     <int> <chr>     <dbl>  <dbl> <lgl> <chr>
#>  1 2016-01-04 11:00:00 2016-01-04     2 1-bcd-345     3  3423. TRUE  high
#>  2 2016-01-04 00:32:00 2016-01-04     3 5-egh-163     8 10000. TRUE  low
#>  3 2016-01-05 13:32:00 2016-01-05     6 8-kdg-938     3  2343. TRUE  high
#>  4 2016-01-06 17:23:00 2016-01-06     2 5-jdo-903    NA  3892. FALSE mid
#>  5 2016-01-09 12:36:00 2016-01-09     8 3-ldm-038     7   284. TRUE  low
#>  6 2016-01-11 06:15:00 2016-01-11     4 2-dhe-923     4  3291. TRUE  mid
#>  7 2016-01-15 18:46:00 2016-01-15     7 1-knw-093     3   843. TRUE  high
#>  8 2016-01-17 11:27:00 2016-01-17     4 5-boe-639     2  1036. FALSE low
#>  9 2016-01-20 04:30:00 2016-01-20     3 5-bce-642     9   838. FALSE high
#> 10 2016-01-20 04:30:00 2016-01-20     3 5-bce-642     9   838. FALSE high
#> 11 2016-01-26 20:07:00 2016-01-26     4 2-dmx-010     7   834. TRUE  low
#> 12 2016-01-28 02:51:00 2016-01-28     2 7-dmx-010     8   108. FALSE low
#> 13 2016-01-30 11:23:00 2016-01-30     1 3-dka-303    NA  2230. TRUE  high
Create an action_levels object with fractional values for the warn,
stop, and notify states.
al <-
  action_levels(
    warn_at = 0.2,
    stop_at = 0.8,
    notify_at = 0.5
  )
A summary of settings for the al object is shown by printing it.
Create a pointblank agent and apply the al object to actions. Add two
validation steps and interrogate the small_table.
agent_1 <-
  create_agent(
    tbl = small_table,
    actions = al
  ) %>%
  col_vals_gt(
    columns = a, value = 2
  ) %>%
  col_vals_lt(
    columns = d, value = 20000
  ) %>%
  interrogate()
The report from the agent will show that the warn state has been entered
for the first validation step but not the second one. We can confirm this in
the console by inspecting the warn component in the agent's x-list.
x_list <- get_agent_x_list(agent = agent_1)

x_list$warn
## [1] TRUE FALSE
Applying the action_levels object to the agent means that all validation
steps will inherit these settings but we can override this by applying
another such object to the validation step instead (this time using the
warn_on_fail() shorthand).
agent_2 <-
  create_agent(
    tbl = small_table,
    actions = al
  ) %>%
  col_vals_gt(
    columns = a, value = 2,
    actions = warn_on_fail(warn_at = 0.5)
  ) %>%
  col_vals_lt(
    columns = d, value = 20000
  ) %>%
  interrogate()
In this case, the first validation step has a less stringent failure
threshold for the warn state and it's high enough that the condition is not
entered. This can be confirmed in the console through inspection of the
x-list warn component.
x_list <- get_agent_x_list(agent = agent_2)

x_list$warn
## [1] FALSE FALSE
In the context of using validation functions directly on data (i.e., no
involvement of an agent) we want to trigger warnings and raise errors. The
following will yield a warning if it is executed (returning the small_table
data).
small_table %>%
  col_vals_gt(
    columns = a, value = 2,
    actions = warn_on_fail(warn_at = 2)
  )
## # A tibble: 13 × 8
##    date_time           date           a b           c      d e
##    <dttm>              <date>     <int> <chr>   <dbl>  <dbl> <lgl>
##  1 2016-01-04 11:00:00 2016-01-04     2 1-bcd-…     3  3423. TRUE
##  2 2016-01-04 00:32:00 2016-01-04     3 5-egh-…     8 10000. TRUE
##  3 2016-01-05 13:32:00 2016-01-05     6 8-kdg-…     3  2343. TRUE
##  4 2016-01-06 17:23:00 2016-01-06     2 5-jdo-…    NA  3892. FALSE
##  5 2016-01-09 12:36:00 2016-01-09     8 3-ldm-…     7   284. TRUE
##  6 2016-01-11 06:15:00 2016-01-11     4 2-dhe-…     4  3291. TRUE
##  7 2016-01-15 18:46:00 2016-01-15     7 1-knw-…     3   843. TRUE
##  8 2016-01-17 11:27:00 2016-01-17     4 5-boe-…     2  1036. FALSE
##  9 2016-01-20 04:30:00 2016-01-20     3 5-bce-…     9   838. FALSE
## 10 2016-01-20 04:30:00 2016-01-20     3 5-bce-…     9   838. FALSE
## 11 2016-01-26 20:07:00 2016-01-26     4 2-dmx-…     7   834. TRUE
## 12 2016-01-28 02:51:00 2016-01-28     2 7-dmx-…     8   108. FALSE
## 13 2016-01-30 11:23:00 2016-01-30     1 3-dka-…    NA  2230. TRUE
## # … with 1 more variable: f <chr>
## Warning message:
## Exceedance of failed test units where values in `a` should have been >
## `2`.
## The `col_vals_gt()` validation failed beyond the absolute threshold
## level (2).
## * failure level (4) >= failure threshold (2)
With the same pipeline, not supplying anything for actions (it's NULL by
default) will have the same effect as using stop_on_fail(stop_at = 1).
small_table %>%
  col_vals_gt(columns = a, value = 2)
## Error: Exceedance of failed test units where values in `a` should have
## been > `2`.
## The `col_vals_gt()` validation failed beyond the absolute threshold
## level (1).
## * failure level (4) >= failure threshold (1)
Here's the equivalent set of statements:
small_table %>%
  col_vals_gt(
    columns = a, value = 2,
    actions = stop_on_fail(stop_at = 1)
  )
## Error: Exceedance of failed test units where values in `a` should have
## been > `2`.
## The `col_vals_gt()` validation failed beyond the absolute threshold
## level (1).
## * failure level (4) >= failure threshold (1)
This is because the stop_on_fail() call is auto-injected in the default
case (when operating on data) for your convenience. Behind the scenes a
'secret agent' uses 'covert actions': all so you can type less.
Function ID
1-5
See Also
Other Planning and Prep:
create_agent(),
create_informant(),
db_tbl(),
draft_validation(),
file_tbl(),
scan_data(),
tbl_get(),
tbl_source(),
tbl_store(),
validate_rmd()
Activate one or more of an agent's validation steps
Description
If certain validation steps need to be activated after the creation of the
validation plan for an agent, use the activate_steps() function. This is
equivalent to using the active = TRUE for the selected validation steps
(active is an argument in all validation functions). This will replace any
function that may have been defined for the active argument during creation
of the targeted validation steps.
Usage
activate_steps(agent, i = NULL)activate_steps(agent, i = NULL)
Arguments
agent |
The pointblank agent object
A pointblank agent object that is commonly created through the use of
the |
i |
A validation step number
The validation step number, which is assigned to each validation step in
the order of definition. If |
Value
A ptblank_agent object.
Function ID
9-5
See Also
For the opposite behavior, use the deactivate_steps() function.
Other Object Ops:
deactivate_steps(),
export_report(),
remove_steps(),
set_tbl(),
x_read_disk(),
x_write_disk()
Examples
# Create an agent that has the # `small_table` object as the # target table, add a few inactive # validation steps, and then use # `interrogate()` agent_1 <- create_agent( tbl = small_table, tbl_name = "small_table", label = "An example." ) %>% col_exists( columns = date, active = FALSE ) %>% col_vals_regex( columns = b, regex = "[0-9]-[a-z]{3}-[0-9]{3}", active = FALSE ) %>% interrogate() # In the above, the data is # not actually interrogated # because the `active` setting # was `FALSE` in all steps; we # can selectively change this # with `activate_steps()` agent_2 <- agent_1 %>% activate_steps(i = 1) %>% interrogate()# Create an agent that has the # `small_table` object as the # target table, add a few inactive # validation steps, and then use # `interrogate()` agent_1 <- create_agent( tbl = small_table, tbl_name = "small_table", label = "An example." ) %>% col_exists( columns = date, active = FALSE ) %>% col_vals_regex( columns = b, regex = "[0-9]-[a-z]{3}-[0-9]{3}", active = FALSE ) %>% interrogate() # In the above, the data is # not actually interrogated # because the `active` setting # was `FALSE` in all steps; we # can selectively change this # with `activate_steps()` agent_2 <- agent_1 %>% activate_steps(i = 1) %>% interrogate()
Put the current date into a file name
Description
This function helps to affix the current date to a filename. This is useful when writing agent and/or informant objects to disk as part of a continuous process. The date can be in terms of UTC time or the local system time. The date can be affixed either to the end of the filename (before the file extension) or at the beginning with a customizable delimiter.
The x_write_disk(), yaml_write() functions allow for the writing of
pointblank objects to disk. Furthermore the log4r_step() function has
the append_to argument that accepts filenames, and, it's reasonable that a
series of log files could be differentiated by a date component in the naming
scheme. The modification of the filename string takes effect immediately but
not at the time of writing a file to disk. In most cases, especially when
using affix_date() with the aforementioned file-writing functions, the file
timestamps should approximate the time components affixed to the filenames.
Usage
affix_date( filename, position = c("end", "start"), format = "%Y-%m-%d", delimiter = "_", utc_time = TRUE )affix_date( filename, position = c("end", "start"), format = "%Y-%m-%d", delimiter = "_", utc_time = TRUE )
Arguments
filename |
The filename to modify. |
position |
Where to place the formatted date. This could either be at
the |
format |
A |
delimiter |
The delimiter characters to use for separating the date string from the original file name. |
utc_time |
An option for whether to use the current UTC time to
establish the date (the default, with |
Value
A character vector.
Examples
The basics of creating a filename with the current date
Taking the generic "pb_file" name for a file, we add the current date to it
as a suffix.
affix_date(filename = "pb_file")
## [1] "pb_file_2022-04-01"
File extensions won't get in the way:
affix_date(filename = "pb_file.rds")
## [1] "pb_file_2022-04-01.rds"
The date can be used as a prefix.
affix_date(
  filename = "pb_file",
  position = "start"
)
## [1] "2022-04-01_pb_file"
The date pattern can be changed and so can the delimiter.
affix_date(
  filename = "pb_file.yml",
  format = "%Y%m%d",
  delimiter = "-"
)
## [1] "pb_file-20220401.yml"
Using a date-based filename in a pointblank workflow
We can use a file-naming convention involving dates when writing output files
immediately after interrogating. This is just one example (any workflow
involving a filename argument is applicable). It's really advantageous to
use date-based filenames when interrogating directly from YAML in a scheduled
process.
yaml_agent_interrogate(
  filename = system.file(
    "yaml", "agent-small_table.yml",
    package = "pointblank"
  )
) %>%
  x_write_disk(
    filename = affix_date(
      filename = "small_table_agent.rds",
      delimiter = "-"
    ),
    keep_tbl = TRUE,
    keep_extracts = TRUE
  )
In the above, we used the written-to-disk agent (The
"agent-small_table.yml" YAML file) for an interrogation via
yaml_agent_interrogate(). Then, the results were written to disk as an RDS
file. In the filename argument of x_write_disk(), the affix_date()
function was used to ensure that a daily run would produce a file whose name
indicates the day of execution.
Function ID
13-3
See Also
The affix_datetime() function provides the same features except it
produces a datetime string by default.
Other Utility and Helper Functions:
affix_datetime(),
col_schema(),
from_github(),
has_columns(),
stop_if_not()
Put the current datetime into a file name
Description
This function helps to affix the current datetime to a filename. This is
useful when writing agent and/or informant objects to disk as part of a
continuous process. The datetime string can be based on the current UTC time
or the local system time. The datetime can be affixed either to the end of
the filename (before the file extension) or at the beginning with a
customizable delimiter. Optionally, the time zone information can be
included. If the datetime is based on the local system time, the user system
time zone is shown with the format <time>(+/-)hhmm. If using UTC time, then
the <time>Z format is adopted.
The x_write_disk(), yaml_write() functions allow for the writing of
pointblank objects to disk. The modification of the filename string takes
effect immediately but not at the time of writing a file to disk. In most
cases, especially when using affix_datetime() with the aforementioned
file-writing functions, the file timestamps should approximate the time
components affixed to the filenames.
Usage
affix_datetime( filename, position = c("end", "start"), format = "%Y-%m-%d_%H-%M-%S", delimiter = "_", utc_time = TRUE, add_tz = FALSE )affix_datetime( filename, position = c("end", "start"), format = "%Y-%m-%d_%H-%M-%S", delimiter = "_", utc_time = TRUE, add_tz = FALSE )
Arguments
filename |
The filename to modify. |
position |
Where to place the formatted datetime. This could either be
at the |
format |
A |
delimiter |
The delimiter characters to use for separating the datetime string from the original file name. |
utc_time |
An option for whether to use the current UTC time to
establish the datetime (the default, with |
add_tz |
Should the time zone (as an offset from UTC) be provided? If
|
Value
A character vector.
Examples
The basics of creating a filename with the current date and time
Taking the generic "pb_file" name for a file, we add the current datetime
to it as a suffix.
affix_datetime(filename = "pb_file")
## [1] "pb_file_2022-04-01_00-32-53"
File extensions won't get in the way:
affix_datetime(filename = "pb_file.rds")
## [1] "pb_file_2022-04-01_00-32-53.rds"
The datetime can be used as a prefix.
affix_datetime(
  filename = "pb_file",
  position = "start"
)
## [1] "2022-04-01_00-32-53_pb_file"
The datetime pattern can be changed and so can the delimiter.
affix_datetime(
  filename = "pb_file.yml",
  format = "%Y%m%d_%H%M%S",
  delimiter = "-"
)
## [1] "pb_file-20220401_003253.yml"
Time zone information can be included. By default, all datetimes are given in the UTC time zone.
affix_datetime(
  filename = "pb_file.yml",
  add_tz = TRUE
)
## [1] "pb_file_2022-04-01_00-32-53Z.yml"
We can use the system's local time zone with utc_time = FALSE.
affix_datetime(
  filename = "pb_file.yml",
  utc_time = FALSE,
  add_tz = TRUE
)
## [1] "pb_file_2022-03-31_20-32-53-0400.yml"
Using a datetime-based filename in a pointblank workflow
We can use a file-naming convention involving datetimes when writing output
files immediately after interrogating. This is just one example (any workflow
involving a filename argument is applicable). It's really advantageous to
use datetime-based filenames when interrogating directly from YAML in a
scheduled process, especially if multiple validation runs per day are being
executed on the same target table.
yaml_agent_interrogate(
  filename = system.file(
    "yaml", "agent-small_table.yml",
    package = "pointblank"
  )
) %>%
  x_write_disk(
    filename = affix_datetime(
      filename = "small_table_agent.rds",
      delimiter = "-"
    ),
    keep_tbl = TRUE,
    keep_extracts = TRUE
  )
In the above, we used the written-to-disk agent (The
"agent-small_table.yml" YAML file) for an interrogation via
yaml_agent_interrogate(). Then, the results were written to disk as an RDS
file. In the filename argument of x_write_disk(), the affix_datetime()
function was used to ensure that frequent runs would produce files whose
names indicate the day and time of execution.
Function ID
13-4
See Also
The affix_date() function provides the same features except it
produces a date string by default.
Other Utility and Helper Functions:
affix_date(),
col_schema(),
from_github(),
has_columns(),
stop_if_not()
Did all of the validations fully pass?
Description
Given an agent's validation plan that had undergone interrogation via
interrogate(), did every single validation step result in zero failing
test units? Using the all_passed() function will let us know whether that's
TRUE or not.
Usage
all_passed(agent, i = NULL)all_passed(agent, i = NULL)
Arguments
agent |
The pointblank agent object
A pointblank agent object that is commonly created through the use of
the |
i |
Validation step numbers
A vector of validation step numbers. These values are assigned to each
validation step by pointblank in the order of definition. If |
Details
The all_passed() function provides a single logical value based on an
interrogation performed in the agent-based workflow. For very large-scale
validation (where data quality is a known issue, and is perhaps something to
be tamed over time) this function is likely to be less useful since it is
quite stringent (all test units must pass across all validation steps).
Should there be a requirement for logical values produced from validation, a
more flexible alternative is in using the test (test_*()) variants of the
validation functions. Each of those produce a single logical value and each
and have a threshold option for failure levels. Another option is to
utilize post-interrogation objects within the agent's x-list (obtained by
using the get_agent_x_list() function). This allows for many possibilities
in producing a single logical value from an interrogation.
Value
A logical value.
Examples
Create a simple table with a column of numerical values.
tbl <- dplyr::tibble(a = c(4, 5, 7, 8))

tbl
#> # A tibble: 4 x 1
#>       a
#>   <dbl>
#> 1     4
#> 2     5
#> 3     7
#> 4     8
Validate that values in column a are always greater than 4.
agent <-
  create_agent(tbl = tbl) %>%
  col_vals_gt(columns = a, value = 3) %>%
  col_vals_lte(columns = a, value = 10) %>%
  col_vals_increasing(columns = a) %>%
  interrogate()
Determine if these column validations have all passed by using all_passed()
(they do).
all_passed(agent = agent)
#> [1] TRUE
Function ID
8-4
See Also
Other Post-interrogation:
get_agent_x_list(),
get_data_extracts(),
get_sundered_data(),
write_testthat_file()
Does the column count match that of a different table?
Description
The col_count_match() validation function, the expect_col_count_match()
expectation function, and the test_col_count_match() test function all
check whether the column count in the target table matches that of a
comparison table. The validation function can be used directly on a data
table or with an agent object (technically, a ptblank_agent object)
whereas the expectation and test functions can only be used with a data
table. As a validation step or as an expectation, there is a single test unit
that hinges on whether the column counts for the two tables are the same
(after any preconditions have been applied).
Usage
col_count_match( x, count, preconditions = NULL, actions = NULL, step_id = NULL, label = NULL, brief = NULL, active = TRUE ) expect_col_count_match(object, count, preconditions = NULL, threshold = 1) test_col_count_match(object, count, preconditions = NULL, threshold = 1)col_count_match( x, count, preconditions = NULL, actions = NULL, step_id = NULL, label = NULL, brief = NULL, active = TRUE ) expect_col_count_match(object, count, preconditions = NULL, threshold = 1) test_col_count_match(object, count, preconditions = NULL, threshold = 1)
Arguments
x |
A pointblank agent or a data table
A data frame, tibble ( |
count |
The count comparison
Either a literal value for the number of columns, or, a table to compare
against the target table in terms of column count values. If supplying a
comparison table, it can either be a table object such as a data frame, a
tibble, a |
preconditions |
Input table modification prior to validation
An optional expression for mutating the input table before proceeding with
the validation. This can either be provided as a one-sided R formula using
a leading |
actions |
Thresholds and actions for different states
A list containing threshold levels so that the validation step can react
accordingly when exceeding the set levels for different states. This is to
be created with the |
step_id |
Manual setting of the step ID value
One or more optional identifiers for the single or multiple validation
steps generated from calling a validation function. The use of step IDs
serves to distinguish validation steps from each other and provide an
opportunity for supplying a more meaningful label compared to the step
index. By default this is |
label |
Optional label for the validation step
Optional label for the validation step. This label appears in the agent report and, for the best appearance, it should be kept quite short. See the Labels section for more information. |
brief |
Brief description for the validation step
A brief is a short, text-based description for the validation step. If
nothing is provided here then an autobrief is generated by the agent,
using the language provided in |
active |
Is the validation step active?
A logical value indicating whether the validation step should be active. If
the validation function is working with an agent, |
object |
A data table for expectations or tests
A data frame, tibble ( |
threshold |
The failure threshold
A simple failure threshold value for use with the expectation ( |
Value
For the validation function, the return value is either a
ptblank_agent object or a table object (depending on whether an agent
object or a table was passed to x). The expectation function invisibly
returns its input but, in the context of testing data, the function is
called primarily for its potential side-effects (e.g., signaling failure).
The test function returns a logical value.
Supported Input Tables
The types of data tables that are officially supported are:
-
data frames (
data.frame) and tibbles (tbl_df) -
Spark DataFrames (
tbl_spark) -
the following database tables (
tbl_dbi):-
PostgreSQL tables (using the
RPostgres::Postgres()as driver) -
MySQL tables (with
RMySQL::MySQL()) -
Microsoft SQL Server tables (via odbc)
-
BigQuery tables (using
bigrquery::bigquery()) -
DuckDB tables (through
duckdb::duckdb()) -
SQLite (with
RSQLite::SQLite())
-
Other database tables may work to varying degrees but they haven't been formally tested (so be mindful of this when using unsupported backends with pointblank).
Preconditions
Providing expressions as preconditions means pointblank will preprocess
the target table during interrogation as a preparatory step. It might happen
that this particular validation requires some operation on the target table
before the column count comparison takes place. Using preconditions can be
useful at times since since we can develop a large validation plan with a
single target table and make minor adjustments to it, as needed, along the
way.
The table mutation is totally isolated in scope to the validation step(s)
where preconditions is used. Using dplyr code is suggested here since
the statements can be translated to SQL if necessary (i.e., if the target
table resides in a database). The code is most easily supplied as a one-sided
R formula (using a leading ~). In the formula representation, the .
serves as the input data table to be transformed. Alternatively, a function
could instead be supplied.
Actions
Often, we will want to specify actions for the validation. This argument,
present in every validation function, takes a specially-crafted list object
that is best produced by the action_levels() function. Read that function's
documentation for the lowdown on how to create reactions to above-threshold
failure levels in validation. The basic gist is that you'll want at least a
single threshold level (specified as either the fraction of test units
failed, or, an absolute value), often using the warn_at argument. Using
action_levels(warn_at = 1) or action_levels(stop_at = 1) are good choices
depending on the situation (the first produces a warning, the other
stop()s).
Labels
label may be a single string or a character vector that matches the number
of expanded steps. label also supports {glue} syntax and exposes the
following dynamic variables contextualized to the current step:
-
"{.step}": The validation step name
The glue context also supports ordinary expressions for further flexibility
(e.g., "{toupper(.step)}") as long as they return a length-1 string.
Briefs
Want to describe this validation step in some detail? Keep in mind that this
is only useful if x is an agent. If that's the case, brief the agent
with some text that fits. Don't worry if you don't want to do it. The
autobrief protocol is kicked in when brief = NULL and a simple brief will
then be automatically generated.
YAML
A pointblank agent can be written to YAML with yaml_write() and the
resulting YAML can be used to regenerate an agent (with yaml_read_agent())
or interrogate the target table (via yaml_agent_interrogate()). When
col_count_match() is represented in YAML (under the top-level steps key
as a list member), the syntax closely follows the signature of the validation
function. Here is an example of how a complex call of col_count_match() as
a validation step is expressed in R code and in the corresponding YAML
representation.
R statement:
agent %>%
  col_count_match(
    count = ~ file_tbl(
      file = from_github(
        file = "sj_all_revenue_large.rds",
        repo = "rich-iannone/intendo",
        subdir = "data-large"
        )
      ),
    preconditions = ~ . %>% dplyr::filter(a < 10),
    actions = action_levels(warn_at = 0.1, stop_at = 0.2),
    label = "The `col_count_match()` step.",
    active = FALSE
  )
YAML representation:
steps:
- col_count_match:
    count: ~ file_tbl(
      file = from_github(
        file = "sj_all_revenue_large.rds",
        repo = "rich-iannone/intendo",
        subdir = "data-large"
        )
      )
    preconditions: ~. %>% dplyr::filter(a < 10)
    actions:
      warn_fraction: 0.1
      stop_fraction: 0.2
    label: The `col_count_match()` step.
    active: false
In practice, both of these will often be shorter. Arguments with default
values won't be written to YAML when using yaml_write() (though it is
acceptable to include them with their default when generating the YAML by
other means). It is also possible to preview the transformation of an agent
to YAML without any writing to disk by using the yaml_agent_string()
function.
Examples
Create a simple table with three columns and three rows of values:
tbl <-
  dplyr::tibble(
    a = c(5, 7, 6),
    b = c(7, 1, 0),
    c = c(1, 1, 1)
  )

tbl
#> # A tibble: 3 x 3
#>       a     b     c
#>   <dbl> <dbl> <dbl>
#> 1     5     7     1
#> 2     7     1     1
#> 3     6     0     1
Create a second table which is quite different but has the same number of
columns as tbl.
tbl_2 <-
  dplyr::tibble(
    e = c("a", NA, "a", "c"),
    f = c(2.6, 1.2, 0, NA),
    g = c("f", "g", "h", "i")
  )

tbl_2
#> # A tibble: 4 x 3
#>   e         f g
#>   <chr> <dbl> <chr>
#> 1 a       2.6 f
#> 2 <NA>    1.2 g
#> 3 a       0   h
#> 4 c      NA   i
We'll use these tables with the different function variants.
A: Using an agent with validation functions and then interrogate()
Validate that the count of columns in the target table (tbl) matches that
of the comparison table (tbl_2).
agent <-
  create_agent(tbl = tbl) %>%
  col_count_match(count = tbl_2) %>%
  interrogate()
Printing the agent in the console shows the validation report in the
Viewer. Here is an excerpt of validation report, showing the single entry
that corresponds to the validation step demonstrated here.

B: Using the validation function directly on the data (no agent)
This way of using validation functions acts as a data filter: data is passed
through but should stop() if there is a single test unit failing. The
behavior of side effects can be customized with the actions option.
tbl %>% col_count_match(count = tbl_2)
#> # A tibble: 3 x 3
#>       a     b     c
#>   <dbl> <dbl> <dbl>
#> 1     5     7     1
#> 2     7     1     1
#> 3     6     0     1
C: Using the expectation function
With the expect_*() form, we would typically perform one validation at a
time. This is primarily used in testthat tests.
expect_col_count_match(tbl, count = tbl_2)
D: Using the test function
With the test_*() form, we should get a single logical value returned to
us.
tbl %>% test_col_count_match(count = 3)
#> [1] TRUE
Function ID
2-32
See Also
Other validation functions:
col_exists(),
col_is_character(),
col_is_date(),
col_is_factor(),
col_is_integer(),
col_is_logical(),
col_is_numeric(),
col_is_posix(),
col_schema_match(),
col_vals_between(),
col_vals_decreasing(),
col_vals_equal(),
col_vals_expr(),
col_vals_gt(),
col_vals_gte(),
col_vals_in_set(),
col_vals_increasing(),
col_vals_lt(),
col_vals_lte(),
col_vals_make_set(),
col_vals_make_subset(),
col_vals_not_between(),
col_vals_not_equal(),
col_vals_not_in_set(),
col_vals_not_null(),
col_vals_null(),
col_vals_regex(),
col_vals_within_spec(),
conjointly(),
row_count_match(),
rows_complete(),
rows_distinct(),
serially(),
specially(),
tbl_match()
Do one or more columns actually exist?
Description
The col_exists() validation function, the expect_col_exists() expectation
function, and the test_col_exists() test function all check whether one or
more columns exist in the target table. The only requirement is specification
of the column names. The validation function can be used directly on a data
table or with an agent object (technically, a ptblank_agent object)
whereas the expectation and test functions can only be used with a data
table. Each validation step or expectation will operate over a single test
unit, which is whether the column exists or not.
Usage
col_exists( x, columns = NULL, actions = NULL, step_id = NULL, label = NULL, brief = NULL, active = TRUE ) expect_col_exists(object, columns, threshold = 1) test_col_exists(object, columns, threshold = 1)col_exists( x, columns = NULL, actions = NULL, step_id = NULL, label = NULL, brief = NULL, active = TRUE ) expect_col_exists(object, columns, threshold = 1) test_col_exists(object, columns, threshold = 1)
Arguments
x |
A pointblank agent or a data table
A data frame, tibble ( |
columns |
The target columns
A column-selecting expression, as one would use inside |
actions |
Thresholds and actions for different states
A list containing threshold levels so that the validation step can react
accordingly when exceeding the set levels for different states. This is to
be created with the |
step_id |
Manual setting of the step ID value
One or more optional identifiers for the single or multiple validation
steps generated from calling a validation function. The use of step IDs
serves to distinguish validation steps from each other and provide an
opportunity for supplying a more meaningful label compared to the step
index. By default this is |
label |
Optional label for the validation step
Optional label for the validation step. This label appears in the agent report and, for the best appearance, it should be kept quite short. See the Labels section for more information. |
brief |
Brief description for the validation step
A brief is a short, text-based description for the validation step. If
nothing is provided here then an autobrief is generated by the agent,
using the language provided in |
active |
Is the validation step active?
A logical value indicating whether the validation step should be active. If
the validation function is working with an agent, |
object |
A data table for expectations or tests
A data frame, tibble ( |
threshold |
The failure threshold
A simple failure threshold value for use with the expectation ( |
Value
For the validation function, the return value is either a
ptblank_agent object or a table object (depending on whether an agent
object or a table was passed to x). The expectation function invisibly
returns its input but, in the context of testing data, the function is
called primarily for its potential side-effects (e.g., signaling failure).
The test function returns a logical value.
Supported Input Tables
The types of data tables that are officially supported are:
-
data frames (
data.frame) and tibbles (tbl_df) -
Spark DataFrames (
tbl_spark) -
the following database tables (
tbl_dbi):-
PostgreSQL tables (using the
RPostgres::Postgres()as driver) -
MySQL tables (with
RMySQL::MySQL()) -
Microsoft SQL Server tables (via odbc)
-
BigQuery tables (using
bigrquery::bigquery()) -
DuckDB tables (through
duckdb::duckdb()) -
SQLite (with
RSQLite::SQLite())
-
Other database tables may work to varying degrees but they haven't been formally tested (so be mindful of this when using unsupported backends with pointblank).
Column Names
columns may be a single column (as symbol a or string "a") or a vector
of columns (c(a, b, c) or c("a", "b", "c")). {tidyselect} helpers
are also supported, such as contains("date") and where(is.double). If
passing an external vector of columns, it should be wrapped in all_of().
When multiple columns are selected by columns, the result will be an
expansion of validation steps to that number of columns (e.g.,
c(col_a, col_b) will result in the entry of two validation steps).
Previously, columns could be specified in vars(). This continues to work,
but c() offers the same capability and supersedes vars() in columns.
Actions
Often, we will want to specify actions for the validation. This argument,
present in every validation function, takes a specially-crafted list object
that is best produced by the action_levels() function. Read that function's
documentation for the lowdown on how to create reactions to above-threshold
failure levels in validation. The basic gist is that you'll want at least a
single threshold level (specified as either the fraction of test units
failed, or, an absolute value), often using the warn_at argument. Using
action_levels(warn_at = 1) or action_levels(stop_at = 1) are good choices
depending on the situation (the first produces a warning, the other
stop()s).
Labels
label may be a single string or a character vector that matches the number
of expanded steps. label also supports {glue} syntax and exposes the
following dynamic variables contextualized to the current step:
-
"{.step}": The validation step name -
"{.col}": The current column name
The glue context also supports ordinary expressions for further flexibility
(e.g., "{toupper(.step)}") as long as they return a length-1 string.
Briefs
Want to describe this validation step in some detail? Keep in mind that this
is only useful if x is an agent. If that's the case, brief the agent
with some text that fits. Don't worry if you don't want to do it. The
autobrief protocol is kicked in when brief = NULL and a simple brief will
then be automatically generated.
YAML
A pointblank agent can be written to YAML with yaml_write() and the
resulting YAML can be used to regenerate an agent (with yaml_read_agent())
or interrogate the target table (via yaml_agent_interrogate()). When
col_exists() is represented in YAML (under the top-level steps key as a
list member), the syntax closely follows the signature of the validation
function. Here is an example of how a complex call of col_exists() as a
validation step is expressed in R code and in the corresponding YAML
representation.
R statement:
agent %>%
  col_exists(
    columns = a,
    actions = action_levels(warn_at = 0.1, stop_at = 0.2),
    label = "The `col_exists()` step.",
    active = FALSE
  )
YAML representation:
steps:
- col_exists:
    columns: c(a)
    actions:
      warn_fraction: 0.1
      stop_fraction: 0.2
    label: The `col_exists()` step.
    active: false
In practice, both of these will often be shorter as only the columns
argument requires a value. Arguments with default values won't be written to
YAML when using yaml_write() (though it is acceptable to include them with
their default when generating the YAML by other means). It is also possible
to preview the transformation of an agent to YAML without any writing to disk
by using the yaml_agent_string() function.
Examples
For all examples here, we'll use a simple table with two columns: a and
b.
tbl <-
  dplyr::tibble(
    a = c(5, 7, 6, 5, 8, 7),
    b = c(7, 1, 0, 0, 0, 3)
  )

tbl
#> # A tibble: 6 x 2
#>       a     b
#>   <dbl> <dbl>
#> 1     5     7
#> 2     7     1
#> 3     6     0
#> 4     5     0
#> 5     8     0
#> 6     7     3
We'll use this table with the different function variants.
A: Using an agent with validation functions and then interrogate()
Validate that column a exists in the tbl table with col_exists().
agent <-
  create_agent(tbl = tbl) %>%
  col_exists(columns = a) %>%
  interrogate()
Printing the agent in the console shows the validation report in the
Viewer. Here is an excerpt of validation report, showing the single entry
that corresponds to the validation step demonstrated here.

B: Using the validation function directly on the data (no agent)
This way of using validation functions acts as a data filter. Data is
passed through but should stop() if there is a single test unit failing.
The behavior of side effects can be customized with the actions option.
tbl %>% col_exists(columns = a)
#> # A tibble: 6 x 2
#>       a     b
#>   <dbl> <dbl>
#> 1     5     7
#> 2     7     1
#> 3     6     0
#> 4     5     0
#> 5     8     0
#> 6     7     3
C: Using the expectation function
With the expect_*() form, we would typically perform one validation at a
time. This is primarily used in testthat tests.
expect_col_exists(tbl, columns = a)
D: Using the test function
With the test_*() form, we should get a single logical value returned to
us.
tbl %>% test_col_exists(columns = a)
#> [1] TRUE
Function ID
2-29
See Also
Other validation functions:
col_count_match(),
col_is_character(),
col_is_date(),
col_is_factor(),
col_is_integer(),
col_is_logical(),
col_is_numeric(),
col_is_posix(),
col_schema_match(),
col_vals_between(),
col_vals_decreasing(),
col_vals_equal(),
col_vals_expr(),
col_vals_gt(),
col_vals_gte(),
col_vals_in_set(),
col_vals_increasing(),
col_vals_lt(),
col_vals_lte(),
col_vals_make_set(),
col_vals_make_subset(),
col_vals_not_between(),
col_vals_not_equal(),
col_vals_not_in_set(),
col_vals_not_null(),
col_vals_null(),
col_vals_regex(),
col_vals_within_spec(),
conjointly(),
row_count_match(),
rows_complete(),
rows_distinct(),
serially(),
specially(),
tbl_match()
Do the columns contain character/string data?
Description
The col_is_character() validation function, the expect_col_is_character()
expectation function, and the test_col_is_character() test function all
check whether one or more columns in a table is of the character type. Like
many of the col_is_*()-type functions in pointblank, the only
requirement is a specification of the column names. The validation function
can be used directly on a data table or with an agent object (technically,
a ptblank_agent object) whereas the expectation and test functions can only
be used with a data table. Each validation step or expectation will operate
over a single test unit, which is whether the column is a character-type
column or not.
Usage
col_is_character( x, columns, actions = NULL, step_id = NULL, label = NULL, brief = NULL, active = TRUE ) expect_col_is_character(object, columns, threshold = 1) test_col_is_character(object, columns, threshold = 1)col_is_character( x, columns, actions = NULL, step_id = NULL, label = NULL, brief = NULL, active = TRUE ) expect_col_is_character(object, columns, threshold = 1) test_col_is_character(object, columns, threshold = 1)
Arguments
x |
A pointblank agent or a data table
A data frame, tibble ( |
columns |
The target columns
A column-selecting expression, as one would use inside |
actions |
Thresholds and actions for different states
A list containing threshold levels so that the validation step can react
accordingly when exceeding the set levels for different states. This is to
be created with the |
step_id |
Manual setting of the step ID value
One or more optional identifiers for the single or multiple validation
steps generated from calling a validation function. The use of step IDs
serves to distinguish validation steps from each other and provide an
opportunity for supplying a more meaningful label compared to the step
index. By default this is |
label |
Optional label for the validation step
Optional label for the validation step. This label appears in the agent report and, for the best appearance, it should be kept quite short. See the Labels section for more information. |
brief |
Brief description for the validation step
A brief is a short, text-based description for the validation step. If
nothing is provided here then an autobrief is generated by the agent,
using the language provided in |
active |
Is the validation step active?
A logical value indicating whether the validation step should be active. If
the validation function is working with an agent, |
object |
A data table for expectations or tests
A data frame, tibble ( |
threshold |
The failure threshold
A simple failure threshold value for use with the expectation ( |
Value
For the validation function, the return value is either a
ptblank_agent object or a table object (depending on whether an agent
object or a table was passed to x). The expectation function invisibly
returns its input but, in the context of testing data, the function is
called primarily for its potential side-effects (e.g., signaling failure).
The test function returns a logical value.
Supported Input Tables
The types of data tables that are officially supported are:
-
data frames (
data.frame) and tibbles (tbl_df) -
Spark DataFrames (
tbl_spark) -
the following database tables (
tbl_dbi):-
PostgreSQL tables (using the
RPostgres::Postgres()as driver) -
MySQL tables (with
RMySQL::MySQL()) -
Microsoft SQL Server tables (via odbc)
-
BigQuery tables (using
bigrquery::bigquery()) -
DuckDB tables (through
duckdb::duckdb()) -
SQLite (with
RSQLite::SQLite())
-
Other database tables may work to varying degrees but they haven't been formally tested (so be mindful of this when using unsupported backends with pointblank).
Column Names
columns may be a single column (as symbol a or string "a") or a vector
of columns (c(a, b, c) or c("a", "b", "c")). {tidyselect} helpers
are also supported, such as contains("date") and where(is.double). If
passing an external vector of columns, it should be wrapped in all_of().
When multiple columns are selected by columns, the result will be an
expansion of validation steps to that number of columns (e.g.,
c(col_a, col_b) will result in the entry of two validation steps).
Previously, columns could be specified in vars(). This continues to work,
but c() offers the same capability and supersedes vars() in columns.
Actions
Often, we will want to specify actions for the validation. This argument,
present in every validation function, takes a specially-crafted list object
that is best produced by the action_levels() function. Read that function's
documentation for the lowdown on how to create reactions to above-threshold
failure levels in validation. The basic gist is that you'll want at least a
single threshold level (specified as either the fraction of test units
failed, or, an absolute value), often using the warn_at argument. This is
especially true when x is a table object because, otherwise, nothing
happens. For the col_is_*()-type functions, using action_levels(warn_at = 1) or action_levels(stop_at = 1) are good choices depending on the
situation (the first produces a warning, the other will stop()).
Labels
label may be a single string or a character vector that matches the number
of expanded steps. label also supports {glue} syntax and exposes the
following dynamic variables contextualized to the current step:
-
"{.step}": The validation step name -
"{.col}": The current column name
The glue context also supports ordinary expressions for further flexibility
(e.g., "{toupper(.step)}") as long as they return a length-1 string.
Briefs
Want to describe this validation step in some detail? Keep in mind that this
is only useful if x is an agent. If that's the case, brief the agent
with some text that fits. Don't worry if you don't want to do it. The
autobrief protocol is kicked in when brief = NULL and a simple brief will
then be automatically generated.
YAML
A pointblank agent can be written to YAML with yaml_write() and the
resulting YAML can be used to regenerate an agent (with yaml_read_agent())
or interrogate the target table (via yaml_agent_interrogate()). When
col_is_character() is represented in YAML (under the top-level steps key
as a list member), the syntax closely follows the signature of the validation
function. Here is an example of how a complex call of col_is_character() as
a validation step is expressed in R code and in the corresponding YAML
representation.
R statement:
agent %>%
  col_is_character(
    columns = a,
    actions = action_levels(warn_at = 0.1, stop_at = 0.2),
    label = "The `col_is_character()` step.",
    active = FALSE
  )
YAML representation:
steps:
- col_is_character:
    columns: c(a)
    actions:
      warn_fraction: 0.1
      stop_fraction: 0.2
    label: The `col_is_character()` step.
    active: false
In practice, both of these will often be shorter as only the columns
argument requires a value. Arguments with default values won't be written to
YAML when using yaml_write() (though it is acceptable to include them with
their default when generating the YAML by other means). It is also possible
to preview the transformation of an agent to YAML without any writing to disk
by using the yaml_agent_string() function.
Examples
For all examples here, we'll use a simple table with a numeric column (a)
and a character column (b).
tbl <-
  dplyr::tibble(
    a = c(5, 7, 6, 5, 8, 7),
    b = LETTERS[1:6]
  )

tbl
#> # A tibble: 6 x 2
#>       a b
#>   <dbl> <chr>
#> 1     5 A
#> 2     7 B
#> 3     6 C
#> 4     5 D
#> 5     8 E
#> 6     7 F
We'll use this table with the different function variants.
A: Using an agent with validation functions and then interrogate()
Validate that column b has the character class.
agent <-
  create_agent(tbl = tbl) %>%
  col_is_character(columns = b) %>%
  interrogate()
Printing the agent in the console shows the validation report in the
Viewer. Here is an excerpt of validation report, showing the single entry
that corresponds to the validation step demonstrated here.

B: Using the validation function directly on the data (no agent)
This way of using validation functions acts as a data filter. Data is passed
through but should stop() if there is a single test unit failing. The
behavior of side effects can be customized with the actions option.
tbl %>%
  col_is_character(columns = b) %>%
  dplyr::slice(1:5)
#> # A tibble: 5 x 2
#>       a b
#>   <dbl> <chr>
#> 1     5 A
#> 2     7 B
#> 3     6 C
#> 4     5 D
#> 5     8 E
C: Using the expectation function
With the expect_*() form, we would typically perform one validation at a
time. This is primarily used in testthat tests.
expect_col_is_character(tbl, columns = b)
D: Using the test function
With the test_*() form, we should get a single logical value returned to
us.
tbl %>% test_col_is_character(columns = b)
#> [1] TRUE
Function ID
2-22
See Also
Other validation functions:
col_count_match(),
col_exists(),
col_is_date(),
col_is_factor(),
col_is_integer(),
col_is_logical(),
col_is_numeric(),
col_is_posix(),
col_schema_match(),
col_vals_between(),
col_vals_decreasing(),
col_vals_equal(),
col_vals_expr(),
col_vals_gt(),
col_vals_gte(),
col_vals_in_set(),
col_vals_increasing(),
col_vals_lt(),
col_vals_lte(),
col_vals_make_set(),
col_vals_make_subset(),
col_vals_not_between(),
col_vals_not_equal(),
col_vals_not_in_set(),
col_vals_not_null(),
col_vals_null(),
col_vals_regex(),
col_vals_within_spec(),
conjointly(),
row_count_match(),
rows_complete(),
rows_distinct(),
serially(),
specially(),
tbl_match()
Do the columns contain R Date objects?
Description
The col_is_date() validation function, the expect_col_is_date()
expectation function, and the test_col_is_date() test function all check
whether one or more columns in a table is of the R Date type. Like many
of the col_is_*()-type functions in pointblank, the only requirement is
a specification of the column names. The validation function can be used
directly on a data table or with an agent object (technically, a
ptblank_agent object) whereas the expectation and test functions can only
be used with a data table. Each validation step or expectation will operate
over a single test unit, which is whether the column is a Date-type column
or not.
Usage
col_is_date( x, columns, actions = NULL, step_id = NULL, label = NULL, brief = NULL, active = TRUE ) expect_col_is_date(object, columns, threshold = 1) test_col_is_date(object, columns, threshold = 1)col_is_date( x, columns, actions = NULL, step_id = NULL, label = NULL, brief = NULL, active = TRUE ) expect_col_is_date(object, columns, threshold = 1) test_col_is_date(object, columns, threshold = 1)
Arguments
x |
A pointblank agent or a data table
A data frame, tibble ( |
columns |
The target columns
A column-selecting expression, as one would use inside |
actions |
Thresholds and actions for different states
A list containing threshold levels so that the validation step can react
accordingly when exceeding the set levels for different states. This is to
be created with the |
step_id |
Manual setting of the step ID value
One or more optional identifiers for the single or multiple validation
steps generated from calling a validation function. The use of step IDs
serves to distinguish validation steps from each other and provide an
opportunity for supplying a more meaningful label compared to the step
index. By default this is |
label |
Optional label for the validation step
Optional label for the validation step. This label appears in the agent report and, for the best appearance, it should be kept quite short. See the Labels section for more information. |
brief |
Brief description for the validation step
A brief is a short, text-based description for the validation step. If
nothing is provided here then an autobrief is generated by the agent,
using the language provided in |
active |
Is the validation step active?
A logical value indicating whether the validation step should be active. If
the validation function is working with an agent, |
object |
A data table for expectations or tests
A data frame, tibble ( |
threshold |
The failure threshold
A simple failure threshold value for use with the expectation ( |
Value
For the validation function, the return value is either a
ptblank_agent object or a table object (depending on whether an agent
object or a table was passed to x). The expectation function invisibly
returns its input but, in the context of testing data, the function is
called primarily for its potential side-effects (e.g., signaling failure).
The test function returns a logical value.
Supported Input Tables
The types of data tables that are officially supported are:
-
data frames (
data.frame) and tibbles (tbl_df) -
Spark DataFrames (
tbl_spark) -
the following database tables (
tbl_dbi):-
PostgreSQL tables (using the
RPostgres::Postgres()as driver) -
MySQL tables (with
RMySQL::MySQL()) -
Microsoft SQL Server tables (via odbc)
-
BigQuery tables (using
bigrquery::bigquery()) -
DuckDB tables (through
duckdb::duckdb()) -
SQLite (with
RSQLite::SQLite())
-
Other database tables may work to varying degrees but they haven't been formally tested (so be mindful of this when using unsupported backends with pointblank).
Column Names
columns may be a single column (as symbol a or string "a") or a vector
of columns (c(a, b, c) or c("a", "b", "c")). {tidyselect} helpers
are also supported, such as contains("date") and where(is.double). If
passing an external vector of columns, it should be wrapped in all_of().
When multiple columns are selected by columns, the result will be an
expansion of validation steps to that number of columns (e.g.,
c(col_a, col_b) will result in the entry of two validation steps).
Previously, columns could be specified in vars(). This continues to work,
but c() offers the same capability and supersedes vars() in columns.
Actions
Often, we will want to specify actions for the validation. This argument,
present in every validation function, takes a specially-crafted list object
that is best produced by the action_levels() function. Read that function's
documentation for the lowdown on how to create reactions to above-threshold
failure levels in validation. The basic gist is that you'll want at least a
single threshold level (specified as either the fraction of test units
failed, or, an absolute value), often using the warn_at argument. This is
especially true when x is a table object because, otherwise, nothing
happens. For the col_is_*()-type functions, using action_levels(warn_at = 1) or action_levels(stop_at = 1) are good choices depending on the
situation (the first produces a warning, the other will stop()).
Labels
label may be a single string or a character vector that matches the number
of expanded steps. label also supports {glue} syntax and exposes the
following dynamic variables contextualized to the current step:
-
"{.step}": The validation step name -
"{.col}": The current column name
The glue context also supports ordinary expressions for further flexibility
(e.g., "{toupper(.step)}") as long as they return a length-1 string.
Briefs
Want to describe this validation step in some detail? Keep in mind that this
is only useful if x is an agent. If that's the case, brief the agent
with some text that fits. Don't worry if you don't want to do it. The
autobrief protocol is kicked in when brief = NULL and a simple brief will
then be automatically generated.
YAML
A pointblank agent can be written to YAML with yaml_write() and the
resulting YAML can be used to regenerate an agent (with yaml_read_agent())
or interrogate the target table (via yaml_agent_interrogate()). When
col_is_date() is represented in YAML (under the top-level steps key as a
list member), the syntax closely follows the signature of the validation
function. Here is an example of how a complex call of col_is_date() as a
validation step is expressed in R code and in the corresponding YAML
representation.
R statement:
agent %>%
  col_is_date(
    columns = a,
    actions = action_levels(warn_at = 0.1, stop_at = 0.2),
    label = "The `col_is_date()` step.",
    active = FALSE
  )
YAML representation:
steps:
- col_is_date:
    columns: c(a)
    actions:
      warn_fraction: 0.1
      stop_fraction: 0.2
    label: The `col_is_date()` step.
    active: false
In practice, both of these will often be shorter as only the columns
argument requires a value. Arguments with default values won't be written to
YAML when using yaml_write() (though it is acceptable to include them with
their default when generating the YAML by other means). It is also possible
to preview the transformation of an agent to YAML without any writing to disk
by using the yaml_agent_string() function.
Examples
The small_table dataset in the package has a date column. The following
examples will validate that that column is of the Date class.
small_table
#> # A tibble: 13 x 8
#>    date_time           date           a b             c      d e     f
#>    <dttm>              <date>     <int> <chr>     <dbl>  <dbl> <lgl> <chr>
#>  1 2016-01-04 11:00:00 2016-01-04     2 1-bcd-345     3  3423. TRUE  high
#>  2 2016-01-04 00:32:00 2016-01-04     3 5-egh-163     8 10000. TRUE  low
#>  3 2016-01-05 13:32:00 2016-01-05     6 8-kdg-938     3  2343. TRUE  high
#>  4 2016-01-06 17:23:00 2016-01-06     2 5-jdo-903    NA  3892. FALSE mid
#>  5 2016-01-09 12:36:00 2016-01-09     8 3-ldm-038     7   284. TRUE  low
#>  6 2016-01-11 06:15:00 2016-01-11     4 2-dhe-923     4  3291. TRUE  mid
#>  7 2016-01-15 18:46:00 2016-01-15     7 1-knw-093     3   843. TRUE  high
#>  8 2016-01-17 11:27:00 2016-01-17     4 5-boe-639     2  1036. FALSE low
#>  9 2016-01-20 04:30:00 2016-01-20     3 5-bce-642     9   838. FALSE high
#> 10 2016-01-20 04:30:00 2016-01-20     3 5-bce-642     9   838. FALSE high
#> 11 2016-01-26 20:07:00 2016-01-26     4 2-dmx-010     7   834. TRUE  low
#> 12 2016-01-28 02:51:00 2016-01-28     2 7-dmx-010     8   108. FALSE low
#> 13 2016-01-30 11:23:00 2016-01-30     1 3-dka-303    NA  2230. TRUE  high
A: Using an agent with validation functions and then interrogate()
Validate that the column date has the Date class.
agent <-
  create_agent(tbl = small_table) %>%
  col_is_date(columns = date) %>%
  interrogate()
Printing the agent in the console shows the validation report in the
Viewer. Here is an excerpt of validation report, showing the single entry
that corresponds to the validation step demonstrated here.

B: Using the validation function directly on the data (no agent)
This way of using validation functions acts as a data filter. Data is passed
through but should stop() if there is a single test unit failing. The
behavior of side effects can be customized with the actions option.
small_table %>%
  col_is_date(columns = date) %>%
  dplyr::slice(1:5)
#> # A tibble: 5 x 8
#>   date_time           date           a b             c      d e     f
#>   <dttm>              <date>     <int> <chr>     <dbl>  <dbl> <lgl> <chr>
#> 1 2016-01-04 11:00:00 2016-01-04     2 1-bcd-345     3  3423. TRUE  high
#> 2 2016-01-04 00:32:00 2016-01-04     3 5-egh-163     8 10000. TRUE  low
#> 3 2016-01-05 13:32:00 2016-01-05     6 8-kdg-938     3  2343. TRUE  high
#> 4 2016-01-06 17:23:00 2016-01-06     2 5-jdo-903    NA  3892. FALSE mid
#> 5 2016-01-09 12:36:00 2016-01-09     8 3-ldm-038     7   284. TRUE  low
C: Using the expectation function
With the expect_*() form, we would typically perform one validation at a
time. This is primarily used in testthat tests.
expect_col_is_date(small_table, columns = date)
D: Using the test function
With the test_*() form, we should get a single logical value returned to
us.
small_table %>% test_col_is_date(columns = date)
#> [1] TRUE
Function ID
2-26
See Also
Other validation functions:
col_count_match(),
col_exists(),
col_is_character(),
col_is_factor(),
col_is_integer(),
col_is_logical(),
col_is_numeric(),
col_is_posix(),
col_schema_match(),
col_vals_between(),
col_vals_decreasing(),
col_vals_equal(),
col_vals_expr(),
col_vals_gt(),
col_vals_gte(),
col_vals_in_set(),
col_vals_increasing(),
col_vals_lt(),
col_vals_lte(),
col_vals_make_set(),
col_vals_make_subset(),
col_vals_not_between(),
col_vals_not_equal(),
col_vals_not_in_set(),
col_vals_not_null(),
col_vals_null(),
col_vals_regex(),
col_vals_within_spec(),
conjointly(),
row_count_match(),
rows_complete(),
rows_distinct(),
serially(),
specially(),
tbl_match()
Do the columns contain R factor objects?
Description
The col_is_factor() validation function, the expect_col_is_factor()
expectation function, and the test_col_is_factor() test function all check
whether one or more columns in a table is of the factor type. Like many of
the col_is_*()-type functions in pointblank, the only requirement is a
specification of the column names. The validation function can be used
directly on a data table or with an agent object (technically, a
ptblank_agent object) whereas the expectation and test functions can only
be used with a data table. Each validation step or expectation will operate
over a single test unit, which is whether the column is a factor-type column
or not.
Usage
col_is_factor( x, columns, actions = NULL, step_id = NULL, label = NULL, brief = NULL, active = TRUE ) expect_col_is_factor(object, columns, threshold = 1) test_col_is_factor(object, columns, threshold = 1)col_is_factor( x, columns, actions = NULL, step_id = NULL, label = NULL, brief = NULL, active = TRUE ) expect_col_is_factor(object, columns, threshold = 1) test_col_is_factor(object, columns, threshold = 1)
Arguments
x |
A pointblank agent or a data table
A data frame, tibble ( |
columns |
The target columns
A column-selecting expression, as one would use inside |
actions |
Thresholds and actions for different states
A list containing threshold levels so that the validation step can react
accordingly when exceeding the set levels for different states. This is to
be created with the |
step_id |
Manual setting of the step ID value
One or more optional identifiers for the single or multiple validation
steps generated from calling a validation function. The use of step IDs
serves to distinguish validation steps from each other and provide an
opportunity for supplying a more meaningful label compared to the step
index. By default this is |
label |
Optional label for the validation step
Optional label for the validation step. This label appears in the agent report and, for the best appearance, it should be kept quite short. See the Labels section for more information. |
brief |
Brief description for the validation step
A brief is a short, text-based description for the validation step. If
nothing is provided here then an autobrief is generated by the agent,
using the language provided in |
active |
Is the validation step active?
A logical value indicating whether the validation step should be active. If
the validation function is working with an agent, |
object |
A data table for expectations or tests
A data frame, tibble ( |
threshold |
The failure threshold
A simple failure threshold value for use with the expectation ( |
Value
For the validation function, the return value is either a
ptblank_agent object or a table object (depending on whether an agent
object or a table was passed to x). The expectation function invisibly
returns its input but, in the context of testing data, the function is
called primarily for its potential side-effects (e.g., signaling failure).
The test function returns a logical value.
Supported Input Tables
The types of data tables that are officially supported are:
-
data frames (
data.frame) and tibbles (tbl_df) -
Spark DataFrames (
tbl_spark) -
the following database tables (
tbl_dbi):-
PostgreSQL tables (using the
RPostgres::Postgres()as driver) -
MySQL tables (with
RMySQL::MySQL()) -
Microsoft SQL Server tables (via odbc)
-
BigQuery tables (using
bigrquery::bigquery()) -
DuckDB tables (through
duckdb::duckdb()) -
SQLite (with
RSQLite::SQLite())
-
Other database tables may work to varying degrees but they haven't been formally tested (so be mindful of this when using unsupported backends with pointblank).
Column Names
columns may be a single column (as symbol a or string "a") or a vector
of columns (c(a, b, c) or c("a", "b", "c")). {tidyselect} helpers
are also supported, such as contains("date") and where(is.double). If
passing an external vector of columns, it should be wrapped in all_of().
When multiple columns are selected by columns, the result will be an
expansion of validation steps to that number of columns (e.g.,
c(col_a, col_b) will result in the entry of two validation steps).
Previously, columns could be specified in vars(). This continues to work,
but c() offers the same capability and supersedes vars() in columns.
Actions
Often, we will want to specify actions for the validation. This argument,
present in every validation function, takes a specially-crafted list object
that is best produced by the action_levels() function. Read that function's
documentation for the lowdown on how to create reactions to above-threshold
failure levels in validation. The basic gist is that you'll want at least a
single threshold level (specified as either the fraction of test units
failed, or, an absolute value), often using the warn_at argument. This is
especially true when x is a table object because, otherwise, nothing
happens. For the col_is_*()-type functions, using action_levels(warn_at = 1) or action_levels(stop_at = 1) are good choices depending on the
situation (the first produces a warning, the other will stop()).
Labels
label may be a single string or a character vector that matches the number
of expanded steps. label also supports {glue} syntax and exposes the
following dynamic variables contextualized to the current step:
-
"{.step}": The validation step name -
"{.col}": The current column name
The glue context also supports ordinary expressions for further flexibility
(e.g., "{toupper(.step)}") as long as they return a length-1 string.
Briefs
Want to describe this validation step in some detail? Keep in mind that this
is only useful if x is an agent. If that's the case, brief the agent
with some text that fits. Don't worry if you don't want to do it. The
autobrief protocol is kicked in when brief = NULL and a simple brief will
then be automatically generated.
YAML
A pointblank agent can be written to YAML with yaml_write() and the
resulting YAML can be used to regenerate an agent (with yaml_read_agent())
or interrogate the target table (via yaml_agent_interrogate()). When
col_is_factor() is represented in YAML (under the top-level steps key as
a list member), the syntax closely follows the signature of the validation
function. Here is an example of how a complex call of col_is_factor() as a
validation step is expressed in R code and in the corresponding YAML
representation.
R statement:
agent %>%
  col_is_factor(
    columns = a,
    actions = action_levels(warn_at = 0.1, stop_at = 0.2),
    label = "The `col_is_factor()` step.",
    active = FALSE
  )
YAML representation:
steps:
- col_is_factor:
    columns: c(a)
    actions:
      warn_fraction: 0.1
      stop_fraction: 0.2
    label: The `col_is_factor()` step.
    active: false
In practice, both of these will often be shorter as only the columns
argument requires a value. Arguments with default values won't be written to
YAML when using yaml_write() (though it is acceptable to include them with
their default when generating the YAML by other means). It is also possible
to preview the transformation of an agent to YAML without any writing to disk
by using the yaml_agent_string() function.
Examples
Let's modify the f column in the small_table dataset so that the values
are factors instead of having the character class. The following examples
will validate that the f column was successfully mutated and now consists
of factors.
tbl <-
  small_table %>%
  dplyr::mutate(f = factor(f))

tbl
#> # A tibble: 13 x 8
#>    date_time           date           a b             c      d e     f
#>    <dttm>              <date>     <int> <chr>     <dbl>  <dbl> <lgl> <fct>
#>  1 2016-01-04 11:00:00 2016-01-04     2 1-bcd-345     3  3423. TRUE  high
#>  2 2016-01-04 00:32:00 2016-01-04     3 5-egh-163     8 10000. TRUE  low
#>  3 2016-01-05 13:32:00 2016-01-05     6 8-kdg-938     3  2343. TRUE  high
#>  4 2016-01-06 17:23:00 2016-01-06     2 5-jdo-903    NA  3892. FALSE mid
#>  5 2016-01-09 12:36:00 2016-01-09     8 3-ldm-038     7   284. TRUE  low
#>  6 2016-01-11 06:15:00 2016-01-11     4 2-dhe-923     4  3291. TRUE  mid
#>  7 2016-01-15 18:46:00 2016-01-15     7 1-knw-093     3   843. TRUE  high
#>  8 2016-01-17 11:27:00 2016-01-17     4 5-boe-639     2  1036. FALSE low
#>  9 2016-01-20 04:30:00 2016-01-20     3 5-bce-642     9   838. FALSE high
#> 10 2016-01-20 04:30:00 2016-01-20     3 5-bce-642     9   838. FALSE high
#> 11 2016-01-26 20:07:00 2016-01-26     4 2-dmx-010     7   834. TRUE  low
#> 12 2016-01-28 02:51:00 2016-01-28     2 7-dmx-010     8   108. FALSE low
#> 13 2016-01-30 11:23:00 2016-01-30     1 3-dka-303    NA  2230. TRUE  high
A: Using an agent with validation functions and then interrogate()
Validate that the column f in the tbl object is of the factor class.
agent <-
  create_agent(tbl = tbl) %>%
  col_is_factor(columns = f) %>%
  interrogate()
Printing the agent in the console shows the validation report in the
Viewer. Here is an excerpt of validation report, showing the single entry
that corresponds to the validation step demonstrated here.

B: Using the validation function directly on the data (no agent)
This way of using validation functions acts as a data filter. Data is passed
through but should stop() if there is a single test unit failing. The
behavior of side effects can be customized with the actions option.
tbl %>%
  col_is_factor(columns = f) %>%
  dplyr::slice(1:5)
#> # A tibble: 5 x 8
#>   date_time           date           a b             c      d e     f
#>   <dttm>              <date>     <int> <chr>     <dbl>  <dbl> <lgl> <fct>
#> 1 2016-01-04 11:00:00 2016-01-04     2 1-bcd-345     3  3423. TRUE  high
#> 2 2016-01-04 00:32:00 2016-01-04     3 5-egh-163     8 10000. TRUE  low
#> 3 2016-01-05 13:32:00 2016-01-05     6 8-kdg-938     3  2343. TRUE  high
#> 4 2016-01-06 17:23:00 2016-01-06     2 5-jdo-903    NA  3892. FALSE mid
#> 5 2016-01-09 12:36:00 2016-01-09     8 3-ldm-038     7   284. TRUE  low
C: Using the expectation function
With the expect_*() form, we would typically perform one validation at a
time. This is primarily used in testthat tests.
expect_col_is_factor(tbl, f)
D: Using the test function
With the test_*() form, we should get a single logical value returned to
us.
tbl %>% test_col_is_factor(columns = f)
#> [1] TRUE
Function ID
2-28
See Also
Other validation functions:
col_count_match(),
col_exists(),
col_is_character(),
col_is_date(),
col_is_integer(),
col_is_logical(),
col_is_numeric(),
col_is_posix(),
col_schema_match(),
col_vals_between(),
col_vals_decreasing(),
col_vals_equal(),
col_vals_expr(),
col_vals_gt(),
col_vals_gte(),
col_vals_in_set(),
col_vals_increasing(),
col_vals_lt(),
col_vals_lte(),
col_vals_make_set(),
col_vals_make_subset(),
col_vals_not_between(),
col_vals_not_equal(),
col_vals_not_in_set(),
col_vals_not_null(),
col_vals_null(),
col_vals_regex(),
col_vals_within_spec(),
conjointly(),
row_count_match(),
rows_complete(),
rows_distinct(),
serially(),
specially(),
tbl_match()
Do the columns contain integer values?
Description
The col_is_integer() validation function, the expect_col_is_integer()
expectation function, and the test_col_is_integer() test function all check
whether one or more columns in a table is of the integer type. Like many of
the col_is_*()-type functions in pointblank, the only requirement is a
specification of the column names. The validation function can be used
directly on a data table or with an agent object (technically, a
ptblank_agent object) whereas the expectation and test functions can only
be used with a data table. Each validation step or expectation will operate
over a single test unit, which is whether the column is an integer-type
column or not.
Usage
col_is_integer( x, columns, actions = NULL, step_id = NULL, label = NULL, brief = NULL, active = TRUE ) expect_col_is_integer(object, columns, threshold = 1) test_col_is_integer(object, columns, threshold = 1)col_is_integer( x, columns, actions = NULL, step_id = NULL, label = NULL, brief = NULL, active = TRUE ) expect_col_is_integer(object, columns, threshold = 1) test_col_is_integer(object, columns, threshold = 1)
Arguments
x |
A pointblank agent or a data table
A data frame, tibble ( |
columns |
The target columns
A column-selecting expression, as one would use inside |
actions |
Thresholds and actions for different states
A list containing threshold levels so that the validation step can react
accordingly when exceeding the set levels for different states. This is to
be created with the |
step_id |
Manual setting of the step ID value
One or more optional identifiers for the single or multiple validation
steps generated from calling a validation function. The use of step IDs
serves to distinguish validation steps from each other and provide an
opportunity for supplying a more meaningful label compared to the step
index. By default this is |
label |
Optional label for the validation step
Optional label for the validation step. This label appears in the agent report and, for the best appearance, it should be kept quite short. See the Labels section for more information. |
brief |
Brief description for the validation step
A brief is a short, text-based description for the validation step. If
nothing is provided here then an autobrief is generated by the agent,
using the language provided in |
active |
Is the validation step active?
A logical value indicating whether the validation step should be active. If
the validation function is working with an agent, |
object |
A data table for expectations or tests
A data frame, tibble ( |
threshold |
The failure threshold
A simple failure threshold value for use with the expectation ( |
Value
For the validation function, the return value is either a
ptblank_agent object or a table object (depending on whether an agent
object or a table was passed to x). The expectation function invisibly
returns its input but, in the context of testing data, the function is
called primarily for its potential side-effects (e.g., signaling failure).
The test function returns a logical value.
Supported Input Tables
The types of data tables that are officially supported are:
-
data frames (
data.frame) and tibbles (tbl_df) -
Spark DataFrames (
tbl_spark) -
the following database tables (
tbl_dbi):-
PostgreSQL tables (using the
RPostgres::Postgres()as driver) -
MySQL tables (with
RMySQL::MySQL()) -
Microsoft SQL Server tables (via odbc)
-
BigQuery tables (using
bigrquery::bigquery()) -
DuckDB tables (through
duckdb::duckdb()) -
SQLite (with
RSQLite::SQLite())
-
Other database tables may work to varying degrees but they haven't been formally tested (so be mindful of this when using unsupported backends with pointblank).
Column Names
columns may be a single column (as symbol a or string "a") or a vector
of columns (c(a, b, c) or c("a", "b", "c")). {tidyselect} helpers
are also supported, such as contains("date") and where(is.double). If
passing an external vector of columns, it should be wrapped in all_of().
When multiple columns are selected by columns, the result will be an
expansion of validation steps to that number of columns (e.g.,
c(col_a, col_b) will result in the entry of two validation steps).
Previously, columns could be specified in vars(). This continues to work,
but c() offers the same capability and supersedes vars() in columns.
Actions
Often, we will want to specify actions for the validation. This argument,
present in every validation function, takes a specially-crafted list object
that is best produced by the action_levels() function. Read that function's
documentation for the lowdown on how to create reactions to above-threshold
failure levels in validation. The basic gist is that you'll want at least a
single threshold level (specified as either the fraction of test units
failed, or, an absolute value), often using the warn_at argument. This is
especially true when x is a table object because, otherwise, nothing
happens. For the col_is_*()-type functions, using action_levels(warn_at = 1) or action_levels(stop_at = 1) are good choices depending on the
situation (the first produces a warning, the other will stop()).
Labels
label may be a single string or a character vector that matches the number
of expanded steps. label also supports {glue} syntax and exposes the
following dynamic variables contextualized to the current step:
-
"{.step}": The validation step name -
"{.col}": The current column name
The glue context also supports ordinary expressions for further flexibility
(e.g., "{toupper(.step)}") as long as they return a length-1 string.
Briefs
Want to describe this validation step in some detail? Keep in mind that this
is only useful if x is an agent. If that's the case, brief the agent
with some text that fits. Don't worry if you don't want to do it. The
autobrief protocol is kicked in when brief = NULL and a simple brief will
then be automatically generated.
YAML
A pointblank agent can be written to YAML with yaml_write() and the
resulting YAML can be used to regenerate an agent (with yaml_read_agent())
or interrogate the target table (via yaml_agent_interrogate()). When
col_is_integer() is represented in YAML (under the top-level steps key as
a list member), the syntax closely follows the signature of the validation
function. Here is an example of how a complex call of col_is_integer() as a
validation step is expressed in R code and in the corresponding YAML
representation.
R statement:
agent %>%
  col_is_integer(
    columns = a,
    actions = action_levels(warn_at = 0.1, stop_at = 0.2),
    label = "The `col_is_integer()` step.",
    active = FALSE
  )
YAML representation:
steps:
- col_is_integer:
    columns: c(a)
    actions:
      warn_fraction: 0.1
      stop_fraction: 0.2
    label: The `col_is_integer()` step.
    active: false
In practice, both of these will often be shorter as only the columns
argument requires a value. Arguments with default values won't be written to
YAML when using yaml_write() (though it is acceptable to include them with
their default when generating the YAML by other means). It is also possible
to preview the transformation of an agent to YAML without any writing to disk
by using the yaml_agent_string() function.
Examples
For all examples here, we'll use a simple table with a character column (a)
and a integer column (b).
tbl <-
  dplyr::tibble(
    a = letters[1:6],
    b = 2:7
  )

tbl
#> # A tibble: 6 x 2
#>   a         b
#>   <chr> <int>
#> 1 a         2
#> 2 b         3
#> 3 c         4
#> 4 d         5
#> 5 e         6
#> 6 f         7
A: Using an agent with validation functions and then interrogate()
Validate that column b has the integer class.
agent <-
  create_agent(tbl = tbl) %>%
  col_is_integer(columns = b) %>%
  interrogate()
Printing the agent in the console shows the validation report in the
Viewer. Here is an excerpt of validation report, showing the single entry
that corresponds to the validation step demonstrated here.

B: Using the validation function directly on the data (no agent)
This way of using validation functions acts as a data filter. Data is passed
through but should stop() if there is a single test unit failing. The
behavior of side effects can be customized with the actions option.
tbl %>% col_is_integer(columns = b)
#> # A tibble: 6 x 2
#>   a         b
#>   <chr> <int>
#> 1 a         2
#> 2 b         3
#> 3 c         4
#> 4 d         5
#> 5 e         6
#> 6 f         7
C: Using the expectation function
With the expect_*() form, we would typically perform one validation at a
time. This is primarily used in testthat tests.
expect_col_is_integer(tbl, columns = b)
D: Using the test function
With the test_*() form, we should get a single logical value returned to
us.
tbl %>% test_col_is_integer(columns = b)
#> [1] TRUE
Function ID
2-24
See Also
Other validation functions:
col_count_match(),
col_exists(),
col_is_character(),
col_is_date(),
col_is_factor(),
col_is_logical(),
col_is_numeric(),
col_is_posix(),
col_schema_match(),
col_vals_between(),
col_vals_decreasing(),
col_vals_equal(),
col_vals_expr(),
col_vals_gt(),
col_vals_gte(),
col_vals_in_set(),
col_vals_increasing(),
col_vals_lt(),
col_vals_lte(),
col_vals_make_set(),
col_vals_make_subset(),
col_vals_not_between(),
col_vals_not_equal(),
col_vals_not_in_set(),
col_vals_not_null(),
col_vals_null(),
col_vals_regex(),
col_vals_within_spec(),
conjointly(),
row_count_match(),
rows_complete(),
rows_distinct(),
serially(),
specially(),
tbl_match()
Do the columns contain logical values?
Description
The col_is_logical() validation function, the expect_col_is_logical()
expectation function, and the test_col_is_logical() test function all check
whether one or more columns in a table is of the logical (TRUE/FALSE)
type. Like many of the col_is_*()-type functions in pointblank, the
only requirement is a specification of the column names. The validation
function can be used directly on a data table or with an agent object
(technically, a ptblank_agent object) whereas the expectation and test
functions can only be used with a data table. Each validation step or
expectation will operate over a single test unit, which is whether the column
is an logical-type column or not.
Usage
col_is_logical( x, columns, actions = NULL, step_id = NULL, label = NULL, brief = NULL, active = TRUE ) expect_col_is_logical(object, columns, threshold = 1) test_col_is_logical(object, columns, threshold = 1)col_is_logical( x, columns, actions = NULL, step_id = NULL, label = NULL, brief = NULL, active = TRUE ) expect_col_is_logical(object, columns, threshold = 1) test_col_is_logical(object, columns, threshold = 1)
Arguments
x |
A pointblank agent or a data table
A data frame, tibble ( |
columns |
The target columns
A column-selecting expression, as one would use inside |
actions |
Thresholds and actions for different states
A list containing threshold levels so that the validation step can react
accordingly when exceeding the set levels for different states. This is to
be created with the |
step_id |
Manual setting of the step ID value
One or more optional identifiers for the single or multiple validation
steps generated from calling a validation function. The use of step IDs
serves to distinguish validation steps from each other and provide an
opportunity for supplying a more meaningful label compared to the step
index. By default this is |
label |
Optional label for the validation step
Optional label for the validation step. This label appears in the agent report and, for the best appearance, it should be kept quite short. See the Labels section for more information. |
brief |
Brief description for the validation step
A brief is a short, text-based description for the validation step. If
nothing is provided here then an autobrief is generated by the agent,
using the language provided in |
active |
Is the validation step active?
A logical value indicating whether the validation step should be active. If
the validation function is working with an agent, |
object |
A data table for expectations or tests
A data frame, tibble ( |
threshold |
The failure threshold
A simple failure threshold value for use with the expectation ( |
Value
For the validation function, the return value is either a
ptblank_agent object or a table object (depending on whether an agent
object or a table was passed to x). The expectation function invisibly
returns its input but, in the context of testing data, the function is
called primarily for its potential side-effects (e.g., signaling failure).
The test function returns a logical value.
Supported Input Tables
The types of data tables that are officially supported are:
-
data frames (
data.frame) and tibbles (tbl_df) -
Spark DataFrames (
tbl_spark) -
the following database tables (
tbl_dbi):-
PostgreSQL tables (using the
RPostgres::Postgres()as driver) -
MySQL tables (with
RMySQL::MySQL()) -
Microsoft SQL Server tables (via odbc)
-
BigQuery tables (using
bigrquery::bigquery()) -
DuckDB tables (through
duckdb::duckdb()) -
SQLite (with
RSQLite::SQLite())
-
Other database tables may work to varying degrees but they haven't been formally tested (so be mindful of this when using unsupported backends with pointblank).
Column Names
columns may be a single column (as symbol a or string "a") or a vector
of columns (c(a, b, c) or c("a", "b", "c")). {tidyselect} helpers
are also supported, such as contains("date") and where(is.double). If
passing an external vector of columns, it should be wrapped in all_of().
When multiple columns are selected by columns, the result will be an
expansion of validation steps to that number of columns (e.g.,
c(col_a, col_b) will result in the entry of two validation steps).
Previously, columns could be specified in vars(). This continues to work,
but c() offers the same capability and supersedes vars() in columns.
Actions
Often, we will want to specify actions for the validation. This argument,
present in every validation function, takes a specially-crafted list object
that is best produced by the action_levels() function. Read that function's
documentation for the lowdown on how to create reactions to above-threshold
failure levels in validation. The basic gist is that you'll want at least a
single threshold level (specified as either the fraction of test units
failed, or, an absolute value), often using the warn_at argument. This is
especially true when x is a table object because, otherwise, nothing
happens. For the col_is_*()-type functions, using action_levels(warn_at = 1) or action_levels(stop_at = 1) are good choices depending on the
situation (the first produces a warning, the other will stop()).
Labels
label may be a single string or a character vector that matches the number
of expanded steps. label also supports {glue} syntax and exposes the
following dynamic variables contextualized to the current step:
-
"{.step}": The validation step name -
"{.col}": The current column name
The glue context also supports ordinary expressions for further flexibility
(e.g., "{toupper(.step)}") as long as they return a length-1 string.
Briefs
Want to describe this validation step in some detail? Keep in mind that this
is only useful if x is an agent. If that's the case, brief the agent
with some text that fits. Don't worry if you don't want to do it. The
autobrief protocol is kicked in when brief = NULL and a simple brief will
then be automatically generated.
YAML
A pointblank agent can be written to YAML with yaml_write() and the
resulting YAML can be used to regenerate an agent (with yaml_read_agent())
or interrogate the target table (via yaml_agent_interrogate()). When
col_is_logical() is represented in YAML (under the top-level steps key as
a list member), the syntax closely follows the signature of the validation
function. Here is an example of how a complex call of col_is_logical() as a
validation step is expressed in R code and in the corresponding YAML
representation.
R statement:
agent %>%
  col_is_logical(
    columns = a,
    actions = action_levels(warn_at = 0.1, stop_at = 0.2),
    label = "The `col_is_logical()` step.",
    active = FALSE
  )
YAML representation:
steps:
- col_is_logical:
    columns: c(a)
    actions:
      warn_fraction: 0.1
      stop_fraction: 0.2
    label: The `col_is_logical()` step.
    active: false
In practice, both of these will often be shorter as only the columns
argument requires a value. Arguments with default values won't be written to
YAML when using yaml_write() (though it is acceptable to include them with
their default when generating the YAML by other means). It is also possible
to preview the transformation of an agent to YAML without any writing to disk
by using the yaml_agent_string() function.
Examples
The small_table dataset in the package has an e column which has logical
values. The following examples will validate that that column is of the
logical class.
small_table
#> # A tibble: 13 x 8
#>    date_time           date           a b             c      d e     f
#>    <dttm>              <date>     <int> <chr>     <dbl>  <dbl> <lgl> <chr>
#>  1 2016-01-04 11:00:00 2016-01-04     2 1-bcd-345     3  3423. TRUE  high
#>  2 2016-01-04 00:32:00 2016-01-04     3 5-egh-163     8 10000. TRUE  low
#>  3 2016-01-05 13:32:00 2016-01-05     6 8-kdg-938     3  2343. TRUE  high
#>  4 2016-01-06 17:23:00 2016-01-06     2 5-jdo-903    NA  3892. FALSE mid
#>  5 2016-01-09 12:36:00 2016-01-09     8 3-ldm-038     7   284. TRUE  low
#>  6 2016-01-11 06:15:00 2016-01-11     4 2-dhe-923     4  3291. TRUE  mid
#>  7 2016-01-15 18:46:00 2016-01-15     7 1-knw-093     3   843. TRUE  high
#>  8 2016-01-17 11:27:00 2016-01-17     4 5-boe-639     2  1036. FALSE low
#>  9 2016-01-20 04:30:00 2016-01-20     3 5-bce-642     9   838. FALSE high
#> 10 2016-01-20 04:30:00 2016-01-20     3 5-bce-642     9   838. FALSE high
#> 11 2016-01-26 20:07:00 2016-01-26     4 2-dmx-010     7   834. TRUE  low
#> 12 2016-01-28 02:51:00 2016-01-28     2 7-dmx-010     8   108. FALSE low
#> 13 2016-01-30 11:23:00 2016-01-30     1 3-dka-303    NA  2230. TRUE  high
A: Using an agent with validation functions and then interrogate()
Validate that the column e has the logical class.
agent <-
  create_agent(tbl = small_table) %>%
  col_is_logical(columns = e) %>%
  interrogate()
Printing the agent in the console shows the validation report in the
Viewer. Here is an excerpt of validation report, showing the single entry
that corresponds to the validation step demonstrated here.

B: Using the validation function directly on the data (no agent)
This way of using validation functions acts as a data filter. Data is passed
through but should stop() if there is a single test unit failing. The
behavior of side effects can be customized with the actions option.
small_table %>%
  col_is_logical(columns = e) %>%
  dplyr::slice(1:5)
#> # A tibble: 5 x 8
#>   date_time           date           a b             c      d e     f
#>   <dttm>              <date>     <int> <chr>     <dbl>  <dbl> <lgl> <chr>
#> 1 2016-01-04 11:00:00 2016-01-04     2 1-bcd-345     3  3423. TRUE  high
#> 2 2016-01-04 00:32:00 2016-01-04     3 5-egh-163     8 10000. TRUE  low
#> 3 2016-01-05 13:32:00 2016-01-05     6 8-kdg-938     3  2343. TRUE  high
#> 4 2016-01-06 17:23:00 2016-01-06     2 5-jdo-903    NA  3892. FALSE mid
#> 5 2016-01-09 12:36:00 2016-01-09     8 3-ldm-038     7   284. TRUE  low
C: Using the expectation function
With the expect_*() form, we would typically perform one validation at a
time. This is primarily used in testthat tests.
expect_col_is_logical(small_table, columns = e)
D: Using the test function
With the test_*() form, we should get a single logical value returned to
us.
small_table %>% test_col_is_logical(columns = e)
#> [1] TRUE
Function ID
2-25
See Also
Other validation functions:
col_count_match(),
col_exists(),
col_is_character(),
col_is_date(),
col_is_factor(),
col_is_integer(),
col_is_numeric(),
col_is_posix(),
col_schema_match(),
col_vals_between(),
col_vals_decreasing(),
col_vals_equal(),
col_vals_expr(),
col_vals_gt(),
col_vals_gte(),
col_vals_in_set(),
col_vals_increasing(),
col_vals_lt(),
col_vals_lte(),
col_vals_make_set(),
col_vals_make_subset(),
col_vals_not_between(),
col_vals_not_equal(),
col_vals_not_in_set(),
col_vals_not_null(),
col_vals_null(),
col_vals_regex(),
col_vals_within_spec(),
conjointly(),
row_count_match(),
rows_complete(),
rows_distinct(),
serially(),
specially(),
tbl_match()
Do the columns contain numeric values?
Description
The col_is_numeric() validation function, the expect_col_is_numeric()
expectation function, and the test_col_is_numeric() test function all check
whether one or more columns in a table is of the numeric type. Like many of
the col_is_*()-type functions in pointblank, the only requirement is a
specification of the column names. The validation function can be used
directly on a data table or with an agent object (technically, a
ptblank_agent object) whereas the expectation and test functions can only
be used with a data table. Each validation step or expectation will operate
over a single test unit, which is whether the column is a numeric-type column
or not.
Usage
col_is_numeric( x, columns, actions = NULL, step_id = NULL, label = NULL, brief = NULL, active = TRUE ) expect_col_is_numeric(object, columns, threshold = 1) test_col_is_numeric(object, columns, threshold = 1)col_is_numeric( x, columns, actions = NULL, step_id = NULL, label = NULL, brief = NULL, active = TRUE ) expect_col_is_numeric(object, columns, threshold = 1) test_col_is_numeric(object, columns, threshold = 1)
Arguments
x |
A pointblank agent or a data table
A data frame, tibble ( |
columns |
The target columns
A column-selecting expression, as one would use inside |
actions |
Thresholds and actions for different states
A list containing threshold levels so that the validation step can react
accordingly when exceeding the set levels for different states. This is to
be created with the |
step_id |
Manual setting of the step ID value
One or more optional identifiers for the single or multiple validation
steps generated from calling a validation function. The use of step IDs
serves to distinguish validation steps from each other and provide an
opportunity for supplying a more meaningful label compared to the step
index. By default this is |
label |
Optional label for the validation step
Optional label for the validation step. This label appears in the agent report and, for the best appearance, it should be kept quite short. See the Labels section for more information. |
brief |
Brief description for the validation step
A brief is a short, text-based description for the validation step. If
nothing is provided here then an autobrief is generated by the agent,
using the language provided in |
active |
Is the validation step active?
A logical value indicating whether the validation step should be active. If
the validation function is working with an agent, |
object |
A data table for expectations or tests
A data frame, tibble ( |
threshold |
The failure threshold
A simple failure threshold value for use with the expectation ( |
Value
For the validation function, the return value is either a
ptblank_agent object or a table object (depending on whether an agent
object or a table was passed to x). The expectation function invisibly
returns its input but, in the context of testing data, the function is
called primarily for its potential side-effects (e.g., signaling failure).
The test function returns a logical value.
Supported Input Tables
The types of data tables that are officially supported are:
-
data frames (
data.frame) and tibbles (tbl_df) -
Spark DataFrames (
tbl_spark) -
the following database tables (
tbl_dbi):-
PostgreSQL tables (using the
RPostgres::Postgres()as driver) -
MySQL tables (with
RMySQL::MySQL()) -
Microsoft SQL Server tables (via odbc)
-
BigQuery tables (using
bigrquery::bigquery()) -
DuckDB tables (through
duckdb::duckdb()) -
SQLite (with
RSQLite::SQLite())
-
Other database tables may work to varying degrees but they haven't been formally tested (so be mindful of this when using unsupported backends with pointblank).
Column Names
columns may be a single column (as symbol a or string "a") or a vector
of columns (c(a, b, c) or c("a", "b", "c")). {tidyselect} helpers
are also supported, such as contains("date") and where(is.double). If
passing an external vector of columns, it should be wrapped in all_of().
When multiple columns are selected by columns, the result will be an
expansion of validation steps to that number of columns (e.g.,
c(col_a, col_b) will result in the entry of two validation steps).
Previously, columns could be specified in vars(). This continues to work,
but c() offers the same capability and supersedes vars() in columns.
Actions
Often, we will want to specify actions for the validation. This argument,
present in every validation function, takes a specially-crafted list object
that is best produced by the action_levels() function. Read that function's
documentation for the lowdown on how to create reactions to above-threshold
failure levels in validation. The basic gist is that you'll want at least a
single threshold level (specified as either the fraction of test units
failed, or, an absolute value), often using the warn_at argument. This is
especially true when x is a table object because, otherwise, nothing
happens. For the col_is_*()-type functions, using action_levels(warn_at = 1) or action_levels(stop_at = 1) are good choices depending on the
situation (the first produces a warning, the other will stop()).
Labels
label may be a single string or a character vector that matches the number
of expanded steps. label also supports {glue} syntax and exposes the
following dynamic variables contextualized to the current step:
-
"{.step}": The validation step name -
"{.col}": The current column name
The glue context also supports ordinary expressions for further flexibility
(e.g., "{toupper(.step)}") as long as they return a length-1 string.
Briefs
Want to describe this validation step in some detail? Keep in mind that this
is only useful if x is an agent. If that's the case, brief the agent
with some text that fits. Don't worry if you don't want to do it. The
autobrief protocol is kicked in when brief = NULL and a simple brief will
then be automatically generated.
YAML
A pointblank agent can be written to YAML with yaml_write() and the
resulting YAML can be used to regenerate an agent (with yaml_read_agent())
or interrogate the target table (via yaml_agent_interrogate()). When
col_is_numeric() is represented in YAML (under the top-level steps key as
a list member), the syntax closely follows the signature of the validation
function. Here is an example of how a complex call of col_is_numeric() as a
validation step is expressed in R code and in the corresponding YAML
representation.
R statement:
agent %>%
  col_is_numeric(
    columns = a,
    actions = action_levels(warn_at = 0.1, stop_at = 0.2),
    label = "The `col_is_numeric()` step.",
    active = FALSE
  )
YAML representation:
steps:
- col_is_numeric:
    columns: c(a)
    actions:
      warn_fraction: 0.1
      stop_fraction: 0.2
    label: The `col_is_numeric()` step.
    active: false
In practice, both of these will often be shorter as only the columns
argument requires a value. Arguments with default values won't be written to
YAML when using yaml_write() (though it is acceptable to include them with
their default when generating the YAML by other means). It is also possible
to preview the transformation of an agent to YAML without any writing to disk
by using the yaml_agent_string() function.
Examples
The small_table dataset in the package has a d column that is known to be
numeric. The following examples will validate that that column is indeed of
the numeric class.
small_table
#> # A tibble: 13 x 8
#>    date_time           date           a b             c      d e     f
#>    <dttm>              <date>     <int> <chr>     <dbl>  <dbl> <lgl> <chr>
#>  1 2016-01-04 11:00:00 2016-01-04     2 1-bcd-345     3  3423. TRUE  high
#>  2 2016-01-04 00:32:00 2016-01-04     3 5-egh-163     8 10000. TRUE  low
#>  3 2016-01-05 13:32:00 2016-01-05     6 8-kdg-938     3  2343. TRUE  high
#>  4 2016-01-06 17:23:00 2016-01-06     2 5-jdo-903    NA  3892. FALSE mid
#>  5 2016-01-09 12:36:00 2016-01-09     8 3-ldm-038     7   284. TRUE  low
#>  6 2016-01-11 06:15:00 2016-01-11     4 2-dhe-923     4  3291. TRUE  mid
#>  7 2016-01-15 18:46:00 2016-01-15     7 1-knw-093     3   843. TRUE  high
#>  8 2016-01-17 11:27:00 2016-01-17     4 5-boe-639     2  1036. FALSE low
#>  9 2016-01-20 04:30:00 2016-01-20     3 5-bce-642     9   838. FALSE high
#> 10 2016-01-20 04:30:00 2016-01-20     3 5-bce-642     9   838. FALSE high
#> 11 2016-01-26 20:07:00 2016-01-26     4 2-dmx-010     7   834. TRUE  low
#> 12 2016-01-28 02:51:00 2016-01-28     2 7-dmx-010     8   108. FALSE low
#> 13 2016-01-30 11:23:00 2016-01-30     1 3-dka-303    NA  2230. TRUE  high
A: Using an agent with validation functions and then interrogate()
Validate that the column d has the numeric class.
agent <-
  create_agent(tbl = small_table) %>%
  col_is_numeric(columns = d) %>%
  interrogate()
Printing the agent in the console shows the validation report in the
Viewer. Here is an excerpt of validation report, showing the single entry
that corresponds to the validation step demonstrated here.

B: Using the validation function directly on the data (no agent)
This way of using validation functions acts as a data filter. Data is passed
through but should stop() if there is a single test unit failing. The
behavior of side effects can be customized with the actions option.
small_table %>%
  col_is_numeric(columns = d) %>%
  dplyr::slice(1:5)
#> # A tibble: 5 x 8
#>   date_time           date           a b             c      d e     f
#>   <dttm>              <date>     <int> <chr>     <dbl>  <dbl> <lgl> <chr>
#> 1 2016-01-04 11:00:00 2016-01-04     2 1-bcd-345     3  3423. TRUE  high
#> 2 2016-01-04 00:32:00 2016-01-04     3 5-egh-163     8 10000. TRUE  low
#> 3 2016-01-05 13:32:00 2016-01-05     6 8-kdg-938     3  2343. TRUE  high
#> 4 2016-01-06 17:23:00 2016-01-06     2 5-jdo-903    NA  3892. FALSE mid
#> 5 2016-01-09 12:36:00 2016-01-09     8 3-ldm-038     7   284. TRUE  low
C: Using the expectation function
With the expect_*() form, we would typically perform one validation at a
time. This is primarily used in testthat tests.
expect_col_is_numeric(small_table, columns = d)
D: Using the test function
With the test_*() form, we should get a single logical value returned to
us.
small_table %>% test_col_is_numeric(columns = d)
#> [1] TRUE
Function ID
2-23
See Also
Other validation functions:
col_count_match(),
col_exists(),
col_is_character(),
col_is_date(),
col_is_factor(),
col_is_integer(),
col_is_logical(),
col_is_posix(),
col_schema_match(),
col_vals_between(),
col_vals_decreasing(),
col_vals_equal(),
col_vals_expr(),
col_vals_gt(),
col_vals_gte(),
col_vals_in_set(),
col_vals_increasing(),
col_vals_lt(),
col_vals_lte(),
col_vals_make_set(),
col_vals_make_subset(),
col_vals_not_between(),
col_vals_not_equal(),
col_vals_not_in_set(),
col_vals_not_null(),
col_vals_null(),
col_vals_regex(),
col_vals_within_spec(),
conjointly(),
row_count_match(),
rows_complete(),
rows_distinct(),
serially(),
specially(),
tbl_match()
Do the columns contain POSIXct dates?
Description
The col_is_posix() validation function, the expect_col_is_posix()
expectation function, and the test_col_is_posix() test function all check
whether one or more columns in a table is of the R POSIXct date-time type.
Like many of the col_is_*()-type functions in pointblank, the only
requirement is a specification of the column names. The validation function
can be used directly on a data table or with an agent object (technically,
a ptblank_agent object) whereas the expectation and test functions can only
be used with a data table. Each validation step or expectation will operate
over a single test unit, which is whether the column is a POSIXct-type
column or not.
Usage
col_is_posix( x, columns, actions = NULL, step_id = NULL, label = NULL, brief = NULL, active = TRUE ) expect_col_is_posix(object, columns, threshold = 1) test_col_is_posix(object, columns, threshold = 1)col_is_posix( x, columns, actions = NULL, step_id = NULL, label = NULL, brief = NULL, active = TRUE ) expect_col_is_posix(object, columns, threshold = 1) test_col_is_posix(object, columns, threshold = 1)
Arguments
x |
A pointblank agent or a data table
A data frame, tibble ( |
columns |
The target columns
A column-selecting expression, as one would use inside |
actions |
Thresholds and actions for different states
A list containing threshold levels so that the validation step can react
accordingly when exceeding the set levels for different states. This is to
be created with the |
step_id |
Manual setting of the step ID value
One or more optional identifiers for the single or multiple validation
steps generated from calling a validation function. The use of step IDs
serves to distinguish validation steps from each other and provide an
opportunity for supplying a more meaningful label compared to the step
index. By default this is |
label |
Optional label for the validation step
Optional label for the validation step. This label appears in the agent report and, for the best appearance, it should be kept quite short. See the Labels section for more information. |
brief |
Brief description for the validation step
A brief is a short, text-based description for the validation step. If
nothing is provided here then an autobrief is generated by the agent,
using the language provided in |
active |
Is the validation step active?
A logical value indicating whether the validation step should be active. If
the validation function is working with an agent, |
object |
A data table for expectations or tests
A data frame, tibble ( |
threshold |
The failure threshold
A simple failure threshold value for use with the expectation ( |
Value
For the validation function, the return value is either a
ptblank_agent object or a table object (depending on whether an agent
object or a table was passed to x). The expectation function invisibly
returns its input but, in the context of testing data, the function is
called primarily for its potential side-effects (e.g., signaling failure).
The test function returns a logical value.
Supported Input Tables
The types of data tables that are officially supported are:
-
data frames (
data.frame) and tibbles (tbl_df) -
Spark DataFrames (
tbl_spark) -
the following database tables (
tbl_dbi):-
PostgreSQL tables (using the
RPostgres::Postgres()as driver) -
MySQL tables (with
RMySQL::MySQL()) -
Microsoft SQL Server tables (via odbc)
-
BigQuery tables (using
bigrquery::bigquery()) -
DuckDB tables (through
duckdb::duckdb()) -
SQLite (with
RSQLite::SQLite())
-
Other database tables may work to varying degrees but they haven't been formally tested (so be mindful of this when using unsupported backends with pointblank).
Column Names
columns may be a single column (as symbol a or string "a") or a vector
of columns (c(a, b, c) or c("a", "b", "c")). {tidyselect} helpers
are also supported, such as contains("date") and where(is.double). If
passing an external vector of columns, it should be wrapped in all_of().
When multiple columns are selected by columns, the result will be an
expansion of validation steps to that number of columns (e.g.,
c(col_a, col_b) will result in the entry of two validation steps).
Previously, columns could be specified in vars(). This continues to work,
but c() offers the same capability and supersedes vars() in columns.
Actions
Often, we will want to specify actions for the validation. This argument,
present in every validation function, takes a specially-crafted list object
that is best produced by the action_levels() function. Read that function's
documentation for the lowdown on how to create reactions to above-threshold
failure levels in validation. The basic gist is that you'll want at least a
single threshold level (specified as either the fraction of test units
failed, or, an absolute value), often using the warn_at argument. This is
especially true when x is a table object because, otherwise, nothing
happens. For the col_is_*()-type functions, using action_levels(warn_at = 1) or action_levels(stop_at = 1) are good choices depending on the
situation (the first produces a warning, the other will stop()).
Labels
label may be a single string or a character vector that matches the number
of expanded steps. label also supports {glue} syntax and exposes the
following dynamic variables contextualized to the current step:
-
"{.step}": The validation step name -
"{.col}": The current column name
The glue context also supports ordinary expressions for further flexibility
(e.g., "{toupper(.step)}") as long as they return a length-1 string.
Briefs
Want to describe this validation step in some detail? Keep in mind that this
is only useful if x is an agent. If that's the case, brief the agent
with some text that fits. Don't worry if you don't want to do it. The
autobrief protocol is kicked in when brief = NULL and a simple brief will
then be automatically generated.
YAML
A pointblank agent can be written to YAML with yaml_write() and the
resulting YAML can be used to regenerate an agent (with yaml_read_agent())
or interrogate the target table (via yaml_agent_interrogate()). When
col_is_posix() is represented in YAML (under the top-level steps key as a
list member), the syntax closely follows the signature of the validation
function. Here is an example of how a complex call of col_is_posix() as a
validation step is expressed in R code and in the corresponding YAML
representation.
R statement:
agent %>%
  col_is_posix(
    columns = a,
    actions = action_levels(warn_at = 0.1, stop_at = 0.2),
    label = "The `col_is_posix()` step.",
    active = FALSE
  )
YAML representation:
steps:
- col_is_posix:
    columns: c(a)
    actions:
      warn_fraction: 0.1
      stop_fraction: 0.2
    label: The `col_is_posix()` step.
    active: false
In practice, both of these will often be shorter as only the columns
argument requires a value. Arguments with default values won't be written to
YAML when using yaml_write() (though it is acceptable to include them with
their default when generating the YAML by other means). It is also possible
to preview the transformation of an agent to YAML without any writing to disk
by using the yaml_agent_string() function.
Examples
The small_table dataset in the package has a date_time column. The
following examples will validate that that column is of the POSIXct and
POSIXt classes.
small_table
#> # A tibble: 13 x 8
#>    date_time           date           a b             c      d e     f
#>    <dttm>              <date>     <int> <chr>     <dbl>  <dbl> <lgl> <chr>
#>  1 2016-01-04 11:00:00 2016-01-04     2 1-bcd-345     3  3423. TRUE  high
#>  2 2016-01-04 00:32:00 2016-01-04     3 5-egh-163     8 10000. TRUE  low
#>  3 2016-01-05 13:32:00 2016-01-05     6 8-kdg-938     3  2343. TRUE  high
#>  4 2016-01-06 17:23:00 2016-01-06     2 5-jdo-903    NA  3892. FALSE mid
#>  5 2016-01-09 12:36:00 2016-01-09     8 3-ldm-038     7   284. TRUE  low
#>  6 2016-01-11 06:15:00 2016-01-11     4 2-dhe-923     4  3291. TRUE  mid
#>  7 2016-01-15 18:46:00 2016-01-15     7 1-knw-093     3   843. TRUE  high
#>  8 2016-01-17 11:27:00 2016-01-17     4 5-boe-639     2  1036. FALSE low
#>  9 2016-01-20 04:30:00 2016-01-20     3 5-bce-642     9   838. FALSE high
#> 10 2016-01-20 04:30:00 2016-01-20     3 5-bce-642     9   838. FALSE high
#> 11 2016-01-26 20:07:00 2016-01-26     4 2-dmx-010     7   834. TRUE  low
#> 12 2016-01-28 02:51:00 2016-01-28     2 7-dmx-010     8   108. FALSE low
#> 13 2016-01-30 11:23:00 2016-01-30     1 3-dka-303    NA  2230. TRUE  high
A: Using an agent with validation functions and then interrogate()
Validate that the column date_time is indeed a date-time column.
agent <-
  create_agent(tbl = small_table) %>%
  col_is_posix(columns = date_time) %>%
  interrogate()
Printing the agent in the console shows the validation report in the
Viewer. Here is an excerpt of validation report, showing the single entry
that corresponds to the validation step demonstrated here.

B: Using the validation function directly on the data (no agent)
This way of using validation functions acts as a data filter. Data is passed
through but should stop() if there is a single test unit failing. The
behavior of side effects can be customized with the actions option.
small_table %>%
  col_is_posix(columns = date_time) %>%
  dplyr::slice(1:5)
#> # A tibble: 5 x 8
#>   date_time           date           a b             c      d e     f
#>   <dttm>              <date>     <int> <chr>     <dbl>  <dbl> <lgl> <chr>
#> 1 2016-01-04 11:00:00 2016-01-04     2 1-bcd-345     3  3423. TRUE  high
#> 2 2016-01-04 00:32:00 2016-01-04     3 5-egh-163     8 10000. TRUE  low
#> 3 2016-01-05 13:32:00 2016-01-05     6 8-kdg-938     3  2343. TRUE  high
#> 4 2016-01-06 17:23:00 2016-01-06     2 5-jdo-903    NA  3892. FALSE mid
#> 5 2016-01-09 12:36:00 2016-01-09     8 3-ldm-038     7   284. TRUE  low
C: Using the expectation function
With the expect_*() form, we would typically perform one validation at a
time. This is primarily used in testthat tests.
expect_col_is_posix(small_table, columns = date_time)
D: Using the test function
With the test_*() form, we should get a single logical value returned to
us.
small_table %>% test_col_is_posix(columns = date_time)
#> [1] TRUE
Function ID
2-27
See Also
Other validation functions:
col_count_match(),
col_exists(),
col_is_character(),
col_is_date(),
col_is_factor(),
col_is_integer(),
col_is_logical(),
col_is_numeric(),
col_schema_match(),
col_vals_between(),
col_vals_decreasing(),
col_vals_equal(),
col_vals_expr(),
col_vals_gt(),
col_vals_gte(),
col_vals_in_set(),
col_vals_increasing(),
col_vals_lt(),
col_vals_lte(),
col_vals_make_set(),
col_vals_make_subset(),
col_vals_not_between(),
col_vals_not_equal(),
col_vals_not_in_set(),
col_vals_not_null(),
col_vals_null(),
col_vals_regex(),
col_vals_within_spec(),
conjointly(),
row_count_match(),
rows_complete(),
rows_distinct(),
serially(),
specially(),
tbl_match()
Generate a table column schema manually or with a reference table
Description
A table column schema object, as can be created by col_schema(), is
necessary when using the col_schema_match() validation function (which
checks whether the table object under study matches a known column schema).
The col_schema object can be made by carefully supplying the column names
and their types as a set of named arguments, or, we could provide a table
object, which could be of the data.frame, tbl_df, tbl_dbi, or
tbl_spark varieties. There's an additional option, which is just for
validating the schema of a tbl_dbi or tbl_spark object: we can validate
the schema based on R column types (e.g., "numeric", "character", etc.),
SQL column types (e.g., "double", "varchar", etc.), or Spark SQL column
types ("DoubleType", "StringType", etc.). This is great if we want to
validate table column schemas both on the server side and when tabular data
is collected and loaded into R.
Usage
col_schema(..., .tbl = NULL, .db_col_types = c("r", "sql"))col_schema(..., .tbl = NULL, .db_col_types = c("r", "sql"))
Arguments
... |
Column-by-column schema definition
A set of named arguments where the names refer to column names and the values are one or more column types. |
.tbl |
A data table for defining a schema
An option to use a table object to define the schema. If this is provided
then any values provided to |
.db_col_types |
Use R column types or database column types?
Determines whether the column types refer to R column types ( |
Examples
Create a simple table with two columns: one integer and the other
character.
tbl <-
  dplyr::tibble(
    a = 1:5,
    b = letters[1:5]
  )

tbl
#> # A tibble: 5 x 2
#>       a b
#>   <int> <chr>
#> 1     1 a
#> 2     2 b
#> 3     3 c
#> 4     4 d
#> 5     5 e
Create a column schema object that describes the columns and their types (in the expected order).
schema_obj <-
  col_schema(
    a = "integer",
    b = "character"
  )

schema_obj
#> $a
#> [1] "integer"
#>
#> $b
#> [1] "character"
#>
#> attr(,"class")
#> [1] "r_type"     "col_schema"
Validate that the schema object schema_obj exactly defines the column names
and column types of the tbl table.
agent <-
  create_agent(tbl = tbl) %>%
  col_schema_match(schema_obj) %>%
  interrogate()
Determine if this validation step passed by using all_passed().
all_passed(agent)
## [1] TRUE
We can alternatively create a column schema object from a tbl_df object.
schema_obj <-
  col_schema(
    .tbl = dplyr::tibble(
      a = integer(0),
      b = character(0)
    )
  )
This should provide the same interrogation results as in the previous example.
create_agent(tbl = tbl) %>%
  col_schema_match(schema_obj) %>%
  interrogate() %>%
  all_passed()
## [1] TRUE
Function ID
13-1
See Also
Other Utility and Helper Functions:
affix_date(),
affix_datetime(),
from_github(),
has_columns(),
stop_if_not()
Do columns in the table (and their types) match a predefined schema?
Description
The col_schema_match() validation function, the expect_col_schema_match()
expectation function, and the test_col_schema_match() test function all
work in conjunction with a col_schema object (generated through the
col_schema() function) to determine whether the expected schema matches
that of the target table. The validation function can be used directly on a
data table or with an agent object (technically, a ptblank_agent object)
whereas the expectation and test functions can only be used with a data
table.
The validation step or expectation operates over a single test unit, which is
whether the schema matches that of the table (within the constraints enforced
by the complete, in_order, and is_exact options). If the target table
is a tbl_dbi or a tbl_spark object, we can choose to validate the column
schema that is based on R column types (e.g., "numeric", "character",
etc.), SQL column types (e.g., "double", "varchar", etc.), or Spark SQL
types (e.g,. "DoubleType", "StringType", etc.). That option is defined in
the col_schema() function (it is the .db_col_types argument).
There are options to make schema checking less stringent (by default, this
validation operates with highest level of strictness). With the complete
option set to FALSE, we can supply a col_schema object with a partial
inclusion of columns. Using in_order set to FALSE means that there is no
requirement for the columns defined in the schema object to be in the same
order as in the target table. Finally, the is_exact option set to FALSE
means that all column classes/types don't have to be provided for a
particular column. It can even be NULL, skipping the check of the column
type.
Usage
col_schema_match( x, schema, complete = TRUE, in_order = TRUE, is_exact = TRUE, actions = NULL, step_id = NULL, label = NULL, brief = NULL, active = TRUE ) expect_col_schema_match( object, schema, complete = TRUE, in_order = TRUE, is_exact = TRUE, threshold = 1 ) test_col_schema_match( object, schema, complete = TRUE, in_order = TRUE, is_exact = TRUE, threshold = 1 )col_schema_match( x, schema, complete = TRUE, in_order = TRUE, is_exact = TRUE, actions = NULL, step_id = NULL, label = NULL, brief = NULL, active = TRUE ) expect_col_schema_match( object, schema, complete = TRUE, in_order = TRUE, is_exact = TRUE, threshold = 1 ) test_col_schema_match( object, schema, complete = TRUE, in_order = TRUE, is_exact = TRUE, threshold = 1 )
Arguments
x |
A pointblank agent or a data table
A data frame, tibble ( |
schema |
The table schema
A table schema of type |
complete |
Requirement for columns specified to exist
A requirement to account for all table columns in the provided |
in_order |
Requirement for columns in a specific order
A stringent requirement for enforcing the order of columns in the provided
|
is_exact |
Requirement for column types to be exactly specified
Determines whether the check for column types should be exact or even
performed at all. For example, columns in R data frames may have multiple
classes (e.g., a date-time column can have both the |
actions |
Thresholds and actions for different states
A list containing threshold levels so that the validation step can react
accordingly when exceeding the set levels for different states. This is to
be created with the |
step_id |
Manual setting of the step ID value
One or more optional identifiers for the single or multiple validation
steps generated from calling a validation function. The use of step IDs
serves to distinguish validation steps from each other and provide an
opportunity for supplying a more meaningful label compared to the step
index. By default this is |
label |
Optional label for the validation step
Optional label for the validation step. This label appears in the agent report and, for the best appearance, it should be kept quite short. See the Labels section for more information. |
brief |
Brief description for the validation step
A brief is a short, text-based description for the validation step. If
nothing is provided here then an autobrief is generated by the agent,
using the language provided in |
active |
Is the validation step active?
A logical value indicating whether the validation step should be active. If
the validation function is working with an agent, |
object |
A data table for expectations or tests
A data frame, tibble ( |
threshold |
The failure threshold
A simple failure threshold value for use with the expectation ( |
Value
For the validation function, the return value is either a
ptblank_agent object or a table object (depending on whether an agent
object or a table was passed to x). The expectation function invisibly
returns its input but, in the context of testing data, the function is
called primarily for its potential side-effects (e.g., signaling failure).
The test function returns a logical value.
Supported Input Tables
The types of data tables that are officially supported are:
-
data frames (
data.frame) and tibbles (tbl_df) -
Spark DataFrames (
tbl_spark) -
the following database tables (
tbl_dbi):-
PostgreSQL tables (using the
RPostgres::Postgres()as driver) -
MySQL tables (with
RMySQL::MySQL()) -
Microsoft SQL Server tables (via odbc)
-
BigQuery tables (using
bigrquery::bigquery()) -
DuckDB tables (through
duckdb::duckdb()) -
SQLite (with
RSQLite::SQLite())
-
Other database tables may work to varying degrees but they haven't been formally tested (so be mindful of this when using unsupported backends with pointblank).
Actions
Often, we will want to specify actions for the validation. This argument,
present in every validation function, takes a specially-crafted list object
that is best produced by the action_levels() function. Read that function's
documentation for the lowdown on how to create reactions to above-threshold
failure levels in validation. The basic gist is that you'll want at least a
single threshold level (specified as either the fraction of test units
failed, or, an absolute value), often using the warn_at argument. Using
action_levels(warn_at = 1) or action_levels(stop_at = 1) are good choices
depending on the situation (the first produces a warning, the other
stop()s).
Labels
label may be a single string or a character vector that matches the number
of expanded steps. label also supports {glue} syntax and exposes the
following dynamic variables contextualized to the current step:
-
"{.step}": The validation step name
The glue context also supports ordinary expressions for further flexibility
(e.g., "{toupper(.step)}") as long as they return a length-1 string.
Briefs
Want to describe this validation step in some detail? Keep in mind that this
is only useful if x is an agent. If that's the case, brief the agent
with some text that fits. Don't worry if you don't want to do it. The
autobrief protocol is kicked in when brief = NULL and a simple brief will
then be automatically generated.
YAML
A pointblank agent can be written to YAML with yaml_write() and the
resulting YAML can be used to regenerate an agent (with yaml_read_agent())
or interrogate the target table (via yaml_agent_interrogate()). When
col_schema_match() is represented in YAML (under the top-level steps key
as a list member), the syntax closely follows the signature of the validation
function. Here is an example of how a complex call of col_schema_match() as
a validation step is expressed in R code and in the corresponding YAML
representation.
R statement:
agent %>%
  col_schema_match(
    schema = col_schema(
      a = "integer",
      b = "character"
    ),
    complete = FALSE,
    in_order = FALSE,
    is_exact = FALSE,
    actions = action_levels(stop_at = 1),
    label = "The `col_schema_match()` step.",
    active = FALSE
  )
YAML representation:
steps:
- col_schema_match:
    schema:
      a: integer
      b: character
    complete: false
    in_order: false
    is_exact: false
    actions:
      stop_count: 1.0
    label: The `col_schema_match()` step.
    active: false
In practice, both of these will often be shorter as only the schema
argument requires a value. Arguments with default values won't be written to
YAML when using yaml_write() (though it is acceptable to include them with
their default when generating the YAML by other means). It is also possible
to preview the transformation of an agent to YAML without any writing to disk
by using the yaml_agent_string() function.
Examples
For all examples here, we'll use a simple table with two columns: one
integer (a) and the other character (b). The following examples will
validate that the table columns abides match a schema object as created by
col_schema().
tbl <-
  dplyr::tibble(
    a = 1:5,
    b = letters[1:5]
  )

tbl
#> # A tibble: 5 x 2
#>       a b
#>   <int> <chr>
#> 1     1 a
#> 2     2 b
#> 3     3 c
#> 4     4 d
#> 5     5 e
Create a column schema object with the helper function col_schema() that
describes the columns and their types (in the expected order).
schema_obj <-
  col_schema(
    a = "integer",
    b = "character"
  )

schema_obj
#> $a
#> [1] "integer"
#>
#> $b
#> [1] "character"
#>
#> attr(,"class")
#> [1] "r_type"     "col_schema"
A: Using an agent with validation functions and then interrogate()
Validate that the schema object schema_obj exactly defines the column names
and column types. We'll determine if this validation has a failing test unit
(there is a single test unit governed by whether there is a match).
agent <-
  create_agent(tbl = tbl) %>%
  col_schema_match(schema = schema_obj) %>%
  interrogate()
Printing the agent in the console shows the validation report in the
Viewer. Here is an excerpt of validation report, showing the single entry
that corresponds to the validation step demonstrated here.

B: Using the validation function directly on the data (no agent)
This way of using validation functions acts as a data filter. Data is passed
through but should stop() if there is a single test unit failing. The
behavior of side effects can be customized with the actions option.
tbl %>% col_schema_match(schema = schema_obj)
#> # A tibble: 5 x 2
#>       a b
#>   <int> <chr>
#> 1     1 a
#> 2     2 b
#> 3     3 c
#> 4     4 d
#> 5     5 e
C: Using the expectation function
With the expect_*() form, we would typically perform one validation at a
time. This is primarily used in testthat tests.
expect_col_schema_match(tbl, scheam = schema_obj)
D: Using the test function
With the test_*() form, we should get a single logical value returned to
us.
tbl %>% test_col_schema_match(schema = schema_obj)
#> [1] TRUE
Function ID
2-30
See Also
Other validation functions:
col_count_match(),
col_exists(),
col_is_character(),
col_is_date(),
col_is_factor(),
col_is_integer(),
col_is_logical(),
col_is_numeric(),
col_is_posix(),
col_vals_between(),
col_vals_decreasing(),
col_vals_equal(),
col_vals_expr(),
col_vals_gt(),
col_vals_gte(),
col_vals_in_set(),
col_vals_increasing(),
col_vals_lt(),
col_vals_lte(),
col_vals_make_set(),
col_vals_make_subset(),
col_vals_not_between(),
col_vals_not_equal(),
col_vals_not_in_set(),
col_vals_not_null(),
col_vals_null(),
col_vals_regex(),
col_vals_within_spec(),
conjointly(),
row_count_match(),
rows_complete(),
rows_distinct(),
serially(),
specially(),
tbl_match()
Do column data lie between two specified values or data in other columns?
Description
The col_vals_between() validation function, the expect_col_vals_between()
expectation function, and the test_col_vals_between() test function all
check whether column values in a table fall within a range. The range
specified with three arguments: left, right, and inclusive. The left
and right values specify the lower and upper bounds. The bounds can be
specified as single, literal values or as column names given in vars(). The
inclusive argument, as a vector of two logical values relating to left
and right, states whether each bound is inclusive or not. The default is
c(TRUE, TRUE), where both endpoints are inclusive (i.e., [left, right]).
For partially-unbounded versions of this function, we can use the
col_vals_lt(), col_vals_lte(), col_vals_gt(), or col_vals_gte()
validation functions. The validation function can be used directly on a data
table or with an agent object (technically, a ptblank_agent object)
whereas the expectation and test functions can only be used with a data
table. Each validation step or expectation will operate over the number of
test units that is equal to the number of rows in the table (after any
preconditions have been applied).
Usage
col_vals_between( x, columns, left, right, inclusive = c(TRUE, TRUE), na_pass = FALSE, preconditions = NULL, segments = NULL, actions = NULL, step_id = NULL, label = NULL, brief = NULL, active = TRUE ) expect_col_vals_between( object, columns, left, right, inclusive = c(TRUE, TRUE), na_pass = FALSE, preconditions = NULL, threshold = 1 ) test_col_vals_between( object, columns, left, right, inclusive = c(TRUE, TRUE), na_pass = FALSE, preconditions = NULL, threshold = 1 )col_vals_between( x, columns, left, right, inclusive = c(TRUE, TRUE), na_pass = FALSE, preconditions = NULL, segments = NULL, actions = NULL, step_id = NULL, label = NULL, brief = NULL, active = TRUE ) expect_col_vals_between( object, columns, left, right, inclusive = c(TRUE, TRUE), na_pass = FALSE, preconditions = NULL, threshold = 1 ) test_col_vals_between( object, columns, left, right, inclusive = c(TRUE, TRUE), na_pass = FALSE, preconditions = NULL, threshold = 1 )
Arguments
x |
A pointblank agent or a data table
A data frame, tibble ( |
columns |
The target columns
A column-selecting expression, as one would use inside |
left |
Definition of left bound
The lower bound for the range. The validation includes this bound
value (if the first element in |
right |
Definition of right bound
The upper bound for the range. The validation includes this
bound value (if the second element in |
inclusive |
Inclusiveness of bounds
A two-element logical value that indicates whether the |
na_pass |
Allow missing values to pass validation
Should any encountered |
preconditions |
Input table modification prior to validation
An optional expression for mutating the input table before proceeding with
the validation. This can either be provided as a one-sided R formula using
a leading |
segments |
Expressions for segmenting the target table
An optional expression or set of expressions (held in a list) that serve to segment the target table by column values. Each expression can be given in one of two ways: (1) as column names, or (2) as a two-sided formula where the LHS holds a column name and the RHS contains the column values to segment on. See the Segments section for more details on this. |
actions |
Thresholds and actions for different states
A list containing threshold levels so that the validation step can react
accordingly when exceeding the set levels for different states. This is to
be created with the |
step_id |
Manual setting of the step ID value
One or more optional identifiers for the single or multiple validation
steps generated from calling a validation function. The use of step IDs
serves to distinguish validation steps from each other and provide an
opportunity for supplying a more meaningful label compared to the step
index. By default this is |
label |
Optional label for the validation step
Optional label for the validation step. This label appears in the agent report and, for the best appearance, it should be kept quite short. See the Labels section for more information. |
brief |
Brief description for the validation step
A brief is a short, text-based description for the validation step. If
nothing is provided here then an autobrief is generated by the agent,
using the language provided in |
active |
Is the validation step active?
A logical value indicating whether the validation step should be active. If
the validation function is working with an agent, |
object |
A data table for expectations or tests
A data frame, tibble ( |
threshold |
The failure threshold
A simple failure threshold value for use with the expectation ( |
Value
For the validation function, the return value is either a
ptblank_agent object or a table object (depending on whether an agent
object or a table was passed to x). The expectation function invisibly
returns its input but, in the context of testing data, the function is
called primarily for its potential side-effects (e.g., signaling failure).
The test function returns a logical value.
Supported Input Tables
The types of data tables that are officially supported are:
-
data frames (
data.frame) and tibbles (tbl_df) -
Spark DataFrames (
tbl_spark) -
the following database tables (
tbl_dbi):-
PostgreSQL tables (using the
RPostgres::Postgres()as driver) -
MySQL tables (with
RMySQL::MySQL()) -
Microsoft SQL Server tables (via odbc)
-
BigQuery tables (using
bigrquery::bigquery()) -
DuckDB tables (through
duckdb::duckdb()) -
SQLite (with
RSQLite::SQLite())
-
Other database tables may work to varying degrees but they haven't been formally tested (so be mindful of this when using unsupported backends with pointblank).
Column Names
columns may be a single column (as symbol a or string "a") or a vector
of columns (c(a, b, c) or c("a", "b", "c")). {tidyselect} helpers
are also supported, such as contains("date") and where(is.double). If
passing an external vector of columns, it should be wrapped in all_of().
When multiple columns are selected by columns, the result will be an
expansion of validation steps to that number of columns (e.g.,
c(col_a, col_b) will result in the entry of two validation steps).
Previously, columns could be specified in vars(). This continues to work,
but c() offers the same capability and supersedes vars() in columns.
Missing Values
This validation function supports special handling of NA values. The
na_pass argument will determine whether an NA value appearing in a test
unit should be counted as a pass or a fail. The default of na_pass = FALSE means that any NAs encountered will accumulate failing test units.
Preconditions
Providing expressions as preconditions means pointblank will preprocess
the target table during interrogation as a preparatory step. It might happen
that a particular validation requires a calculated column, some filtering of
rows, or the addition of columns via a join, etc. Especially for an
agent-based report this can be advantageous since we can develop a large
validation plan with a single target table and make minor adjustments to it,
as needed, along the way.
The table mutation is totally isolated in scope to the validation step(s)
where preconditions is used. Using dplyr code is suggested here since
the statements can be translated to SQL if necessary (i.e., if the target
table resides in a database). The code is most easily supplied as a one-sided
R formula (using a leading ~). In the formula representation, the .
serves as the input data table to be transformed (e.g., ~ . %>% dplyr::mutate(col_b = col_a + 10)). Alternatively, a function could instead
be supplied (e.g., function(x) dplyr::mutate(x, col_b = col_a + 10)).
Segments
By using the segments argument, it's possible to define a particular
validation with segments (or row slices) of the target table. An optional
expression or set of expressions that serve to segment the target table by
column values. Each expression can be given in one of two ways: (1) as column
names, or (2) as a two-sided formula where the LHS holds a column name and
the RHS contains the column values to segment on.
As an example of the first type of expression that can be used,
vars(a_column) will segment the target table in however many unique values
are present in the column called a_column. This is great if every unique
value in a particular column (like different locations, or different dates)
requires it's own repeating validation.
With a formula, we can be more selective with which column values should be
used for segmentation. Using a_column ~ c("group_1", "group_2") will
attempt to obtain two segments where one is a slice of data where the value
"group_1" exists in the column named "a_column", and, the other is a
slice where "group_2" exists in the same column. Each group of rows
resolved from the formula will result in a separate validation step.
If there are multiple columns specified then the potential number of
validation steps will be m columns multiplied by n segments resolved.
Segmentation will always occur after preconditions (i.e., statements that
mutate the target table), if any, are applied. With this type of one-two
combo, it's possible to generate labels for segmentation using an expression
for preconditions and refer to those labels in segments without having to
generate a separate version of the target table.
Actions
Often, we will want to specify actions for the validation. This argument,
present in every validation function, takes a specially-crafted list
object that is best produced by the action_levels() function. Read that
function's documentation for the lowdown on how to create reactions to
above-threshold failure levels in validation. The basic gist is that you'll
want at least a single threshold level (specified as either the fraction of
test units failed, or, an absolute value), often using the warn_at
argument. This is especially true when x is a table object because,
otherwise, nothing happens. For the col_vals_*()-type functions, using
action_levels(warn_at = 0.25) or action_levels(stop_at = 0.25) are good
choices depending on the situation (the first produces a warning when a
quarter of the total test units fails, the other stop()s at the same
threshold level).
Labels
label may be a single string or a character vector that matches the number
of expanded steps. label also supports {glue} syntax and exposes the
following dynamic variables contextualized to the current step:
-
"{.step}": The validation step name -
"{.col}": The current column name -
"{.seg_col}": The current segment's column name -
"{.seg_val}": The current segment's value/group
The glue context also supports ordinary expressions for further flexibility
(e.g., "{toupper(.step)}") as long as they return a length-1 string.
Briefs
Want to describe this validation step in some detail? Keep in mind that this
is only useful if x is an agent. If that's the case, brief the agent
with some text that fits. Don't worry if you don't want to do it. The
autobrief protocol is kicked in when brief = NULL and a simple brief will
then be automatically generated.
YAML
A pointblank agent can be written to YAML with yaml_write() and the
resulting YAML can be used to regenerate an agent (with yaml_read_agent())
or interrogate the target table (via yaml_agent_interrogate()). When
col_vals_between() is represented in YAML (under the top-level steps key
as a list member), the syntax closely follows the signature of the validation
function. Here is an example of how a complex call of col_vals_between() as
a validation step is expressed in R code and in the corresponding YAML
representation.
R statement:
agent %>%
  col_vals_between(
    columns = a,
    left = 1,
    right = 2,
    inclusive = c(TRUE, FALSE),
    na_pass = TRUE,
    preconditions = ~ . %>% dplyr::filter(a < 10),
    segments = b ~ c("group_1", "group_2"),
    actions = action_levels(warn_at = 0.1, stop_at = 0.2),
    label = "The `col_vals_between()` step.",
    active = FALSE
  )
YAML representation:
steps:
- col_vals_between:
    columns: c(a)
    left: 1.0
    right: 2.0
    inclusive:
    - true
    - false
    na_pass: true
    preconditions: ~. %>% dplyr::filter(a < 10)
    segments: b ~ c("group_1", "group_2")
    actions:
      warn_fraction: 0.1
      stop_fraction: 0.2
    label: The `col_vals_between()` step.
    active: false
In practice, both of these will often be shorter as only the columns,
left, and right arguments require values. Arguments with default values
won't be written to YAML when using yaml_write() (though it is acceptable
to include them with their default when generating the YAML by other means).
It is also possible to preview the transformation of an agent to YAML without
any writing to disk by using the yaml_agent_string() function.
Examples
The small_table dataset in the package has a column of numeric values in
c (there are a few NAs in that column). The following examples will
validate the values in that numeric column.
small_table
#> # A tibble: 13 x 8
#>    date_time           date           a b             c      d e     f
#>    <dttm>              <date>     <int> <chr>     <dbl>  <dbl> <lgl> <chr>
#>  1 2016-01-04 11:00:00 2016-01-04     2 1-bcd-345     3  3423. TRUE  high
#>  2 2016-01-04 00:32:00 2016-01-04     3 5-egh-163     8 10000. TRUE  low
#>  3 2016-01-05 13:32:00 2016-01-05     6 8-kdg-938     3  2343. TRUE  high
#>  4 2016-01-06 17:23:00 2016-01-06     2 5-jdo-903    NA  3892. FALSE mid
#>  5 2016-01-09 12:36:00 2016-01-09     8 3-ldm-038     7   284. TRUE  low
#>  6 2016-01-11 06:15:00 2016-01-11     4 2-dhe-923     4  3291. TRUE  mid
#>  7 2016-01-15 18:46:00 2016-01-15     7 1-knw-093     3   843. TRUE  high
#>  8 2016-01-17 11:27:00 2016-01-17     4 5-boe-639     2  1036. FALSE low
#>  9 2016-01-20 04:30:00 2016-01-20     3 5-bce-642     9   838. FALSE high
#> 10 2016-01-20 04:30:00 2016-01-20     3 5-bce-642     9   838. FALSE high
#> 11 2016-01-26 20:07:00 2016-01-26     4 2-dmx-010     7   834. TRUE  low
#> 12 2016-01-28 02:51:00 2016-01-28     2 7-dmx-010     8   108. FALSE low
#> 13 2016-01-30 11:23:00 2016-01-30     1 3-dka-303    NA  2230. TRUE  high
A: Using an agent with validation functions and then interrogate()
Validate that values in column c are all between 1 and 9. Because there
are NA values, we'll choose to let those pass validation by setting
na_pass = TRUE.
agent <-
  create_agent(tbl = small_table) %>%
  col_vals_between(
    columns = c,
    left = 1, right = 9,
    na_pass = TRUE
  ) %>%
  interrogate()
Printing the agent in the console shows the validation report in the
Viewer. Here is an excerpt of validation report, showing the single entry
that corresponds to the validation step demonstrated here.

B: Using the validation function directly on the data (no agent)
This way of using validation functions acts as a data filter. Data is passed
through but should stop() if there is a single test unit failing. The
behavior of side effects can be customized with the actions option.
small_table %>%
  col_vals_between(
    columns = c,
    left = 1, right = 9,
    na_pass = TRUE
  ) %>%
  dplyr::pull(c)
#>  [1]  3  8  3 NA  7  4  3  2  9  9  7  8 NA
C: Using the expectation function
With the expect_*() form, we would typically perform one validation at a
time. This is primarily used in testthat tests.
expect_col_vals_between(
  small_table, columns = c,
  left = 1, right = 9,
  na_pass = TRUE
)
D: Using the test function
With the test_*() form, we should get a single logical value returned to
us.
small_table %>%
  test_col_vals_between(
    columns = c,
    left = 1, right = 9,
    na_pass = TRUE
  )
#> [1] TRUE
An additional note on the bounds for this function: they are inclusive by
default (i.e., values of exactly 1 and 9 will pass). We can modify the
inclusiveness of the upper and lower bounds with the inclusive option,
which is a length-2 logical vector.
Testing with the upper bound being non-inclusive, we get FALSE since two
values are 9 and they now fall outside of the upper (or right) bound.
small_table %>%
  test_col_vals_between(
    columns = c, left = 1, right = 9,
    inclusive = c(TRUE, FALSE),
    na_pass = TRUE
  )
#> [1] FALSE
Function ID
2-7
See Also
The analogue to this function: col_vals_not_between().
Other validation functions:
col_count_match(),
col_exists(),
col_is_character(),
col_is_date(),
col_is_factor(),
col_is_integer(),
col_is_logical(),
col_is_numeric(),
col_is_posix(),
col_schema_match(),
col_vals_decreasing(),
col_vals_equal(),
col_vals_expr(),
col_vals_gt(),
col_vals_gte(),
col_vals_in_set(),
col_vals_increasing(),
col_vals_lt(),
col_vals_lte(),
col_vals_make_set(),
col_vals_make_subset(),
col_vals_not_between(),
col_vals_not_equal(),
col_vals_not_in_set(),
col_vals_not_null(),
col_vals_null(),
col_vals_regex(),
col_vals_within_spec(),
conjointly(),
row_count_match(),
rows_complete(),
rows_distinct(),
serially(),
specially(),
tbl_match()
Are column data decreasing by row?
Description
The col_vals_decreasing() validation function, the
expect_col_vals_decreasing() expectation function, and the
test_col_vals_decreasing() test function all check whether column values in
a table are decreasing when moving down a table. There are options for
allowing NA values in the target column, allowing stationary phases (where
consecutive values don't change), and even on for allowing increasing
movements up to a certain threshold. The validation function can be used
directly on a data table or with an agent object (technically, a
ptblank_agent object) whereas the expectation and test functions can only
be used with a data table. Each validation step or expectation will operate
over the number of test units that is equal to the number of rows in the
table (after any preconditions have been applied).
Usage
col_vals_decreasing( x, columns, allow_stationary = FALSE, increasing_tol = NULL, na_pass = FALSE, preconditions = NULL, segments = NULL, actions = NULL, step_id = NULL, label = NULL, brief = NULL, active = TRUE ) expect_col_vals_decreasing( object, columns, allow_stationary = FALSE, increasing_tol = NULL, na_pass = FALSE, preconditions = NULL, threshold = 1 ) test_col_vals_decreasing( object, columns, allow_stationary = FALSE, increasing_tol = NULL, na_pass = FALSE, preconditions = NULL, threshold = 1 )col_vals_decreasing( x, columns, allow_stationary = FALSE, increasing_tol = NULL, na_pass = FALSE, preconditions = NULL, segments = NULL, actions = NULL, step_id = NULL, label = NULL, brief = NULL, active = TRUE ) expect_col_vals_decreasing( object, columns, allow_stationary = FALSE, increasing_tol = NULL, na_pass = FALSE, preconditions = NULL, threshold = 1 ) test_col_vals_decreasing( object, columns, allow_stationary = FALSE, increasing_tol = NULL, na_pass = FALSE, preconditions = NULL, threshold = 1 )
Arguments
x |
A pointblank agent or a data table
A data frame, tibble ( |
columns |
The target columns
A column-selecting expression, as one would use inside |
allow_stationary |
Allowance for stationary pauses in values
An option to allow pauses in decreasing values. For example if the values
for the test units are |
increasing_tol |
Optional tolerance threshold for backtracking
An optional threshold value that allows for movement of numerical values in
the positive direction. By default this is |
na_pass |
Allow missing values to pass validation
Should any encountered |
preconditions |
Input table modification prior to validation
An optional expression for mutating the input table before proceeding with
the validation. This can either be provided as a one-sided R formula using
a leading |
segments |
Expressions for segmenting the target table
An optional expression or set of expressions (held in a list) that serve to segment the target table by column values. Each expression can be given in one of two ways: (1) as column names, or (2) as a two-sided formula where the LHS holds a column name and the RHS contains the column values to segment on. See the Segments section for more details on this. |
actions |
Thresholds and actions for different states
A list containing threshold levels so that the validation step can react
accordingly when exceeding the set levels for different states. This is to
be created with the |
step_id |
Manual setting of the step ID value
One or more optional identifiers for the single or multiple validation
steps generated from calling a validation function. The use of step IDs
serves to distinguish validation steps from each other and provide an
opportunity for supplying a more meaningful label compared to the step
index. By default this is |
label |
Optional label for the validation step
Optional label for the validation step. This label appears in the agent report and, for the best appearance, it should be kept quite short. See the Labels section for more information. |
brief |
Brief description for the validation step
A brief is a short, text-based description for the validation step. If
nothing is provided here then an autobrief is generated by the agent,
using the language provided in |
active |
Is the validation step active?
A logical value indicating whether the validation step should be active. If
the validation function is working with an agent, |
object |
A data table for expectations or tests
A data frame, tibble ( |
threshold |
The failure threshold
A simple failure threshold value for use with the expectation ( |
Value
For the validation function, the return value is either a
ptblank_agent object or a table object (depending on whether an agent
object or a table was passed to x). The expectation function invisibly
returns its input but, in the context of testing data, the function is
called primarily for its potential side-effects (e.g., signaling failure).
The test function returns a logical value.
Supported Input Tables
The types of data tables that are officially supported are:
-
data frames (
data.frame) and tibbles (tbl_df) -
Spark DataFrames (
tbl_spark) -
the following database tables (
tbl_dbi):-
PostgreSQL tables (using the
RPostgres::Postgres()as driver) -
MySQL tables (with
RMySQL::MySQL()) -
Microsoft SQL Server tables (via odbc)
-
BigQuery tables (using
bigrquery::bigquery()) -
DuckDB tables (through
duckdb::duckdb()) -
SQLite (with
RSQLite::SQLite())
-
Other database tables may work to varying degrees but they haven't been formally tested (so be mindful of this when using unsupported backends with pointblank).
Column Names
columns may be a single column (as symbol a or string "a") or a vector
of columns (c(a, b, c) or c("a", "b", "c")). {tidyselect} helpers
are also supported, such as contains("date") and where(is.double). If
passing an external vector of columns, it should be wrapped in all_of().
When multiple columns are selected by columns, the result will be an
expansion of validation steps to that number of columns (e.g.,
c(col_a, col_b) will result in the entry of two validation steps).
Previously, columns could be specified in vars(). This continues to work,
but c() offers the same capability and supersedes vars() in columns.
Missing Values
This validation function supports special handling of NA values. The
na_pass argument will determine whether an NA value appearing in a test
unit should be counted as a pass or a fail. The default of na_pass = FALSE means that any NAs encountered will accumulate failing test units.
Preconditions
Providing expressions as preconditions means pointblank will preprocess
the target table during interrogation as a preparatory step. It might happen
that a particular validation requires a calculated column, some filtering of
rows, or the addition of columns via a join, etc. Especially for an
agent-based report this can be advantageous since we can develop a large
validation plan with a single target table and make minor adjustments to it,
as needed, along the way.
The table mutation is totally isolated in scope to the validation step(s)
where preconditions is used. Using dplyr code is suggested here since
the statements can be translated to SQL if necessary (i.e., if the target
table resides in a database). The code is most easily supplied as a one-sided
R formula (using a leading ~). In the formula representation, the .
serves as the input data table to be transformed (e.g., ~ . %>% dplyr::mutate(col_b = col_a + 10)). Alternatively, a function could instead
be supplied (e.g., function(x) dplyr::mutate(x, col_b = col_a + 10)).
Segments
By using the segments argument, it's possible to define a particular
validation with segments (or row slices) of the target table. An optional
expression or set of expressions that serve to segment the target table by
column values. Each expression can be given in one of two ways: (1) as column
names, or (2) as a two-sided formula where the LHS holds a column name and
the RHS contains the column values to segment on.
As an example of the first type of expression that can be used,
vars(a_column) will segment the target table in however many unique values
are present in the column called a_column. This is great if every unique
value in a particular column (like different locations, or different dates)
requires it's own repeating validation.
With a formula, we can be more selective with which column values should be
used for segmentation. Using a_column ~ c("group_1", "group_2") will
attempt to obtain two segments where one is a slice of data where the value
"group_1" exists in the column named "a_column", and, the other is a
slice where "group_2" exists in the same column. Each group of rows
resolved from the formula will result in a separate validation step.
If there are multiple columns specified then the potential number of
validation steps will be m columns multiplied by n segments resolved.
Segmentation will always occur after preconditions (i.e., statements that
mutate the target table), if any, are applied. With this type of one-two
combo, it's possible to generate labels for segmentation using an expression
for preconditions and refer to those labels in segments without having to
generate a separate version of the target table.
Actions
Often, we will want to specify actions for the validation. This argument,
present in every validation function, takes a specially-crafted list
object that is best produced by the action_levels() function. Read that
function's documentation for the lowdown on how to create reactions to
above-threshold failure levels in validation. The basic gist is that you'll
want at least a single threshold level (specified as either the fraction of
test units failed, or, an absolute value), often using the warn_at
argument. This is especially true when x is a table object because,
otherwise, nothing happens. For the col_vals_*()-type functions, using
action_levels(warn_at = 0.25) or action_levels(stop_at = 0.25) are good
choices depending on the situation (the first produces a warning when a
quarter of the total test units fails, the other stop()s at the same
threshold level).
Labels
label may be a single string or a character vector that matches the number
of expanded steps. label also supports {glue} syntax and exposes the
following dynamic variables contextualized to the current step:
-
"{.step}": The validation step name -
"{.col}": The current column name -
"{.seg_col}": The current segment's column name -
"{.seg_val}": The current segment's value/group
The glue context also supports ordinary expressions for further flexibility
(e.g., "{toupper(.step)}") as long as they return a length-1 string.
Briefs
Want to describe this validation step in some detail? Keep in mind that this
is only useful if x is an agent. If that's the case, brief the agent
with some text that fits. Don't worry if you don't want to do it. The
autobrief protocol is kicked in when brief = NULL and a simple brief will
then be automatically generated.
YAML
A pointblank agent can be written to YAML with yaml_write() and the
resulting YAML can be used to regenerate an agent (with yaml_read_agent())
or interrogate the target table (via yaml_agent_interrogate()). When
col_vals_decreasing() is represented in YAML (under the top-level steps
key as a list member), the syntax closely follows the signature of the
validation function. Here is an example of how a complex call of
col_vals_decreasing() as a validation step is expressed in R code and in
the corresponding YAML representation.
R statement:
agent %>%
  col_vals_decreasing(
    columns = a,
    allow_stationary = TRUE,
    increasing_tol = 0.5,
    na_pass = TRUE,
    preconditions = ~ . %>% dplyr::filter(a < 10),
    segments = b ~ c("group_1", "group_2"),
    actions = action_levels(warn_at = 0.1, stop_at = 0.2),
    label = "The `col_vals_decreasing()` step.",
    active = FALSE
  )
YAML representation:
steps:
- col_vals_decreasing:
    columns: c(a)
    allow_stationary: true
    increasing_tol: 0.5
    na_pass: true
    preconditions: ~. %>% dplyr::filter(a < 10)
    segments: b ~ c("group_1", "group_2")
    actions:
      warn_fraction: 0.1
      stop_fraction: 0.2
    label: The `col_vals_decreasing()` step.
    active: false
In practice, both of these will often be shorter as only the columns
argument requires a value. Arguments with default values won't be written to
YAML when using yaml_write() (though it is acceptable to include them with
their default when generating the YAML by other means). It is also possible
to preview the transformation of an agent to YAML without any writing to disk
by using the yaml_agent_string() function.
Examples
The game_revenue dataset in the package has the column session_start,
which contains date-time values. Let's create a column of difftime values (in
time_left) that describes the time remaining in the month relative to the
session start.
game_revenue_2 <-
  game_revenue %>%
  dplyr::mutate(
    time_left =
      lubridate::ymd_hms(
        "2015-02-01 00:00:00"
      ) - session_start
  )

game_revenue_2
#> # A tibble: 2,000 x 12
#>    player_id       session_id  session_start       time                item_type
#>    <chr>           <chr>       <dttm>              <dttm>              <chr>
#>  1 ECPANOIXLZHF896 ECPANOIXLZ~ 2015-01-01 01:31:03 2015-01-01 01:31:27 iap
#>  2 ECPANOIXLZHF896 ECPANOIXLZ~ 2015-01-01 01:31:03 2015-01-01 01:36:57 iap
#>  3 ECPANOIXLZHF896 ECPANOIXLZ~ 2015-01-01 01:31:03 2015-01-01 01:37:45 iap
#>  4 ECPANOIXLZHF896 ECPANOIXLZ~ 2015-01-01 01:31:03 2015-01-01 01:42:33 ad
#>  5 ECPANOIXLZHF896 ECPANOIXLZ~ 2015-01-01 11:50:02 2015-01-01 11:55:20 ad
#>  6 ECPANOIXLZHF896 ECPANOIXLZ~ 2015-01-01 11:50:02 2015-01-01 12:08:56 ad
#>  7 ECPANOIXLZHF896 ECPANOIXLZ~ 2015-01-01 11:50:02 2015-01-01 12:14:08 ad
#>  8 ECPANOIXLZHF896 ECPANOIXLZ~ 2015-01-01 11:50:02 2015-01-01 12:21:44 ad
#>  9 ECPANOIXLZHF896 ECPANOIXLZ~ 2015-01-01 11:50:02 2015-01-01 12:24:20 ad
#> 10 FXWUORGYNJAE271 FXWUORGYNJ~ 2015-01-01 15:17:18 2015-01-01 15:19:36 ad
#> # i 1,990 more rows
#> # i 7 more variables: item_name <chr>, item_revenue <dbl>,
#> #   session_duration <dbl>, start_day <date>, acquisition <chr>, country <chr>,
#> #   time_left <drtn>
Let's ensure that the "difftime" values in the new time_left column has
values that are decreasing from top to bottom.
A: Using an agent with validation functions and then interrogate()
Validate that all "difftime" values in the column time_left are
decreasing, and, allow for repeating values (allow_stationary will be set
to TRUE).
agent <-
  create_agent(tbl = game_revenue_2) %>%
  col_vals_decreasing(
    columns = time_left,
    allow_stationary = TRUE
  ) %>%
  interrogate()
Printing the agent in the console shows the validation report in the
Viewer. Here is an excerpt of validation report, showing the single entry
that corresponds to the validation step demonstrated here.

B: Using the validation function directly on the data (no agent)
This way of using validation functions acts as a data filter. Data is passed
through but should stop() if there is a single test unit failing. The
behavior of side effects can be customized with the actions option.
game_revenue_2 %>%
  col_vals_decreasing(
    columns = time_left,
    allow_stationary = TRUE
  ) %>%
  dplyr::select(time_left) %>%
  dplyr::distinct() %>%
  dplyr::count()
#> # A tibble: 1 x 1
#>       n
#>   <int>
#> 1   618
C: Using the expectation function
With the expect_*() form, we would typically perform one validation at a
time. This is primarily used in testthat tests.
expect_col_vals_decreasing(
  game_revenue_2,
  columns = time_left,
  allow_stationary = TRUE
)
D: Using the test function
With the test_*() form, we should get a single logical value returned to
us.
game_revenue_2 %>%
  test_col_vals_decreasing(
    columns = time_left,
    allow_stationary = TRUE
  )
#> [1] TRUE
Function ID
2-14
See Also
The analogous function that moves in the opposite direction:
col_vals_increasing().
Other validation functions:
col_count_match(),
col_exists(),
col_is_character(),
col_is_date(),
col_is_factor(),
col_is_integer(),
col_is_logical(),
col_is_numeric(),
col_is_posix(),
col_schema_match(),
col_vals_between(),
col_vals_equal(),
col_vals_expr(),
col_vals_gt(),
col_vals_gte(),
col_vals_in_set(),
col_vals_increasing(),
col_vals_lt(),
col_vals_lte(),
col_vals_make_set(),
col_vals_make_subset(),
col_vals_not_between(),
col_vals_not_equal(),
col_vals_not_in_set(),
col_vals_not_null(),
col_vals_null(),
col_vals_regex(),
col_vals_within_spec(),
conjointly(),
row_count_match(),
rows_complete(),
rows_distinct(),
serially(),
specially(),
tbl_match()
Are column data equal to a fixed value or data in another column?
Description
The col_vals_equal() validation function, the expect_col_vals_equal()
expectation function, and the test_col_vals_equal() test function all check
whether column values in a table are equal to a specified value. The
value can be specified as a single, literal value or as a column name given
in vars(). The validation function can be used directly on a data table or
with an agent object (technically, a ptblank_agent object) whereas the
expectation and test functions can only be used with a data table. Each
validation step or expectation will operate over the number of test units
that is equal to the number of rows in the table (after any preconditions
have been applied).
Usage
col_vals_equal( x, columns, value, na_pass = FALSE, preconditions = NULL, segments = NULL, actions = NULL, step_id = NULL, label = NULL, brief = NULL, active = TRUE ) expect_col_vals_equal( object, columns, value, na_pass = FALSE, preconditions = NULL, threshold = 1 ) test_col_vals_equal( object, columns, value, na_pass = FALSE, preconditions = NULL, threshold = 1 )col_vals_equal( x, columns, value, na_pass = FALSE, preconditions = NULL, segments = NULL, actions = NULL, step_id = NULL, label = NULL, brief = NULL, active = TRUE ) expect_col_vals_equal( object, columns, value, na_pass = FALSE, preconditions = NULL, threshold = 1 ) test_col_vals_equal( object, columns, value, na_pass = FALSE, preconditions = NULL, threshold = 1 )
Arguments
x |
A pointblank agent or a data table
A data frame, tibble ( |
columns |
The target columns
A column-selecting expression, as one would use inside |
value |
Value for comparison
A value used for this test of equality. This can be a single value or a
compatible column given in |
na_pass |
Allow missing values to pass validation
Should any encountered |
preconditions |
Input table modification prior to validation
An optional expression for mutating the input table before proceeding with
the validation. This can either be provided as a one-sided R formula using
a leading |
segments |
Expressions for segmenting the target table
An optional expression or set of expressions (held in a list) that serve to segment the target table by column values. Each expression can be given in one of two ways: (1) as column names, or (2) as a two-sided formula where the LHS holds a column name and the RHS contains the column values to segment on. See the Segments section for more details on this. |
actions |
Thresholds and actions for different states
A list containing threshold levels so that the validation step can react
accordingly when exceeding the set levels for different states. This is to
be created with the |
step_id |
Manual setting of the step ID value
One or more optional identifiers for the single or multiple validation
steps generated from calling a validation function. The use of step IDs
serves to distinguish validation steps from each other and provide an
opportunity for supplying a more meaningful label compared to the step
index. By default this is |
label |
Optional label for the validation step
Optional label for the validation step. This label appears in the agent report and, for the best appearance, it should be kept quite short. See the Labels section for more information. |
brief |
Brief description for the validation step
A brief is a short, text-based description for the validation step. If
nothing is provided here then an autobrief is generated by the agent,
using the language provided in |
active |
Is the validation step active?
A logical value indicating whether the validation step should be active. If
the validation function is working with an agent, |
object |
A data table for expectations or tests
A data frame, tibble ( |
threshold |
The failure threshold
A simple failure threshold value for use with the expectation ( |
Value
For the validation function, the return value is either a
ptblank_agent object or a table object (depending on whether an agent
object or a table was passed to x). The expectation function invisibly
returns its input but, in the context of testing data, the function is
called primarily for its potential side-effects (e.g., signaling failure).
The test function returns a logical value.
Supported Input Tables
The types of data tables that are officially supported are:
-
data frames (
data.frame) and tibbles (tbl_df) -
Spark DataFrames (
tbl_spark) -
the following database tables (
tbl_dbi):-
PostgreSQL tables (using the
RPostgres::Postgres()as driver) -
MySQL tables (with
RMySQL::MySQL()) -
Microsoft SQL Server tables (via odbc)
-
BigQuery tables (using
bigrquery::bigquery()) -
DuckDB tables (through
duckdb::duckdb()) -
SQLite (with
RSQLite::SQLite())
-
Other database tables may work to varying degrees but they haven't been formally tested (so be mindful of this when using unsupported backends with pointblank).
Column Names
columns may be a single column (as symbol a or string "a") or a vector
of columns (c(a, b, c) or c("a", "b", "c")). {tidyselect} helpers
are also supported, such as contains("date") and where(is.double). If
passing an external vector of columns, it should be wrapped in all_of().
When multiple columns are selected by columns, the result will be an
expansion of validation steps to that number of columns (e.g.,
c(col_a, col_b) will result in the entry of two validation steps).
Previously, columns could be specified in vars(). This continues to work,
but c() offers the same capability and supersedes vars() in columns.
Missing Values
This validation function supports special handling of NA values. The
na_pass argument will determine whether an NA value appearing in a test
unit should be counted as a pass or a fail. The default of na_pass = FALSE means that any NAs encountered will accumulate failing test units.
Preconditions
Providing expressions as preconditions means pointblank will preprocess
the target table during interrogation as a preparatory step. It might happen
that a particular validation requires a calculated column, some filtering of
rows, or the addition of columns via a join, etc. Especially for an
agent-based report this can be advantageous since we can develop a large
validation plan with a single target table and make minor adjustments to it,
as needed, along the way.
The table mutation is totally isolated in scope to the validation step(s)
where preconditions is used. Using dplyr code is suggested here since
the statements can be translated to SQL if necessary (i.e., if the target
table resides in a database). The code is most easily supplied as a one-sided
R formula (using a leading ~). In the formula representation, the .
serves as the input data table to be transformed (e.g., ~ . %>% dplyr::mutate(col_b = col_a + 10)). Alternatively, a function could instead
be supplied (e.g., function(x) dplyr::mutate(x, col_b = col_a + 10)).
Segments
By using the segments argument, it's possible to define a particular
validation with segments (or row slices) of the target table. An optional
expression or set of expressions that serve to segment the target table by
column values. Each expression can be given in one of two ways: (1) as column
names, or (2) as a two-sided formula where the LHS holds a column name and
the RHS contains the column values to segment on.
As an example of the first type of expression that can be used,
vars(a_column) will segment the target table in however many unique values
are present in the column called a_column. This is great if every unique
value in a particular column (like different locations, or different dates)
requires it's own repeating validation.
With a formula, we can be more selective with which column values should be
used for segmentation. Using a_column ~ c("group_1", "group_2") will
attempt to obtain two segments where one is a slice of data where the value
"group_1" exists in the column named "a_column", and, the other is a
slice where "group_2" exists in the same column. Each group of rows
resolved from the formula will result in a separate validation step.
If there are multiple columns specified then the potential number of
validation steps will be m columns multiplied by n segments resolved.
Segmentation will always occur after preconditions (i.e., statements that
mutate the target table), if any, are applied. With this type of one-two
combo, it's possible to generate labels for segmentation using an expression
for preconditions and refer to those labels in segments without having to
generate a separate version of the target table.
Actions
Often, we will want to specify actions for the validation. This argument,
present in every validation function, takes a specially-crafted list
object that is best produced by the action_levels() function. Read that
function's documentation for the lowdown on how to create reactions to
above-threshold failure levels in validation. The basic gist is that you'll
want at least a single threshold level (specified as either the fraction of
test units failed, or, an absolute value), often using the warn_at
argument. This is especially true when x is a table object because,
otherwise, nothing happens. For the col_vals_*()-type functions, using
action_levels(warn_at = 0.25) or action_levels(stop_at = 0.25) are good
choices depending on the situation (the first produces a warning when a
quarter of the total test units fails, the other stop()s at the same
threshold level).
Labels
label may be a single string or a character vector that matches the number
of expanded steps. label also supports {glue} syntax and exposes the
following dynamic variables contextualized to the current step:
-
"{.step}": The validation step name -
"{.col}": The current column name -
"{.seg_col}": The current segment's column name -
"{.seg_val}": The current segment's value/group
The glue context also supports ordinary expressions for further flexibility
(e.g., "{toupper(.step)}") as long as they return a length-1 string.
Briefs
Want to describe this validation step in some detail? Keep in mind that this
is only useful if x is an agent. If that's the case, brief the agent
with some text that fits. Don't worry if you don't want to do it. The
autobrief protocol is kicked in when brief = NULL and a simple brief will
then be automatically generated.
YAML
A pointblank agent can be written to YAML with yaml_write() and the
resulting YAML can be used to regenerate an agent (with yaml_read_agent())
or interrogate the target table (via yaml_agent_interrogate()). When
col_vals_equal() is represented in YAML (under the top-level steps key as
a list member), the syntax closely follows the signature of the validation
function. Here is an example of how a complex call of col_vals_equal() as a
validation step is expressed in R code and in the corresponding YAML
representation.
R statement:
agent %>%
  col_vals_equal(
    columns = a,
    value = 1,
    na_pass = TRUE,
    preconditions = ~ . %>% dplyr::filter(a < 10),
    segments = b ~ c("group_1", "group_2"),
    actions = action_levels(warn_at = 0.1, stop_at = 0.2),
    label = "The `col_vals_equal()` step.",
    active = FALSE
  )
YAML representation:
steps:
- col_vals_equal:
    columns: c(a)
    value: 1.0
    na_pass: true
    preconditions: ~. %>% dplyr::filter(a < 10)
    segments: b ~ c("group_1", "group_2")
    actions:
      warn_fraction: 0.1
      stop_fraction: 0.2
    label: The `col_vals_equal()` step.
    active: false
In practice, both of these will often be shorter as only the columns and
value arguments require values. Arguments with default values won't be
written to YAML when using yaml_write() (though it is acceptable to include
them with their default when generating the YAML by other means). It is also
possible to preview the transformation of an agent to YAML without any
writing to disk by using the yaml_agent_string() function.
Examples
For all of the examples here, we'll use a simple table with three numeric
columns (a, b, and c) and three character columns (d, e, and f).
tbl <-
  dplyr::tibble(
    a = c(5, 5, 5, 5, 5, 5),
    b = c(1, 1, 1, 2, 2, 2),
    c = c(1, 1, 1, 2, 2, 2),
    d = LETTERS[c(1:3, 5:7)],
    e = LETTERS[c(1:6)],
    f = LETTERS[c(1:6)]
  )

tbl
#> # A tibble: 6 x 6
#>       a     b     c d     e     f
#>   <dbl> <dbl> <dbl> <chr> <chr> <chr>
#> 1     5     1     1 A     A     A
#> 2     5     1     1 B     B     B
#> 3     5     1     1 C     C     C
#> 4     5     2     2 E     D     D
#> 5     5     2     2 F     E     E
#> 6     5     2     2 G     F     F
A: Using an agent with validation functions and then interrogate()
Validate that values in column a are all equal to the value of 5. We'll
determine if this validation has any failing test units (there are 6 test
units, one for each row).
agent <-
  create_agent(tbl = tbl) %>%
  col_vals_equal(columns = a, value = 5) %>%
  interrogate()
Printing the agent in the console shows the validation report in the
Viewer. Here is an excerpt of validation report, showing the single entry
that corresponds to the validation step demonstrated here.

B: Using the validation function directly on the data (no agent)
This way of using validation functions acts as a data filter. Data is passed
through but should stop() if there is a single test unit failing. The
behavior of side effects can be customized with the actions option.
tbl %>%
  col_vals_equal(columns = a, value = 5) %>%
  dplyr::pull(a)
#> [1] 5 5 5 5 5 5
C: Using the expectation function
With the expect_*() form, we would typically perform one validation at a
time. This is primarily used in testthat tests.
expect_col_vals_equal(tbl, columns = a, value = 5)
D: Using the test function
With the test_*() form, we should get a single logical value returned to
us.
test_col_vals_equal(tbl, columns = a, value = 5)
#> [1] TRUE
Function ID
2-3
See Also
The analogue to this function: col_vals_not_equal().
Other validation functions:
col_count_match(),
col_exists(),
col_is_character(),
col_is_date(),
col_is_factor(),
col_is_integer(),
col_is_logical(),
col_is_numeric(),
col_is_posix(),
col_schema_match(),
col_vals_between(),
col_vals_decreasing(),
col_vals_expr(),
col_vals_gt(),
col_vals_gte(),
col_vals_in_set(),
col_vals_increasing(),
col_vals_lt(),
col_vals_lte(),
col_vals_make_set(),
col_vals_make_subset(),
col_vals_not_between(),
col_vals_not_equal(),
col_vals_not_in_set(),
col_vals_not_null(),
col_vals_null(),
col_vals_regex(),
col_vals_within_spec(),
conjointly(),
row_count_match(),
rows_complete(),
rows_distinct(),
serially(),
specially(),
tbl_match()
Do column data agree with a predicate expression?
Description
The col_vals_expr() validation function, the expect_col_vals_expr()
expectation function, and the test_col_vals_expr() test function all check
whether column values in a table agree with a user-defined predicate
expression. The validation function can be used directly on a data table or
with an agent object (technically, a ptblank_agent object) whereas the
expectation and test functions can only be used with a data table. Each
validation step or expectation will operate over the number of test units
that is equal to the number of rows in the table (after any preconditions
have been applied).
Usage
col_vals_expr( x, expr, na_pass = FALSE, preconditions = NULL, segments = NULL, actions = NULL, step_id = NULL, label = NULL, brief = NULL, active = TRUE ) expect_col_vals_expr( object, expr, na_pass = FALSE, preconditions = NULL, threshold = 1 ) test_col_vals_expr( object, expr, na_pass = FALSE, preconditions = NULL, threshold = 1 )col_vals_expr( x, expr, na_pass = FALSE, preconditions = NULL, segments = NULL, actions = NULL, step_id = NULL, label = NULL, brief = NULL, active = TRUE ) expect_col_vals_expr( object, expr, na_pass = FALSE, preconditions = NULL, threshold = 1 ) test_col_vals_expr( object, expr, na_pass = FALSE, preconditions = NULL, threshold = 1 )
Arguments
x |
A pointblank agent or a data table
A data frame, tibble ( |
expr |
Predicate expression
A predicate expression to use for this validation. This can either be in
the form of a call made with the |
na_pass |
Allow missing values to pass validation
Should any encountered |
preconditions |
Input table modification prior to validation
An optional expression for mutating the input table before proceeding with
the validation. This can either be provided as a one-sided R formula using
a leading |
segments |
Expressions for segmenting the target table
An optional expression or set of expressions (held in a list) that serve to segment the target table by column values. Each expression can be given in one of two ways: (1) as column names, or (2) as a two-sided formula where the LHS holds a column name and the RHS contains the column values to segment on. See the Segments section for more details on this. |
actions |
Thresholds and actions for different states
A list containing threshold levels so that the validation step can react
accordingly when exceeding the set levels for different states. This is to
be created with the |
step_id |
Manual setting of the step ID value
One or more optional identifiers for the single or multiple validation
steps generated from calling a validation function. The use of step IDs
serves to distinguish validation steps from each other and provide an
opportunity for supplying a more meaningful label compared to the step
index. By default this is |
label |
Optional label for the validation step
Optional label for the validation step. This label appears in the agent report and, for the best appearance, it should be kept quite short. See the Labels section for more information. |
brief |
Brief description for the validation step
A brief is a short, text-based description for the validation step. If
nothing is provided here then an autobrief is generated by the agent,
using the language provided in |
active |
Is the validation step active?
A logical value indicating whether the validation step should be active. If
the validation function is working with an agent, |
object |
A data table for expectations or tests
A data frame, tibble ( |
threshold |
The failure threshold
A simple failure threshold value for use with the expectation ( |
Value
For the validation function, the return value is either a
ptblank_agent object or a table object (depending on whether an agent
object or a table was passed to x). The expectation function invisibly
returns its input but, in the context of testing data, the function is
called primarily for its potential side-effects (e.g., signaling failure).
The test function returns a logical value.
Supported Input Tables
The types of data tables that are officially supported are:
-
data frames (
data.frame) and tibbles (tbl_df) -
Spark DataFrames (
tbl_spark) -
the following database tables (
tbl_dbi):-
PostgreSQL tables (using the
RPostgres::Postgres()as driver) -
MySQL tables (with
RMySQL::MySQL()) -
Microsoft SQL Server tables (via odbc)
-
BigQuery tables (using
bigrquery::bigquery()) -
DuckDB tables (through
duckdb::duckdb()) -
SQLite (with
RSQLite::SQLite())
-
Other database tables may work to varying degrees but they haven't been formally tested (so be mindful of this when using unsupported backends with pointblank).
Missing Values
This validation function supports special handling of NA values. The
na_pass argument will determine whether an NA value appearing in a test
unit should be counted as a pass or a fail. The default of na_pass = FALSE means that any NAs encountered will accumulate failing test units.
Preconditions
Providing expressions as preconditions means pointblank will preprocess
the target table during interrogation as a preparatory step. It might happen
that a particular validation requires a calculated column, some filtering of
rows, or the addition of columns via a join, etc. Especially for an
agent-based report this can be advantageous since we can develop a large
validation plan with a single target table and make minor adjustments to it,
as needed, along the way.
The table mutation is totally isolated in scope to the validation step(s)
where preconditions is used. Using dplyr code is suggested here since
the statements can be translated to SQL if necessary (i.e., if the target
table resides in a database). The code is most easily supplied as a one-sided
R formula (using a leading ~). In the formula representation, the .
serves as the input data table to be transformed (e.g., ~ . %>% dplyr::mutate(col_b = col_a + 10)). Alternatively, a function could instead
be supplied (e.g., function(x) dplyr::mutate(x, col_b = col_a + 10)).
Segments
By using the segments argument, it's possible to define a particular
validation with segments (or row slices) of the target table. An optional
expression or set of expressions that serve to segment the target table by
column values. Each expression can be given in one of two ways: (1) as column
names, or (2) as a two-sided formula where the LHS holds a column name and
the RHS contains the column values to segment on.
As an example of the first type of expression that can be used,
vars(a_column) will segment the target table in however many unique values
are present in the column called a_column. This is great if every unique
value in a particular column (like different locations, or different dates)
requires it's own repeating validation.
With a formula, we can be more selective with which column values should be
used for segmentation. Using a_column ~ c("group_1", "group_2") will
attempt to obtain two segments where one is a slice of data where the value
"group_1" exists in the column named "a_column", and, the other is a
slice where "group_2" exists in the same column. Each group of rows
resolved from the formula will result in a separate validation step.
If there are multiple columns specified then the potential number of
validation steps will be m columns multiplied by n segments resolved.
Segmentation will always occur after preconditions (i.e., statements that
mutate the target table), if any, are applied. With this type of one-two
combo, it's possible to generate labels for segmentation using an expression
for preconditions and refer to those labels in segments without having to
generate a separate version of the target table.
Actions
Often, we will want to specify actions for the validation. This argument,
present in every validation function, takes a specially-crafted list
object that is best produced by the action_levels() function. Read that
function's documentation for the lowdown on how to create reactions to
above-threshold failure levels in validation. The basic gist is that you'll
want at least a single threshold level (specified as either the fraction of
test units failed, or, an absolute value), often using the warn_at
argument. This is especially true when x is a table object because,
otherwise, nothing happens. For the col_vals_*()-type functions, using
action_levels(warn_at = 0.25) or action_levels(stop_at = 0.25) are good
choices depending on the situation (the first produces a warning when a
quarter of the total test units fails, the other stop()s at the same
threshold level).
Labels
label may be a single string or a character vector that matches the number
of expanded steps. label also supports {glue} syntax and exposes the
following dynamic variables contextualized to the current step:
-
"{.step}": The validation step name -
"{.col}": The current column name -
"{.seg_col}": The current segment's column name -
"{.seg_val}": The current segment's value/group
The glue context also supports ordinary expressions for further flexibility
(e.g., "{toupper(.step)}") as long as they return a length-1 string.
Briefs
Want to describe this validation step in some detail? Keep in mind that this
is only useful if x is an agent. If that's the case, brief the agent
with some text that fits. Don't worry if you don't want to do it. The
autobrief protocol is kicked in when brief = NULL and a simple brief will
then be automatically generated.
YAML
A pointblank agent can be written to YAML with yaml_write() and the
resulting YAML can be used to regenerate an agent (with yaml_read_agent())
or interrogate the target table (via yaml_agent_interrogate()). When
col_vals_expr() is represented in YAML (under the top-level steps key as
a list member), the syntax closely follows the signature of the validation
function. Here is an example of how a complex call of col_vals_expr() as a
validation step is expressed in R code and in the corresponding YAML
representation.
R statement:
agent %>%
  col_vals_expr(
    expr = ~ a %% 1 == 0,
    preconditions = ~ . %>% dplyr::filter(a < 10),
    segments = b ~ c("group_1", "group_2"),
    actions = action_levels(warn_at = 0.1, stop_at = 0.2),
    label = "The `col_vals_expr()` step.",
    active = FALSE
  )
YAML representation:
steps:
- col_vals_expr:
    expr: ~a%%1 == 0
    preconditions: ~. %>% dplyr::filter(a < 10)
    segments: b ~ c("group_1", "group_2")
    actions:
      warn_fraction: 0.1
      stop_fraction: 0.2
    label: The `col_vals_expr()` step.
    active: false
In practice, both of these will often be shorter as only the expr argument
requires a value. Arguments with default values won't be written to YAML when
using yaml_write() (though it is acceptable to include them with their
default when generating the YAML by other means). It is also possible to
preview the transformation of an agent to YAML without any writing to disk by
using the yaml_agent_string() function.
Examples
For all of the examples here, we'll use a simple table with three numeric
columns (a, b, and c) and three character columns (d, e, and f).
tbl <-
  dplyr::tibble(
    a = c(1, 2, 1, 7, 8, 6),
    b = c(0, 0, 0, 1, 1, 1),
    c = c(0.5, 0.3, 0.8, 1.4, 1.9, 1.2),
  )

tbl
#> # A tibble: 6 x 3
#>       a     b     c
#>   <dbl> <dbl> <dbl>
#> 1     1     0   0.5
#> 2     2     0   0.3
#> 3     1     0   0.8
#> 4     7     1   1.4
#> 5     8     1   1.9
#> 6     6     1   1.2
A: Using an agent with validation functions and then interrogate()
Validate that values in column a are integer-like by using the R modulo
operator and expecting 0. We'll determine if this validation has any
failing test units (there are 6 test units, one for each row).
agent <-
  create_agent(tbl = tbl) %>%
  col_vals_expr(expr = expr(a %% 1 == 0)) %>%
  interrogate()
Printing the agent in the console shows the validation report in the
Viewer. Here is an excerpt of validation report, showing the single entry
that corresponds to the validation step demonstrated here.

B: Using the validation function directly on the data (no agent)
This way of using validation functions acts as a data filter. Data is passed
through but should stop() if there is a single test unit failing. The
behavior of side effects can be customized with the actions option.
tbl %>%
  col_vals_expr(expr = expr(a %% 1 == 0)) %>%
  dplyr::pull(a)
#> [1] 1 2 1 7 8 6
C: Using the expectation function
With the expect_*() form, we would typically perform one validation at a
time. This is primarily used in testthat tests.
expect_col_vals_expr(tbl, expr = ~ a %% 1 == 0)
D: Using the test function
With the test_*() form, we should get a single logical value returned to
us.
test_col_vals_expr(tbl, expr = ~ a %% 1 == 0)
#> [1] TRUE
Variations
We can do more complex things by taking advantage of the case_when() and
between() functions (available for use in the pointblank package).
tbl %>%
  test_col_vals_expr(expr = ~ case_when(
    b == 0 ~ a %>% between(0, 5) & c < 1,
    b == 1 ~ a > 5 & c >= 1
  ))
#> [1] TRUE
If you only want to test a subset of rows, then the case_when() statement
doesn't need to be exhaustive. Any rows that don't fall into the cases will
be pruned (giving us less test units overall).
tbl %>%
  test_col_vals_expr(expr = ~ case_when(
    b == 1 ~ a > 5 & c >= 1
  ))
#> [1] TRUE
Function ID
2-19
See Also
These reexported functions (from rlang and dplyr) work
nicely within col_vals_expr() and its variants: rlang::expr(),
dplyr::between(), and dplyr::case_when().
Other validation functions:
col_count_match(),
col_exists(),
col_is_character(),
col_is_date(),
col_is_factor(),
col_is_integer(),
col_is_logical(),
col_is_numeric(),
col_is_posix(),
col_schema_match(),
col_vals_between(),
col_vals_decreasing(),
col_vals_equal(),
col_vals_gt(),
col_vals_gte(),
col_vals_in_set(),
col_vals_increasing(),
col_vals_lt(),
col_vals_lte(),
col_vals_make_set(),
col_vals_make_subset(),
col_vals_not_between(),
col_vals_not_equal(),
col_vals_not_in_set(),
col_vals_not_null(),
col_vals_null(),
col_vals_regex(),
col_vals_within_spec(),
conjointly(),
row_count_match(),
rows_complete(),
rows_distinct(),
serially(),
specially(),
tbl_match()
Are column data greater than a fixed value or data in another column?
Description
The col_vals_gt() validation function, the expect_col_vals_gt()
expectation function, and the test_col_vals_gt() test function all check
whether column values in a table are greater than a specified value (the
exact comparison used in this function is col_val > value). The value can
be specified as a single, literal value or as a column name given in
vars(). The validation function can be used directly on a data table or
with an agent object (technically, a ptblank_agent object) whereas the
expectation and test functions can only be used with a data table. Each
validation step or expectation will operate over the number of test units
that is equal to the number of rows in the table (after any preconditions
have been applied).
Usage
col_vals_gt( x, columns, value, na_pass = FALSE, preconditions = NULL, segments = NULL, actions = NULL, step_id = NULL, label = NULL, brief = NULL, active = TRUE ) expect_col_vals_gt( object, columns, value, na_pass = FALSE, preconditions = NULL, threshold = 1 ) test_col_vals_gt( object, columns, value, na_pass = FALSE, preconditions = NULL, threshold = 1 )col_vals_gt( x, columns, value, na_pass = FALSE, preconditions = NULL, segments = NULL, actions = NULL, step_id = NULL, label = NULL, brief = NULL, active = TRUE ) expect_col_vals_gt( object, columns, value, na_pass = FALSE, preconditions = NULL, threshold = 1 ) test_col_vals_gt( object, columns, value, na_pass = FALSE, preconditions = NULL, threshold = 1 )
Arguments
x |
A pointblank agent or a data table
A data frame, tibble ( |
columns |
The target columns
A column-selecting expression, as one would use inside |
value |
Value for comparison
A value used for this comparison. This can be a single value or a
compatible column given in |
na_pass |
Allow missing values to pass validation
Should any encountered |
preconditions |
Input table modification prior to validation
An optional expression for mutating the input table before proceeding with
the validation. This can either be provided as a one-sided R formula using
a leading |
segments |
Expressions for segmenting the target table
An optional expression or set of expressions (held in a list) that serve to segment the target table by column values. Each expression can be given in one of two ways: (1) as column names, or (2) as a two-sided formula where the LHS holds a column name and the RHS contains the column values to segment on. See the Segments section for more details on this. |
actions |
Thresholds and actions for different states
A list containing threshold levels so that the validation step can react
accordingly when exceeding the set levels for different states. This is to
be created with the |
step_id |
Manual setting of the step ID value
One or more optional identifiers for the single or multiple validation
steps generated from calling a validation function. The use of step IDs
serves to distinguish validation steps from each other and provide an
opportunity for supplying a more meaningful label compared to the step
index. By default this is |
label |
Optional label for the validation step
Optional label for the validation step. This label appears in the agent report and, for the best appearance, it should be kept quite short. See the Labels section for more information. |
brief |
Brief description for the validation step
A brief is a short, text-based description for the validation step. If
nothing is provided here then an autobrief is generated by the agent,
using the language provided in |
active |
Is the validation step active?
A logical value indicating whether the validation step should be active. If
the validation function is working with an agent, |
object |
A data table for expectations or tests
A data frame, tibble ( |
threshold |
The failure threshold
A simple failure threshold value for use with the expectation ( |
Value
For the validation function, the return value is either a
ptblank_agent object or a table object (depending on whether an agent
object or a table was passed to x). The expectation function invisibly
returns its input but, in the context of testing data, the function is
called primarily for its potential side-effects (e.g., signaling failure).
The test function returns a logical value.
Supported Input Tables
The types of data tables that are officially supported are:
-
data frames (
data.frame) and tibbles (tbl_df) -
Spark DataFrames (
tbl_spark) -
the following database tables (
tbl_dbi):-
PostgreSQL tables (using the
RPostgres::Postgres()as driver) -
MySQL tables (with
RMySQL::MySQL()) -
Microsoft SQL Server tables (via odbc)
-
BigQuery tables (using
bigrquery::bigquery()) -
DuckDB tables (through
duckdb::duckdb()) -
SQLite (with
RSQLite::SQLite())
-
Other database tables may work to varying degrees but they haven't been formally tested (so be mindful of this when using unsupported backends with pointblank).
Column Names
columns may be a single column (as symbol a or string "a") or a vector
of columns (c(a, b, c) or c("a", "b", "c")). {tidyselect} helpers
are also supported, such as contains("date") and where(is.double). If
passing an external vector of columns, it should be wrapped in all_of().
When multiple columns are selected by columns, the result will be an
expansion of validation steps to that number of columns (e.g.,
c(col_a, col_b) will result in the entry of two validation steps).
Previously, columns could be specified in vars(). This continues to work,
but c() offers the same capability and supersedes vars() in columns.
Missing Values
This validation function supports special handling of NA values. The
na_pass argument will determine whether an NA value appearing in a test
unit should be counted as a pass or a fail. The default of na_pass = FALSE means that any NAs encountered will accumulate failing test units.
Preconditions
Providing expressions as preconditions means pointblank will preprocess
the target table during interrogation as a preparatory step. It might happen
that a particular validation requires a calculated column, some filtering of
rows, or the addition of columns via a join, etc. Especially for an
agent-based report this can be advantageous since we can develop a large
validation plan with a single target table and make minor adjustments to it,
as needed, along the way.
The table mutation is totally isolated in scope to the validation step(s)
where preconditions is used. Using dplyr code is suggested here since
the statements can be translated to SQL if necessary (i.e., if the target
table resides in a database). The code is most easily supplied as a one-sided
R formula (using a leading ~). In the formula representation, the .
serves as the input data table to be transformed (e.g., ~ . %>% dplyr::mutate(col_b = col_a + 10)). Alternatively, a function could instead
be supplied (e.g., function(x) dplyr::mutate(x, col_b = col_a + 10)).
Segments
By using the segments argument, it's possible to define a particular
validation with segments (or row slices) of the target table. An optional
expression or set of expressions that serve to segment the target table by
column values. Each expression can be given in one of two ways: (1) as column
names, or (2) as a two-sided formula where the LHS holds a column name and
the RHS contains the column values to segment on.
As an example of the first type of expression that can be used,
vars(a_column) will segment the target table in however many unique values
are present in the column called a_column. This is great if every unique
value in a particular column (like different locations, or different dates)
requires it's own repeating validation.
With a formula, we can be more selective with which column values should be
used for segmentation. Using a_column ~ c("group_1", "group_2") will
attempt to obtain two segments where one is a slice of data where the value
"group_1" exists in the column named "a_column", and, the other is a
slice where "group_2" exists in the same column. Each group of rows
resolved from the formula will result in a separate validation step.
If there are multiple columns specified then the potential number of
validation steps will be m columns multiplied by n segments resolved.
Segmentation will always occur after preconditions (i.e., statements that
mutate the target table), if any, are applied. With this type of one-two
combo, it's possible to generate labels for segmentation using an expression
for preconditions and refer to those labels in segments without having to
generate a separate version of the target table.
Actions
Often, we will want to specify actions for the validation. This argument,
present in every validation function, takes a specially-crafted list
object that is best produced by the action_levels() function. Read that
function's documentation for the lowdown on how to create reactions to
above-threshold failure levels in validation. The basic gist is that you'll
want at least a single threshold level (specified as either the fraction of
test units failed, or, an absolute value), often using the warn_at
argument. This is especially true when x is a table object because,
otherwise, nothing happens. For the col_vals_*()-type functions, using
action_levels(warn_at = 0.25) or action_levels(stop_at = 0.25) are good
choices depending on the situation (the first produces a warning when a
quarter of the total test units fails, the other stop()s at the same
threshold level).
Labels
label may be a single string or a character vector that matches the number
of expanded steps. label also supports {glue} syntax and exposes the
following dynamic variables contextualized to the current step:
-
"{.step}": The validation step name -
"{.col}": The current column name -
"{.seg_col}": The current segment's column name -
"{.seg_val}": The current segment's value/group
The glue context also supports ordinary expressions for further flexibility
(e.g., "{toupper(.step)}") as long as they return a length-1 string.
Briefs
Want to describe this validation step in some detail? Keep in mind that this
is only useful if x is an agent. If that's the case, brief the agent
with some text that fits. Don't worry if you don't want to do it. The
autobrief protocol is kicked in when brief = NULL and a simple brief will
then be automatically generated.
YAML
A pointblank agent can be written to YAML with yaml_write() and the
resulting YAML can be used to regenerate an agent (with yaml_read_agent())
or interrogate the target table (via yaml_agent_interrogate()). When
col_vals_gt() is represented in YAML (under the top-level steps key as a
list member), the syntax closely follows the signature of the validation
function. Here is an example of how a complex call of col_vals_gt() as a
validation step is expressed in R code and in the corresponding YAML
representation.
R statement:
agent %>%
  col_vals_gt(
    columns = a,
    value = 1,
    na_pass = TRUE,
    preconditions = ~ . %>% dplyr::filter(a < 10),
    segments = b ~ c("group_1", "group_2"),
    actions = action_levels(warn_at = 0.1, stop_at = 0.2),
    label = "The `col_vals_gt()` step.",
    active = FALSE
  )
YAML representation:
steps:
- col_vals_gt:
    columns: c(a)
    value: 1.0
    na_pass: true
    preconditions: ~. %>% dplyr::filter(a < 10)
    segments: b ~ c("group_1", "group_2")
    actions:
      warn_fraction: 0.1
      stop_fraction: 0.2
    label: The `col_vals_gt()` step.
    active: false
In practice, both of these will often be shorter as only the columns and
value arguments require values. Arguments with default values won't be
written to YAML when using yaml_write() (though it is acceptable to include
them with their default when generating the YAML by other means). It is also
possible to preview the transformation of an agent to YAML without any
writing to disk by using the yaml_agent_string() function.
Examples
For all of the examples here, we'll use a simple table with three numeric
columns (a, b, and c) and three character columns (d, e, and f).
tbl <-
  dplyr::tibble(
    a = c(5, 5, 5, 5, 5, 5),
    b = c(1, 1, 1, 2, 2, 2),
    c = c(1, 1, 1, 2, 3, 4),
    d = LETTERS[a],
    e = LETTERS[b],
    f = LETTERS[c]
  )

tbl
#> # A tibble: 6 x 6
#>       a     b     c d     e     f
#>   <dbl> <dbl> <dbl> <chr> <chr> <chr>
#> 1     5     1     1 E     A     A
#> 2     5     1     1 E     A     A
#> 3     5     1     1 E     A     A
#> 4     5     2     2 E     B     B
#> 5     5     2     3 E     B     C
#> 6     5     2     4 E     B     D
A: Using an agent with validation functions and then interrogate()
Validate that values in column a are all greater than the value of 4.
We'll determine if this validation had any failing test units (there are 6
test units, one for each row).
agent <-
  create_agent(tbl = tbl) %>%
  col_vals_gt(columns = a, value = 4) %>%
  interrogate()
Printing the agent in the console shows the validation report in the
Viewer. Here is an excerpt of validation report, showing the single entry
that corresponds to the validation step demonstrated here.

B: Using the validation function directly on the data (no agent)
This way of using validation functions acts as a data filter. Data is passed
through but should stop() if there is a single test unit failing. The
behavior of side effects can be customized with the actions option.
tbl %>% col_vals_gt(columns = a, value = 4)
#> # A tibble: 6 x 6
#>       a     b     c d     e     f
#>   <dbl> <dbl> <dbl> <chr> <chr> <chr>
#> 1     5     1     1 E     A     A
#> 2     5     1     1 E     A     A
#> 3     5     1     1 E     A     A
#> 4     5     2     2 E     B     B
#> 5     5     2     3 E     B     C
#> 6     5     2     4 E     B     D
C: Using the expectation function
With the expect_*() form, we would typically perform one validation at a
time. This is primarily used in testthat tests.
expect_col_vals_gt(tbl, columns = a, value = 4)
D: Using the test function
With the test_*() form, we should get a single logical value returned to
us.
test_col_vals_gt(tbl, columns = a, value = 4)
#> [1] TRUE
Function ID
2-6
See Also
The analogous function with a left-closed bound: col_vals_gte().
Other validation functions:
col_count_match(),
col_exists(),
col_is_character(),
col_is_date(),
col_is_factor(),
col_is_integer(),
col_is_logical(),
col_is_numeric(),
col_is_posix(),
col_schema_match(),
col_vals_between(),
col_vals_decreasing(),
col_vals_equal(),
col_vals_expr(),
col_vals_gte(),
col_vals_in_set(),
col_vals_increasing(),
col_vals_lt(),
col_vals_lte(),
col_vals_make_set(),
col_vals_make_subset(),
col_vals_not_between(),
col_vals_not_equal(),
col_vals_not_in_set(),
col_vals_not_null(),
col_vals_null(),
col_vals_regex(),
col_vals_within_spec(),
conjointly(),
row_count_match(),
rows_complete(),
rows_distinct(),
serially(),
specially(),
tbl_match()
Are column data greater than or equal to a fixed value or data in another column?
Description
The col_vals_gte() validation function, the expect_col_vals_gte()
expectation function, and the test_col_vals_gte() test function all check
whether column values in a table are greater than or equal to a specified
value (the exact comparison used in this function is col_val >= value).
The value can be specified as a single, literal value or as a column name
given in vars(). The validation function can be used directly on a data
table or with an agent object (technically, a ptblank_agent object)
whereas the expectation and test functions can only be used with a data
table. Each validation step or expectation will operate over the number of
test units that is equal to the number of rows in the table (after any
preconditions have been applied).
Usage
col_vals_gte( x, columns, value, na_pass = FALSE, preconditions = NULL, segments = NULL, actions = NULL, step_id = NULL, label = NULL, brief = NULL, active = TRUE ) expect_col_vals_gte( object, columns, value, na_pass = FALSE, preconditions = NULL, threshold = 1 ) test_col_vals_gte( object, columns, value, na_pass = FALSE, preconditions = NULL, threshold = 1 )col_vals_gte( x, columns, value, na_pass = FALSE, preconditions = NULL, segments = NULL, actions = NULL, step_id = NULL, label = NULL, brief = NULL, active = TRUE ) expect_col_vals_gte( object, columns, value, na_pass = FALSE, preconditions = NULL, threshold = 1 ) test_col_vals_gte( object, columns, value, na_pass = FALSE, preconditions = NULL, threshold = 1 )
Arguments
x |
A pointblank agent or a data table
A data frame, tibble ( |
columns |
The target columns
A column-selecting expression, as one would use inside |
value |
Value for comparison
A value used for this comparison. This can be a single value or a
compatible column given in |
na_pass |
Allow missing values to pass validation
Should any encountered |
preconditions |
Input table modification prior to validation
An optional expression for mutating the input table before proceeding with
the validation. This can either be provided as a one-sided R formula using
a leading |
segments |
Expressions for segmenting the target table
An optional expression or set of expressions (held in a list) that serve to segment the target table by column values. Each expression can be given in one of two ways: (1) as column names, or (2) as a two-sided formula where the LHS holds a column name and the RHS contains the column values to segment on. See the Segments section for more details on this. |
actions |
Thresholds and actions for different states
A list containing threshold levels so that the validation step can react
accordingly when exceeding the set levels for different states. This is to
be created with the |
step_id |
Manual setting of the step ID value
One or more optional identifiers for the single or multiple validation
steps generated from calling a validation function. The use of step IDs
serves to distinguish validation steps from each other and provide an
opportunity for supplying a more meaningful label compared to the step
index. By default this is |
label |
Optional label for the validation step
Optional label for the validation step. This label appears in the agent report and, for the best appearance, it should be kept quite short. See the Labels section for more information. |
brief |
Brief description for the validation step
A brief is a short, text-based description for the validation step. If
nothing is provided here then an autobrief is generated by the agent,
using the language provided in |
active |
Is the validation step active?
A logical value indicating whether the validation step should be active. If
the validation function is working with an agent, |
object |
A data table for expectations or tests
A data frame, tibble ( |
threshold |
The failure threshold
A simple failure threshold value for use with the expectation ( |
Value
For the validation function, the return value is either a
ptblank_agent object or a table object (depending on whether an agent
object or a table was passed to x). The expectation function invisibly
returns its input but, in the context of testing data, the function is
called primarily for its potential side-effects (e.g., signaling failure).
The test function returns a logical value.
Supported Input Tables
The types of data tables that are officially supported are:
-
data frames (
data.frame) and tibbles (tbl_df) -
Spark DataFrames (
tbl_spark) -
the following database tables (
tbl_dbi):-
PostgreSQL tables (using the
RPostgres::Postgres()as driver) -
MySQL tables (with
RMySQL::MySQL()) -
Microsoft SQL Server tables (via odbc)
-
BigQuery tables (using
bigrquery::bigquery()) -
DuckDB tables (through
duckdb::duckdb()) -
SQLite (with
RSQLite::SQLite())
-
Other database tables may work to varying degrees but they haven't been formally tested (so be mindful of this when using unsupported backends with pointblank).
Column Names
columns may be a single column (as symbol a or string "a") or a vector
of columns (c(a, b, c) or c("a", "b", "c")). {tidyselect} helpers
are also supported, such as contains("date") and where(is.double). If
passing an external vector of columns, it should be wrapped in all_of().
When multiple columns are selected by columns, the result will be an
expansion of validation steps to that number of columns (e.g.,
c(col_a, col_b) will result in the entry of two validation steps).
Previously, columns could be specified in vars(). This continues to work,
but c() offers the same capability and supersedes vars() in columns.
Missing Values
This validation function supports special handling of NA values. The
na_pass argument will determine whether an NA value appearing in a test
unit should be counted as a pass or a fail. The default of na_pass = FALSE means that any NAs encountered will accumulate failing test units.
Preconditions
Providing expressions as preconditions means pointblank will preprocess
the target table during interrogation as a preparatory step. It might happen
that a particular validation requires a calculated column, some filtering of
rows, or the addition of columns via a join, etc. Especially for an
agent-based report this can be advantageous since we can develop a large
validation plan with a single target table and make minor adjustments to it,
as needed, along the way.
The table mutation is totally isolated in scope to the validation step(s)
where preconditions is used. Using dplyr code is suggested here since
the statements can be translated to SQL if necessary (i.e., if the target
table resides in a database). The code is most easily supplied as a one-sided
R formula (using a leading ~). In the formula representation, the .
serves as the input data table to be transformed (e.g., ~ . %>% dplyr::mutate(col_b = col_a + 10)). Alternatively, a function could instead
be supplied (e.g., function(x) dplyr::mutate(x, col_b = col_a + 10)).
Segments
By using the segments argument, it's possible to define a particular
validation with segments (or row slices) of the target table. An optional
expression or set of expressions that serve to segment the target table by
column values. Each expression can be given in one of two ways: (1) as column
names, or (2) as a two-sided formula where the LHS holds a column name and
the RHS contains the column values to segment on.
As an example of the first type of expression that can be used,
vars(a_column) will segment the target table in however many unique values
are present in the column called a_column. This is great if every unique
value in a particular column (like different locations, or different dates)
requires it's own repeating validation.
With a formula, we can be more selective with which column values should be
used for segmentation. Using a_column ~ c("group_1", "group_2") will
attempt to obtain two segments where one is a slice of data where the value
"group_1" exists in the column named "a_column", and, the other is a
slice where "group_2" exists in the same column. Each group of rows
resolved from the formula will result in a separate validation step.
If there are multiple columns specified then the potential number of
validation steps will be m columns multiplied by n segments resolved.
Segmentation will always occur after preconditions (i.e., statements that
mutate the target table), if any, are applied. With this type of one-two
combo, it's possible to generate labels for segmentation using an expression
for preconditions and refer to those labels in segments without having to
generate a separate version of the target table.
Actions
Often, we will want to specify actions for the validation. This argument,
present in every validation function, takes a specially-crafted list object
that is best produced by the action_levels() function. Read that function's
documentation for the lowdown on how to create reactions to above-threshold
failure levels in validation. The basic gist is that you'll want at least a
single threshold level (specified as either the fraction of test units
failed, or, an absolute value), often using the warn_at argument. This is
especially true when x is a table object because, otherwise, nothing
happens. For the col_vals_*()-type functions, using action_levels(warn_at = 0.25) or action_levels(stop_at = 0.25) are good choices depending on the
situation (the first produces a warning when a quarter of the total test
units fails, the other stop()s at the same threshold level).
Labels
label may be a single string or a character vector that matches the number
of expanded steps. label also supports {glue} syntax and exposes the
following dynamic variables contextualized to the current step:
-
"{.step}": The validation step name -
"{.col}": The current column name -
"{.seg_col}": The current segment's column name -
"{.seg_val}": The current segment's value/group
The glue context also supports ordinary expressions for further flexibility
(e.g., "{toupper(.step)}") as long as they return a length-1 string.
Briefs
Want to describe this validation step in some detail? Keep in mind that this
is only useful if x is an agent. If that's the case, brief the agent
with some text that fits. Don't worry if you don't want to do it. The
autobrief protocol is kicked in when brief = NULL and a simple brief will
then be automatically generated.
YAML
A pointblank agent can be written to YAML with yaml_write() and the
resulting YAML can be used to regenerate an agent (with yaml_read_agent())
or interrogate the target table (via yaml_agent_interrogate()). When
col_vals_gte() is represented in YAML (under the top-level steps key as a
list member), the syntax closely follows the signature of the validation
function. Here is an example of how a complex call of col_vals_gte() as a
validation step is expressed in R code and in the corresponding YAML
representation.
R statement:
agent %>%
  col_vals_gte(
    columns = a,
    value = 1,
    na_pass = TRUE,
    preconditions = ~ . %>% dplyr::filter(a < 10),
    segments = b ~ c("group_1", "group_2"),
    actions = action_levels(warn_at = 0.1, stop_at = 0.2),
    label = "The `col_vals_gte()` step.",
    active = FALSE
  )
YAML representation:
steps:
- col_vals_gte:
    columns: c(a)
    value: 1.0
    na_pass: true
    preconditions: ~. %>% dplyr::filter(a < 10)
    segments: b ~ c("group_1", "group_2")
    actions:
      warn_fraction: 0.1
      stop_fraction: 0.2
    label: The `col_vals_gte()` step.
    active: false
In practice, both of these will often be shorter as only the columns and
value arguments require values. Arguments with default values won't be
written to YAML when using yaml_write() (though it is acceptable to include
them with their default when generating the YAML by other means). It is also
possible to preview the transformation of an agent to YAML without any
writing to disk by using the yaml_agent_string() function.
Examples
For all of the examples here, we'll use a simple table with three numeric
columns (a, b, and c) and three character columns (d, e, and f).
tbl <-
  dplyr::tibble(
      a = c(5, 5, 5, 5, 5, 5),
      b = c(1, 1, 1, 2, 2, 2),
      c = c(1, 1, 1, 2, 3, 4),
      d = LETTERS[a],
      e = LETTERS[b],
      f = LETTERS[c]
  )

tbl
#> # A tibble: 6 x 6
#>       a     b     c d     e     f
#>   <dbl> <dbl> <dbl> <chr> <chr> <chr>
#> 1     5     1     1 E     A     A
#> 2     5     1     1 E     A     A
#> 3     5     1     1 E     A     A
#> 4     5     2     2 E     B     B
#> 5     5     2     3 E     B     C
#> 6     5     2     4 E     B     D
A: Using an agent with validation functions and then interrogate()
Validate that values in column a are all greater than or equal to the value
of 5. We'll determine if this validation has any failing test units (there
are 6 test units, one for each row).
agent <-
  create_agent(tbl = tbl) %>%
  col_vals_gte(columns = a, value = 5) %>%
  interrogate()
Printing the agent in the console shows the validation report in the
Viewer. Here is an excerpt of validation report, showing the single entry
that corresponds to the validation step demonstrated here.

B: Using the validation function directly on the data (no agent)
This way of using validation functions acts as a data filter. Data is passed
through but should stop() if there is a single test unit failing. The
behavior of side effects can be customized with the actions option.
tbl %>% col_vals_gte(columns = a, value = 5)
#> # A tibble: 6 x 6
#>       a     b     c d     e     f
#>   <dbl> <dbl> <dbl> <chr> <chr> <chr>
#> 1     5     1     1 E     A     A
#> 2     5     1     1 E     A     A
#> 3     5     1     1 E     A     A
#> 4     5     2     2 E     B     B
#> 5     5     2     3 E     B     C
#> 6     5     2     4 E     B     D
C: Using the expectation function
With the expect_*() form, we would typically perform one validation at a
time. This is primarily used in testthat tests.
expect_col_vals_gte(tbl, columns = a, value = 5)
D: Using the test function
With the test_*() form, we should get a single logical value returned to
us.
test_col_vals_gte(tbl, columns = a, value = 5)
#> [1] TRUE
Function ID
2-5
See Also
The analogous function with a left-open bound: col_vals_gt().
Other validation functions:
col_count_match(),
col_exists(),
col_is_character(),
col_is_date(),
col_is_factor(),
col_is_integer(),
col_is_logical(),
col_is_numeric(),
col_is_posix(),
col_schema_match(),
col_vals_between(),
col_vals_decreasing(),
col_vals_equal(),
col_vals_expr(),
col_vals_gt(),
col_vals_in_set(),
col_vals_increasing(),
col_vals_lt(),
col_vals_lte(),
col_vals_make_set(),
col_vals_make_subset(),
col_vals_not_between(),
col_vals_not_equal(),
col_vals_not_in_set(),
col_vals_not_null(),
col_vals_null(),
col_vals_regex(),
col_vals_within_spec(),
conjointly(),
row_count_match(),
rows_complete(),
rows_distinct(),
serially(),
specially(),
tbl_match()
Are column data part of a specified set of values?
Description
The col_vals_in_set() validation function, the expect_col_vals_in_set()
expectation function, and the test_col_vals_in_set() test function all
check whether column values in a table are part of a specified set of
values. The validation function can be used directly on a data table or with
an agent object (technically, a ptblank_agent object) whereas the
expectation and test functions can only be used with a data table. Each
validation step or expectation will operate over the number of test units
that is equal to the number of rows in the table (after any preconditions
have been applied).
Usage
col_vals_in_set( x, columns, set, preconditions = NULL, segments = NULL, actions = NULL, step_id = NULL, label = NULL, brief = NULL, active = TRUE ) expect_col_vals_in_set( object, columns, set, preconditions = NULL, threshold = 1 ) test_col_vals_in_set(object, columns, set, preconditions = NULL, threshold = 1)col_vals_in_set( x, columns, set, preconditions = NULL, segments = NULL, actions = NULL, step_id = NULL, label = NULL, brief = NULL, active = TRUE ) expect_col_vals_in_set( object, columns, set, preconditions = NULL, threshold = 1 ) test_col_vals_in_set(object, columns, set, preconditions = NULL, threshold = 1)
Arguments
x |
A pointblank agent or a data table
A data frame, tibble ( |
columns |
The target columns
A column-selecting expression, as one would use inside |
set |
Set of values
A vector of numeric or string-based elements, where column values found
within this |
preconditions |
Input table modification prior to validation
An optional expression for mutating the input table before proceeding with
the validation. This can either be provided as a one-sided R formula using
a leading |
segments |
Expressions for segmenting the target table
An optional expression or set of expressions (held in a list) that serve to segment the target table by column values. Each expression can be given in one of two ways: (1) as column names, or (2) as a two-sided formula where the LHS holds a column name and the RHS contains the column values to segment on. See the Segments section for more details on this. |
actions |
Thresholds and actions for different states
A list containing threshold levels so that the validation step can react
accordingly when exceeding the set levels for different states. This is to
be created with the |
step_id |
Manual setting of the step ID value
One or more optional identifiers for the single or multiple validation
steps generated from calling a validation function. The use of step IDs
serves to distinguish validation steps from each other and provide an
opportunity for supplying a more meaningful label compared to the step
index. By default this is |
label |
Optional label for the validation step
Optional label for the validation step. This label appears in the agent report and, for the best appearance, it should be kept quite short. See the Labels section for more information. |
brief |
Brief description for the validation step
A brief is a short, text-based description for the validation step. If
nothing is provided here then an autobrief is generated by the agent,
using the language provided in |
active |
Is the validation step active?
A logical value indicating whether the validation step should be active. If
the validation function is working with an agent, |
object |
A data table for expectations or tests
A data frame, tibble ( |
threshold |
The failure threshold
A simple failure threshold value for use with the expectation ( |
Value
For the validation function, the return value is either a
ptblank_agent object or a table object (depending on whether an agent
object or a table was passed to x). The expectation function invisibly
returns its input but, in the context of testing data, the function is
called primarily for its potential side-effects (e.g., signaling failure).
The test function returns a logical value.
Supported Input Tables
The types of data tables that are officially supported are:
-
data frames (
data.frame) and tibbles (tbl_df) -
Spark DataFrames (
tbl_spark) -
the following database tables (
tbl_dbi):-
PostgreSQL tables (using the
RPostgres::Postgres()as driver) -
MySQL tables (with
RMySQL::MySQL()) -
Microsoft SQL Server tables (via odbc)
-
BigQuery tables (using
bigrquery::bigquery()) -
DuckDB tables (through
duckdb::duckdb()) -
SQLite (with
RSQLite::SQLite())
-
Other database tables may work to varying degrees but they haven't been formally tested (so be mindful of this when using unsupported backends with pointblank).
Column Names
columns may be a single column (as symbol a or string "a") or a vector
of columns (c(a, b, c) or c("a", "b", "c")). {tidyselect} helpers
are also supported, such as contains("date") and where(is.double). If
passing an external vector of columns, it should be wrapped in all_of().
When multiple columns are selected by columns, the result will be an
expansion of validation steps to that number of columns (e.g.,
c(col_a, col_b) will result in the entry of two validation steps).
Previously, columns could be specified in vars(). This continues to work,
but c() offers the same capability and supersedes vars() in columns.
Preconditions
Providing expressions as preconditions means pointblank will preprocess
the target table during interrogation as a preparatory step. It might happen
that a particular validation requires a calculated column, some filtering of
rows, or the addition of columns via a join, etc. Especially for an
agent-based report this can be advantageous since we can develop a large
validation plan with a single target table and make minor adjustments to it,
as needed, along the way.
The table mutation is totally isolated in scope to the validation step(s)
where preconditions is used. Using dplyr code is suggested here since
the statements can be translated to SQL if necessary (i.e., if the target
table resides in a database). The code is most easily supplied as a one-sided
R formula (using a leading ~). In the formula representation, the .
serves as the input data table to be transformed (e.g., ~ . %>% dplyr::mutate(col_b = col_a + 10)). Alternatively, a function could instead
be supplied (e.g., function(x) dplyr::mutate(x, col_b = col_a + 10)).
Segments
By using the segments argument, it's possible to define a particular
validation with segments (or row slices) of the target table. An optional
expression or set of expressions that serve to segment the target table by
column values. Each expression can be given in one of two ways: (1) as column
names, or (2) as a two-sided formula where the LHS holds a column name and
the RHS contains the column values to segment on.
As an example of the first type of expression that can be used,
vars(a_column) will segment the target table in however many unique values
are present in the column called a_column. This is great if every unique
value in a particular column (like different locations, or different dates)
requires it's own repeating validation.
With a formula, we can be more selective with which column values should be
used for segmentation. Using a_column ~ c("group_1", "group_2") will
attempt to obtain two segments where one is a slice of data where the value
"group_1" exists in the column named "a_column", and, the other is a
slice where "group_2" exists in the same column. Each group of rows
resolved from the formula will result in a separate validation step.
If there are multiple columns specified then the potential number of
validation steps will be m columns multiplied by n segments resolved.
Segmentation will always occur after preconditions (i.e., statements that
mutate the target table), if any, are applied. With this type of one-two
combo, it's possible to generate labels for segmentation using an expression
for preconditions and refer to those labels in segments without having to
generate a separate version of the target table.
Actions
Often, we will want to specify actions for the validation. This argument,
present in every validation function, takes a specially-crafted list
object that is best produced by the action_levels() function. Read that
function's documentation for the lowdown on how to create reactions to
above-threshold failure levels in validation. The basic gist is that you'll
want at least a single threshold level (specified as either the fraction of
test units failed, or, an absolute value), often using the warn_at
argument. This is especially true when x is a table object because,
otherwise, nothing happens. For the col_vals_*()-type functions, using
action_levels(warn_at = 0.25) or action_levels(stop_at = 0.25) are good
choices depending on the situation (the first produces a warning when a
quarter of the total test units fails, the other stop()s at the same
threshold level).
Labels
label may be a single string or a character vector that matches the number
of expanded steps. label also supports {glue} syntax and exposes the
following dynamic variables contextualized to the current step:
-
"{.step}": The validation step name -
"{.col}": The current column name -
"{.seg_col}": The current segment's column name -
"{.seg_val}": The current segment's value/group
The glue context also supports ordinary expressions for further flexibility
(e.g., "{toupper(.step)}") as long as they return a length-1 string.
Briefs
Want to describe this validation step in some detail? Keep in mind that this
is only useful if x is an agent. If that's the case, brief the agent
with some text that fits. Don't worry if you don't want to do it. The
autobrief protocol is kicked in when brief = NULL and a simple brief will
then be automatically generated.
YAML
A pointblank agent can be written to YAML with yaml_write() and the
resulting YAML can be used to regenerate an agent (with yaml_read_agent())
or interrogate the target table (via yaml_agent_interrogate()). When
col_vals_in_set() is represented in YAML (under the top-level steps key
as a list member), the syntax closely follows the signature of the validation
function. Here is an example of how a complex call of col_vals_in_set() as
a validation step is expressed in R code and in the corresponding YAML
representation.
R statement:
agent %>%
  col_vals_in_set(
    columns = a,
    set = c(1, 2, 3, 4),
    preconditions = ~ . %>% dplyr::filter(a < 10),
    segments = b ~ c("group_1", "group_2"),
    actions = action_levels(warn_at = 0.1, stop_at = 0.2),
    label = "The `col_vals_in_set()` step.",
    active = FALSE
  )
YAML representation:
steps:
- col_vals_in_set:
   columns: c(a)
   set:
   - 1.0
   - 2.0
   - 3.0
   - 4.0
   preconditions: ~. %>% dplyr::filter(a < 10)
   segments: b ~ c("group_1", "group_2")
   actions:
     warn_fraction: 0.1
     stop_fraction: 0.2
   label: The `col_vals_in_set()` step.
   active: false
In practice, both of these will often be shorter as only the columns and
set arguments require values. Arguments with default values won't be
written to YAML when using yaml_write() (though it is acceptable to include
them with their default when generating the YAML by other means). It is also
possible to preview the transformation of an agent to YAML without any
writing to disk by using the yaml_agent_string() function.
Examples
The small_table dataset in the package will be used to validate that column
values are part of a given set.
small_table
#> # A tibble: 13 x 8
#>    date_time           date           a b             c      d e     f
#>    <dttm>              <date>     <int> <chr>     <dbl>  <dbl> <lgl> <chr>
#>  1 2016-01-04 11:00:00 2016-01-04     2 1-bcd-345     3  3423. TRUE  high
#>  2 2016-01-04 00:32:00 2016-01-04     3 5-egh-163     8 10000. TRUE  low
#>  3 2016-01-05 13:32:00 2016-01-05     6 8-kdg-938     3  2343. TRUE  high
#>  4 2016-01-06 17:23:00 2016-01-06     2 5-jdo-903    NA  3892. FALSE mid
#>  5 2016-01-09 12:36:00 2016-01-09     8 3-ldm-038     7   284. TRUE  low
#>  6 2016-01-11 06:15:00 2016-01-11     4 2-dhe-923     4  3291. TRUE  mid
#>  7 2016-01-15 18:46:00 2016-01-15     7 1-knw-093     3   843. TRUE  high
#>  8 2016-01-17 11:27:00 2016-01-17     4 5-boe-639     2  1036. FALSE low
#>  9 2016-01-20 04:30:00 2016-01-20     3 5-bce-642     9   838. FALSE high
#> 10 2016-01-20 04:30:00 2016-01-20     3 5-bce-642     9   838. FALSE high
#> 11 2016-01-26 20:07:00 2016-01-26     4 2-dmx-010     7   834. TRUE  low
#> 12 2016-01-28 02:51:00 2016-01-28     2 7-dmx-010     8   108. FALSE low
#> 13 2016-01-30 11:23:00 2016-01-30     1 3-dka-303    NA  2230. TRUE  high
A: Using an agent with validation functions and then interrogate()
Validate that values in column f are all part of the set of values
containing low, mid, and high. We'll determine if this validation has
any failing test units (there are 13 test units, one for each row).
agent <-
  create_agent(tbl = small_table) %>%
  col_vals_in_set(
    columns = f, set = c("low", "mid", "high")
  ) %>%
  interrogate()
Printing the agent in the console shows the validation report in the
Viewer. Here is an excerpt of validation report, showing the single entry
that corresponds to the validation step demonstrated here.

B: Using the validation function directly on the data (no agent)
This way of using validation functions acts as a data filter. Data is passed
through but should stop() if there is a single test unit failing. The
behavior of side effects can be customized with the actions option.
small_table %>%
  col_vals_in_set(
    columns = f, set = c("low", "mid", "high")
  ) %>%
  dplyr::pull(f) %>%
  unique()
#> [1] "high" "low"  "mid"
C: Using the expectation function
With the expect_*() form, we would typically perform one validation at a
time. This is primarily used in testthat tests.
expect_col_vals_in_set(
  small_table,
  columns = f, set = c("low", "mid", "high")
)
D: Using the test function
With the test_*() form, we should get a single logical value returned to
us.
small_table %>%
  test_col_vals_in_set(
    columns = f, set = c("low", "mid", "high")
  )
#> [1] TRUE
Function ID
2-9
See Also
The analogue to this function: col_vals_not_in_set().
Other validation functions:
col_count_match(),
col_exists(),
col_is_character(),
col_is_date(),
col_is_factor(),
col_is_integer(),
col_is_logical(),
col_is_numeric(),
col_is_posix(),
col_schema_match(),
col_vals_between(),
col_vals_decreasing(),
col_vals_equal(),
col_vals_expr(),
col_vals_gt(),
col_vals_gte(),
col_vals_increasing(),
col_vals_lt(),
col_vals_lte(),
col_vals_make_set(),
col_vals_make_subset(),
col_vals_not_between(),
col_vals_not_equal(),
col_vals_not_in_set(),
col_vals_not_null(),
col_vals_null(),
col_vals_regex(),
col_vals_within_spec(),
conjointly(),
row_count_match(),
rows_complete(),
rows_distinct(),
serially(),
specially(),
tbl_match()
Are column data increasing by row?
Description
The col_vals_increasing() validation function, the
expect_col_vals_increasing() expectation function, and the
test_col_vals_increasing() test function all check whether column values in
a table are increasing when moving down a table. There are options for
allowing NA values in the target column, allowing stationary phases (where
consecutive values don't change), and even on for allowing decreasing
movements up to a certain threshold. The validation function can be used
directly on a data table or with an agent object (technically, a
ptblank_agent object) whereas the expectation and test functions can only
be used with a data table. Each validation step or expectation will operate
over the number of test units that is equal to the number of rows in the
table (after any preconditions have been applied).
Usage
col_vals_increasing( x, columns, allow_stationary = FALSE, decreasing_tol = NULL, na_pass = FALSE, preconditions = NULL, segments = NULL, actions = NULL, step_id = NULL, label = NULL, brief = NULL, active = TRUE ) expect_col_vals_increasing( object, columns, allow_stationary = FALSE, decreasing_tol = NULL, na_pass = FALSE, preconditions = NULL, threshold = 1 ) test_col_vals_increasing( object, columns, allow_stationary = FALSE, decreasing_tol = NULL, na_pass = FALSE, preconditions = NULL, threshold = 1 )col_vals_increasing( x, columns, allow_stationary = FALSE, decreasing_tol = NULL, na_pass = FALSE, preconditions = NULL, segments = NULL, actions = NULL, step_id = NULL, label = NULL, brief = NULL, active = TRUE ) expect_col_vals_increasing( object, columns, allow_stationary = FALSE, decreasing_tol = NULL, na_pass = FALSE, preconditions = NULL, threshold = 1 ) test_col_vals_increasing( object, columns, allow_stationary = FALSE, decreasing_tol = NULL, na_pass = FALSE, preconditions = NULL, threshold = 1 )
Arguments
x |
A pointblank agent or a data table
A data frame, tibble ( |
columns |
The target columns
A column-selecting expression, as one would use inside |
allow_stationary |
Allowance for stationary pauses in values
An option to allow pauses in decreasing values. For example if the values
for the test units are |
decreasing_tol |
Optional tolerance threshold for backtracking
An optional threshold value that allows for movement of numerical values in
the negative direction. By default this is |
na_pass |
Allow missing values to pass validation
Should any encountered |
preconditions |
Input table modification prior to validation
An optional expression for mutating the input table before proceeding with
the validation. This can either be provided as a one-sided R formula using
a leading |
segments |
Expressions for segmenting the target table
An optional expression or set of expressions (held in a list) that serve to segment the target table by column values. Each expression can be given in one of two ways: (1) as column names, or (2) as a two-sided formula where the LHS holds a column name and the RHS contains the column values to segment on. See the Segments section for more details on this. |
actions |
Thresholds and actions for different states
A list containing threshold levels so that the validation step can react
accordingly when exceeding the set levels for different states. This is to
be created with the |
step_id |
Manual setting of the step ID value
One or more optional identifiers for the single or multiple validation
steps generated from calling a validation function. The use of step IDs
serves to distinguish validation steps from each other and provide an
opportunity for supplying a more meaningful label compared to the step
index. By default this is |
label |
Optional label for the validation step
Optional label for the validation step. This label appears in the agent report and, for the best appearance, it should be kept quite short. See the Labels section for more information. |
brief |
Brief description for the validation step
A brief is a short, text-based description for the validation step. If
nothing is provided here then an autobrief is generated by the agent,
using the language provided in |
active |
Is the validation step active?
A logical value indicating whether the validation step should be active. If
the validation function is working with an agent, |
object |
A data table for expectations or tests
A data frame, tibble ( |
threshold |
The failure threshold
A simple failure threshold value for use with the expectation ( |
Value
For the validation function, the return value is either a
ptblank_agent object or a table object (depending on whether an agent
object or a table was passed to x). The expectation function invisibly
returns its input but, in the context of testing data, the function is
called primarily for its potential side-effects (e.g., signaling failure).
The test function returns a logical value.
Supported Input Tables
The types of data tables that are officially supported are:
-
data frames (
data.frame) and tibbles (tbl_df) -
Spark DataFrames (
tbl_spark) -
the following database tables (
tbl_dbi):-
PostgreSQL tables (using the
RPostgres::Postgres()as driver) -
MySQL tables (with
RMySQL::MySQL()) -
Microsoft SQL Server tables (via odbc)
-
BigQuery tables (using
bigrquery::bigquery()) -
DuckDB tables (through
duckdb::duckdb()) -
SQLite (with
RSQLite::SQLite())
-
Other database tables may work to varying degrees but they haven't been formally tested (so be mindful of this when using unsupported backends with pointblank).
Column Names
columns may be a single column (as symbol a or string "a") or a vector
of columns (c(a, b, c) or c("a", "b", "c")). {tidyselect} helpers
are also supported, such as contains("date") and where(is.double). If
passing an external vector of columns, it should be wrapped in all_of().
When multiple columns are selected by columns, the result will be an
expansion of validation steps to that number of columns (e.g.,
c(col_a, col_b) will result in the entry of two validation steps).
Previously, columns could be specified in vars(). This continues to work,
but c() offers the same capability and supersedes vars() in columns.
Missing Values
This validation function supports special handling of NA values. The
na_pass argument will determine whether an NA value appearing in a test
unit should be counted as a pass or a fail. The default of na_pass = FALSE means that any NAs encountered will accumulate failing test units.
Preconditions
Providing expressions as preconditions means pointblank will preprocess
the target table during interrogation as a preparatory step. It might happen
that a particular validation requires a calculated column, some filtering of
rows, or the addition of columns via a join, etc. Especially for an
agent-based report this can be advantageous since we can develop a large
validation plan with a single target table and make minor adjustments to it,
as needed, along the way.
The table mutation is totally isolated in scope to the validation step(s)
where preconditions is used. Using dplyr code is suggested here since
the statements can be translated to SQL if necessary (i.e., if the target
table resides in a database). The code is most easily supplied as a one-sided
R formula (using a leading ~). In the formula representation, the .
serves as the input data table to be transformed (e.g., ~ . %>% dplyr::mutate(col_b = col_a + 10)). Alternatively, a function could instead
be supplied (e.g., function(x) dplyr::mutate(x, col_b = col_a + 10)).
Segments
By using the segments argument, it's possible to define a particular
validation with segments (or row slices) of the target table. An optional
expression or set of expressions that serve to segment the target table by
column values. Each expression can be given in one of two ways: (1) as column
names, or (2) as a two-sided formula where the LHS holds a column name and
the RHS contains the column values to segment on.
As an example of the first type of expression that can be used,
vars(a_column) will segment the target table in however many unique values
are present in the column called a_column. This is great if every unique
value in a particular column (like different locations, or different dates)
requires it's own repeating validation.
With a formula, we can be more selective with which column values should be
used for segmentation. Using a_column ~ c("group_1", "group_2") will
attempt to obtain two segments where one is a slice of data where the value
"group_1" exists in the column named "a_column", and, the other is a
slice where "group_2" exists in the same column. Each group of rows
resolved from the formula will result in a separate validation step.
If there are multiple columns specified then the potential number of
validation steps will be m columns multiplied by n segments resolved.
Segmentation will always occur after preconditions (i.e., statements that
mutate the target table), if any, are applied. With this type of one-two
combo, it's possible to generate labels for segmentation using an expression
for preconditions and refer to those labels in segments without having to
generate a separate version of the target table.
Actions
Often, we will want to specify actions for the validation. This argument,
present in every validation function, takes a specially-crafted list
object that is best produced by the action_levels() function. Read that
function's documentation for the lowdown on how to create reactions to
above-threshold failure levels in validation. The basic gist is that you'll
want at least a single threshold level (specified as either the fraction of
test units failed, or, an absolute value), often using the warn_at
argument. This is especially true when x is a table object because,
otherwise, nothing happens. For the col_vals_*()-type functions, using
action_levels(warn_at = 0.25) or action_levels(stop_at = 0.25) are good
choices depending on the situation (the first produces a warning when a
quarter of the total test units fails, the other stop()s at the same
threshold level).
Labels
label may be a single string or a character vector that matches the number
of expanded steps. label also supports {glue} syntax and exposes the
following dynamic variables contextualized to the current step:
-
"{.step}": The validation step name -
"{.col}": The current column name -
"{.seg_col}": The current segment's column name -
"{.seg_val}": The current segment's value/group
The glue context also supports ordinary expressions for further flexibility
(e.g., "{toupper(.step)}") as long as they return a length-1 string.
Briefs
Want to describe this validation step in some detail? Keep in mind that this
is only useful if x is an agent. If that's the case, brief the agent
with some text that fits. Don't worry if you don't want to do it. The
autobrief protocol is kicked in when brief = NULL and a simple brief will
then be automatically generated.
YAML
A pointblank agent can be written to YAML with yaml_write() and the
resulting YAML can be used to regenerate an agent (with yaml_read_agent())
or interrogate the target table (via yaml_agent_interrogate()). When
col_vals_increasing() is represented in YAML (under the top-level steps
key as a list member), the syntax closely follows the signature of the
validation function. Here is an example of how a complex call of
col_vals_increasing() as a validation step is expressed in R code and in
the corresponding YAML representation.
R statement:
agent %>%
  col_vals_increasing(
    columns = a,
    allow_stationary = TRUE,
    decreasing_tol = 0.5,
    na_pass = TRUE,
    preconditions = ~ . %>% dplyr::filter(a < 10),
    segments = b ~ c("group_1", "group_2"),
    actions = action_levels(warn_at = 0.1, stop_at = 0.2),
    label = "The `col_vals_increasing()` step.",
    active = FALSE
  )
YAML representation:
steps:
- col_vals_increasing:
    columns: c(a)
    allow_stationary: true
    decreasing_tol: 0.5
    na_pass: true
    preconditions: ~. %>% dplyr::filter(a < 10)
    segments: b ~ c("group_1", "group_2")
    actions:
      warn_fraction: 0.1
      stop_fraction: 0.2
    label: The `col_vals_increasing()` step.
    active: false
In practice, both of these will often be shorter as only the columns
argument requires a value. Arguments with default values won't be written to
YAML when using yaml_write() (though it is acceptable to include them with
their default when generating the YAML by other means). It is also possible
to preview the transformation of an agent to YAML without any writing to disk
by using the yaml_agent_string() function.
Examples
The game_revenue dataset in the package has the column session_start,
which contains date-time values. Let's ensure that this column has values
that are increasing from top to bottom.
game_revenue
#> # A tibble: 2,000 x 11
#>    player_id       session_id  session_start       time                item_type
#>    <chr>           <chr>       <dttm>              <dttm>              <chr>
#>  1 ECPANOIXLZHF896 ECPANOIXLZ~ 2015-01-01 01:31:03 2015-01-01 01:31:27 iap
#>  2 ECPANOIXLZHF896 ECPANOIXLZ~ 2015-01-01 01:31:03 2015-01-01 01:36:57 iap
#>  3 ECPANOIXLZHF896 ECPANOIXLZ~ 2015-01-01 01:31:03 2015-01-01 01:37:45 iap
#>  4 ECPANOIXLZHF896 ECPANOIXLZ~ 2015-01-01 01:31:03 2015-01-01 01:42:33 ad
#>  5 ECPANOIXLZHF896 ECPANOIXLZ~ 2015-01-01 11:50:02 2015-01-01 11:55:20 ad
#>  6 ECPANOIXLZHF896 ECPANOIXLZ~ 2015-01-01 11:50:02 2015-01-01 12:08:56 ad
#>  7 ECPANOIXLZHF896 ECPANOIXLZ~ 2015-01-01 11:50:02 2015-01-01 12:14:08 ad
#>  8 ECPANOIXLZHF896 ECPANOIXLZ~ 2015-01-01 11:50:02 2015-01-01 12:21:44 ad
#>  9 ECPANOIXLZHF896 ECPANOIXLZ~ 2015-01-01 11:50:02 2015-01-01 12:24:20 ad
#> 10 FXWUORGYNJAE271 FXWUORGYNJ~ 2015-01-01 15:17:18 2015-01-01 15:19:36 ad
#> # i 1,990 more rows
#> # i 6 more variables: item_name <chr>, item_revenue <dbl>,
#> #   session_duration <dbl>, start_day <date>, acquisition <chr>, country <chr>
A: Using an agent with validation functions and then interrogate()
Validate that all date-time values in the column session_start are
increasing, and, allow for repeating values (allow_stationary will be set
to TRUE). We'll determine if this validation has any failing test units
(there are 2000 test units).
agent <-
  create_agent(tbl = game_revenue) %>%
  col_vals_increasing(
    columns = session_start,
    allow_stationary = TRUE
  ) %>%
  interrogate()
Printing the agent in the console shows the validation report in the
Viewer. Here is an excerpt of validation report, showing the single entry
that corresponds to the validation step demonstrated here.

B: Using the validation function directly on the data (no agent)
This way of using validation functions acts as a data filter. Data is passed
through but should stop() if there is a single test unit failing. The
behavior of side effects can be customized with the actions option.
game_revenue %>%
  col_vals_increasing(
    columns = session_start,
    allow_stationary = TRUE
  ) %>%
  dplyr::select(session_start) %>%
  dplyr::distinct() %>%
  dplyr::count()
#> # A tibble: 1 x 1
#>       n
#>   <int>
#> 1   618
C: Using the expectation function
With the expect_*() form, we would typically perform one validation at a
time. This is primarily used in testthat tests.
expect_col_vals_increasing(
  game_revenue,
  columns = session_start,
  allow_stationary = TRUE
)
D: Using the test function
With the test_*() form, we should get a single logical value returned to
us.
game_revenue %>%
  test_col_vals_increasing(
    columns = session_start,
    allow_stationary = TRUE
  )
#> [1] TRUE
Function ID
2-13
See Also
The analogous function that moves in the opposite direction:
col_vals_decreasing().
Other validation functions:
col_count_match(),
col_exists(),
col_is_character(),
col_is_date(),
col_is_factor(),
col_is_integer(),
col_is_logical(),
col_is_numeric(),
col_is_posix(),
col_schema_match(),
col_vals_between(),
col_vals_decreasing(),
col_vals_equal(),
col_vals_expr(),
col_vals_gt(),
col_vals_gte(),
col_vals_in_set(),
col_vals_lt(),
col_vals_lte(),
col_vals_make_set(),
col_vals_make_subset(),
col_vals_not_between(),
col_vals_not_equal(),
col_vals_not_in_set(),
col_vals_not_null(),
col_vals_null(),
col_vals_regex(),
col_vals_within_spec(),
conjointly(),
row_count_match(),
rows_complete(),
rows_distinct(),
serially(),
specially(),
tbl_match()
Are column data less than a fixed value or data in another column?
Description
The col_vals_lt() validation function, the expect_col_vals_lt()
expectation function, and the test_col_vals_lt() test function all check
whether column values in a table are less than a specified value (the
exact comparison used in this function is col_val < value). The value can
be specified as a single, literal value or as a column name given in
vars(). The validation function can be used directly on a data table or
with an agent object (technically, a ptblank_agent object) whereas the
expectation and test functions can only be used with a data table. Each
validation step or expectation will operate over the number of test units
that is equal to the number of rows in the table (after any preconditions
have been applied).
Usage
col_vals_lt( x, columns, value, na_pass = FALSE, preconditions = NULL, segments = NULL, actions = NULL, step_id = NULL, label = NULL, brief = NULL, active = TRUE ) expect_col_vals_lt( object, columns, value, na_pass = FALSE, preconditions = NULL, threshold = 1 ) test_col_vals_lt( object, columns, value, na_pass = FALSE, preconditions = NULL, threshold = 1 )col_vals_lt( x, columns, value, na_pass = FALSE, preconditions = NULL, segments = NULL, actions = NULL, step_id = NULL, label = NULL, brief = NULL, active = TRUE ) expect_col_vals_lt( object, columns, value, na_pass = FALSE, preconditions = NULL, threshold = 1 ) test_col_vals_lt( object, columns, value, na_pass = FALSE, preconditions = NULL, threshold = 1 )
Arguments
x |
A pointblank agent or a data table
A data frame, tibble ( |
columns |
The target columns
A column-selecting expression, as one would use inside |
value |
Value for comparison
A value used for this comparison. This can be a single value or a
compatible column given in |
na_pass |
Allow missing values to pass validation
Should any encountered |
preconditions |
Input table modification prior to validation
An optional expression for mutating the input table before proceeding with
the validation. This can either be provided as a one-sided R formula using
a leading |
segments |
Expressions for segmenting the target table
An optional expression or set of expressions (held in a list) that serve to segment the target table by column values. Each expression can be given in one of two ways: (1) as column names, or (2) as a two-sided formula where the LHS holds a column name and the RHS contains the column values to segment on. See the Segments section for more details on this. |
actions |
Thresholds and actions for different states
A list containing threshold levels so that the validation step can react
accordingly when exceeding the set levels for different states. This is to
be created with the |
step_id |
Manual setting of the step ID value
One or more optional identifiers for the single or multiple validation
steps generated from calling a validation function. The use of step IDs
serves to distinguish validation steps from each other and provide an
opportunity for supplying a more meaningful label compared to the step
index. By default this is |
label |
Optional label for the validation step
Optional label for the validation step. This label appears in the agent report and, for the best appearance, it should be kept quite short. See the Labels section for more information. |
brief |
Brief description for the validation step
A brief is a short, text-based description for the validation step. If
nothing is provided here then an autobrief is generated by the agent,
using the language provided in |
active |
Is the validation step active?
A logical value indicating whether the validation step should be active. If
the validation function is working with an agent, |
object |
A data table for expectations or tests
A data frame, tibble ( |
threshold |
The failure threshold
A simple failure threshold value for use with the expectation ( |
Value
For the validation function, the return value is either a
ptblank_agent object or a table object (depending on whether an agent
object or a table was passed to x). The expectation function invisibly
returns its input but, in the context of testing data, the function is
called primarily for its potential side-effects (e.g., signaling failure).
The test function returns a logical value.
Supported Input Tables
The types of data tables that are officially supported are:
-
data frames (
data.frame) and tibbles (tbl_df) -
Spark DataFrames (
tbl_spark) -
the following database tables (
tbl_dbi):-
PostgreSQL tables (using the
RPostgres::Postgres()as driver) -
MySQL tables (with
RMySQL::MySQL()) -
Microsoft SQL Server tables (via odbc)
-
BigQuery tables (using
bigrquery::bigquery()) -
DuckDB tables (through
duckdb::duckdb()) -
SQLite (with
RSQLite::SQLite())
-
Other database tables may work to varying degrees but they haven't been formally tested (so be mindful of this when using unsupported backends with pointblank).
Column Names
columns may be a single column (as symbol a or string "a") or a vector
of columns (c(a, b, c) or c("a", "b", "c")). {tidyselect} helpers
are also supported, such as contains("date") and where(is.double). If
passing an external vector of columns, it should be wrapped in all_of().
When multiple columns are selected by columns, the result will be an
expansion of validation steps to that number of columns (e.g.,
c(col_a, col_b) will result in the entry of two validation steps).
Previously, columns could be specified in vars(). This continues to work,
but c() offers the same capability and supersedes vars() in columns.
Missing Values
This validation function supports special handling of NA values. The
na_pass argument will determine whether an NA value appearing in a test
unit should be counted as a pass or a fail. The default of na_pass = FALSE means that any NAs encountered will accumulate failing test units.
Preconditions
Providing expressions as preconditions means pointblank will preprocess
the target table during interrogation as a preparatory step. It might happen
that a particular validation requires a calculated column, some filtering of
rows, or the addition of columns via a join, etc. Especially for an
agent-based report this can be advantageous since we can develop a large
validation plan with a single target table and make minor adjustments to it,
as needed, along the way.
The table mutation is totally isolated in scope to the validation step(s)
where preconditions is used. Using dplyr code is suggested here since
the statements can be translated to SQL if necessary (i.e., if the target
table resides in a database). The code is most easily supplied as a one-sided
R formula (using a leading ~). In the formula representation, the .
serves as the input data table to be transformed (e.g., ~ . %>% dplyr::mutate(col_b = col_a + 10)). Alternatively, a function could instead
be supplied (e.g., function(x) dplyr::mutate(x, col_b = col_a + 10)).
Segments
By using the segments argument, it's possible to define a particular
validation with segments (or row slices) of the target table. An optional
expression or set of expressions that serve to segment the target table by
column values. Each expression can be given in one of two ways: (1) as column
names, or (2) as a two-sided formula where the LHS holds a column name and
the RHS contains the column values to segment on.
As an example of the first type of expression that can be used,
vars(a_column) will segment the target table in however many unique values
are present in the column called a_column. This is great if every unique
value in a particular column (like different locations, or different dates)
requires it's own repeating validation.
With a formula, we can be more selective with which column values should be
used for segmentation. Using a_column ~ c("group_1", "group_2") will
attempt to obtain two segments where one is a slice of data where the value
"group_1" exists in the column named "a_column", and, the other is a
slice where "group_2" exists in the same column. Each group of rows
resolved from the formula will result in a separate validation step.
If there are multiple columns specified then the potential number of
validation steps will be m columns multiplied by n segments resolved.
Segmentation will always occur after preconditions (i.e., statements that
mutate the target table), if any, are applied. With this type of one-two
combo, it's possible to generate labels for segmentation using an expression
for preconditions and refer to those labels in segments without having to
generate a separate version of the target table.
Actions
Often, we will want to specify actions for the validation. This argument,
present in every validation function, takes a specially-crafted list
object that is best produced by the action_levels() function. Read that
function's documentation for the lowdown on how to create reactions to
above-threshold failure levels in validation. The basic gist is that you'll
want at least a single threshold level (specified as either the fraction of
test units failed, or, an absolute value), often using the warn_at
argument. This is especially true when x is a table object because,
otherwise, nothing happens. For the col_vals_*()-type functions, using
action_levels(warn_at = 0.25) or action_levels(stop_at = 0.25) are good
choices depending on the situation (the first produces a warning when a
quarter of the total test units fails, the other stop()s at the same
threshold level).
Labels
label may be a single string or a character vector that matches the number
of expanded steps. label also supports {glue} syntax and exposes the
following dynamic variables contextualized to the current step:
-
"{.step}": The validation step name -
"{.col}": The current column name -
"{.seg_col}": The current segment's column name -
"{.seg_val}": The current segment's value/group
The glue context also supports ordinary expressions for further flexibility
(e.g., "{toupper(.step)}") as long as they return a length-1 string.
Briefs
Want to describe this validation step in some detail? Keep in mind that this
is only useful if x is an agent. If that's the case, brief the agent
with some text that fits. Don't worry if you don't want to do it. The
autobrief protocol is kicked in when brief = NULL and a simple brief will
then be automatically generated.
YAML
A pointblank agent can be written to YAML with yaml_write() and the
resulting YAML can be used to regenerate an agent (with yaml_read_agent())
or interrogate the target table (via yaml_agent_interrogate()). When
col_vals_lt() is represented in YAML (under the top-level steps key as a
list member), the syntax closely follows the signature of the validation
function. Here is an example of how a complex call of col_vals_lt() as a
validation step is expressed in R code and in the corresponding YAML
representation.
R statement:
agent %>%
  col_vals_lt(
    columns = a,
    value = 1,
    na_pass = TRUE,
    preconditions = ~ . %>% dplyr::filter(a < 10),
    segments = b ~ c("group_1", "group_2"),
    actions = action_levels(warn_at = 0.1, stop_at = 0.2),
    label = "The `col_vals_lt()` step.",
    active = FALSE
  )
YAML representation:
steps:
- col_vals_lt:
    columns: c(a)
    value: 1.0
    na_pass: true
    preconditions: ~. %>% dplyr::filter(a < 10)
    segments: b ~ c("group_1", "group_2")
    actions:
      warn_fraction: 0.1
      stop_fraction: 0.2
    label: The `col_vals_lt()` step.
    active: false
In practice, both of these will often be shorter as only the columns and
value arguments require values. Arguments with default values won't be
written to YAML when using yaml_write() (though it is acceptable to include
them with their default when generating the YAML by other means). It is also
possible to preview the transformation of an agent to YAML without any
writing to disk by using the yaml_agent_string() function.
Examples
For all of the examples here, we'll use a simple table with three numeric
columns (a, b, and c) and three character columns (d, e, and f).
tbl <-
  dplyr::tibble(
      a = c(5, 5, 5, 5, 5, 5),
      b = c(1, 1, 1, 2, 2, 2),
      c = c(1, 1, 1, 2, 3, 4),
      d = LETTERS[a],
      e = LETTERS[b],
      f = LETTERS[c]
  )

tbl
#> # A tibble: 6 x 6
#>       a     b     c d     e     f
#>   <dbl> <dbl> <dbl> <chr> <chr> <chr>
#> 1     5     1     1 E     A     A
#> 2     5     1     1 E     A     A
#> 3     5     1     1 E     A     A
#> 4     5     2     2 E     B     B
#> 5     5     2     3 E     B     C
#> 6     5     2     4 E     B     D
A: Using an agent with validation functions and then interrogate()
Validate that values in column c are all less than the value of 5. We'll
determine if this validation has any failing test units (there are 6 test
units, one for each row).
agent <-
  create_agent(tbl = tbl) %>%
  col_vals_lt(columns = c, value = 5) %>%
  interrogate()
Printing the agent in the console shows the validation report in the
Viewer. Here is an excerpt of validation report, showing the single entry
that corresponds to the validation step demonstrated here.

B: Using the validation function directly on the data (no agent)
This way of using validation functions acts as a data filter. Data is passed
through but should stop() if there is a single test unit failing. The
behavior of side effects can be customized with the actions option.
tbl %>%
  col_vals_lt(columns = c, value = 5) %>%
  dplyr::pull(c)
#> [1] 1 1 1 2 3 4
C: Using the expectation function
With the expect_*() form, we would typically perform one validation at a
time. This is primarily used in testthat tests.
expect_col_vals_lt(tbl, columns = c, value = 5)
D: Using the test function
With the test_*() form, we should get a single logical value returned to
us.
test_col_vals_lt(tbl, columns = c, value = 5)
#> [1] TRUE
Function ID
2-1
See Also
The analogous function with a right-closed bound: col_vals_lte().
Other validation functions:
col_count_match(),
col_exists(),
col_is_character(),
col_is_date(),
col_is_factor(),
col_is_integer(),
col_is_logical(),
col_is_numeric(),
col_is_posix(),
col_schema_match(),
col_vals_between(),
col_vals_decreasing(),
col_vals_equal(),
col_vals_expr(),
col_vals_gt(),
col_vals_gte(),
col_vals_in_set(),
col_vals_increasing(),
col_vals_lte(),
col_vals_make_set(),
col_vals_make_subset(),
col_vals_not_between(),
col_vals_not_equal(),
col_vals_not_in_set(),
col_vals_not_null(),
col_vals_null(),
col_vals_regex(),
col_vals_within_spec(),
conjointly(),
row_count_match(),
rows_complete(),
rows_distinct(),
serially(),
specially(),
tbl_match()
Are column data less than or equal to a fixed value or data in another column?
Description
The col_vals_lte() validation function, the expect_col_vals_lte()
expectation function, and the test_col_vals_lte() test function all check
whether column values in a table are less than or equal to a specified
value (the exact comparison used in this function is col_val <= value).
The value can be specified as a single, literal value or as a column name
given in vars(). The validation function can be used directly on a data
table or with an agent object (technically, a ptblank_agent object)
whereas the expectation and test functions can only be used with a data
table. Each validation step or expectation will operate over the number of
test units that is equal to the number of rows in the table (after any
preconditions have been applied).
Usage
col_vals_lte( x, columns, value, na_pass = FALSE, preconditions = NULL, segments = NULL, actions = NULL, step_id = NULL, label = NULL, brief = NULL, active = TRUE ) expect_col_vals_lte( object, columns, value, na_pass = FALSE, preconditions = NULL, threshold = 1 ) test_col_vals_lte( object, columns, value, na_pass = FALSE, preconditions = NULL, threshold = 1 )col_vals_lte( x, columns, value, na_pass = FALSE, preconditions = NULL, segments = NULL, actions = NULL, step_id = NULL, label = NULL, brief = NULL, active = TRUE ) expect_col_vals_lte( object, columns, value, na_pass = FALSE, preconditions = NULL, threshold = 1 ) test_col_vals_lte( object, columns, value, na_pass = FALSE, preconditions = NULL, threshold = 1 )
Arguments
x |
A pointblank agent or a data table
A data frame, tibble ( |
columns |
The target columns
A column-selecting expression, as one would use inside |
value |
Value for comparison
A value used for this comparison. This can be a single value or a
compatible column given in |
na_pass |
Allow missing values to pass validation
Should any encountered |
preconditions |
Input table modification prior to validation
An optional expression for mutating the input table before proceeding with
the validation. This can either be provided as a one-sided R formula using
a leading |
segments |
Expressions for segmenting the target table
An optional expression or set of expressions (held in a list) that serve to segment the target table by column values. Each expression can be given in one of two ways: (1) as column names, or (2) as a two-sided formula where the LHS holds a column name and the RHS contains the column values to segment on. See the Segments section for more details on this. |
actions |
Thresholds and actions for different states
A list containing threshold levels so that the validation step can react
accordingly when exceeding the set levels for different states. This is to
be created with the |
step_id |
Manual setting of the step ID value
One or more optional identifiers for the single or multiple validation
steps generated from calling a validation function. The use of step IDs
serves to distinguish validation steps from each other and provide an
opportunity for supplying a more meaningful label compared to the step
index. By default this is |
label |
Optional label for the validation step
Optional label for the validation step. This label appears in the agent report and, for the best appearance, it should be kept quite short. See the Labels section for more information. |
brief |
Brief description for the validation step
A brief is a short, text-based description for the validation step. If
nothing is provided here then an autobrief is generated by the agent,
using the language provided in |
active |
Is the validation step active?
A logical value indicating whether the validation step should be active. If
the validation function is working with an agent, |
object |
A data table for expectations or tests
A data frame, tibble ( |
threshold |
The failure threshold
A simple failure threshold value for use with the expectation ( |
Value
For the validation function, the return value is either a
ptblank_agent object or a table object (depending on whether an agent
object or a table was passed to x). The expectation function invisibly
returns its input but, in the context of testing data, the function is
called primarily for its potential side-effects (e.g., signaling failure).
The test function returns a logical value.
Supported Input Tables
The types of data tables that are officially supported are:
-
data frames (
data.frame) and tibbles (tbl_df) -
Spark DataFrames (
tbl_spark) -
the following database tables (
tbl_dbi):-
PostgreSQL tables (using the
RPostgres::Postgres()as driver) -
MySQL tables (with
RMySQL::MySQL()) -
Microsoft SQL Server tables (via odbc)
-
BigQuery tables (using
bigrquery::bigquery()) -
DuckDB tables (through
duckdb::duckdb()) -
SQLite (with
RSQLite::SQLite())
-
Other database tables may work to varying degrees but they haven't been formally tested (so be mindful of this when using unsupported backends with pointblank).
Column Names
columns may be a single column (as symbol a or string "a") or a vector
of columns (c(a, b, c) or c("a", "b", "c")). {tidyselect} helpers
are also supported, such as contains("date") and where(is.double). If
passing an external vector of columns, it should be wrapped in all_of().
When multiple columns are selected by columns, the result will be an
expansion of validation steps to that number of columns (e.g.,
c(col_a, col_b) will result in the entry of two validation steps).
Previously, columns could be specified in vars(). This continues to work,
but c() offers the same capability and supersedes vars() in columns.
Missing Values
This validation function supports special handling of NA values. The
na_pass argument will determine whether an NA value appearing in a test
unit should be counted as a pass or a fail. The default of na_pass = FALSE means that any NAs encountered will accumulate failing test units.
Preconditions
Providing expressions as preconditions means pointblank will preprocess
the target table during interrogation as a preparatory step. It might happen
that a particular validation requires a calculated column, some filtering of
rows, or the addition of columns via a join, etc. Especially for an
agent-based report this can be advantageous since we can develop a large
validation plan with a single target table and make minor adjustments to it,
as needed, along the way.
The table mutation is totally isolated in scope to the validation step(s)
where preconditions is used. Using dplyr code is suggested here since
the statements can be translated to SQL if necessary (i.e., if the target
table resides in a database). The code is most easily supplied as a one-sided
R formula (using a leading ~). In the formula representation, the .
serves as the input data table to be transformed (e.g., ~ . %>% dplyr::mutate(col_b = col_a + 10)). Alternatively, a function could instead
be supplied (e.g., function(x) dplyr::mutate(x, col_b = col_a + 10)).
Segments
By using the segments argument, it's possible to define a particular
validation with segments (or row slices) of the target table. An optional
expression or set of expressions that serve to segment the target table by
column values. Each expression can be given in one of two ways: (1) as column
names, or (2) as a two-sided formula where the LHS holds a column name and
the RHS contains the column values to segment on.
As an example of the first type of expression that can be used,
vars(a_column) will segment the target table in however many unique values
are present in the column called a_column. This is great if every unique
value in a particular column (like different locations, or different dates)
requires it's own repeating validation.
With a formula, we can be more selective with which column values should be
used for segmentation. Using a_column ~ c("group_1", "group_2") will
attempt to obtain two segments where one is a slice of data where the value
"group_1" exists in the column named "a_column", and, the other is a
slice where "group_2" exists in the same column. Each group of rows
resolved from the formula will result in a separate validation step.
If there are multiple columns specified then the potential number of
validation steps will be m columns multiplied by n segments resolved.
Segmentation will always occur after preconditions (i.e., statements that
mutate the target table), if any, are applied. With this type of one-two
combo, it's possible to generate labels for segmentation using an expression
for preconditions and refer to those labels in segments without having to
generate a separate version of the target table.
Actions
Often, we will want to specify actions for the validation. This argument,
present in every validation function, takes a specially-crafted list
object that is best produced by the action_levels() function. Read that
function's documentation for the lowdown on how to create reactions to
above-threshold failure levels in validation. The basic gist is that you'll
want at least a single threshold level (specified as either the fraction of
test units failed, or, an absolute value), often using the warn_at
argument. This is especially true when x is a table object because,
otherwise, nothing happens. For the col_vals_*()-type functions, using
action_levels(warn_at = 0.25) or action_levels(stop_at = 0.25) are good
choices depending on the situation (the first produces a warning when a
quarter of the total test units fails, the other stop()s at the same
threshold level).
Labels
label may be a single string or a character vector that matches the number
of expanded steps. label also supports {glue} syntax and exposes the
following dynamic variables contextualized to the current step:
-
"{.step}": The validation step name -
"{.col}": The current column name -
"{.seg_col}": The current segment's column name -
"{.seg_val}": The current segment's value/group
The glue context also supports ordinary expressions for further flexibility
(e.g., "{toupper(.step)}") as long as they return a length-1 string.
Briefs
Want to describe this validation step in some detail? Keep in mind that this
is only useful if x is an agent. If that's the case, brief the agent
with some text that fits. Don't worry if you don't want to do it. The
autobrief protocol is kicked in when brief = NULL and a simple brief will
then be automatically generated.
YAML
A pointblank agent can be written to YAML with yaml_write() and the
resulting YAML can be used to regenerate an agent (with yaml_read_agent())
or interrogate the target table (via yaml_agent_interrogate()). When
col_vals_lte() is represented in YAML (under the top-level steps key as a
list member), the syntax closely follows the signature of the validation
function. Here is an example of how a complex call of col_vals_lte() as a
validation step is expressed in R code and in the corresponding YAML
representation.
R statement:
agent %>%
  col_vals_lte(
    columns = a,
    value = 1,
    na_pass = TRUE,
    preconditions = ~ . %>% dplyr::filter(a < 10),
    segments = b ~ c("group_1", "group_2"),
    actions = action_levels(warn_at = 0.1, stop_at = 0.2),
    label = "The `col_vals_lte()` step.",
    active = FALSE
  )
YAML representation:
steps:
- col_vals_lte:
    columns: c(a)
    value: 1.0
    na_pass: true
    preconditions: ~. %>% dplyr::filter(a < 10)
    segments: b ~ c("group_1", "group_2")
    actions:
      warn_fraction: 0.1
      stop_fraction: 0.2
    label: The `col_vals_lte()` step.
    active: false
In practice, both of these will often be shorter as only the columns and
value arguments require values. Arguments with default values won't be
written to YAML when using yaml_write() (though it is acceptable to include
them with their default when generating the YAML by other means). It is also
possible to preview the transformation of an agent to YAML without any
writing to disk by using the yaml_agent_string() function.
Examples
For all of the examples here, we'll use a simple table with three numeric
columns (a, b, and c) and three character columns (d, e, and f).
tbl <-
  dplyr::tibble(
      a = c(5, 5, 5, 5, 5, 5),
      b = c(1, 1, 1, 2, 2, 2),
      c = c(1, 1, 1, 2, 3, 4),
      d = LETTERS[a],
      e = LETTERS[b],
      f = LETTERS[c]
  )

tbl
#> # A tibble: 6 x 6
#>       a     b     c d     e     f
#>   <dbl> <dbl> <dbl> <chr> <chr> <chr>
#> 1     5     1     1 E     A     A
#> 2     5     1     1 E     A     A
#> 3     5     1     1 E     A     A
#> 4     5     2     2 E     B     B
#> 5     5     2     3 E     B     C
#> 6     5     2     4 E     B     D
A: Using an agent with validation functions and then interrogate()
Validate that values in column c are all less than or equal to the value of
4. We'll determine if this validation has any failing test units (there are
6 test units, one for each row).
agent <-
  create_agent(tbl = tbl) %>%
  col_vals_lte(columns = c, value = 4) %>%
  interrogate()
Printing the agent in the console shows the validation report in the
Viewer. Here is an excerpt of validation report, showing the single entry
that corresponds to the validation step demonstrated here.

B: Using the validation function directly on the data (no agent)
This way of using validation functions acts as a data filter. Data is passed
through but should stop() if there is a single test unit failing. The
behavior of side effects can be customized with the actions option.
tbl %>%
  col_vals_lte(columns = c, value = 4) %>%
  dplyr::pull(c)
#> [1] 1 1 1 2 3 4
C: Using the expectation function
With the expect_*() form, we would typically perform one validation at a
time. This is primarily used in testthat tests.
expect_col_vals_lte(tbl, columns = c, value = 4)
D: Using the test function
With the test_*() form, we should get a single logical value returned to
us.
test_col_vals_lte(tbl, columns = c, value = 4)
#> [1] TRUE
Function ID
2-2
See Also
The analogous function with a right-open bound: col_vals_lt().
Other validation functions:
col_count_match(),
col_exists(),
col_is_character(),
col_is_date(),
col_is_factor(),
col_is_integer(),
col_is_logical(),
col_is_numeric(),
col_is_posix(),
col_schema_match(),
col_vals_between(),
col_vals_decreasing(),
col_vals_equal(),
col_vals_expr(),
col_vals_gt(),
col_vals_gte(),
col_vals_in_set(),
col_vals_increasing(),
col_vals_lt(),
col_vals_make_set(),
col_vals_make_subset(),
col_vals_not_between(),
col_vals_not_equal(),
col_vals_not_in_set(),
col_vals_not_null(),
col_vals_null(),
col_vals_regex(),
col_vals_within_spec(),
conjointly(),
row_count_match(),
rows_complete(),
rows_distinct(),
serially(),
specially(),
tbl_match()
Is a set of values entirely accounted for in a column of values?
Description
The col_vals_make_set() validation function, the
expect_col_vals_make_set() expectation function, and the
test_col_vals_make_set() test function all check whether set values are
all seen at least once in a table column. A necessary criterion here is that
no additional values (outside those definied in the set) should be seen
(this requirement is relaxed in the col_vals_make_subset() validation
function and in its expectation and test variants). The validation function
can be used directly on a data table or with an agent object (technically,
a ptblank_agent object) whereas the expectation and test functions can only
be used with a data table. Each validation step or expectation will operate
over the number of test units that is equal to the number of elements in the
set plus a test unit reserved for detecting column values outside of the
set (any outside value seen will make this additional test unit fail).
Usage
col_vals_make_set( x, columns, set, preconditions = NULL, segments = NULL, actions = NULL, step_id = NULL, label = NULL, brief = NULL, active = TRUE ) expect_col_vals_make_set( object, columns, set, preconditions = NULL, threshold = 1 ) test_col_vals_make_set( object, columns, set, preconditions = NULL, threshold = 1 )col_vals_make_set( x, columns, set, preconditions = NULL, segments = NULL, actions = NULL, step_id = NULL, label = NULL, brief = NULL, active = TRUE ) expect_col_vals_make_set( object, columns, set, preconditions = NULL, threshold = 1 ) test_col_vals_make_set( object, columns, set, preconditions = NULL, threshold = 1 )
Arguments
x |
A pointblank agent or a data table
A data frame, tibble ( |
columns |
The target columns
A column-selecting expression, as one would use inside |
set |
Set of values
A vector of elements that is expected to be equal to the set of unique values in the target column. |
preconditions |
Input table modification prior to validation
An optional expression for mutating the input table before proceeding with
the validation. This can either be provided as a one-sided R formula using
a leading |
segments |
Expressions for segmenting the target table
An optional expression or set of expressions (held in a list) that serve to segment the target table by column values. Each expression can be given in one of two ways: (1) as column names, or (2) as a two-sided formula where the LHS holds a column name and the RHS contains the column values to segment on. See the Segments section for more details on this. |
actions |
Thresholds and actions for different states
A list containing threshold levels so that the validation step can react
accordingly when exceeding the set levels for different states. This is to
be created with the |
step_id |
Manual setting of the step ID value
One or more optional identifiers for the single or multiple validation
steps generated from calling a validation function. The use of step IDs
serves to distinguish validation steps from each other and provide an
opportunity for supplying a more meaningful label compared to the step
index. By default this is |
label |
Optional label for the validation step
Optional label for the validation step. This label appears in the agent report and, for the best appearance, it should be kept quite short. See the Labels section for more information. |
brief |
Brief description for the validation step
A brief is a short, text-based description for the validation step. If
nothing is provided here then an autobrief is generated by the agent,
using the language provided in |
active |
Is the validation step active?
A logical value indicating whether the validation step should be active. If
the validation function is working with an agent, |
object |
A data table for expectations or tests
A data frame, tibble ( |
threshold |
The failure threshold
A simple failure threshold value for use with the expectation ( |
Value
For the validation function, the return value is either a
ptblank_agent object or a table object (depending on whether an agent
object or a table was passed to x). The expectation function invisibly
returns its input but, in the context of testing data, the function is
called primarily for its potential side-effects (e.g., signaling failure).
The test function returns a logical value.
Supported Input Tables
The types of data tables that are officially supported are:
-
data frames (
data.frame) and tibbles (tbl_df) -
Spark DataFrames (
tbl_spark) -
the following database tables (
tbl_dbi):-
PostgreSQL tables (using the
RPostgres::Postgres()as driver) -
MySQL tables (with
RMySQL::MySQL()) -
Microsoft SQL Server tables (via odbc)
-
BigQuery tables (using
bigrquery::bigquery()) -
DuckDB tables (through
duckdb::duckdb()) -
SQLite (with
RSQLite::SQLite())
-
Other database tables may work to varying degrees but they haven't been formally tested (so be mindful of this when using unsupported backends with pointblank).
Column Names
columns may be a single column (as symbol a or string "a") or a vector
of columns (c(a, b, c) or c("a", "b", "c")). {tidyselect} helpers
are also supported, such as contains("date") and where(is.double). If
passing an external vector of columns, it should be wrapped in all_of().
When multiple columns are selected by columns, the result will be an
expansion of validation steps to that number of columns (e.g.,
c(col_a, col_b) will result in the entry of two validation steps).
Previously, columns could be specified in vars(). This continues to work,
but c() offers the same capability and supersedes vars() in columns.
Preconditions
Providing expressions as preconditions means pointblank will preprocess
the target table during interrogation as a preparatory step. It might happen
that a particular validation requires a calculated column, some filtering of
rows, or the addition of columns via a join, etc. Especially for an
agent-based report this can be advantageous since we can develop a large
validation plan with a single target table and make minor adjustments to it,
as needed, along the way.
The table mutation is totally isolated in scope to the validation step(s)
where preconditions is used. Using dplyr code is suggested here since
the statements can be translated to SQL if necessary (i.e., if the target
table resides in a database). The code is most easily supplied as a one-sided
R formula (using a leading ~). In the formula representation, the .
serves as the input data table to be transformed (e.g., ~ . %>% dplyr::mutate(col_b = col_a + 10)). Alternatively, a function could instead
be supplied (e.g., function(x) dplyr::mutate(x, col_b = col_a + 10)).
Segments
By using the segments argument, it's possible to define a particular
validation with segments (or row slices) of the target table. An optional
expression or set of expressions that serve to segment the target table by
column values. Each expression can be given in one of two ways: (1) as column
names, or (2) as a two-sided formula where the LHS holds a column name and
the RHS contains the column values to segment on.
As an example of the first type of expression that can be used,
vars(a_column) will segment the target table in however many unique values
are present in the column called a_column. This is great if every unique
value in a particular column (like different locations, or different dates)
requires it's own repeating validation.
With a formula, we can be more selective with which column values should be
used for segmentation. Using a_column ~ c("group_1", "group_2") will
attempt to obtain two segments where one is a slice of data where the value
"group_1" exists in the column named "a_column", and, the other is a
slice where "group_2" exists in the same column. Each group of rows
resolved from the formula will result in a separate validation step.
If there are multiple columns specified then the potential number of
validation steps will be m columns multiplied by n segments resolved.
Segmentation will always occur after preconditions (i.e., statements that
mutate the target table), if any, are applied. With this type of one-two
combo, it's possible to generate labels for segmentation using an expression
for preconditions and refer to those labels in segments without having to
generate a separate version of the target table.
Actions
Often, we will want to specify actions for the validation. This argument,
present in every validation function, takes a specially-crafted list
object that is best produced by the action_levels() function. Read that
function's documentation for the lowdown on how to create reactions to
above-threshold failure levels in validation. The basic gist is that you'll
want at least a single threshold level (specified as either the fraction of
test units failed, or, an absolute value), often using the warn_at
argument. This is especially true when x is a table object because,
otherwise, nothing happens. For the col_vals_*()-type functions, using
action_levels(warn_at = 0.25) or action_levels(stop_at = 0.25) are good
choices depending on the situation (the first produces a warning when a
quarter of the total test units fails, the other stop()s at the same
threshold level).
Labels
label may be a single string or a character vector that matches the number
of expanded steps. label also supports {glue} syntax and exposes the
following dynamic variables contextualized to the current step:
-
"{.step}": The validation step name -
"{.col}": The current column name -
"{.seg_col}": The current segment's column name -
"{.seg_val}": The current segment's value/group
The glue context also supports ordinary expressions for further flexibility
(e.g., "{toupper(.step)}") as long as they return a length-1 string.
Briefs
Want to describe this validation step in some detail? Keep in mind that this
is only useful if x is an agent. If that's the case, brief the agent
with some text that fits. Don't worry if you don't want to do it. The
autobrief protocol is kicked in when brief = NULL and a simple brief will
then be automatically generated.
YAML
A pointblank agent can be written to YAML with yaml_write() and the
resulting YAML can be used to regenerate an agent (with yaml_read_agent())
or interrogate the target table (via yaml_agent_interrogate()). When
col_vals_make_set() is represented in YAML (under the top-level steps key
as a list member), the syntax closely follows the signature of the validation
function. Here is an example of how a complex call of col_vals_make_set()
as a validation step is expressed in R code and in the corresponding YAML
representation.
R statement:
agent %>%
  col_vals_make_set(
    columns = a,
    set = c(1, 2, 3, 4),
    preconditions = ~ . %>% dplyr::filter(a < 10),
    segments = b ~ c("group_1", "group_2"),
    actions = action_levels(warn_at = 0.1, stop_at = 0.2),
    label = "The `col_vals_make_set()` step.",
    active = FALSE
  )
YAML representation:
steps:
- col_vals_make_set:
   columns: c(a)
   set:
   - 1.0
   - 2.0
   - 3.0
   - 4.0
   preconditions: ~. %>% dplyr::filter(a < 10)
   segments: b ~ c("group_1", "group_2")
   actions:
     warn_fraction: 0.1
     stop_fraction: 0.2
   label: The `col_vals_make_set()` step.
   active: false
In practice, both of these will often be shorter as only the columns and
set arguments require values. Arguments with default values won't be
written to YAML when using yaml_write() (though it is acceptable to include
them with their default when generating the YAML by other means). It is also
possible to preview the transformation of an agent to YAML without any
writing to disk by using the yaml_agent_string() function.
Examples
The small_table dataset in the package will be used to validate that column
values are part of a given set.
small_table
#> # A tibble: 13 x 8
#>    date_time           date           a b             c      d e     f
#>    <dttm>              <date>     <int> <chr>     <dbl>  <dbl> <lgl> <chr>
#>  1 2016-01-04 11:00:00 2016-01-04     2 1-bcd-345     3  3423. TRUE  high
#>  2 2016-01-04 00:32:00 2016-01-04     3 5-egh-163     8 10000. TRUE  low
#>  3 2016-01-05 13:32:00 2016-01-05     6 8-kdg-938     3  2343. TRUE  high
#>  4 2016-01-06 17:23:00 2016-01-06     2 5-jdo-903    NA  3892. FALSE mid
#>  5 2016-01-09 12:36:00 2016-01-09     8 3-ldm-038     7   284. TRUE  low
#>  6 2016-01-11 06:15:00 2016-01-11     4 2-dhe-923     4  3291. TRUE  mid
#>  7 2016-01-15 18:46:00 2016-01-15     7 1-knw-093     3   843. TRUE  high
#>  8 2016-01-17 11:27:00 2016-01-17     4 5-boe-639     2  1036. FALSE low
#>  9 2016-01-20 04:30:00 2016-01-20     3 5-bce-642     9   838. FALSE high
#> 10 2016-01-20 04:30:00 2016-01-20     3 5-bce-642     9   838. FALSE high
#> 11 2016-01-26 20:07:00 2016-01-26     4 2-dmx-010     7   834. TRUE  low
#> 12 2016-01-28 02:51:00 2016-01-28     2 7-dmx-010     8   108. FALSE low
#> 13 2016-01-30 11:23:00 2016-01-30     1 3-dka-303    NA  2230. TRUE  high
A: Using an agent with validation functions and then interrogate()
Validate that values in column f comprise the values of low, mid, and
high, and, no other values. We'll determine if this validation has any
failing test units (there are 4 test units).
agent <-
  create_agent(tbl = small_table) %>%
  col_vals_make_set(
    columns = f, set = c("low", "mid", "high")
  ) %>%
  interrogate()
Printing the agent in the console shows the validation report in the
Viewer. Here is an excerpt of validation report, showing the single entry
that corresponds to the validation step demonstrated here.

B: Using the validation function directly on the data (no agent)
This way of using validation functions acts as a data filter. Data is passed
through but should stop() if there is a single test unit failing. The
behavior of side effects can be customized with the actions option.
small_table %>%
  col_vals_make_set(
    columns = f, set = c("low", "mid", "high")
  ) %>%
  dplyr::pull(f) %>%
  unique()
#> [1] "high" "low"  "mid"
C: Using the expectation function
With the expect_*() form, we would typically perform one validation at a
time. This is primarily used in testthat tests.
expect_col_vals_make_set(
  small_table,
  columns = f, set = c("low", "mid", "high")
)
D: Using the test function
With the test_*() form, we should get a single logical value returned to
us.
small_table %>%
  test_col_vals_make_set(
    columns = f, set = c("low", "mid", "high")
  )
#> [1] TRUE
Function ID
2-11
See Also
Other validation functions:
col_count_match(),
col_exists(),
col_is_character(),
col_is_date(),
col_is_factor(),
col_is_integer(),
col_is_logical(),
col_is_numeric(),
col_is_posix(),
col_schema_match(),
col_vals_between(),
col_vals_decreasing(),
col_vals_equal(),
col_vals_expr(),
col_vals_gt(),
col_vals_gte(),
col_vals_in_set(),
col_vals_increasing(),
col_vals_lt(),
col_vals_lte(),
col_vals_make_subset(),
col_vals_not_between(),
col_vals_not_equal(),
col_vals_not_in_set(),
col_vals_not_null(),
col_vals_null(),
col_vals_regex(),
col_vals_within_spec(),
conjointly(),
row_count_match(),
rows_complete(),
rows_distinct(),
serially(),
specially(),
tbl_match()
Is a set of values a subset of a column of values?
Description
The col_vals_make_subset() validation function, the
expect_col_vals_make_subset() expectation function, and the
test_col_vals_make_subset() test function all check whether all set
values are seen at least once in a table column. The validation function can
be used directly on a data table or with an agent object (technically, a
ptblank_agent object) whereas the expectation and test functions can only
be used with a data table. Each validation step or expectation will operate
over the number of test units that is equal to the number of elements in the
set.
Usage
col_vals_make_subset( x, columns, set, preconditions = NULL, segments = NULL, actions = NULL, step_id = NULL, label = NULL, brief = NULL, active = TRUE ) expect_col_vals_make_subset( object, columns, set, preconditions = NULL, threshold = 1 ) test_col_vals_make_subset( object, columns, set, preconditions = NULL, threshold = 1 )col_vals_make_subset( x, columns, set, preconditions = NULL, segments = NULL, actions = NULL, step_id = NULL, label = NULL, brief = NULL, active = TRUE ) expect_col_vals_make_subset( object, columns, set, preconditions = NULL, threshold = 1 ) test_col_vals_make_subset( object, columns, set, preconditions = NULL, threshold = 1 )
Arguments
x |
A pointblank agent or a data table
A data frame, tibble ( |
columns |
The target columns
A column-selecting expression, as one would use inside |
set |
Set of values
A vector of elements that is expected to be a subset of the unique values in the target column. |
preconditions |
Input table modification prior to validation
An optional expression for mutating the input table before proceeding with
the validation. This can either be provided as a one-sided R formula using
a leading |
segments |
Expressions for segmenting the target table
An optional expression or set of expressions (held in a list) that serve to segment the target table by column values. Each expression can be given in one of two ways: (1) as column names, or (2) as a two-sided formula where the LHS holds a column name and the RHS contains the column values to segment on. See the Segments section for more details on this. |
actions |
Thresholds and actions for different states
A list containing threshold levels so that the validation step can react
accordingly when exceeding the set levels for different states. This is to
be created with the |
step_id |
Manual setting of the step ID value
One or more optional identifiers for the single or multiple validation
steps generated from calling a validation function. The use of step IDs
serves to distinguish validation steps from each other and provide an
opportunity for supplying a more meaningful label compared to the step
index. By default this is |
label |
Optional label for the validation step
Optional label for the validation step. This label appears in the agent report and, for the best appearance, it should be kept quite short. See the Labels section for more information. |
brief |
Brief description for the validation step
A brief is a short, text-based description for the validation step. If
nothing is provided here then an autobrief is generated by the agent,
using the language provided in |
active |
Is the validation step active?
A logical value indicating whether the validation step should be active. If
the validation function is working with an agent, |
object |
A data table for expectations or tests
A data frame, tibble ( |
threshold |
The failure threshold
A simple failure threshold value for use with the expectation ( |
Value
For the validation function, the return value is either a
ptblank_agent object or a table object (depending on whether an agent
object or a table was passed to x). The expectation function invisibly
returns its input but, in the context of testing data, the function is
called primarily for its potential side-effects (e.g., signaling failure).
The test function returns a logical value.
Supported Input Tables
The types of data tables that are officially supported are:
-
data frames (
data.frame) and tibbles (tbl_df) -
Spark DataFrames (
tbl_spark) -
the following database tables (
tbl_dbi):-
PostgreSQL tables (using the
RPostgres::Postgres()as driver) -
MySQL tables (with
RMySQL::MySQL()) -
Microsoft SQL Server tables (via odbc)
-
BigQuery tables (using
bigrquery::bigquery()) -
DuckDB tables (through
duckdb::duckdb()) -
SQLite (with
RSQLite::SQLite())
-
Other database tables may work to varying degrees but they haven't been formally tested (so be mindful of this when using unsupported backends with pointblank).
Column Names
columns may be a single column (as symbol a or string "a") or a vector
of columns (c(a, b, c) or c("a", "b", "c")). {tidyselect} helpers
are also supported, such as contains("date") and where(is.double). If
passing an external vector of columns, it should be wrapped in all_of().
When multiple columns are selected by columns, the result will be an
expansion of validation steps to that number of columns (e.g.,
c(col_a, col_b) will result in the entry of two validation steps).
Previously, columns could be specified in vars(). This continues to work,
but c() offers the same capability and supersedes vars() in columns.
Preconditions
Providing expressions as preconditions means pointblank will preprocess
the target table during interrogation as a preparatory step. It might happen
that a particular validation requires a calculated column, some filtering of
rows, or the addition of columns via a join, etc. Especially for an
agent-based report this can be advantageous since we can develop a large
validation plan with a single target table and make minor adjustments to it,
as needed, along the way.
The table mutation is totally isolated in scope to the validation step(s)
where preconditions is used. Using dplyr code is suggested here since
the statements can be translated to SQL if necessary (i.e., if the target
table resides in a database). The code is most easily supplied as a one-sided
R formula (using a leading ~). In the formula representation, the .
serves as the input data table to be transformed (e.g., ~ . %>% dplyr::mutate(col_b = col_a + 10)). Alternatively, a function could instead
be supplied (e.g., function(x) dplyr::mutate(x, col_b = col_a + 10)).
Segments
By using the segments argument, it's possible to define a particular
validation with segments (or row slices) of the target table. An optional
expression or set of expressions that serve to segment the target table by
column values. Each expression can be given in one of two ways: (1) as column
names, or (2) as a two-sided formula where the LHS holds a column name and
the RHS contains the column values to segment on.
As an example of the first type of expression that can be used,
vars(a_column) will segment the target table in however many unique values
are present in the column called a_column. This is great if every unique
value in a particular column (like different locations, or different dates)
requires it's own repeating validation.
With a formula, we can be more selective with which column values should be
used for segmentation. Using a_column ~ c("group_1", "group_2") will
attempt to obtain two segments where one is a slice of data where the value
"group_1" exists in the column named "a_column", and, the other is a
slice where "group_2" exists in the same column. Each group of rows
resolved from the formula will result in a separate validation step.
If there are multiple columns specified then the potential number of
validation steps will be m columns multiplied by n segments resolved.
Segmentation will always occur after preconditions (i.e., statements that
mutate the target table), if any, are applied. With this type of one-two
combo, it's possible to generate labels for segmentation using an expression
for preconditions and refer to those labels in segments without having to
generate a separate version of the target table.
Actions
Often, we will want to specify actions for the validation. This argument,
present in every validation function, takes a specially-crafted list
object that is best produced by the action_levels() function. Read that
function's documentation for the lowdown on how to create reactions to
above-threshold failure levels in validation. The basic gist is that you'll
want at least a single threshold level (specified as either the fraction of
test units failed, or, an absolute value), often using the warn_at
argument. This is especially true when x is a table object because,
otherwise, nothing happens. For the col_vals_*()-type functions, using
action_levels(warn_at = 0.25) or action_levels(stop_at = 0.25) are good
choices depending on the situation (the first produces a warning when a
quarter of the total test units fails, the other stop()s at the same
threshold level).
Labels
label may be a single string or a character vector that matches the number
of expanded steps. label also supports {glue} syntax and exposes the
following dynamic variables contextualized to the current step:
-
"{.step}": The validation step name -
"{.col}": The current column name -
"{.seg_col}": The current segment's column name -
"{.seg_val}": The current segment's value/group
The glue context also supports ordinary expressions for further flexibility
(e.g., "{toupper(.step)}") as long as they return a length-1 string.
Briefs
Want to describe this validation step in some detail? Keep in mind that this
is only useful if x is an agent. If that's the case, brief the agent
with some text that fits. Don't worry if you don't want to do it. The
autobrief protocol is kicked in when brief = NULL and a simple brief will
then be automatically generated.
YAML
A pointblank agent can be written to YAML with yaml_write() and the
resulting YAML can be used to regenerate an agent (with yaml_read_agent())
or interrogate the target table (via yaml_agent_interrogate()). When
col_vals_make_subset() is represented in YAML (under the top-level steps
key as a list member), the syntax closely follows the signature of the
validation function. Here is an example of how a complex call of
col_vals_make_subset() as a validation step is expressed in R code and in
the corresponding YAML representation.
R statement:
agent %>%
  col_vals_make_subset(
    columns = a,
    set = c(1, 2, 3, 4),
    preconditions = ~ . %>% dplyr::filter(a < 10),
    segments = b ~ c("group_1", "group_2"),
    actions = action_levels(warn_at = 0.1, stop_at = 0.2),
    label = "The `col_vals_make_subset()` step.",
    active = FALSE
  )
YAML representation:
steps:
- col_vals_make_subset:
   columns: c(a)
   set:
   - 1.0
   - 2.0
   - 3.0
   - 4.0
   preconditions: ~. %>% dplyr::filter(a < 10)
   segments: b ~ c("group_1", "group_2")
   actions:
     warn_fraction: 0.1
     stop_fraction: 0.2
   label: The `col_vals_make_subset()` step.
   active: false
In practice, both of these will often be shorter as only the columns and
set arguments require values. Arguments with default values won't be
written to YAML when using yaml_write() (though it is acceptable to include
them with their default when generating the YAML by other means). It is also
possible to preview the transformation of an agent to YAML without any
writing to disk by using the yaml_agent_string() function.
Examples
The small_table dataset in the package will be used to validate that column
values are part of a given set.
small_table
#> # A tibble: 13 x 8
#>    date_time           date           a b             c      d e     f
#>    <dttm>              <date>     <int> <chr>     <dbl>  <dbl> <lgl> <chr>
#>  1 2016-01-04 11:00:00 2016-01-04     2 1-bcd-345     3  3423. TRUE  high
#>  2 2016-01-04 00:32:00 2016-01-04     3 5-egh-163     8 10000. TRUE  low
#>  3 2016-01-05 13:32:00 2016-01-05     6 8-kdg-938     3  2343. TRUE  high
#>  4 2016-01-06 17:23:00 2016-01-06     2 5-jdo-903    NA  3892. FALSE mid
#>  5 2016-01-09 12:36:00 2016-01-09     8 3-ldm-038     7   284. TRUE  low
#>  6 2016-01-11 06:15:00 2016-01-11     4 2-dhe-923     4  3291. TRUE  mid
#>  7 2016-01-15 18:46:00 2016-01-15     7 1-knw-093     3   843. TRUE  high
#>  8 2016-01-17 11:27:00 2016-01-17     4 5-boe-639     2  1036. FALSE low
#>  9 2016-01-20 04:30:00 2016-01-20     3 5-bce-642     9   838. FALSE high
#> 10 2016-01-20 04:30:00 2016-01-20     3 5-bce-642     9   838. FALSE high
#> 11 2016-01-26 20:07:00 2016-01-26     4 2-dmx-010     7   834. TRUE  low
#> 12 2016-01-28 02:51:00 2016-01-28     2 7-dmx-010     8   108. FALSE low
#> 13 2016-01-30 11:23:00 2016-01-30     1 3-dka-303    NA  2230. TRUE  high
A: Using an agent with validation functions and then interrogate()
Validate that the distinct set of values in column f contains at least the
subset defined as low and high (the column actually has both of those and
some mid values). We'll determine if this validation has any failing test
units (there are 2 test units, one per element in the set).
agent <-
  create_agent(tbl = small_table) %>%
  col_vals_make_subset(
    columns = f, set = c("low", "high")
  ) %>%
  interrogate()
Printing the agent in the console shows the validation report in the
Viewer. Here is an excerpt of validation report, showing the single entry
that corresponds to the validation step demonstrated here.

B: Using the validation function directly on the data (no agent)
This way of using validation functions acts as a data filter. Data is passed
through but should stop() if there is a single test unit failing. The
behavior of side effects can be customized with the actions option.
small_table %>%
  col_vals_make_subset(
    columns = f, set = c("low", "high")
  ) %>%
  dplyr::pull(f) %>%
  unique()
#> [1] "high" "low"  "mid"
C: Using the expectation function
With the expect_*() form, we would typically perform one validation at a
time. This is primarily used in testthat tests.
expect_col_vals_make_subset(
  small_table,
  columns = f, set = c("low", "high")
)
D: Using the test function
With the test_*() form, we should get a single logical value returned to
us.
small_table %>%
  test_col_vals_make_subset(
    columns = f, set = c("low", "high")
  )
#> [1] TRUE
Function ID
2-12
See Also
Other validation functions:
col_count_match(),
col_exists(),
col_is_character(),
col_is_date(),
col_is_factor(),
col_is_integer(),
col_is_logical(),
col_is_numeric(),
col_is_posix(),
col_schema_match(),
col_vals_between(),
col_vals_decreasing(),
col_vals_equal(),
col_vals_expr(),
col_vals_gt(),
col_vals_gte(),
col_vals_in_set(),
col_vals_increasing(),
col_vals_lt(),
col_vals_lte(),
col_vals_make_set(),
col_vals_not_between(),
col_vals_not_equal(),
col_vals_not_in_set(),
col_vals_not_null(),
col_vals_null(),
col_vals_regex(),
col_vals_within_spec(),
conjointly(),
row_count_match(),
rows_complete(),
rows_distinct(),
serially(),
specially(),
tbl_match()
Do column data lie outside of two specified values or data in other columns?
Description
The col_vals_not_between() validation function, the
expect_col_vals_not_between() expectation function, and the
test_col_vals_not_between() test function all check whether column values
in a table do not fall within a range. The range specified with three
arguments: left, right, and inclusive. The left and right values
specify the lower and upper bounds. The bounds can be specified as single,
literal values or as column names given in vars(). The inclusive
argument, as a vector of two logical values relating to left and right,
states whether each bound is inclusive or not. The default is c(TRUE, TRUE), where both endpoints are inclusive (i.e., [left, right]). For
partially-unbounded versions of this function, we can use the
col_vals_lt(), col_vals_lte(), col_vals_gt(), or col_vals_gte()
validation functions. The validation function can be used directly on a data
table or with an agent object (technically, a ptblank_agent object)
whereas the expectation and test functions can only be used with a data
table. Each validation step or expectation will operate over the number of
test units that is equal to the number of rows in the table (after any
preconditions have been applied).
Usage
col_vals_not_between( x, columns, left, right, inclusive = c(TRUE, TRUE), na_pass = FALSE, preconditions = NULL, segments = NULL, actions = NULL, step_id = NULL, label = NULL, brief = NULL, active = TRUE ) expect_col_vals_not_between( object, columns, left, right, inclusive = c(TRUE, TRUE), na_pass = FALSE, preconditions = NULL, threshold = 1 ) test_col_vals_not_between( object, columns, left, right, inclusive = c(TRUE, TRUE), na_pass = FALSE, preconditions = NULL, threshold = 1 )col_vals_not_between( x, columns, left, right, inclusive = c(TRUE, TRUE), na_pass = FALSE, preconditions = NULL, segments = NULL, actions = NULL, step_id = NULL, label = NULL, brief = NULL, active = TRUE ) expect_col_vals_not_between( object, columns, left, right, inclusive = c(TRUE, TRUE), na_pass = FALSE, preconditions = NULL, threshold = 1 ) test_col_vals_not_between( object, columns, left, right, inclusive = c(TRUE, TRUE), na_pass = FALSE, preconditions = NULL, threshold = 1 )
Arguments
x |
A pointblank agent or a data table
A data frame, tibble ( |
columns |
The target columns
A column-selecting expression, as one would use inside |
left |
Definition of left bound
The lower bound for the range. The validation includes this bound
value (if the first element in |
right |
Definition of right bound
The upper bound for the range. The validation includes this
bound value (if the second element in |
inclusive |
Inclusiveness of bounds
A two-element logical value that indicates whether the |
na_pass |
Allow missing values to pass validation
Should any encountered |
preconditions |
Input table modification prior to validation
An optional expression for mutating the input table before proceeding with
the validation. This can either be provided as a one-sided R formula using
a leading |
segments |
Expressions for segmenting the target table
An optional expression or set of expressions (held in a list) that serve to segment the target table by column values. Each expression can be given in one of two ways: (1) as column names, or (2) as a two-sided formula where the LHS holds a column name and the RHS contains the column values to segment on. See the Segments section for more details on this. |
actions |
Thresholds and actions for different states
A list containing threshold levels so that the validation step can react
accordingly when exceeding the set levels for different states. This is to
be created with the |
step_id |
Manual setting of the step ID value
One or more optional identifiers for the single or multiple validation
steps generated from calling a validation function. The use of step IDs
serves to distinguish validation steps from each other and provide an
opportunity for supplying a more meaningful label compared to the step
index. By default this is |
label |
Optional label for the validation step
Optional label for the validation step. This label appears in the agent report and, for the best appearance, it should be kept quite short. See the Labels section for more information. |
brief |
Brief description for the validation step
A brief is a short, text-based description for the validation step. If
nothing is provided here then an autobrief is generated by the agent,
using the language provided in |
active |
Is the validation step active?
A logical value indicating whether the validation step should be active. If
the validation function is working with an agent, |
object |
A data table for expectations or tests
A data frame, tibble ( |
threshold |
The failure threshold
A simple failure threshold value for use with the expectation ( |
Value
For the validation function, the return value is either a
ptblank_agent object or a table object (depending on whether an agent
object or a table was passed to x). The expectation function invisibly
returns its input but, in the context of testing data, the function is
called primarily for its potential side-effects (e.g., signaling failure).
The test function returns a logical value.
Supported Input Tables
The types of data tables that are officially supported are:
-
data frames (
data.frame) and tibbles (tbl_df) -
Spark DataFrames (
tbl_spark) -
the following database tables (
tbl_dbi):-
PostgreSQL tables (using the
RPostgres::Postgres()as driver) -
MySQL tables (with
RMySQL::MySQL()) -
Microsoft SQL Server tables (via odbc)
-
BigQuery tables (using
bigrquery::bigquery()) -
DuckDB tables (through
duckdb::duckdb()) -
SQLite (with
RSQLite::SQLite())
-
Other database tables may work to varying degrees but they haven't been formally tested (so be mindful of this when using unsupported backends with pointblank).
Column Names
columns may be a single column (as symbol a or string "a") or a vector
of columns (c(a, b, c) or c("a", "b", "c")). {tidyselect} helpers
are also supported, such as contains("date") and where(is.double). If
passing an external vector of columns, it should be wrapped in all_of().
When multiple columns are selected by columns, the result will be an
expansion of validation steps to that number of columns (e.g.,
c(col_a, col_b) will result in the entry of two validation steps).
Previously, columns could be specified in vars(). This continues to work,
but c() offers the same capability and supersedes vars() in columns.
Missing Values
This validation function supports special handling of NA values. The
na_pass argument will determine whether an NA value appearing in a test
unit should be counted as a pass or a fail. The default of na_pass = FALSE means that any NAs encountered will accumulate failing test units.
Preconditions
Providing expressions as preconditions means pointblank will preprocess
the target table during interrogation as a preparatory step. It might happen
that a particular validation requires a calculated column, some filtering of
rows, or the addition of columns via a join, etc. Especially for an
agent-based report this can be advantageous since we can develop a large
validation plan with a single target table and make minor adjustments to it,
as needed, along the way.
The table mutation is totally isolated in scope to the validation step(s)
where preconditions is used. Using dplyr code is suggested here since
the statements can be translated to SQL if necessary (i.e., if the target
table resides in a database). The code is most easily supplied as a one-sided
R formula (using a leading ~). In the formula representation, the .
serves as the input data table to be transformed (e.g., ~ . %>% dplyr::mutate(col_b = col_a + 10)). Alternatively, a function could instead
be supplied (e.g., function(x) dplyr::mutate(x, col_b = col_a + 10)).
Segments
By using the segments argument, it's possible to define a particular
validation with segments (or row slices) of the target table. An optional
expression or set of expressions that serve to segment the target table by
column values. Each expression can be given in one of two ways: (1) as column
names, or (2) as a two-sided formula where the LHS holds a column name and
the RHS contains the column values to segment on.
As an example of the first type of expression that can be used,
vars(a_column) will segment the target table in however many unique values
are present in the column called a_column. This is great if every unique
value in a particular column (like different locations, or different dates)
requires it's own repeating validation.
With a formula, we can be more selective with which column values should be
used for segmentation. Using a_column ~ c("group_1", "group_2") will
attempt to obtain two segments where one is a slice of data where the value
"group_1" exists in the column named "a_column", and, the other is a
slice where "group_2" exists in the same column. Each group of rows
resolved from the formula will result in a separate validation step.
If there are multiple columns specified then the potential number of
validation steps will be m columns multiplied by n segments resolved.
Segmentation will always occur after preconditions (i.e., statements that
mutate the target table), if any, are applied. With this type of one-two
combo, it's possible to generate labels for segmentation using an expression
for preconditions and refer to those labels in segments without having to
generate a separate version of the target table.
Actions
Often, we will want to specify actions for the validation. This argument,
present in every validation function, takes a specially-crafted list
object that is best produced by the action_levels() function. Read that
function's documentation for the lowdown on how to create reactions to
above-threshold failure levels in validation. The basic gist is that you'll
want at least a single threshold level (specified as either the fraction of
test units failed, or, an absolute value), often using the warn_at
argument. This is especially true when x is a table object because,
otherwise, nothing happens. For the col_vals_*()-type functions, using
action_levels(warn_at = 0.25) or action_levels(stop_at = 0.25) are good
choices depending on the situation (the first produces a warning when a
quarter of the total test units fails, the other stop()s at the same
threshold level).
Labels
label may be a single string or a character vector that matches the number
of expanded steps. label also supports {glue} syntax and exposes the
following dynamic variables contextualized to the current step:
-
"{.step}": The validation step name -
"{.col}": The current column name -
"{.seg_col}": The current segment's column name -
"{.seg_val}": The current segment's value/group
The glue context also supports ordinary expressions for further flexibility
(e.g., "{toupper(.step)}") as long as they return a length-1 string.
Briefs
Want to describe this validation step in some detail? Keep in mind that this
is only useful if x is an agent. If that's the case, brief the agent
with some text that fits. Don't worry if you don't want to do it. The
autobrief protocol is kicked in when brief = NULL and a simple brief will
then be automatically generated.
YAML
A pointblank agent can be written to YAML with yaml_write() and the
resulting YAML can be used to regenerate an agent (with yaml_read_agent())
or interrogate the target table (via yaml_agent_interrogate()). When
col_vals_not_between() is represented in YAML (under the top-level steps
key as a list member), the syntax closely follows the signature of the
validation function. Here is an example of how a complex call of
col_vals_not_between() as a validation step is expressed in R code and in
the corresponding YAML representation.
R statement:
agent %>%
col_vals_not_between(
columns = a,
left = 1,
right = 2,
inclusive = c(TRUE, FALSE),
na_pass = TRUE,
preconditions = ~ . %>% dplyr::filter(a < 10),
segments = b ~ c("group_1", "group_2"),
actions = action_levels(warn_at = 0.1, stop_at = 0.2),
label = "The `col_vals_not_between()` step.",
active = FALSE
)
YAML representation:
steps:
- col_vals_not_between:
columns: c(a)
left: 1.0
right: 2.0
inclusive:
- true
- false
na_pass: true
preconditions: ~. %>% dplyr::filter(a < 10)
segments: b ~ c("group_1", "group_2")
actions:
warn_fraction: 0.1
stop_fraction: 0.2
label: The `col_vals_not_between()` step.
active: false
In practice, both of these will often be shorter as only the columns,
left, and right arguments require values. Arguments with default values
won't be written to YAML when using yaml_write() (though it is acceptable
to include them with their default when generating the YAML by other means).
It is also possible to preview the transformation of an agent to YAML without
any writing to disk by using the yaml_agent_string() function.
Examples
The small_table dataset in the package has a column of numeric values in
c (there are a few NAs in that column). The following examples will
validate the values in that numeric column.
small_table #> # A tibble: 13 x 8 #> date_time date a b c d e f #> <dttm> <date> <int> <chr> <dbl> <dbl> <lgl> <chr> #> 1 2016-01-04 11:00:00 2016-01-04 2 1-bcd-345 3 3423. TRUE high #> 2 2016-01-04 00:32:00 2016-01-04 3 5-egh-163 8 10000. TRUE low #> 3 2016-01-05 13:32:00 2016-01-05 6 8-kdg-938 3 2343. TRUE high #> 4 2016-01-06 17:23:00 2016-01-06 2 5-jdo-903 NA 3892. FALSE mid #> 5 2016-01-09 12:36:00 2016-01-09 8 3-ldm-038 7 284. TRUE low #> 6 2016-01-11 06:15:00 2016-01-11 4 2-dhe-923 4 3291. TRUE mid #> 7 2016-01-15 18:46:00 2016-01-15 7 1-knw-093 3 843. TRUE high #> 8 2016-01-17 11:27:00 2016-01-17 4 5-boe-639 2 1036. FALSE low #> 9 2016-01-20 04:30:00 2016-01-20 3 5-bce-642 9 838. FALSE high #> 10 2016-01-20 04:30:00 2016-01-20 3 5-bce-642 9 838. FALSE high #> 11 2016-01-26 20:07:00 2016-01-26 4 2-dmx-010 7 834. TRUE low #> 12 2016-01-28 02:51:00 2016-01-28 2 7-dmx-010 8 108. FALSE low #> 13 2016-01-30 11:23:00 2016-01-30 1 3-dka-303 NA 2230. TRUE high
A: Using an agent with validation functions and then interrogate()
Validate that values in column c are all between 10 and 20. Because
there are NA values, we'll choose to let those pass validation by setting
na_pass = TRUE. We'll determine if this validation has any failing test
units (there are 13 test units, one for each row).
agent <-
create_agent(tbl = small_table) %>%
col_vals_not_between(
columns = c,
left = 10, right = 20,
na_pass = TRUE
) %>%
interrogate()
Printing the agent in the console shows the validation report in the
Viewer. Here is an excerpt of validation report, showing the single entry
that corresponds to the validation step demonstrated here.

B: Using the validation function directly on the data (no agent)
This way of using validation functions acts as a data filter. Data is passed
through but should stop() if there is a single test unit failing. The
behavior of side effects can be customized with the actions option.
small_table %>%
col_vals_not_between(
columns = c,
left = 10, right = 20,
na_pass = TRUE
) %>%
dplyr::pull(c)
#> [1] 3 8 3 NA 7 4 3 2 9 9 7 8 NA
C: Using the expectation function
With the expect_*() form, we would typically perform one validation at a
time. This is primarily used in testthat tests.
expect_col_vals_not_between( small_table, columns = c, left = 10, right = 20, na_pass = TRUE )
D: Using the test function
With the test_*() form, we should get a single logical value returned to
us.
small_table %>%
test_col_vals_not_between(
columns = c,
left = 10, right = 20,
na_pass = TRUE
)
#> [1] TRUE
An additional note on the bounds for this function: they are inclusive by
default. We can modify the inclusiveness of the upper and lower bounds with
the inclusive option, which is a length-2 logical vector.
In changing the lower bound to be 9 and making it non-inclusive, we get
TRUE since although two values are 9 and they fall outside of the lower
(or left) bound (and any values 'not between' count as passing test units).
small_table %>%
test_col_vals_not_between(
columns = c,
left = 9, right = 20,
inclusive = c(FALSE, TRUE),
na_pass = TRUE
)
#> [1] TRUE
Function ID
2-8
See Also
The analogue to this function: col_vals_between().
Other validation functions:
col_count_match(),
col_exists(),
col_is_character(),
col_is_date(),
col_is_factor(),
col_is_integer(),
col_is_logical(),
col_is_numeric(),
col_is_posix(),
col_schema_match(),
col_vals_between(),
col_vals_decreasing(),
col_vals_equal(),
col_vals_expr(),
col_vals_gt(),
col_vals_gte(),
col_vals_in_set(),
col_vals_increasing(),
col_vals_lt(),
col_vals_lte(),
col_vals_make_set(),
col_vals_make_subset(),
col_vals_not_equal(),
col_vals_not_in_set(),
col_vals_not_null(),
col_vals_null(),
col_vals_regex(),
col_vals_within_spec(),
conjointly(),
row_count_match(),
rows_complete(),
rows_distinct(),
serially(),
specially(),
tbl_match()
Are column data not equal to a fixed value or data in another column?
Description
The col_vals_not_equal() validation function, the
expect_col_vals_not_equal() expectation function, and the
test_col_vals_not_equal() test function all check whether column values in
a table are not equal to a specified value. The validation function can
be used directly on a data table or with an agent object (technically, a
ptblank_agent object) whereas the expectation and test functions can only
be used with a data table. Each validation step or expectation will operate
over the number of test units that is equal to the number of rows in the
table (after any preconditions have been applied).
Usage
col_vals_not_equal( x, columns, value, na_pass = FALSE, preconditions = NULL, segments = NULL, actions = NULL, step_id = NULL, label = NULL, brief = NULL, active = TRUE ) expect_col_vals_not_equal( object, columns, value, na_pass = FALSE, preconditions = NULL, threshold = 1 ) test_col_vals_not_equal( object, columns, value, na_pass = FALSE, preconditions = NULL, threshold = 1 )col_vals_not_equal( x, columns, value, na_pass = FALSE, preconditions = NULL, segments = NULL, actions = NULL, step_id = NULL, label = NULL, brief = NULL, active = TRUE ) expect_col_vals_not_equal( object, columns, value, na_pass = FALSE, preconditions = NULL, threshold = 1 ) test_col_vals_not_equal( object, columns, value, na_pass = FALSE, preconditions = NULL, threshold = 1 )
Arguments
x |
A pointblank agent or a data table
A data frame, tibble ( |
columns |
The target columns
A column-selecting expression, as one would use inside |
value |
Value for comparison
A value used for this test of inequality. This can be a single value or a
compatible column given in |
na_pass |
Allow missing values to pass validation
Should any encountered |
preconditions |
Input table modification prior to validation
An optional expression for mutating the input table before proceeding with
the validation. This can either be provided as a one-sided R formula using
a leading |
segments |
Expressions for segmenting the target table
An optional expression or set of expressions (held in a list) that serve to segment the target table by column values. Each expression can be given in one of two ways: (1) as column names, or (2) as a two-sided formula where the LHS holds a column name and the RHS contains the column values to segment on. See the Segments section for more details on this. |
actions |
Thresholds and actions for different states
A list containing threshold levels so that the validation step can react
accordingly when exceeding the set levels for different states. This is to
be created with the |
step_id |
Manual setting of the step ID value
One or more optional identifiers for the single or multiple validation
steps generated from calling a validation function. The use of step IDs
serves to distinguish validation steps from each other and provide an
opportunity for supplying a more meaningful label compared to the step
index. By default this is |
label |
Optional label for the validation step
Optional label for the validation step. This label appears in the agent report and, for the best appearance, it should be kept quite short. See the Labels section for more information. |
brief |
Brief description for the validation step
A brief is a short, text-based description for the validation step. If
nothing is provided here then an autobrief is generated by the agent,
using the language provided in |
active |
Is the validation step active?
A logical value indicating whether the validation step should be active. If
the validation function is working with an agent, |
object |
A data table for expectations or tests
A data frame, tibble ( |
threshold |
The failure threshold
A simple failure threshold value for use with the expectation ( |
Value
For the validation function, the return value is either a
ptblank_agent object or a table object (depending on whether an agent
object or a table was passed to x). The expectation function invisibly
returns its input but, in the context of testing data, the function is
called primarily for its potential side-effects (e.g., signaling failure).
The test function returns a logical value.
Supported Input Tables
The types of data tables that are officially supported are:
-
data frames (
data.frame) and tibbles (tbl_df) -
Spark DataFrames (
tbl_spark) -
the following database tables (
tbl_dbi):-
PostgreSQL tables (using the
RPostgres::Postgres()as driver) -
MySQL tables (with
RMySQL::MySQL()) -
Microsoft SQL Server tables (via odbc)
-
BigQuery tables (using
bigrquery::bigquery()) -
DuckDB tables (through
duckdb::duckdb()) -
SQLite (with
RSQLite::SQLite())
-
Other database tables may work to varying degrees but they haven't been formally tested (so be mindful of this when using unsupported backends with pointblank).
Column Names
columns may be a single column (as symbol a or string "a") or a vector
of columns (c(a, b, c) or c("a", "b", "c")). {tidyselect} helpers
are also supported, such as contains("date") and where(is.double). If
passing an external vector of columns, it should be wrapped in all_of().
When multiple columns are selected by columns, the result will be an
expansion of validation steps to that number of columns (e.g.,
c(col_a, col_b) will result in the entry of two validation steps).
Previously, columns could be specified in vars(). This continues to work,
but c() offers the same capability and supersedes vars() in columns.
Missing Values
This validation function supports special handling of NA values. The
na_pass argument will determine whether an NA value appearing in a test
unit should be counted as a pass or a fail. The default of na_pass = FALSE means that any NAs encountered will accumulate failing test units.
Preconditions
Providing expressions as preconditions means pointblank will preprocess
the target table during interrogation as a preparatory step. It might happen
that a particular validation requires a calculated column, some filtering of
rows, or the addition of columns via a join, etc. Especially for an
agent-based report this can be advantageous since we can develop a large
validation plan with a single target table and make minor adjustments to it,
as needed, along the way.
The table mutation is totally isolated in scope to the validation step(s)
where preconditions is used. Using dplyr code is suggested here since
the statements can be translated to SQL if necessary (i.e., if the target
table resides in a database). The code is most easily supplied as a one-sided
R formula (using a leading ~). In the formula representation, the .
serves as the input data table to be transformed (e.g., ~ . %>% dplyr::mutate(col_b = col_a + 10)). Alternatively, a function could instead
be supplied (e.g., function(x) dplyr::mutate(x, col_b = col_a + 10)).
Segments
By using the segments argument, it's possible to define a particular
validation with segments (or row slices) of the target table. An optional
expression or set of expressions that serve to segment the target table by
column values. Each expression can be given in one of two ways: (1) as column
names, or (2) as a two-sided formula where the LHS holds a column name and
the RHS contains the column values to segment on.
As an example of the first type of expression that can be used,
vars(a_column) will segment the target table in however many unique values
are present in the column called a_column. This is great if every unique
value in a particular column (like different locations, or different dates)
requires it's own repeating validation.
With a formula, we can be more selective with which column values should be
used for segmentation. Using a_column ~ c("group_1", "group_2") will
attempt to obtain two segments where one is a slice of data where the value
"group_1" exists in the column named "a_column", and, the other is a
slice where "group_2" exists in the same column. Each group of rows
resolved from the formula will result in a separate validation step.
If there are multiple columns specified then the potential number of
validation steps will be m columns multiplied by n segments resolved.
Segmentation will always occur after preconditions (i.e., statements that
mutate the target table), if any, are applied. With this type of one-two
combo, it's possible to generate labels for segmentation using an expression
for preconditions and refer to those labels in segments without having to
generate a separate version of the target table.
Actions
Often, we will want to specify actions for the validation. This argument,
present in every validation function, takes a specially-crafted list
object that is best produced by the action_levels() function. Read that
function's documentation for the lowdown on how to create reactions to
above-threshold failure levels in validation. The basic gist is that you'll
want at least a single threshold level (specified as either the fraction of
test units failed, or, an absolute value), often using the warn_at
argument. This is especially true when x is a table object because,
otherwise, nothing happens. For the col_vals_*()-type functions, using
action_levels(warn_at = 0.25) or action_levels(stop_at = 0.25) are good
choices depending on the situation (the first produces a warning when a
quarter of the total test units fails, the other stop()s at the same
threshold level).
Labels
label may be a single string or a character vector that matches the number
of expanded steps. label also supports {glue} syntax and exposes the
following dynamic variables contextualized to the current step:
-
"{.step}": The validation step name -
"{.col}": The current column name -
"{.seg_col}": The current segment's column name -
"{.seg_val}": The current segment's value/group
The glue context also supports ordinary expressions for further flexibility
(e.g., "{toupper(.step)}") as long as they return a length-1 string.
Briefs
Want to describe this validation step in some detail? Keep in mind that this
is only useful if x is an agent. If that's the case, brief the agent
with some text that fits. Don't worry if you don't want to do it. The
autobrief protocol is kicked in when brief = NULL and a simple brief will
then be automatically generated.
YAML
A pointblank agent can be written to YAML with yaml_write() and the
resulting YAML can be used to regenerate an agent (with yaml_read_agent())
or interrogate the target table (via yaml_agent_interrogate()). When
col_vals_not_equal() is represented in YAML (under the top-level steps
key as a list member), the syntax closely follows the signature of the
validation function. Here is an example of how a complex call of
col_vals_not_equal() as a validation step is expressed in R code and in the
corresponding YAML representation.
R statement:
agent %>%
col_vals_not_equal(
columns = a,
value = 1,
na_pass = TRUE,
preconditions = ~ . %>% dplyr::filter(a < 10),
segments = b ~ c("group_1", "group_2"),
actions = action_levels(warn_at = 0.1, stop_at = 0.2),
label = "The `col_vals_not_equal()` step.",
active = FALSE
)
YAML representation:
steps:
- col_vals_not_equal:
columns: c(a)
value: 1.0
na_pass: true
preconditions: ~. %>% dplyr::filter(a < 10)
segments: b ~ c("group_1", "group_2")
actions:
warn_fraction: 0.1
stop_fraction: 0.2
label: The `col_vals_not_equal()` step.
active: false
In practice, both of these will often be shorter as only the columns and
value arguments require values. Arguments with default values won't be
written to YAML when using yaml_write() (though it is acceptable to include
them with their default when generating the YAML by other means). It is also
possible to preview the transformation of an agent to YAML without any
writing to disk by using the yaml_agent_string() function.
Examples
For all of the examples here, we'll use a simple table with three numeric
columns (a, b, and c) and three character columns (d, e, and f).
tbl <-
dplyr::tibble(
a = c(5, 5, 5, 5, 5, 5),
b = c(1, 1, 1, 2, 2, 2),
c = c(1, 1, 1, 2, 2, 2),
d = LETTERS[c(1:3, 5:7)],
e = LETTERS[c(1:6)],
f = LETTERS[c(1:6)]
)
tbl
#> # A tibble: 6 x 6
#> a b c d e f
#> <dbl> <dbl> <dbl> <chr> <chr> <chr>
#> 1 5 1 1 A A A
#> 2 5 1 1 B B B
#> 3 5 1 1 C C C
#> 4 5 2 2 E D D
#> 5 5 2 2 F E E
#> 6 5 2 2 G F F
A: Using an agent with validation functions and then interrogate()
Validate that values in column a are all not equal to the value of 6.
We'll determine if this validation has any failing test units (there are 6
test units, one for each row).
agent <- create_agent(tbl = tbl) %>% col_vals_not_equal(columns = a, value = 6) %>% interrogate()
Printing the agent in the console shows the validation report in the
Viewer. Here is an excerpt of validation report, showing the single entry
that corresponds to the validation step demonstrated here.

B: Using the validation function directly on the data (no agent)
This way of using validation functions acts as a data filter. Data is passed
through but should stop() if there is a single test unit failing. The
behavior of side effects can be customized with the actions option.
tbl %>% col_vals_not_equal(columns = a, value = 6) %>% dplyr::pull(a) #> [1] 5 5 5 5 5 5
C: Using the expectation function
With the expect_*() form, we would typically perform one validation at a
time. This is primarily used in testthat tests.
expect_col_vals_not_equal(tbl, columns = a, value = 6)
D: Using the test function
With the test_*() form, we should get a single logical value returned to
us.
test_col_vals_not_equal(tbl, columns = a, value = 6) #> [1] TRUE
Function ID
2-4
See Also
The analogue to this function: col_vals_equal().
Other validation functions:
col_count_match(),
col_exists(),
col_is_character(),
col_is_date(),
col_is_factor(),
col_is_integer(),
col_is_logical(),
col_is_numeric(),
col_is_posix(),
col_schema_match(),
col_vals_between(),
col_vals_decreasing(),
col_vals_equal(),
col_vals_expr(),
col_vals_gt(),
col_vals_gte(),
col_vals_in_set(),
col_vals_increasing(),
col_vals_lt(),
col_vals_lte(),
col_vals_make_set(),
col_vals_make_subset(),
col_vals_not_between(),
col_vals_not_in_set(),
col_vals_not_null(),
col_vals_null(),
col_vals_regex(),
col_vals_within_spec(),
conjointly(),
row_count_match(),
rows_complete(),
rows_distinct(),
serially(),
specially(),
tbl_match()
Are data not part of a specified set of values?
Description
The col_vals_not_in_set() validation function, the
expect_col_vals_not_in_set() expectation function, and the
test_col_vals_not_in_set() test function all check whether column values in
a table are not part of a specified set of values. The validation
function can be used directly on a data table or with an agent object
(technically, a ptblank_agent object) whereas the expectation and test
functions can only be used with a data table. Each validation step or
expectation will operate over the number of test units that is equal to the
number of rows in the table (after any preconditions have been applied).
Usage
col_vals_not_in_set( x, columns, set, preconditions = NULL, segments = NULL, actions = NULL, step_id = NULL, label = NULL, brief = NULL, active = TRUE ) expect_col_vals_not_in_set( object, columns, set, preconditions = NULL, threshold = 1 ) test_col_vals_not_in_set( object, columns, set, preconditions = NULL, threshold = 1 )col_vals_not_in_set( x, columns, set, preconditions = NULL, segments = NULL, actions = NULL, step_id = NULL, label = NULL, brief = NULL, active = TRUE ) expect_col_vals_not_in_set( object, columns, set, preconditions = NULL, threshold = 1 ) test_col_vals_not_in_set( object, columns, set, preconditions = NULL, threshold = 1 )
Arguments
x |
A pointblank agent or a data table
A data frame, tibble ( |
columns |
The target columns
A column-selecting expression, as one would use inside |
set |
Set of values
A vector of numeric or string-based elements, where column values found
within this |
preconditions |
Input table modification prior to validation
An optional expression for mutating the input table before proceeding with
the validation. This can either be provided as a one-sided R formula using
a leading |
segments |
Expressions for segmenting the target table
An optional expression or set of expressions (held in a list) that serve to segment the target table by column values. Each expression can be given in one of two ways: (1) as column names, or (2) as a two-sided formula where the LHS holds a column name and the RHS contains the column values to segment on. See the Segments section for more details on this. |
actions |
Thresholds and actions for different states
A list containing threshold levels so that the validation step can react
accordingly when exceeding the set levels for different states. This is to
be created with the |
step_id |
Manual setting of the step ID value
One or more optional identifiers for the single or multiple validation
steps generated from calling a validation function. The use of step IDs
serves to distinguish validation steps from each other and provide an
opportunity for supplying a more meaningful label compared to the step
index. By default this is |
label |
Optional label for the validation step
Optional label for the validation step. This label appears in the agent report and, for the best appearance, it should be kept quite short. See the Labels section for more information. |
brief |
Brief description for the validation step
A brief is a short, text-based description for the validation step. If
nothing is provided here then an autobrief is generated by the agent,
using the language provided in |
active |
Is the validation step active?
A logical value indicating whether the validation step should be active. If
the validation function is working with an agent, |
object |
A data table for expectations or tests
A data frame, tibble ( |
threshold |
The failure threshold
A simple failure threshold value for use with the expectation ( |
Value
For the validation function, the return value is either a
ptblank_agent object or a table object (depending on whether an agent
object or a table was passed to x). The expectation function invisibly
returns its input but, in the context of testing data, the function is
called primarily for its potential side-effects (e.g., signaling failure).
The test function returns a logical value.
Supported Input Tables
The types of data tables that are officially supported are:
-
data frames (
data.frame) and tibbles (tbl_df) -
Spark DataFrames (
tbl_spark) -
the following database tables (
tbl_dbi):-
PostgreSQL tables (using the
RPostgres::Postgres()as driver) -
MySQL tables (with
RMySQL::MySQL()) -
Microsoft SQL Server tables (via odbc)
-
BigQuery tables (using
bigrquery::bigquery()) -
DuckDB tables (through
duckdb::duckdb()) -
SQLite (with
RSQLite::SQLite())
-
Other database tables may work to varying degrees but they haven't been formally tested (so be mindful of this when using unsupported backends with pointblank).
Column Names
columns may be a single column (as symbol a or string "a") or a vector
of columns (c(a, b, c) or c("a", "b", "c")). {tidyselect} helpers
are also supported, such as contains("date") and where(is.double). If
passing an external vector of columns, it should be wrapped in all_of().
When multiple columns are selected by columns, the result will be an
expansion of validation steps to that number of columns (e.g.,
c(col_a, col_b) will result in the entry of two validation steps).
Previously, columns could be specified in vars(). This continues to work,
but c() offers the same capability and supersedes vars() in columns.
Preconditions
Providing expressions as preconditions means pointblank will preprocess
the target table during interrogation as a preparatory step. It might happen
that a particular validation requires a calculated column, some filtering of
rows, or the addition of columns via a join, etc. Especially for an
agent-based report this can be advantageous since we can develop a large
validation plan with a single target table and make minor adjustments to it,
as needed, along the way.
The table mutation is totally isolated in scope to the validation step(s)
where preconditions is used. Using dplyr code is suggested here since
the statements can be translated to SQL if necessary (i.e., if the target
table resides in a database). The code is most easily supplied as a one-sided
R formula (using a leading ~). In the formula representation, the .
serves as the input data table to be transformed (e.g., ~ . %>% dplyr::mutate(col_b = col_a + 10)). Alternatively, a function could instead
be supplied (e.g., function(x) dplyr::mutate(x, col_b = col_a + 10)).
Segments
By using the segments argument, it's possible to define a particular
validation with segments (or row slices) of the target table. An optional
expression or set of expressions that serve to segment the target table by
column values. Each expression can be given in one of two ways: (1) as column
names, or (2) as a two-sided formula where the LHS holds a column name and
the RHS contains the column values to segment on.
As an example of the first type of expression that can be used,
vars(a_column) will segment the target table in however many unique values
are present in the column called a_column. This is great if every unique
value in a particular column (like different locations, or different dates)
requires it's own repeating validation.
With a formula, we can be more selective with which column values should be
used for segmentation. Using a_column ~ c("group_1", "group_2") will
attempt to obtain two segments where one is a slice of data where the value
"group_1" exists in the column named "a_column", and, the other is a
slice where "group_2" exists in the same column. Each group of rows
resolved from the formula will result in a separate validation step.
If there are multiple columns specified then the potential number of
validation steps will be m columns multiplied by n segments resolved.
Segmentation will always occur after preconditions (i.e., statements that
mutate the target table), if any, are applied. With this type of one-two
combo, it's possible to generate labels for segmentation using an expression
for preconditions and refer to those labels in segments without having to
generate a separate version of the target table.
Actions
Often, we will want to specify actions for the validation. This argument,
present in every validation function, takes a specially-crafted list object
that is best produced by the action_levels() function. Read that function's
documentation for the lowdown on how to create reactions to above-threshold
failure levels in validation. The basic gist is that you'll want at least a
single threshold level (specified as either the fraction of test units
failed, or, an absolute value), often using the warn_at argument. This is
especially true when x is a table object because, otherwise, nothing
happens. For the col_vals_*()-type functions, using
action_levels(warn_at = 0.25) or action_levels(stop_at = 0.25) are good
choices depending on the situation (the first produces a warning when a
quarter of the total test units fails, the other stop()s at the same
threshold level).
Labels
label may be a single string or a character vector that matches the number
of expanded steps. label also supports {glue} syntax and exposes the
following dynamic variables contextualized to the current step:
-
"{.step}": The validation step name -
"{.col}": The current column name -
"{.seg_col}": The current segment's column name -
"{.seg_val}": The current segment's value/group
The glue context also supports ordinary expressions for further flexibility
(e.g., "{toupper(.step)}") as long as they return a length-1 string.
Briefs
Want to describe this validation step in some detail? Keep in mind that this
is only useful if x is an agent. If that's the case, brief the agent
with some text that fits. Don't worry if you don't want to do it. The
autobrief protocol is kicked in when brief = NULL and a simple brief will
then be automatically generated.
YAML
A pointblank agent can be written to YAML with yaml_write() and the
resulting YAML can be used to regenerate an agent (with yaml_read_agent())
or interrogate the target table (via yaml_agent_interrogate()). When
col_vals_not_in_set() is represented in YAML (under the top-level steps
key as a list member), the syntax closely follows the signature of the
validation function. Here is an example of how a complex call of
col_vals_not_in_set() as a validation step is expressed in R code and in
the corresponding YAML representation.
R statement:
agent %>%
col_vals_not_in_set(
columns = a,
set = c(1, 2, 3, 4),
preconditions = ~ . %>% dplyr::filter(a < 10),
segments = b ~ c("group_1", "group_2"),
actions = action_levels(warn_at = 0.1, stop_at = 0.2),
label = "The `col_vals_not_in_set()` step.",
active = FALSE
)
YAML representation:
steps:
- col_vals_not_in_set:
columns: c(a)
set:
- 1.0
- 2.0
- 3.0
- 4.0
preconditions: ~. %>% dplyr::filter(a < 10)
segments: b ~ c("group_1", "group_2")
actions:
warn_fraction: 0.1
stop_fraction: 0.2
label: The `col_vals_not_in_set()` step.
active: false
In practice, both of these will often be shorter as only the columns and
set arguments require values. Arguments with default values won't be
written to YAML when using yaml_write() (though it is acceptable to include
them with their default when generating the YAML by other means). It is also
possible to preview the transformation of an agent to YAML without any
writing to disk by using the yaml_agent_string() function.
Examples
The small_table dataset in the package will be used to validate that column
values are not part of a given set.
A: Using an agent with validation functions and then interrogate()
Validate that values in column f contain none of the values lows, mids,
and highs. We'll determine if this validation has any failing test units
(there are 13 test units, one for each row).
agent <-
create_agent(tbl = small_table) %>%
col_vals_not_in_set(
columns = f, set = c("lows", "mids", "highs")
) %>%
interrogate()
Printing the agent in the console shows the validation report in the
Viewer. Here is an excerpt of validation report, showing the single entry
that corresponds to the validation step demonstrated here.

B: Using the validation function directly on the data (no agent)
This way of using validation functions acts as a data filter. Data is passed
through but should stop() if there is a single test unit failing. The
behavior of side effects can be customized with the actions option.
small_table %>%
col_vals_not_in_set(
columns = f, set = c("lows", "mids", "highs")
) %>%
dplyr::pull(f) %>%
unique()
C: Using the expectation function
With the expect_*() form, we would typically perform one validation at a
time. This is primarily used in testthat tests.
expect_col_vals_not_in_set(
small_table,
columns = f, set = c("lows", "mids", "highs")
)
D: Using the test function
With the test_*() form, we should get a single logical value returned to
us.
small_table %>%
test_col_vals_not_in_set(
columns = f, set = c("lows", "mids", "highs")
)
#> [1] TRUE
Function ID
2-10
See Also
The analogue to this function: col_vals_in_set().
Other validation functions:
col_count_match(),
col_exists(),
col_is_character(),
col_is_date(),
col_is_factor(),
col_is_integer(),
col_is_logical(),
col_is_numeric(),
col_is_posix(),
col_schema_match(),
col_vals_between(),
col_vals_decreasing(),
col_vals_equal(),
col_vals_expr(),
col_vals_gt(),
col_vals_gte(),
col_vals_in_set(),
col_vals_increasing(),
col_vals_lt(),
col_vals_lte(),
col_vals_make_set(),
col_vals_make_subset(),
col_vals_not_between(),
col_vals_not_equal(),
col_vals_not_null(),
col_vals_null(),
col_vals_regex(),
col_vals_within_spec(),
conjointly(),
row_count_match(),
rows_complete(),
rows_distinct(),
serially(),
specially(),
tbl_match()
Are column data not NULL/NA?
Description
The col_vals_not_null() validation function, the
expect_col_vals_not_null() expectation function, and the
test_col_vals_not_null() test function all check whether column values in a
table are not NA values or, in the database context, not NULL values.
The validation function can be used directly on a data table or with an
agent object (technically, a ptblank_agent object) whereas the
expectation and test functions can only be used with a data table. Each
validation step or expectation will operate over the number of test units
that is equal to the number of rows in the table (after any preconditions
have been applied).
Usage
col_vals_not_null( x, columns, preconditions = NULL, segments = NULL, actions = NULL, step_id = NULL, label = NULL, brief = NULL, active = TRUE ) expect_col_vals_not_null(object, columns, preconditions = NULL, threshold = 1) test_col_vals_not_null(object, columns, preconditions = NULL, threshold = 1)col_vals_not_null( x, columns, preconditions = NULL, segments = NULL, actions = NULL, step_id = NULL, label = NULL, brief = NULL, active = TRUE ) expect_col_vals_not_null(object, columns, preconditions = NULL, threshold = 1) test_col_vals_not_null(object, columns, preconditions = NULL, threshold = 1)
Arguments
x |
A pointblank agent or a data table
A data frame, tibble ( |
columns |
The target columns
A column-selecting expression, as one would use inside |
preconditions |
Input table modification prior to validation
An optional expression for mutating the input table before proceeding with
the validation. This can either be provided as a one-sided R formula using
a leading |
segments |
Expressions for segmenting the target table
An optional expression or set of expressions (held in a list) that serve to segment the target table by column values. Each expression can be given in one of two ways: (1) as column names, or (2) as a two-sided formula where the LHS holds a column name and the RHS contains the column values to segment on. See the Segments section for more details on this. |
actions |
Thresholds and actions for different states
A list containing threshold levels so that the validation step can react
accordingly when exceeding the set levels for different states. This is to
be created with the |
step_id |
Manual setting of the step ID value
One or more optional identifiers for the single or multiple validation
steps generated from calling a validation function. The use of step IDs
serves to distinguish validation steps from each other and provide an
opportunity for supplying a more meaningful label compared to the step
index. By default this is |
label |
Optional label for the validation step
Optional label for the validation step. This label appears in the agent report and, for the best appearance, it should be kept quite short. See the Labels section for more information. |
brief |
Brief description for the validation step
A brief is a short, text-based description for the validation step. If
nothing is provided here then an autobrief is generated by the agent,
using the language provided in |
active |
Is the validation step active?
A logical value indicating whether the validation step should be active. If
the validation function is working with an agent, |
object |
A data table for expectations or tests
A data frame, tibble ( |
threshold |
The failure threshold
A simple failure threshold value for use with the expectation ( |
Value
For the validation function, the return value is either a
ptblank_agent object or a table object (depending on whether an agent
object or a table was passed to x). The expectation function invisibly
returns its input but, in the context of testing data, the function is
called primarily for its potential side-effects (e.g., signaling failure).
The test function returns a logical value.
Supported Input Tables
The types of data tables that are officially supported are:
-
data frames (
data.frame) and tibbles (tbl_df) -
Spark DataFrames (
tbl_spark) -
the following database tables (
tbl_dbi):-
PostgreSQL tables (using the
RPostgres::Postgres()as driver) -
MySQL tables (with
RMySQL::MySQL()) -
Microsoft SQL Server tables (via odbc)
-
BigQuery tables (using
bigrquery::bigquery()) -
DuckDB tables (through
duckdb::duckdb()) -
SQLite (with
RSQLite::SQLite())
-
Other database tables may work to varying degrees but they haven't been formally tested (so be mindful of this when using unsupported backends with pointblank).
Column Names
columns may be a single column (as symbol a or string "a") or a vector
of columns (c(a, b, c) or c("a", "b", "c")). {tidyselect} helpers
are also supported, such as contains("date") and where(is.double). If
passing an external vector of columns, it should be wrapped in all_of().
When multiple columns are selected by columns, the result will be an
expansion of validation steps to that number of columns (e.g.,
c(col_a, col_b) will result in the entry of two validation steps).
Previously, columns could be specified in vars(). This continues to work,
but c() offers the same capability and supersedes vars() in columns.
Preconditions
Providing expressions as preconditions means pointblank will preprocess
the target table during interrogation as a preparatory step. It might happen
that a particular validation requires a calculated column, some filtering of
rows, or the addition of columns via a join, etc. Especially for an
agent-based report this can be advantageous since we can develop a large
validation plan with a single target table and make minor adjustments to it,
as needed, along the way.
The table mutation is totally isolated in scope to the validation step(s)
where preconditions is used. Using dplyr code is suggested here since
the statements can be translated to SQL if necessary (i.e., if the target
table resides in a database). The code is most easily supplied as a one-sided
R formula (using a leading ~). In the formula representation, the .
serves as the input data table to be transformed (e.g., ~ . %>% dplyr::mutate(col_b = col_a + 10)). Alternatively, a function could instead
be supplied (e.g., function(x) dplyr::mutate(x, col_b = col_a + 10)).
Segments
By using the segments argument, it's possible to define a particular
validation with segments (or row slices) of the target table. An optional
expression or set of expressions that serve to segment the target table by
column values. Each expression can be given in one of two ways: (1) as column
names, or (2) as a two-sided formula where the LHS holds a column name and
the RHS contains the column values to segment on.
As an example of the first type of expression that can be used,
vars(a_column) will segment the target table in however many unique values
are present in the column called a_column. This is great if every unique
value in a particular column (like different locations, or different dates)
requires it's own repeating validation.
With a formula, we can be more selective with which column values should be
used for segmentation. Using a_column ~ c("group_1", "group_2") will
attempt to obtain two segments where one is a slice of data where the value
"group_1" exists in the column named "a_column", and, the other is a
slice where "group_2" exists in the same column. Each group of rows
resolved from the formula will result in a separate validation step.
If there are multiple columns specified then the potential number of
validation steps will be m columns multiplied by n segments resolved.
Segmentation will always occur after preconditions (i.e., statements that
mutate the target table), if any, are applied. With this type of one-two
combo, it's possible to generate labels for segmentation using an expression
for preconditions and refer to those labels in segments without having to
generate a separate version of the target table.
Actions
Often, we will want to specify actions for the validation. This argument,
present in every validation function, takes a specially-crafted list
object that is best produced by the action_levels() function. Read that
function's documentation for the lowdown on how to create reactions to
above-threshold failure levels in validation. The basic gist is that you'll
want at least a single threshold level (specified as either the fraction of
test units failed, or, an absolute value), often using the warn_at
argument. This is especially true when x is a table object because,
otherwise, nothing happens. For the col_vals_*()-type functions, using
action_levels(warn_at = 0.25) or action_levels(stop_at = 0.25) are good
choices depending on the situation (the first produces a warning when a
quarter of the total test units fails, the other stop()s at the same
threshold level).
Labels
label may be a single string or a character vector that matches the number
of expanded steps. label also supports {glue} syntax and exposes the
following dynamic variables contextualized to the current step:
-
"{.step}": The validation step name -
"{.col}": The current column name -
"{.seg_col}": The current segment's column name -
"{.seg_val}": The current segment's value/group
The glue context also supports ordinary expressions for further flexibility
(e.g., "{toupper(.step)}") as long as they return a length-1 string.
Briefs
Want to describe this validation step in some detail? Keep in mind that this
is only useful if x is an agent. If that's the case, brief the agent
with some text that fits. Don't worry if you don't want to do it. The
autobrief protocol is kicked in when brief = NULL and a simple brief will
then be automatically generated.
YAML
A pointblank agent can be written to YAML with yaml_write() and the
resulting YAML can be used to regenerate an agent (with yaml_read_agent())
or interrogate the target table (via yaml_agent_interrogate()). When
col_vals_not_null() is represented in YAML (under the top-level steps key
as a list member), the syntax closely follows the signature of the validation
function. Here is an example of how a complex call of col_vals_not_null()
as a validation step is expressed in R code and in the corresponding YAML
representation.
R statement:
agent %>%
col_vals_not_null(
columns = a,
preconditions = ~ . %>% dplyr::filter(a < 10),
segments = b ~ c("group_1", "group_2"),
actions = action_levels(warn_at = 0.1, stop_at = 0.2),
label = "The `col_vals_not_null()` step.",
active = FALSE
)
YAML representation:
steps:
- col_vals_not_null:
columns: c(a)
preconditions: ~. %>% dplyr::filter(a < 10)
segments: b ~ c("group_1", "group_2")
actions:
warn_fraction: 0.1
stop_fraction: 0.2
label: The `col_vals_not_null()` step.
active: false
In practice, both of these will often be shorter as only the columns
argument requires a value. Arguments with default values won't be written to
YAML when using yaml_write() (though it is acceptable to include them with
their default when generating the YAML by other means). It is also possible
to preview the transformation of an agent to YAML without any writing to disk
by using the yaml_agent_string() function.
Examples
For all examples here, we'll use a simple table with four columns: a, b,
c, and d.
tbl <-
dplyr::tibble(
a = c( 5, 7, 6, 5, 8),
b = c( 7, 1, 0, 0, 0),
c = c(NA, NA, NA, NA, NA),
d = c(35, 23, NA, NA, NA)
)
tbl
#> # A tibble: 5 x 4
#> a b c d
#> <dbl> <dbl> <lgl> <dbl>
#> 1 5 7 NA 35
#> 2 7 1 NA 23
#> 3 6 0 NA NA
#> 4 5 0 NA NA
#> 5 8 0 NA NA
A: Using an agent with validation functions and then interrogate()
Validate that all values in column b are not NA (they would be non-NULL
in a database context, which isn't the case here). We'll determine if this
validation has any failing test units (there are 5 test units, one for each
row).
agent <- create_agent(tbl = tbl) %>% col_vals_not_null(columns = b) %>% interrogate()
Printing the agent in the console shows the validation report in the
Viewer. Here is an excerpt of validation report, showing the single entry
that corresponds to the validation step demonstrated here.

B: Using the validation function directly on the data (no agent)
This way of using validation functions acts as a data filter. Data is passed
through but should stop() if there is a single test unit failing. The
behavior of side effects can be customized with the actions option.
tbl %>% col_vals_not_null(columns = b) %>% dplyr::pull(b) #> [1] 7 1 0 0 0
C: Using the expectation function
With the expect_*() form, we would typically perform one validation at a
time. This is primarily used in testthat tests.
expect_col_vals_not_null(tbl, columns = b)
D: Using the test function
With the test_*() form, we should get a single logical value returned to
us.
tbl %>% test_col_vals_not_null(columns = b) #> [1] TRUE
Function ID
2-16
See Also
The analogue to this function: col_vals_null().
Other validation functions:
col_count_match(),
col_exists(),
col_is_character(),
col_is_date(),
col_is_factor(),
col_is_integer(),
col_is_logical(),
col_is_numeric(),
col_is_posix(),
col_schema_match(),
col_vals_between(),
col_vals_decreasing(),
col_vals_equal(),
col_vals_expr(),
col_vals_gt(),
col_vals_gte(),
col_vals_in_set(),
col_vals_increasing(),
col_vals_lt(),
col_vals_lte(),
col_vals_make_set(),
col_vals_make_subset(),
col_vals_not_between(),
col_vals_not_equal(),
col_vals_not_in_set(),
col_vals_null(),
col_vals_regex(),
col_vals_within_spec(),
conjointly(),
row_count_match(),
rows_complete(),
rows_distinct(),
serially(),
specially(),
tbl_match()
Are column data NULL/NA?
Description
The col_vals_null() validation function, the expect_col_vals_null()
expectation function, and the test_col_vals_null() test function all check
whether column values in a table are NA values or, in the database context,
NULL values. The validation function can be used directly on a data table
or with an agent object (technically, a ptblank_agent object) whereas the
expectation and test functions can only be used with a data table. Each
validation step or expectation will operate over the number of test units
that is equal to the number of rows in the table (after any preconditions
have been applied).
Usage
col_vals_null( x, columns, preconditions = NULL, segments = NULL, actions = NULL, step_id = NULL, label = NULL, brief = NULL, active = TRUE ) expect_col_vals_null(object, columns, preconditions = NULL, threshold = 1) test_col_vals_null(object, columns, preconditions = NULL, threshold = 1)col_vals_null( x, columns, preconditions = NULL, segments = NULL, actions = NULL, step_id = NULL, label = NULL, brief = NULL, active = TRUE ) expect_col_vals_null(object, columns, preconditions = NULL, threshold = 1) test_col_vals_null(object, columns, preconditions = NULL, threshold = 1)
Arguments
x |
A pointblank agent or a data table
A data frame, tibble ( |
columns |
The target columns
A column-selecting expression, as one would use inside |
preconditions |
Input table modification prior to validation
An optional expression for mutating the input table before proceeding with
the validation. This can either be provided as a one-sided R formula using
a leading |
segments |
Expressions for segmenting the target table
An optional expression or set of expressions (held in a list) that serve to segment the target table by column values. Each expression can be given in one of two ways: (1) as column names, or (2) as a two-sided formula where the LHS holds a column name and the RHS contains the column values to segment on. See the Segments section for more details on this. |
actions |
Thresholds and actions for different states
A list containing threshold levels so that the validation step can react
accordingly when exceeding the set levels for different states. This is to
be created with the |
step_id |
Manual setting of the step ID value
One or more optional identifiers for the single or multiple validation
steps generated from calling a validation function. The use of step IDs
serves to distinguish validation steps from each other and provide an
opportunity for supplying a more meaningful label compared to the step
index. By default this is |
label |
Optional label for the validation step
Optional label for the validation step. This label appears in the agent report and, for the best appearance, it should be kept quite short. See the Labels section for more information. |
brief |
Brief description for the validation step
A brief is a short, text-based description for the validation step. If
nothing is provided here then an autobrief is generated by the agent,
using the language provided in |
active |
Is the validation step active?
A logical value indicating whether the validation step should be active. If
the validation function is working with an agent, |
object |
A data table for expectations or tests
A data frame, tibble ( |
threshold |
The failure threshold
A simple failure threshold value for use with the expectation ( |
Value
For the validation function, the return value is either a
ptblank_agent object or a table object (depending on whether an agent
object or a table was passed to x). The expectation function invisibly
returns its input but, in the context of testing data, the function is
called primarily for its potential side-effects (e.g., signaling failure).
The test function returns a logical value.
Supported Input Tables
The types of data tables that are officially supported are:
-
data frames (
data.frame) and tibbles (tbl_df) -
Spark DataFrames (
tbl_spark) -
the following database tables (
tbl_dbi):-
PostgreSQL tables (using the
RPostgres::Postgres()as driver) -
MySQL tables (with
RMySQL::MySQL()) -
Microsoft SQL Server tables (via odbc)
-
BigQuery tables (using
bigrquery::bigquery()) -
DuckDB tables (through
duckdb::duckdb()) -
SQLite (with
RSQLite::SQLite())
-
Other database tables may work to varying degrees but they haven't been formally tested (so be mindful of this when using unsupported backends with pointblank).
Column Names
columns may be a single column (as symbol a or string "a") or a vector
of columns (c(a, b, c) or c("a", "b", "c")). {tidyselect} helpers
are also supported, such as contains("date") and where(is.double). If
passing an external vector of columns, it should be wrapped in all_of().
When multiple columns are selected by columns, the result will be an
expansion of validation steps to that number of columns (e.g.,
c(col_a, col_b) will result in the entry of two validation steps).
Previously, columns could be specified in vars(). This continues to work,
but c() offers the same capability and supersedes vars() in columns.
Preconditions
Providing expressions as preconditions means pointblank will preprocess
the target table during interrogation as a preparatory step. It might happen
that a particular validation requires a calculated column, some filtering of
rows, or the addition of columns via a join, etc. Especially for an
agent-based report this can be advantageous since we can develop a large
validation plan with a single target table and make minor adjustments to it,
as needed, along the way.
The table mutation is totally isolated in scope to the validation step(s)
where preconditions is used. Using dplyr code is suggested here since
the statements can be translated to SQL if necessary (i.e., if the target
table resides in a database). The code is most easily supplied as a one-sided
R formula (using a leading ~). In the formula representation, the .
serves as the input data table to be transformed (e.g., ~ . %>% dplyr::mutate(col_b = col_a + 10)). Alternatively, a function could instead
be supplied (e.g., function(x) dplyr::mutate(x, col_b = col_a + 10)).
Segments
By using the segments argument, it's possible to define a particular
validation with segments (or row slices) of the target table. An optional
expression or set of expressions that serve to segment the target table by
column values. Each expression can be given in one of two ways: (1) as column
names, or (2) as a two-sided formula where the LHS holds a column name and
the RHS contains the column values to segment on.
As an example of the first type of expression that can be used,
vars(a_column) will segment the target table in however many unique values
are present in the column called a_column. This is great if every unique
value in a particular column (like different locations, or different dates)
requires it's own repeating validation.
With a formula, we can be more selective with which column values should be
used for segmentation. Using a_column ~ c("group_1", "group_2") will
attempt to obtain two segments where one is a slice of data where the value
"group_1" exists in the column named "a_column", and, the other is a
slice where "group_2" exists in the same column. Each group of rows
resolved from the formula will result in a separate validation step.
If there are multiple columns specified then the potential number of
validation steps will be m columns multiplied by n segments resolved.
Segmentation will always occur after preconditions (i.e., statements that
mutate the target table), if any, are applied. With this type of one-two
combo, it's possible to generate labels for segmentation using an expression
for preconditions and refer to those labels in segments without having to
generate a separate version of the target table.
Actions
Often, we will want to specify actions for the validation. This argument,
present in every validation function, takes a specially-crafted list
object that is best produced by the action_levels() function. Read that
function's documentation for the lowdown on how to create reactions to
above-threshold failure levels in validation. The basic gist is that you'll
want at least a single threshold level (specified as either the fraction of
test units failed, or, an absolute value), often using the warn_at
argument. This is especially true when x is a table object because,
otherwise, nothing happens. For the col_vals_*()-type functions, using
action_levels(warn_at = 0.25) or action_levels(stop_at = 0.25) are good
choices depending on the situation (the first produces a warning when a
quarter of the total test units fails, the other stop()s at the same
threshold level).
Labels
label may be a single string or a character vector that matches the number
of expanded steps. label also supports {glue} syntax and exposes the
following dynamic variables contextualized to the current step:
-
"{.step}": The validation step name -
"{.col}": The current column name -
"{.seg_col}": The current segment's column name -
"{.seg_val}": The current segment's value/group
The glue context also supports ordinary expressions for further flexibility
(e.g., "{toupper(.step)}") as long as they return a length-1 string.
Briefs
Want to describe this validation step in some detail? Keep in mind that this
is only useful if x is an agent. If that's the case, brief the agent
with some text that fits. Don't worry if you don't want to do it. The
autobrief protocol is kicked in when brief = NULL and a simple brief will
then be automatically generated.
YAML
A pointblank agent can be written to YAML with yaml_write() and the
resulting YAML can be used to regenerate an agent (with yaml_read_agent())
or interrogate the target table (via yaml_agent_interrogate()). When
col_vals_null() is represented in YAML (under the top-level steps key as
a list member), the syntax closely follows the signature of the validation
function. Here is an example of how a complex call of col_vals_null() as a
validation step is expressed in R code and in the corresponding YAML
representation.
R statement:
agent %>%
col_vals_null(
columns = a,
preconditions = ~ . %>% dplyr::filter(a < 10),
segments = b ~ c("group_1", "group_2"),
actions = action_levels(warn_at = 0.1, stop_at = 0.2),
label = "The `col_vals_null()` step.",
active = FALSE
)
YAML representation:
steps:
- col_vals_null:
columns: c(a)
preconditions: ~. %>% dplyr::filter(a < 10)
segments: b ~ c("group_1", "group_2")
actions:
warn_fraction: 0.1
stop_fraction: 0.2
label: The `col_vals_null()` step.
active: false
In practice, both of these will often be shorter as only the columns
argument requires a value. Arguments with default values won't be written to
YAML when using yaml_write() (though it is acceptable to include them with
their default when generating the YAML by other means). It is also possible
to preview the transformation of an agent to YAML without any writing to disk
by using the yaml_agent_string() function.
Examples
For all examples here, we'll use a simple table with four columns: a, b,
c, and d.
tbl <-
dplyr::tibble(
a = c( 5, 7, 6, 5, 8),
b = c( 7, 1, 0, 0, 0),
c = c(NA, NA, NA, NA, NA),
d = c(35, 23, NA, NA, NA)
)
tbl
#> # A tibble: 5 x 4
#> a b c d
#> <dbl> <dbl> <lgl> <dbl>
#> 1 5 7 NA 35
#> 2 7 1 NA 23
#> 3 6 0 NA NA
#> 4 5 0 NA NA
#> 5 8 0 NA NA
A: Using an agent with validation functions and then interrogate()
Validate that all values in column c are NA (they would be NULL in a
database context, which isn't the case here). We'll determine if this
validation has any failing test units (there are 5 test units, one for each
row).
agent <- create_agent(tbl = tbl) %>% col_vals_null(columns = c) %>% interrogate()
Printing the agent in the console shows the validation report in the
Viewer. Here is an excerpt of validation report, showing the single entry
that corresponds to the validation step demonstrated here.

B: Using the validation function directly on the data (no agent)
This way of using validation functions acts as a data filter. Data is passed
through but should stop() if there is a single test unit failing. The
behavior of side effects can be customized with the actions option.
tbl %>% col_vals_null(columns = c) %>% dplyr::pull(c) #> [1] NA NA NA NA NA
C: Using the expectation function
With the expect_*() form, we would typically perform one validation at a
time. This is primarily used in testthat tests.
expect_col_vals_null(tbl, columns = c)
D: Using the test function
With the test_*() form, we should get a single logical value returned to
us.
tbl %>% test_col_vals_null(columns = c) #> [1] TRUE
Function ID
2-15
See Also
The analogue to this function: col_vals_not_null().
Other validation functions:
col_count_match(),
col_exists(),
col_is_character(),
col_is_date(),
col_is_factor(),
col_is_integer(),
col_is_logical(),
col_is_numeric(),
col_is_posix(),
col_schema_match(),
col_vals_between(),
col_vals_decreasing(),
col_vals_equal(),
col_vals_expr(),
col_vals_gt(),
col_vals_gte(),
col_vals_in_set(),
col_vals_increasing(),
col_vals_lt(),
col_vals_lte(),
col_vals_make_set(),
col_vals_make_subset(),
col_vals_not_between(),
col_vals_not_equal(),
col_vals_not_in_set(),
col_vals_not_null(),
col_vals_regex(),
col_vals_within_spec(),
conjointly(),
row_count_match(),
rows_complete(),
rows_distinct(),
serially(),
specially(),
tbl_match()
Do strings in column data match a regex pattern?
Description
The col_vals_regex() validation function, the expect_col_vals_regex()
expectation function, and the test_col_vals_regex() test function all check
whether column values in a table correspond to a regex matching expression.
The validation function can be used directly on a data table or with an
agent object (technically, a ptblank_agent object) whereas the
expectation and test functions can only be used with a data table. Each
validation step or expectation will operate over the number of test units
that is equal to the number of rows in the table (after any preconditions
have been applied).
Usage
col_vals_regex( x, columns, regex, na_pass = FALSE, preconditions = NULL, segments = NULL, actions = NULL, step_id = NULL, label = NULL, brief = NULL, active = TRUE ) expect_col_vals_regex( object, columns, regex, na_pass = FALSE, preconditions = NULL, threshold = 1 ) test_col_vals_regex( object, columns, regex, na_pass = FALSE, preconditions = NULL, threshold = 1 )col_vals_regex( x, columns, regex, na_pass = FALSE, preconditions = NULL, segments = NULL, actions = NULL, step_id = NULL, label = NULL, brief = NULL, active = TRUE ) expect_col_vals_regex( object, columns, regex, na_pass = FALSE, preconditions = NULL, threshold = 1 ) test_col_vals_regex( object, columns, regex, na_pass = FALSE, preconditions = NULL, threshold = 1 )
Arguments
x |
A pointblank agent or a data table
A data frame, tibble ( |
columns |
The target columns
A column-selecting expression, as one would use inside |
regex |
Regex pattern
A regular expression pattern to test for a match to the target column. Any
regex matches to values in the target |
na_pass |
Allow missing values to pass validation
Should any encountered |
preconditions |
Input table modification prior to validation
An optional expression for mutating the input table before proceeding with
the validation. This can either be provided as a one-sided R formula using
a leading |
segments |
Expressions for segmenting the target table
An optional expression or set of expressions (held in a list) that serve to segment the target table by column values. Each expression can be given in one of two ways: (1) as column names, or (2) as a two-sided formula where the LHS holds a column name and the RHS contains the column values to segment on. See the Segments section for more details on this. |
actions |
Thresholds and actions for different states
A list containing threshold levels so that the validation step can react
accordingly when exceeding the set levels for different states. This is to
be created with the |
step_id |
Manual setting of the step ID value
One or more optional identifiers for the single or multiple validation
steps generated from calling a validation function. The use of step IDs
serves to distinguish validation steps from each other and provide an
opportunity for supplying a more meaningful label compared to the step
index. By default this is |
label |
Optional label for the validation step
Optional label for the validation step. This label appears in the agent report and, for the best appearance, it should be kept quite short. See the Labels section for more information. |
brief |
Brief description for the validation step
A brief is a short, text-based description for the validation step. If
nothing is provided here then an autobrief is generated by the agent,
using the language provided in |
active |
Is the validation step active?
A logical value indicating whether the validation step should be active. If
the validation function is working with an agent, |
object |
A data table for expectations or tests
A data frame, tibble ( |
threshold |
The failure threshold
A simple failure threshold value for use with the expectation ( |
Value
For the validation function, the return value is either a
ptblank_agent object or a table object (depending on whether an agent
object or a table was passed to x). The expectation function invisibly
returns its input but, in the context of testing data, the function is
called primarily for its potential side-effects (e.g., signaling failure).
The test function returns a logical value.
Supported Input Tables
The types of data tables that are officially supported are:
-
data frames (
data.frame) and tibbles (tbl_df) -
Spark DataFrames (
tbl_spark) -
the following database tables (
tbl_dbi):-
PostgreSQL tables (using the
RPostgres::Postgres()as driver) -
MySQL tables (with
RMySQL::MySQL()) -
Microsoft SQL Server tables (via odbc)
-
BigQuery tables (using
bigrquery::bigquery()) -
DuckDB tables (through
duckdb::duckdb()) -
SQLite (with
RSQLite::SQLite())
-
Other database tables may work to varying degrees but they haven't been formally tested (so be mindful of this when using unsupported backends with pointblank).
Column Names
columns may be a single column (as symbol a or string "a") or a vector
of columns (c(a, b, c) or c("a", "b", "c")). {tidyselect} helpers
are also supported, such as contains("date") and where(is.double). If
passing an external vector of columns, it should be wrapped in all_of().
When multiple columns are selected by columns, the result will be an
expansion of validation steps to that number of columns (e.g.,
c(col_a, col_b) will result in the entry of two validation steps).
Previously, columns could be specified in vars(). This continues to work,
but c() offers the same capability and supersedes vars() in columns.
Missing Values
This validation function supports special handling of NA values. The
na_pass argument will determine whether an NA value appearing in a test
unit should be counted as a pass or a fail. The default of na_pass = FALSE means that any NAs encountered will accumulate failing test units.
Preconditions
Providing expressions as preconditions means pointblank will preprocess
the target table during interrogation as a preparatory step. It might happen
that a particular validation requires a calculated column, some filtering of
rows, or the addition of columns via a join, etc. Especially for an
agent-based report this can be advantageous since we can develop a large
validation plan with a single target table and make minor adjustments to it,
as needed, along the way.
The table mutation is totally isolated in scope to the validation step(s)
where preconditions is used. Using dplyr code is suggested here since
the statements can be translated to SQL if necessary (i.e., if the target
table resides in a database). The code is most easily supplied as a one-sided
R formula (using a leading ~). In the formula representation, the .
serves as the input data table to be transformed (e.g., ~ . %>% dplyr::mutate(col_b = col_a + 10)). Alternatively, a function could instead
be supplied (e.g., function(x) dplyr::mutate(x, col_b = col_a + 10)).
Segments
By using the segments argument, it's possible to define a particular
validation with segments (or row slices) of the target table. An optional
expression or set of expressions that serve to segment the target table by
column values. Each expression can be given in one of two ways: (1) as column
names, or (2) as a two-sided formula where the LHS holds a column name and
the RHS contains the column values to segment on.
As an example of the first type of expression that can be used,
vars(a_column) will segment the target table in however many unique values
are present in the column called a_column. This is great if every unique
value in a particular column (like different locations, or different dates)
requires it's own repeating validation.
With a formula, we can be more selective with which column values should be
used for segmentation. Using a_column ~ c("group_1", "group_2") will
attempt to obtain two segments where one is a slice of data where the value
"group_1" exists in the column named "a_column", and, the other is a
slice where "group_2" exists in the same column. Each group of rows
resolved from the formula will result in a separate validation step.
If there are multiple columns specified then the potential number of
validation steps will be m columns multiplied by n segments resolved.
Segmentation will always occur after preconditions (i.e., statements that
mutate the target table), if any, are applied. With this type of one-two
combo, it's possible to generate labels for segmentation using an expression
for preconditions and refer to those labels in segments without having to
generate a separate version of the target table.
Actions
Often, we will want to specify actions for the validation. This argument,
present in every validation function, takes a specially-crafted list
object that is best produced by the action_levels() function. Read that
function's documentation for the lowdown on how to create reactions to
above-threshold failure levels in validation. The basic gist is that you'll
want at least a single threshold level (specified as either the fraction of
test units failed, or, an absolute value), often using the warn_at
argument. This is especially true when x is a table object because,
otherwise, nothing happens. For the col_vals_*()-type functions, using
action_levels(warn_at = 0.25) or action_levels(stop_at = 0.25) are good
choices depending on the situation (the first produces a warning when a
quarter of the total test units fails, the other stop()s at the same
threshold level).
Labels
label may be a single string or a character vector that matches the number
of expanded steps. label also supports {glue} syntax and exposes the
following dynamic variables contextualized to the current step:
-
"{.step}": The validation step name -
"{.col}": The current column name -
"{.seg_col}": The current segment's column name -
"{.seg_val}": The current segment's value/group
The glue context also supports ordinary expressions for further flexibility
(e.g., "{toupper(.step)}") as long as they return a length-1 string.
Briefs
Want to describe this validation step in some detail? Keep in mind that this
is only useful if x is an agent. If that's the case, brief the agent
with some text that fits. Don't worry if you don't want to do it. The
autobrief protocol is kicked in when brief = NULL and a simple brief will
then be automatically generated.
YAML
A pointblank agent can be written to YAML with yaml_write() and the
resulting YAML can be used to regenerate an agent (with yaml_read_agent())
or interrogate the target table (via yaml_agent_interrogate()). When
col_vals_regex() is represented in YAML (under the top-level steps key as
a list member), the syntax closely follows the signature of the validation
function. Here is an example of how a complex call of col_vals_regex() as a
validation step is expressed in R code and in the corresponding YAML
representation.
R statement:
agent %>%
col_vals_regex(
columns = a,
regex = "[0-9]-[a-z]{3}-[0-9]{3}",
na_pass = TRUE,
preconditions = ~ . %>% dplyr::filter(a < 10),
segments = b ~ c("group_1", "group_2"),
actions = action_levels(warn_at = 0.1, stop_at = 0.2),
label = "The `col_vals_regex()` step.",
active = FALSE
)
YAML representation:
steps:
- col_vals_regex:
columns: c(a)
regex: '[0-9]-[a-z]{3}-[0-9]{3}'
na_pass: true
preconditions: ~. %>% dplyr::filter(a < 10)
segments: b ~ c("group_1", "group_2")
actions:
warn_fraction: 0.1
stop_fraction: 0.2
label: The `col_vals_regex()` step.
active: false
In practice, both of these will often be shorter as only the columns and
regex arguments require values. Arguments with default values won't be
written to YAML when using yaml_write() (though it is acceptable to include
them with their default when generating the YAML by other means). It is also
possible to preview the transformation of an agent to YAML without any
writing to disk by using the yaml_agent_string() function.
Examples
The small_table dataset in the package has a character-based b column
with values that adhere to a very particular pattern. The following examples
will validate that that column abides by a regex pattern.
small_table #> # A tibble: 13 x 8 #> date_time date a b c d e f #> <dttm> <date> <int> <chr> <dbl> <dbl> <lgl> <chr> #> 1 2016-01-04 11:00:00 2016-01-04 2 1-bcd-345 3 3423. TRUE high #> 2 2016-01-04 00:32:00 2016-01-04 3 5-egh-163 8 10000. TRUE low #> 3 2016-01-05 13:32:00 2016-01-05 6 8-kdg-938 3 2343. TRUE high #> 4 2016-01-06 17:23:00 2016-01-06 2 5-jdo-903 NA 3892. FALSE mid #> 5 2016-01-09 12:36:00 2016-01-09 8 3-ldm-038 7 284. TRUE low #> 6 2016-01-11 06:15:00 2016-01-11 4 2-dhe-923 4 3291. TRUE mid #> 7 2016-01-15 18:46:00 2016-01-15 7 1-knw-093 3 843. TRUE high #> 8 2016-01-17 11:27:00 2016-01-17 4 5-boe-639 2 1036. FALSE low #> 9 2016-01-20 04:30:00 2016-01-20 3 5-bce-642 9 838. FALSE high #> 10 2016-01-20 04:30:00 2016-01-20 3 5-bce-642 9 838. FALSE high #> 11 2016-01-26 20:07:00 2016-01-26 4 2-dmx-010 7 834. TRUE low #> 12 2016-01-28 02:51:00 2016-01-28 2 7-dmx-010 8 108. FALSE low #> 13 2016-01-30 11:23:00 2016-01-30 1 3-dka-303 NA 2230. TRUE high
This is the regex pattern that will be used throughout:
pattern <- "[0-9]-[a-z]{3}-[0-9]{3}"
A: Using an agent with validation functions and then interrogate()
Validate that all values in column b match the regex pattern. We'll
determine if this validation has any failing test units (there are 13 test
units, one for each row).
agent <- create_agent(tbl = small_table) %>% col_vals_regex(columns = b, regex = pattern) %>% interrogate()
Printing the agent in the console shows the validation report in the
Viewer. Here is an excerpt of validation report, showing the single entry
that corresponds to the validation step demonstrated here.

B: Using the validation function directly on the data (no agent)
This way of using validation functions acts as a data filter. Data is passed
through but should stop() if there is a single test unit failing. The
behavior of side effects can be customized with the actions option.
small_table %>% col_vals_regex(columns = b, regex = pattern) %>% dplyr::slice(1:5) #> # A tibble: 5 x 8 #> date_time date a b c d e f #> <dttm> <date> <int> <chr> <dbl> <dbl> <lgl> <chr> #> 1 2016-01-04 11:00:00 2016-01-04 2 1-bcd-345 3 3423. TRUE high #> 2 2016-01-04 00:32:00 2016-01-04 3 5-egh-163 8 10000. TRUE low #> 3 2016-01-05 13:32:00 2016-01-05 6 8-kdg-938 3 2343. TRUE high #> 4 2016-01-06 17:23:00 2016-01-06 2 5-jdo-903 NA 3892. FALSE mid #> 5 2016-01-09 12:36:00 2016-01-09 8 3-ldm-038 7 284. TRUE low
C: Using the expectation function
With the expect_*() form, we would typically perform one validation at a
time. This is primarily used in testthat tests.
expect_col_vals_regex(small_table, columns = b, regex = pattern)
D: Using the test function
With the test_*() form, we should get a single logical value returned to
us.
small_table %>% test_col_vals_regex(columns = b, regex = pattern) #> [1] TRUE
Function ID
2-17
See Also
Other validation functions:
col_count_match(),
col_exists(),
col_is_character(),
col_is_date(),
col_is_factor(),
col_is_integer(),
col_is_logical(),
col_is_numeric(),
col_is_posix(),
col_schema_match(),
col_vals_between(),
col_vals_decreasing(),
col_vals_equal(),
col_vals_expr(),
col_vals_gt(),
col_vals_gte(),
col_vals_in_set(),
col_vals_increasing(),
col_vals_lt(),
col_vals_lte(),
col_vals_make_set(),
col_vals_make_subset(),
col_vals_not_between(),
col_vals_not_equal(),
col_vals_not_in_set(),
col_vals_not_null(),
col_vals_null(),
col_vals_within_spec(),
conjointly(),
row_count_match(),
rows_complete(),
rows_distinct(),
serially(),
specially(),
tbl_match()
Do values in column data fit within a specification?
Description
The col_vals_within_spec() validation function, the
expect_col_vals_within_spec() expectation function, and the
test_col_vals_within_spec() test function all check whether column values
in a table correspond to a specification (spec) type (details of which are
available in the Specifications section). The validation function can be
used directly on a data table or with an agent object (technically, a
ptblank_agent object) whereas the expectation and test functions can only
be used with a data table. Each validation step or expectation will operate
over the number of test units that is equal to the number of rows in the
table (after any preconditions have been applied).
Usage
col_vals_within_spec( x, columns, spec, na_pass = FALSE, preconditions = NULL, segments = NULL, actions = NULL, step_id = NULL, label = NULL, brief = NULL, active = TRUE ) expect_col_vals_within_spec( object, columns, spec, na_pass = FALSE, preconditions = NULL, threshold = 1 ) test_col_vals_within_spec( object, columns, spec, na_pass = FALSE, preconditions = NULL, threshold = 1 )col_vals_within_spec( x, columns, spec, na_pass = FALSE, preconditions = NULL, segments = NULL, actions = NULL, step_id = NULL, label = NULL, brief = NULL, active = TRUE ) expect_col_vals_within_spec( object, columns, spec, na_pass = FALSE, preconditions = NULL, threshold = 1 ) test_col_vals_within_spec( object, columns, spec, na_pass = FALSE, preconditions = NULL, threshold = 1 )
Arguments
x |
A pointblank agent or a data table
A data frame, tibble ( |
columns |
The target columns
A column-selecting expression, as one would use inside |
spec |
Specification type
A specification string for defining the specification type. Examples are
|
na_pass |
Allow missing values to pass validation
Should any encountered |
preconditions |
Input table modification prior to validation
An optional expression for mutating the input table before proceeding with
the validation. This can either be provided as a one-sided R formula using
a leading |
segments |
Expressions for segmenting the target table
An optional expression or set of expressions (held in a list) that serve to segment the target table by column values. Each expression can be given in one of two ways: (1) as column names, or (2) as a two-sided formula where the LHS holds a column name and the RHS contains the column values to segment on. See the Segments section for more details on this. |
actions |
Thresholds and actions for different states
A list containing threshold levels so that the validation step can react
accordingly when exceeding the set levels for different states. This is to
be created with the |
step_id |
Manual setting of the step ID value
One or more optional identifiers for the single or multiple validation
steps generated from calling a validation function. The use of step IDs
serves to distinguish validation steps from each other and provide an
opportunity for supplying a more meaningful label compared to the step
index. By default this is |
label |
Optional label for the validation step
Optional label for the validation step. This label appears in the agent report and, for the best appearance, it should be kept quite short. See the Labels section for more information. |
brief |
Brief description for the validation step
A brief is a short, text-based description for the validation step. If
nothing is provided here then an autobrief is generated by the agent,
using the language provided in |
active |
Is the validation step active?
A logical value indicating whether the validation step should be active. If
the validation function is working with an agent, |
object |
A data table for expectations or tests
A data frame, tibble ( |
threshold |
The failure threshold
A simple failure threshold value for use with the expectation ( |
Value
For the validation function, the return value is either a
ptblank_agent object or a table object (depending on whether an agent
object or a table was passed to x). The expectation function invisibly
returns its input but, in the context of testing data, the function is
called primarily for its potential side-effects (e.g., signaling failure).
The test function returns a logical value.
Supported Input Tables
The types of data tables that are officially supported are:
-
data frames (
data.frame) and tibbles (tbl_df) -
Spark DataFrames (
tbl_spark) -
the following database tables (
tbl_dbi):-
PostgreSQL tables (using the
RPostgres::Postgres()as driver) -
MySQL tables (with
RMySQL::MySQL()) -
Microsoft SQL Server tables (via odbc)
-
BigQuery tables (using
bigrquery::bigquery()) -
DuckDB tables (through
duckdb::duckdb()) -
SQLite (with
RSQLite::SQLite())
-
Other database tables may work to varying degrees but they haven't been formally tested (so be mindful of this when using unsupported backends with pointblank).
Specifications
A specification type must be used with the spec argument. This is a
character-based keyword that corresponds to the type of data in the specified
columns. The following keywords can be used:
-
"isbn": The International Standard Book Number (ISBN) is a unique numerical identifier for books, pamphletes, educational kits, microforms, and digital/electronic publications. The specification has been formalized in ISO 2108. This keyword can be used to validate 10- or 13-digit ISBNs. -
"VIN": A vehicle identification number (VIN) is a unique code (which includes a serial number) used by the automotive industry to identify individual motor vehicles, motorcycles, scooters, and mopeds as stipulated by ISO 3779 and ISO 4030. -
"postal_code[<country_code>]": A postal code (also known as postcodes, PIN, or ZIP codes, depending on region) is a series of letters, digits, or both (sometimes including spaces/punctuation) included in a postal address to aid in sorting mail. Because the coding varies by country, a country code in either the 2- (ISO 3166-1 alpha-2) or 3-letter (ISO 3166-1 alpha-3) formats needs to be supplied along with the keywords (e.g., for postal codes in Germany,"postal_code[DE]"or"postal_code[DEU]"can be used). The keyword alias"zip"can be used for US ZIP codes. -
"credit_card": A credit card number can be validated and this check works across a large variety of credit type issuers (where card numbers are allocated in accordance with ISO/IEC 7812). Numbers can be of various lengths (typically, they are of 14-19 digits) and the key validation performed here is the usage of the Luhn algorithm. -
"iban[<country_code>]": The International Bank Account Number (IBAN) is a system of identifying bank accounts across different countries for the purpose of improving cross-border transactions. IBAN values are validated through conversion to integer values and performing a basic mod-97 operation (as described in ISO 7064) on them. Because the length and coding varies by country, a country code in either the 2- (ISO 3166-1 alpha-2) or 3-letter (ISO 3166-1 alpha-3) formats needs to be supplied along with the keywords (e.g., for IBANs in Germany,"iban[DE]"or"iban[DEU]"can be used). -
"swift": Business Identifier Codes (also known as SWIFT-BIC, BIC, or SWIFT code) are defined in a standard format as described by ISO 9362. These codes are unique identifiers for both financial and non-financial institutions. SWIFT stands for the Society for Worldwide Interbank Financial Telecommunication. These numbers are used when transferring money between banks, especially important for international wire transfers. -
"phone","email","url","ipv4","ipv6","mac": Phone numbers, email addresses, Internet URLs, IPv4 or IPv6 addresses, and MAC addresses can be validated with their respective keywords. These validations use regex-based matching to determine validity.
Only a single spec value should be provided per function call.
Column Names
columns may be a single column (as symbol a or string "a") or a vector
of columns (c(a, b, c) or c("a", "b", "c")). {tidyselect} helpers
are also supported, such as contains("date") and where(is.double). If
passing an external vector of columns, it should be wrapped in all_of().
When multiple columns are selected by columns, the result will be an
expansion of validation steps to that number of columns (e.g.,
c(col_a, col_b) will result in the entry of two validation steps).
Previously, columns could be specified in vars(). This continues to work,
but c() offers the same capability and supersedes vars() in columns.
Missing Values
This validation function supports special handling of NA values. The
na_pass argument will determine whether an NA value appearing in a test
unit should be counted as a pass or a fail. The default of na_pass = FALSE means that any NAs encountered will accumulate failing test units.
Preconditions
Providing expressions as preconditions means pointblank will preprocess
the target table during interrogation as a preparatory step. It might happen
that a particular validation requires a calculated column, some filtering of
rows, or the addition of columns via a join, etc. Especially for an
agent-based report this can be advantageous since we can develop a large
validation plan with a single target table and make minor adjustments to it,
as needed, along the way.
The table mutation is totally isolated in scope to the validation step(s)
where preconditions is used. Using dplyr code is suggested here since
the statements can be translated to SQL if necessary (i.e., if the target
table resides in a database). The code is most easily supplied as a one-sided
R formula (using a leading ~). In the formula representation, the .
serves as the input data table to be transformed (e.g., ~ . %>% dplyr::mutate(col_b = col_a + 10)). Alternatively, a function could instead
be supplied (e.g., function(x) dplyr::mutate(x, col_b = col_a + 10)).
Segments
By using the segments argument, it's possible to define a particular
validation with segments (or row slices) of the target table. An optional
expression or set of expressions that serve to segment the target table by
column values. Each expression can be given in one of two ways: (1) as column
names, or (2) as a two-sided formula where the LHS holds a column name and
the RHS contains the column values to segment on.
As an example of the first type of expression that can be used,
vars(a_column) will segment the target table in however many unique values
are present in the column called a_column. This is great if every unique
value in a particular column (like different locations, or different dates)
requires it's own repeating validation.
With a formula, we can be more selective with which column values should be
used for segmentation. Using a_column ~ c("group_1", "group_2") will
attempt to obtain two segments where one is a slice of data where the value
"group_1" exists in the column named "a_column", and, the other is a
slice where "group_2" exists in the same column. Each group of rows
resolved from the formula will result in a separate validation step.
If there are multiple columns specified then the potential number of
validation steps will be m columns multiplied by n segments resolved.
Segmentation will always occur after preconditions (i.e., statements that
mutate the target table), if any, are applied. With this type of one-two
combo, it's possible to generate labels for segmentation using an expression
for preconditions and refer to those labels in segments without having to
generate a separate version of the target table.
Actions
Often, we will want to specify actions for the validation. This argument,
present in every validation function, takes a specially-crafted list
object that is best produced by the action_levels() function. Read that
function's documentation for the lowdown on how to create reactions to
above-threshold failure levels in validation. The basic gist is that you'll
want at least a single threshold level (specified as either the fraction of
test units failed, or, an absolute value), often using the warn_at
argument. This is especially true when x is a table object because,
otherwise, nothing happens. For the col_vals_*()-type functions, using
action_levels(warn_at = 0.25) or action_levels(stop_at = 0.25) are good
choices depending on the situation (the first produces a warning when a
quarter of the total test units fails, the other stop()s at the same
threshold level).
Labels
label may be a single string or a character vector that matches the number
of expanded steps. label also supports {glue} syntax and exposes the
following dynamic variables contextualized to the current step:
-
"{.step}": The validation step name -
"{.col}": The current column name -
"{.seg_col}": The current segment's column name -
"{.seg_val}": The current segment's value/group
The glue context also supports ordinary expressions for further flexibility
(e.g., "{toupper(.step)}") as long as they return a length-1 string.
Briefs
Want to describe this validation step in some detail? Keep in mind that this
is only useful if x is an agent. If that's the case, brief the agent
with some text that fits. Don't worry if you don't want to do it. The
autobrief protocol is kicked in when brief = NULL and a simple brief will
then be automatically generated.
YAML
A pointblank agent can be written to YAML with yaml_write() and the
resulting YAML can be used to regenerate an agent (with yaml_read_agent())
or interrogate the target table (via yaml_agent_interrogate()). When
col_vals_within_spec() is represented in YAML (under the top-level steps
key as a list member), the syntax closely follows the signature of the
validation function. Here is an example of how a complex call of
col_vals_within_spec() as a validation step is expressed in R code and in
the corresponding YAML representation.
R statement:
agent %>%
col_vals_within_spec(
columns = a,
spec = "email",
na_pass = TRUE,
preconditions = ~ . %>% dplyr::filter(b < 10),
segments = b ~ c("group_1", "group_2"),
actions = action_levels(warn_at = 0.1, stop_at = 0.2),
label = "The `col_vals_within_spec()` step.",
active = FALSE
)
YAML representation:
steps:
- col_vals_within_spec:
columns: c(a)
spec: email
na_pass: true
preconditions: ~. %>% dplyr::filter(b < 10)
segments: b ~ c("group_1", "group_2")
actions:
warn_fraction: 0.1
stop_fraction: 0.2
label: The `col_vals_within_spec()` step.
active: false
In practice, both of these will often be shorter as only the columns and
spec arguments require values. Arguments with default values won't be
written to YAML when using yaml_write() (though it is acceptable to include
them with their default when generating the YAML by other means). It is also
possible to preview the transformation of an agent to YAML without any
writing to disk by using the yaml_agent_string() function.
Examples
The specifications dataset in the package has columns of character data
that correspond to each of the specifications that can be tested. The
following examples will validate that the email_addresses column has 5
correct values (this is true if we get a subset of the data: the first five
rows).
spec_slice <- specifications[1:5, ] spec_slice #> # A tibble: 5 x 12 #> isbn_numbers vin_numbers zip_codes credit_card_numbers iban_austria #> <chr> <chr> <chr> <chr> <chr> #> 1 978 1 85715 201 2 4UZAANDH85CV12329 99553 340000000000009 AT582774098~ #> 2 978-1-84159-362-3 JM1BL1S59A1134659 36264 378734493671000 AT220332087~ #> 3 978 1 84159 329 6 1GCEK14R3WZ274764 71660 6703444444444449 AT328650112~ #> 4 978 1 85715 202 9 2B7JB21Y0XK524370 85225 6703000000000000003 AT193357281~ #> 5 978 1 85715 198 5 4UZAANDH85CV12329 90309 4035501000000008 AT535755326~ #> # i 7 more variables: swift_numbers <chr>, phone_numbers <chr>, #> # email_addresses <chr>, urls <chr>, ipv4_addresses <chr>, #> # ipv6_addresses <chr>, mac_addresses <chr>
A: Using an agent with validation functions and then interrogate()
Validate that all values in the column email_addresses are correct. We'll
determine if this validation has any failing test units (there are 5 test
units, one for each row).
agent <-
create_agent(tbl = spec_slice) %>%
col_vals_within_spec(
columns = email_addresses,
spec = "email"
) %>%
interrogate()
Printing the agent in the console shows the validation report in the
Viewer. Here is an excerpt of validation report, showing the single entry
that corresponds to the validation step demonstrated here.

B: Using the validation function directly on the data (no agent)
This way of using validation functions acts as a data filter. Data is passed
through but should stop() if there is a single test unit failing. The
behavior of side effects can be customized with the actions option.
spec_slice %>%
col_vals_within_spec(
columns = email_addresses,
spec = "email"
) %>%
dplyr::select(email_addresses)
#> # A tibble: 5 x 1
#> email_addresses
#> <chr>
#> 1 [email protected]
#> 2 [email protected]
#> 3 [email protected]
#> 4 abcdefghijklmnopqrstuvwxyzABCDEFGHIJKLMNOPQRSTUVWXYZ@letters-in-local.org
#> 5 [email protected]
C: Using the expectation function
With the expect_*() form, we would typically perform one validation at a
time. This is primarily used in testthat tests.
expect_col_vals_within_spec( spec_slice, columns = email_addresses, spec = "email" )
D: Using the test function
With the test_*() form, we should get a single logical value returned to
us.
spec_slice %>%
test_col_vals_within_spec(
columns = email_addresses,
spec = "email"
)
#> [1] TRUE
Function ID
2-18
See Also
Other validation functions:
col_count_match(),
col_exists(),
col_is_character(),
col_is_date(),
col_is_factor(),
col_is_integer(),
col_is_logical(),
col_is_numeric(),
col_is_posix(),
col_schema_match(),
col_vals_between(),
col_vals_decreasing(),
col_vals_equal(),
col_vals_expr(),
col_vals_gt(),
col_vals_gte(),
col_vals_in_set(),
col_vals_increasing(),
col_vals_lt(),
col_vals_lte(),
col_vals_make_set(),
col_vals_make_subset(),
col_vals_not_between(),
col_vals_not_equal(),
col_vals_not_in_set(),
col_vals_not_null(),
col_vals_null(),
col_vals_regex(),
conjointly(),
row_count_match(),
rows_complete(),
rows_distinct(),
serially(),
specially(),
tbl_match()
Perform multiple rowwise validations for joint validity
Description
The conjointly() validation function, the expect_conjointly() expectation
function, and the test_conjointly() test function all check whether test
units at each index (typically each row) all pass multiple validations. We
can use validation functions that validate row units (the col_vals_*()
series), check for column existence (col_exists()), or validate column type
(the col_is_*() series). Because of the imposed constraint on the allowed
validation functions, the ensemble of test units are either comprised rows of
the table (after any common preconditions have been applied) or are single
test units (for those functions that validate columns).
Each of the functions used in a conjointly() validation step (composed
using multiple validation function calls) ultimately perform a rowwise test
of whether all sub-validations reported a pass for the same test units. In
practice, an example of a joint validation is testing whether values for
column a are greater than a specific value while adjacent values in column
b lie within a specified range. The validation functions to be part of the
conjoint validation are to be supplied as one-sided R formulas (using a
leading ~, and having a . stand in as the data object). The validation
function can be used directly on a data table or with an agent object
(technically, a ptblank_agent object) whereas the expectation and test
functions can only be used with a data table.
Usage
conjointly( x, ..., .list = list2(...), preconditions = NULL, segments = NULL, actions = NULL, step_id = NULL, label = NULL, brief = NULL, active = TRUE ) expect_conjointly( object, ..., .list = list2(...), preconditions = NULL, threshold = 1 ) test_conjointly( object, ..., .list = list2(...), preconditions = NULL, threshold = 1 )conjointly( x, ..., .list = list2(...), preconditions = NULL, segments = NULL, actions = NULL, step_id = NULL, label = NULL, brief = NULL, active = TRUE ) expect_conjointly( object, ..., .list = list2(...), preconditions = NULL, threshold = 1 ) test_conjointly( object, ..., .list = list2(...), preconditions = NULL, threshold = 1 )
Arguments
x |
A pointblank agent or a data table
A data frame, tibble ( |
... |
Validation expressions
A collection one-sided formulas that consist of validation functions that
validate row units (the |
.list |
Alternative to
Allows for the use of a list as an input alternative to |
preconditions |
Input table modification prior to validation
An optional expression for mutating the input table before proceeding with
the validation. This can either be provided as a one-sided R formula using
a leading |
segments |
Expressions for segmenting the target table
An optional expression or set of expressions (held in a list) that serve to segment the target table by column values. Each expression can be given in one of two ways: (1) as column names, or (2) as a two-sided formula where the LHS holds a column name and the RHS contains the column values to segment on. See the Segments section for more details on this. |
actions |
Thresholds and actions for different states
A list containing threshold levels so that the validation step can react
accordingly when exceeding the set levels for different states. This is to
be created with the |
step_id |
Manual setting of the step ID value
One or more optional identifiers for the single or multiple validation
steps generated from calling a validation function. The use of step IDs
serves to distinguish validation steps from each other and provide an
opportunity for supplying a more meaningful label compared to the step
index. By default this is |
label |
Optional label for the validation step
Optional label for the validation step. This label appears in the agent report and, for the best appearance, it should be kept quite short. See the Labels section for more information. |
brief |
Brief description for the validation step
A brief is a short, text-based description for the validation step. If
nothing is provided here then an autobrief is generated by the agent,
using the language provided in |
active |
Is the validation step active?
A logical value indicating whether the validation step should be active. If
the validation function is working with an agent, |
object |
A data table for expectations or tests
A data frame, tibble ( |
threshold |
The failure threshold
A simple failure threshold value for use with the expectation ( |
Value
For the validation function, the return value is either a
ptblank_agent object or a table object (depending on whether an agent
object or a table was passed to x). The expectation function invisibly
returns its input but, in the context of testing data, the function is
called primarily for its potential side-effects (e.g., signaling failure).
The test function returns a logical value.
Supported Input Tables
The types of data tables that are officially supported are:
-
data frames (
data.frame) and tibbles (tbl_df) -
Spark DataFrames (
tbl_spark) -
the following database tables (
tbl_dbi):-
PostgreSQL tables (using the
RPostgres::Postgres()as driver) -
MySQL tables (with
RMySQL::MySQL()) -
Microsoft SQL Server tables (via odbc)
-
BigQuery tables (using
bigrquery::bigquery()) -
DuckDB tables (through
duckdb::duckdb()) -
SQLite (with
RSQLite::SQLite())
-
Other database tables may work to varying degrees but they haven't been formally tested (so be mindful of this when using unsupported backends with pointblank).
Column Names
columns may be a single column (as symbol a or string "a") or a vector
of columns (c(a, b, c) or c("a", "b", "c")). {tidyselect} helpers
are also supported, such as contains("date") and where(is.double). If
passing an external vector of columns, it should be wrapped in all_of().
When multiple columns are selected by columns, the result will be an
expansion of validation steps to that number of columns (e.g.,
c(col_a, col_b) will result in the entry of two validation steps).
Previously, columns could be specified in vars(). This continues to work,
but c() offers the same capability and supersedes vars() in columns.
Preconditions
Providing expressions as preconditions means pointblank will preprocess
the target table during interrogation as a preparatory step. It might happen
that a particular validation requires a calculated column, some filtering of
rows, or the addition of columns via a join, etc. Especially for an
agent-based report this can be advantageous since we can develop a large
validation plan with a single target table and make minor adjustments to it,
as needed, along the way.
The table mutation is totally isolated in scope to the validation step(s)
where preconditions is used. Using dplyr code is suggested here since
the statements can be translated to SQL if necessary (i.e., if the target
table resides in a database). The code is most easily supplied as a one-sided
R formula (using a leading ~). In the formula representation, the .
serves as the input data table to be transformed (e.g., ~ . %>% dplyr::mutate(col_b = col_a + 10)). Alternatively, a function could instead
be supplied (e.g., function(x) dplyr::mutate(x, col_b = col_a + 10)).
Segments
By using the segments argument, it's possible to define a particular
validation with segments (or row slices) of the target table. An optional
expression or set of expressions that serve to segment the target table by
column values. Each expression can be given in one of two ways: (1) as column
names, or (2) as a two-sided formula where the LHS holds a column name and
the RHS contains the column values to segment on.
As an example of the first type of expression that can be used,
vars(a_column) will segment the target table in however many unique values
are present in the column called a_column. This is great if every unique
value in a particular column (like different locations, or different dates)
requires it's own repeating validation.
With a formula, we can be more selective with which column values should be
used for segmentation. Using a_column ~ c("group_1", "group_2") will
attempt to obtain two segments where one is a slice of data where the value
"group_1" exists in the column named "a_column", and, the other is a
slice where "group_2" exists in the same column. Each group of rows
resolved from the formula will result in a separate validation step.
If there are multiple columns specified then the potential number of
validation steps will be m columns multiplied by n segments resolved.
Segmentation will always occur after preconditions (i.e., statements that
mutate the target table), if any, are applied. With this type of one-two
combo, it's possible to generate labels for segmentation using an expression
for preconditions and refer to those labels in segments without having to
generate a separate version of the target table.
Actions
Often, we will want to specify actions for the validation. This argument,
present in every validation function, takes a specially-crafted list
object that is best produced by the action_levels() function. Read that
function's documentation for the lowdown on how to create reactions to
above-threshold failure levels in validation. The basic gist is that you'll
want at least a single threshold level (specified as either the fraction of
test units failed, or, an absolute value), often using the warn_at
argument. This is especially true when x is a table object because,
otherwise, nothing happens. For the col_vals_*()-type functions, using
action_levels(warn_at = 0.25) or action_levels(stop_at = 0.25) are good
choices depending on the situation (the first produces a warning when a
quarter of the total test units fails, the other stop()s at the same
threshold level).
Labels
label may be a single string or a character vector that matches the number
of expanded steps. label also supports {glue} syntax and exposes the
following dynamic variables contextualized to the current step:
-
"{.step}": The validation step name -
"{.seg_col}": The current segment's column name -
"{.seg_val}": The current segment's value/group
The glue context also supports ordinary expressions for further flexibility
(e.g., "{toupper(.step)}") as long as they return a length-1 string.
Briefs
Want to describe this validation step in some detail? Keep in mind that this
is only useful if x is an agent. If that's the case, brief the agent
with some text that fits. Don't worry if you don't want to do it. The
autobrief protocol is kicked in when brief = NULL and a simple brief will
then be automatically generated.
YAML
A pointblank agent can be written to YAML with yaml_write() and the
resulting YAML can be used to regenerate an agent (with yaml_read_agent())
or interrogate the target table (via yaml_agent_interrogate()). When
conjointly() is represented in YAML (under the top-level steps key as a
list member), the syntax closely follows the signature of the validation
function. Here is an example of how a complex call of conjointly() as a
validation step is expressed in R code and in the corresponding YAML
representation.
R statement:
agent %>%
conjointly(
~ col_vals_lt(., columns = a, value = 8),
~ col_vals_gt(., columns = c, value = vars(a)),
~ col_vals_not_null(., columns = b),
preconditions = ~ . %>% dplyr::filter(a < 10),
segments = b ~ c("group_1", "group_2"),
actions = action_levels(warn_at = 0.1, stop_at = 0.2),
label = "The `conjointly()` step.",
active = FALSE
)
YAML representation:
steps:
- conjointly:
fns:
- ~col_vals_lt(., columns = a, value = 8)
- ~col_vals_gt(., columns = c, value = vars(a))
- ~col_vals_not_null(., columns = b)
preconditions: ~. %>% dplyr::filter(a < 10)
segments: b ~ c("group_1", "group_2")
actions:
warn_fraction: 0.1
stop_fraction: 0.2
label: The `conjointly()` step.
active: false
In practice, both of these will often be shorter as only the expressions for
validation steps are necessary. Arguments with default values won't be
written to YAML when using yaml_write() (though it is acceptable to include
them with their default when generating the YAML by other means). It is also
possible to preview the transformation of an agent to YAML without any
writing to disk by using the yaml_agent_string() function.
Examples
For all examples here, we'll use a simple table with three numeric columns
(a, b, and c). This is a very basic table but it'll be more useful when
explaining things later.
tbl <-
dplyr::tibble(
a = c(5, 2, 6),
b = c(3, 4, 6),
c = c(9, 8, 7)
)
tbl
#> # A tibble: 3 x 3
#> a b c
#> <dbl> <dbl> <dbl>
#> 1 5 3 9
#> 2 2 4 8
#> 3 6 6 7
A: Using an agent with validation functions and then interrogate()
Validate a number of things on a row-by-row basis using validation functions
of the col_vals* type (all have the same number of test units): (1) values
in a are less than 8, (2) values in c are greater than the adjacent
values in a, and (3) there aren't any NA values in b. We'll determine if
this validation has any failing test units (there are 3 test units, one for
each row).
agent <-
create_agent(tbl = tbl) %>%
conjointly(
~ col_vals_lt(., columns = a, value = 8),
~ col_vals_gt(., columns = c, value = vars(a)),
~ col_vals_not_null(., columns = b)
) %>%
interrogate()
Printing the agent in the console shows the validation report in the
Viewer. Here is an excerpt of validation report, showing the single entry
that corresponds to the validation step demonstrated here.

What's going on? Think of there being three parallel validations, each
producing a column of TRUE or FALSE values (pass or fail) and line
them up side-by-side, any rows with any FALSE values results in a conjoint
fail test unit.
B: Using the validation function directly on the data (no agent)
This way of using validation functions acts as a data filter. Data is passed
through but should stop() if there is a single test unit failing. The
behavior of side effects can be customized with the actions option.
tbl %>%
conjointly(
~ col_vals_lt(., columns = a, value = 8),
~ col_vals_gt(., columns = c, value = vars(a)),
~ col_vals_not_null(., columns = b)
)
#> # A tibble: 3 x 3
#> a b c
#> <dbl> <dbl> <dbl>
#> 1 5 3 9
#> 2 2 4 8
#> 3 6 6 7
C: Using the expectation function
With the expect_*() form, we would typically perform one validation at a
time. This is primarily used in testthat tests.
expect_conjointly( tbl, ~ col_vals_lt(., columns = a, value = 8), ~ col_vals_gt(., columns = c, value = vars(a)), ~ col_vals_not_null(., columns = b) )
D: Using the test function
With the test_*() form, we should get a single logical value returned to
us.
tbl %>%
test_conjointly(
~ col_vals_lt(., columns = a, value = 8),
~ col_vals_gt(., columns = c, value = vars(a)),
~ col_vals_not_null(., columns = b)
)
#> [1] TRUE
Function ID
2-34
See Also
Other validation functions:
col_count_match(),
col_exists(),
col_is_character(),
col_is_date(),
col_is_factor(),
col_is_integer(),
col_is_logical(),
col_is_numeric(),
col_is_posix(),
col_schema_match(),
col_vals_between(),
col_vals_decreasing(),
col_vals_equal(),
col_vals_expr(),
col_vals_gt(),
col_vals_gte(),
col_vals_in_set(),
col_vals_increasing(),
col_vals_lt(),
col_vals_lte(),
col_vals_make_set(),
col_vals_make_subset(),
col_vals_not_between(),
col_vals_not_equal(),
col_vals_not_in_set(),
col_vals_not_null(),
col_vals_null(),
col_vals_regex(),
col_vals_within_spec(),
row_count_match(),
rows_complete(),
rows_distinct(),
serially(),
specially(),
tbl_match()
Create a pointblank agent object
Description
The create_agent() function creates an agent object, which is used in a
data quality reporting workflow. The overall aim of this workflow is to
generate useful reporting information for assessing the level of data quality
for the target table. We can supply as many validation functions as the user
wishes to write, thereby increasing the level of validation coverage for that
table. The agent assigned by the create_agent() call takes validation
functions (e.g., col_vals_between(), rows_distinct(), etc.), which
translate to discrete validation steps (each one is numbered and will later
provide its own set of results). This process is known as developing a
validation plan.
The validation functions, when called on an agent, are merely instructions
up to the point the interrogate() function is called. That kicks off the
process of the agent acting on the validation plan and getting results
for each step. Once the interrogation process is complete, we can say that
the agent has intel. Calling the agent itself will result in a reporting
table. This reporting of the interrogation can also be accessed with the
get_agent_report() function, where there are more reporting options.
Usage
create_agent( tbl = NULL, tbl_name = NULL, label = NULL, actions = NULL, end_fns = NULL, embed_report = FALSE, lang = NULL, locale = NULL, read_fn = NULL )create_agent( tbl = NULL, tbl_name = NULL, label = NULL, actions = NULL, end_fns = NULL, embed_report = FALSE, lang = NULL, locale = NULL, read_fn = NULL )
Arguments
tbl |
Table or expression for reading in one
The input table. This can be a data frame, a tibble, a |
tbl_name |
A table name
A optional name to assign to the input table object. If no value is
provided, a name will be generated based on whatever information is
available. This table name will be displayed in the header area of the
agent report generated by printing the agent or calling
|
label |
An optional label for the validation plan
An optional label for the validation plan. If no value is provided, a label will be generated based on the current system time. Markdown can be used here to make the label more visually appealing (it will appear in the header area of the agent report). |
actions |
Default thresholds and actions for different states
A option to include a list with threshold levels so that all validation
steps can react accordingly when exceeding the set levels. This is to be
created with the |
end_fns |
Functions to execute after interrogation
A list of expressions that should be invoked at the end of an
interrogation. Each expression should be in the form of a one-sided R
formula, so overall this construction should be used: |
embed_report |
Embed the validation report into agent object?
An option to embed a gt-based validation report into the
|
lang |
Reporting language
The language to use for automatic creation of briefs (short descriptions
for each validation step) and for the agent report (a summary table that
provides the validation plan and the results from the interrogation. By
default, |
locale |
Locale for value formatting within reports
An optional locale ID to use for formatting values in the agent report
summary table according the locale's rules. Examples include |
read_fn |
Deprecated Table reading function
The |
Value
A ptblank_agent object.
Supported Input Tables
The types of data tables that are officially supported are:
-
data frames (
data.frame) and tibbles (tbl_df) -
Spark DataFrames (
tbl_spark) -
the following database tables (
tbl_dbi):-
PostgreSQL tables (using the
RPostgres::Postgres()as driver) -
MySQL tables (with
RMySQL::MySQL()) -
Microsoft SQL Server tables (via odbc)
-
BigQuery tables (using
bigrquery::bigquery()) -
DuckDB tables (through
duckdb::duckdb()) -
SQLite (with
RSQLite::SQLite())
-
Other database tables may work to varying degrees but they haven't been formally tested (so be mindful of this when using unsupported backends with pointblank).
The Use of an Agent for Validation Is Just One Option of Several
There are a few validation workflows and using an agent is the one that provides the most options. It is probably the best choice for assessing the state of data quality since it yields detailed reporting, has options for further exploration of root causes, and allows for granular definition of actions to be taken based on the severity of validation failures (e.g., emailing, logging, etc.).
Different situations, however, call for different validation workflows. You use validation functions (the same ones you would with an agent) directly on the data. This acts as a sort of data filter in that the input table will become output data (without modification), but there may be warnings, errors, or other side effects that you can define if validation fails. Basically, instead of this
create_agent(tbl = small_table) %>% rows_distinct() %>% interrogate()
you would use this:
small_table %>% rows_distinct()
This results in an error (with the default failure threshold settings), displaying the reason for the error in the console. Notably, the data is not passed though.
We can use variants of the validation functions, the test (test_*()) and
expectation (expect_*()) versions, directly on the data for different
workflows. The first returns to us a logical value. So this
small_table %>% test_rows_distinct()
returns FALSE instead of an error.
In a unit testing scenario, we can use expectation functions exactly as we
would with testthat's library of expect_*() functions:
small_table %>% expect_rows_distinct()
This test of small_table would be counted as a failure.
The Agent Report
While printing an agent (a ptblank_agent object) will display its
reporting in the Viewer, we can alternatively use the get_agent_report() to
take advantage of other options (e.g., overriding the language, modifying the
arrangement of report rows, etc.), and to return the report as independent
objects. For example, with the display_table = TRUE option (the default),
get_agent_report() will return a ptblank_agent_report object. If
display_table is set to FALSE, we'll get a data frame back instead.
Exporting the report as standalone HTML file can be accomplished by using the
export_report() function. This function can accept either the
ptblank_agent object or the ptblank_agent_report as input. Each HTML
document written to disk in this way is self-contained and easily viewable in
a web browser.
Data Products Obtained from an Agent
A very detailed list object, known as an x-list, can be obtained by using the
get_agent_x_list() function on the agent. This font of information can be
taken as a whole, or, broken down by the step number (with the i argument).
Sometimes it is useful to see which rows were the failing ones. By using the
get_data_extracts() function on the agent, we either get a list of
tibbles (for those steps that have data extracts) or one tibble if the
validation step is specified with the i argument.
The target data can be split into pieces that represent the 'pass' and 'fail'
portions with the get_sundered_data() function. A primary requirement is an
agent that has had interrogate() called on it. In addition, the validation
steps considered for this data splitting need to be those that operate on
values down a column (e.g., the col_vals_*() functions or conjointly()).
With these in-consideration validation steps, rows with no failing test units
across all validation steps comprise the 'pass' data piece, and rows with at
least one failing test unit across the same series of validations constitute
the 'fail' piece.
If we just need to know whether all validations completely passed (i.e., all
steps had no failing test units), the all_passed() function could be used
on the agent. However, in practice, it's not often the case that all data
validation steps are free from any failing units.
YAML
A pointblank agent can be written to YAML with yaml_write() and the
resulting YAML can be used to regenerate an agent (with yaml_read_agent())
or interrogate the target table (via yaml_agent_interrogate()). Here is an
example of how a complex call of create_agent() is expressed in R code and
in the corresponding YAML representation.
R statement:
create_agent(
tbl = ~ small_table,
tbl_name = "small_table",
label = "An example.",
actions = action_levels(
warn_at = 0.10,
stop_at = 0.25,
notify_at = 0.35,
fns = list(notify = ~ email_blast(
x,
to = "[email protected]",
from = "[email protected]",
msg_subject = "Table Validation",
credentials = blastula::creds_key(
id = "smtp2go"
)
))
),
end_fns = list(
~ beepr::beep(2),
~ Sys.sleep(1)
),
embed_report = TRUE,
lang = "fr",
locale = "fr_CA"
)
YAML representation:
type: agent
tbl: ~small_table
tbl_name: small_table
label: An example.
lang: fr
locale: fr_CA
actions:
warn_fraction: 0.1
stop_fraction: 0.25
notify_fraction: 0.35
fns:
notify: ~email_blast(x, to = "[email protected]",
from = "[email protected]",
msg_subject = "Table Validation",
credentials = blastula::creds_key(id = "smtp2go"))
end_fns:
- ~beepr::beep(2)
- ~Sys.sleep(1)
embed_report: true
steps: []
In practice, this YAML file will be shorter since arguments with default
values won't be written to YAML when using yaml_write() (though it is
acceptable to include them with their default when generating the YAML by
other means). The only requirement for writing the YAML representation of an
agent is having tbl specified as table-prep formula.
What typically follows this chunk of YAML is a steps part, and that
corresponds to the addition of validation steps via validation functions.
Help articles for each validation function have a YAML section that
describes how a given validation function is translated to YAML.
Should you need to preview the transformation of an agent to YAML (without
any committing anything to disk), use the yaml_agent_string() function. If
you already have a .yml file that holds an agent, you can get a glimpse
of the R expressions that are used to regenerate that agent with
yaml_agent_show_exprs().
Writing an Agent to Disk
An agent object can be written to disk with the x_write_disk() function.
This can be useful for keeping a history of validations and generating views
of data quality over time. Agents are stored in the serialized RDS format and
can be easily retrieved with the x_read_disk() function.
It's recommended that table-prep formulas are supplied to the tbl
argument of create_agent(). In this way, when an agent is read from disk
through x_read_disk(), it can be reused to access the target table (which
may change, hence the need to use an expression for this).
Combining Several Agents in a multiagent Object
Multiple agent objects can be part of a multiagent object, and two
functions can be used for this: create_multiagent() and
read_disk_multiagent(). By gathering multiple agents that have performed
interrogations in the past, we can get a multiagent report showing how data
quality evolved over time. This use case is interesting for data quality
monitoring and management, and, the reporting (which can be customized with
get_multiagent_report()) is robust against changes in validation steps for
a given target table.
Examples
Creating an agent, adding a validation plan, and interrogating
Let's walk through a data quality analysis of an extremely small table. It's
actually called small_table and we can find it as a dataset in this
package.
small_table #> # A tibble: 13 x 8 #> date_time date a b c d e f #> <dttm> <date> <int> <chr> <dbl> <dbl> <lgl> <chr> #> 1 2016-01-04 11:00:00 2016-01-04 2 1-bcd-345 3 3423. TRUE high #> 2 2016-01-04 00:32:00 2016-01-04 3 5-egh-163 8 10000. TRUE low #> 3 2016-01-05 13:32:00 2016-01-05 6 8-kdg-938 3 2343. TRUE high #> 4 2016-01-06 17:23:00 2016-01-06 2 5-jdo-903 NA 3892. FALSE mid #> 5 2016-01-09 12:36:00 2016-01-09 8 3-ldm-038 7 284. TRUE low #> 6 2016-01-11 06:15:00 2016-01-11 4 2-dhe-923 4 3291. TRUE mid #> 7 2016-01-15 18:46:00 2016-01-15 7 1-knw-093 3 843. TRUE high #> 8 2016-01-17 11:27:00 2016-01-17 4 5-boe-639 2 1036. FALSE low #> 9 2016-01-20 04:30:00 2016-01-20 3 5-bce-642 9 838. FALSE high #> 10 2016-01-20 04:30:00 2016-01-20 3 5-bce-642 9 838. FALSE high #> 11 2016-01-26 20:07:00 2016-01-26 4 2-dmx-010 7 834. TRUE low #> 12 2016-01-28 02:51:00 2016-01-28 2 7-dmx-010 8 108. FALSE low #> 13 2016-01-30 11:23:00 2016-01-30 1 3-dka-303 NA 2230. TRUE high
We ought to think about what's tolerable in terms of data quality so let's
designate proportional failure thresholds to the warn, stop, and notify
states using action_levels().
al <-
action_levels(
warn_at = 0.10,
stop_at = 0.25,
notify_at = 0.35
)
Now create a pointblank agent object and give it the al object (which
serves as a default for all validation steps which can be overridden). The
static thresholds provided by al will make the reporting a bit more useful.
We also provide a target table and we'll use pointblank::small_table.
agent <-
create_agent(
tbl = pointblank::small_table,
tbl_name = "small_table",
label = "`create_agent()` example.",
actions = al
)
Then, as with any agent object, we can add steps to the validation plan by
using as many validation functions as we want. then, we use interrogate()
to actually perform the validations and gather intel.
agent <-
agent %>%
col_exists(columns = c(date, date_time)) %>%
col_vals_regex(
columns = b,
regex = "[0-9]-[a-z]{3}-[0-9]{3}"
) %>%
rows_distinct() %>%
col_vals_gt(columns = d, value = 100) %>%
col_vals_lte(columns = c, value = 5) %>%
col_vals_between(
columns = c,
left = vars(a), right = vars(d),
na_pass = TRUE
) %>%
interrogate()
The agent object can be printed to see the validation report in the
Viewer.
agent
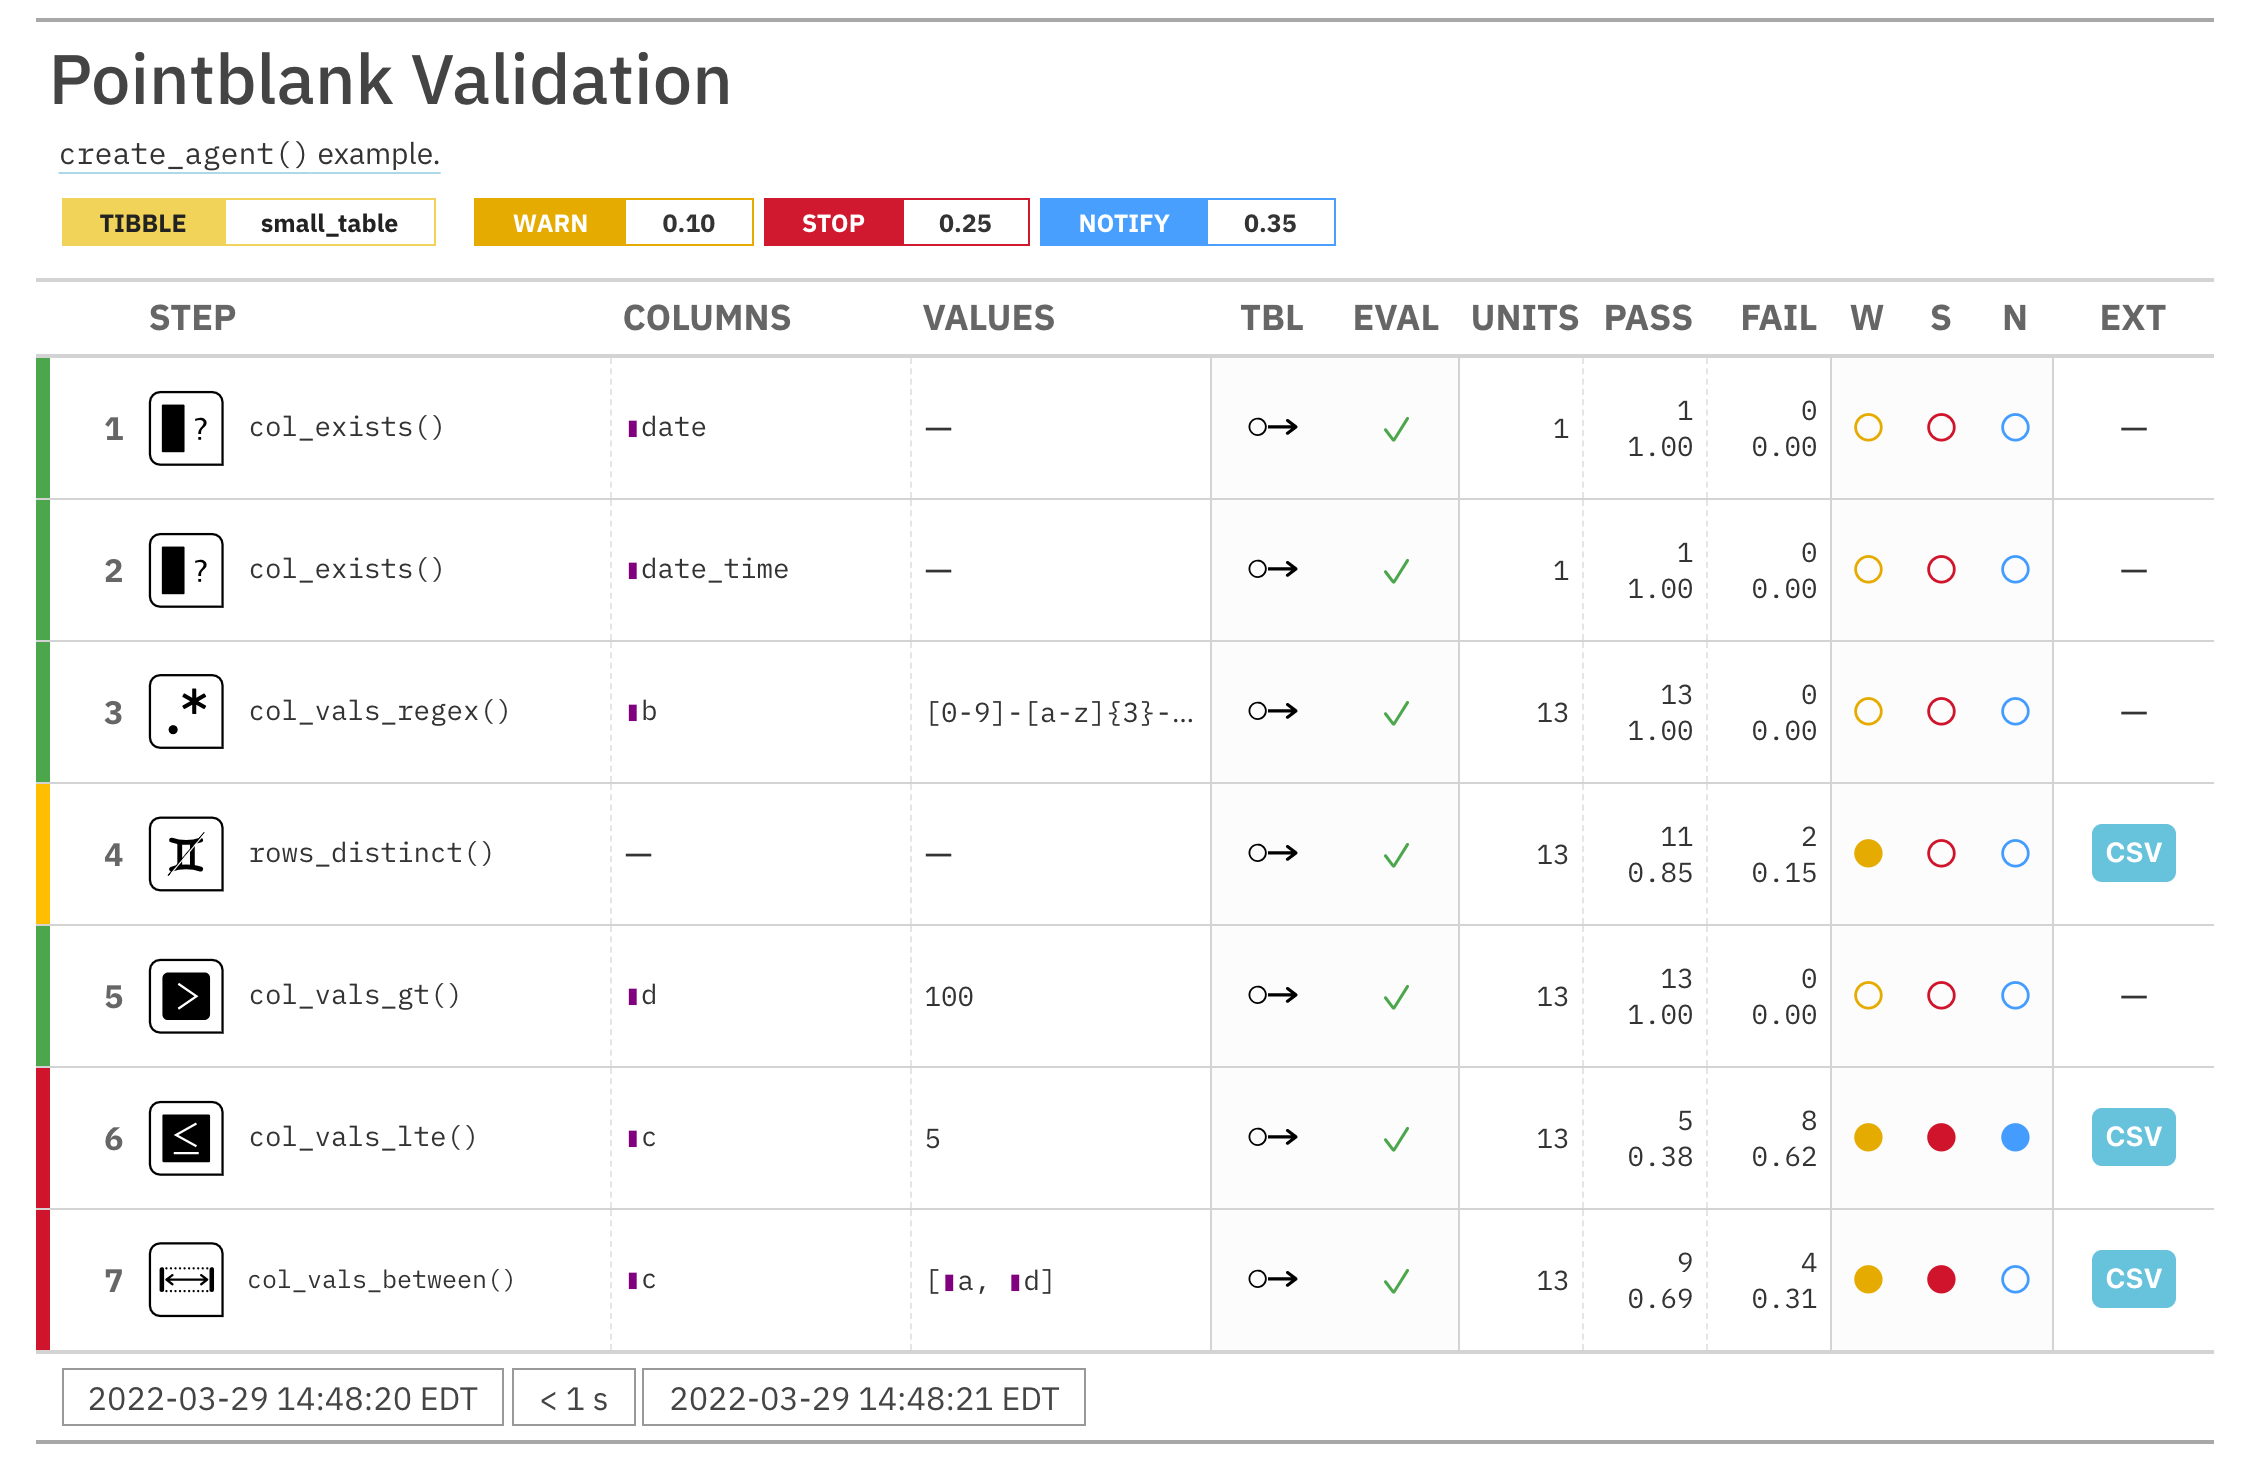
If we want to make use of more report display options, we can alternatively
use the get_agent_report() function.
report <-
get_agent_report(
agent = agent,
arrange_by = "severity",
title = "Validation of `small_table`"
)
report
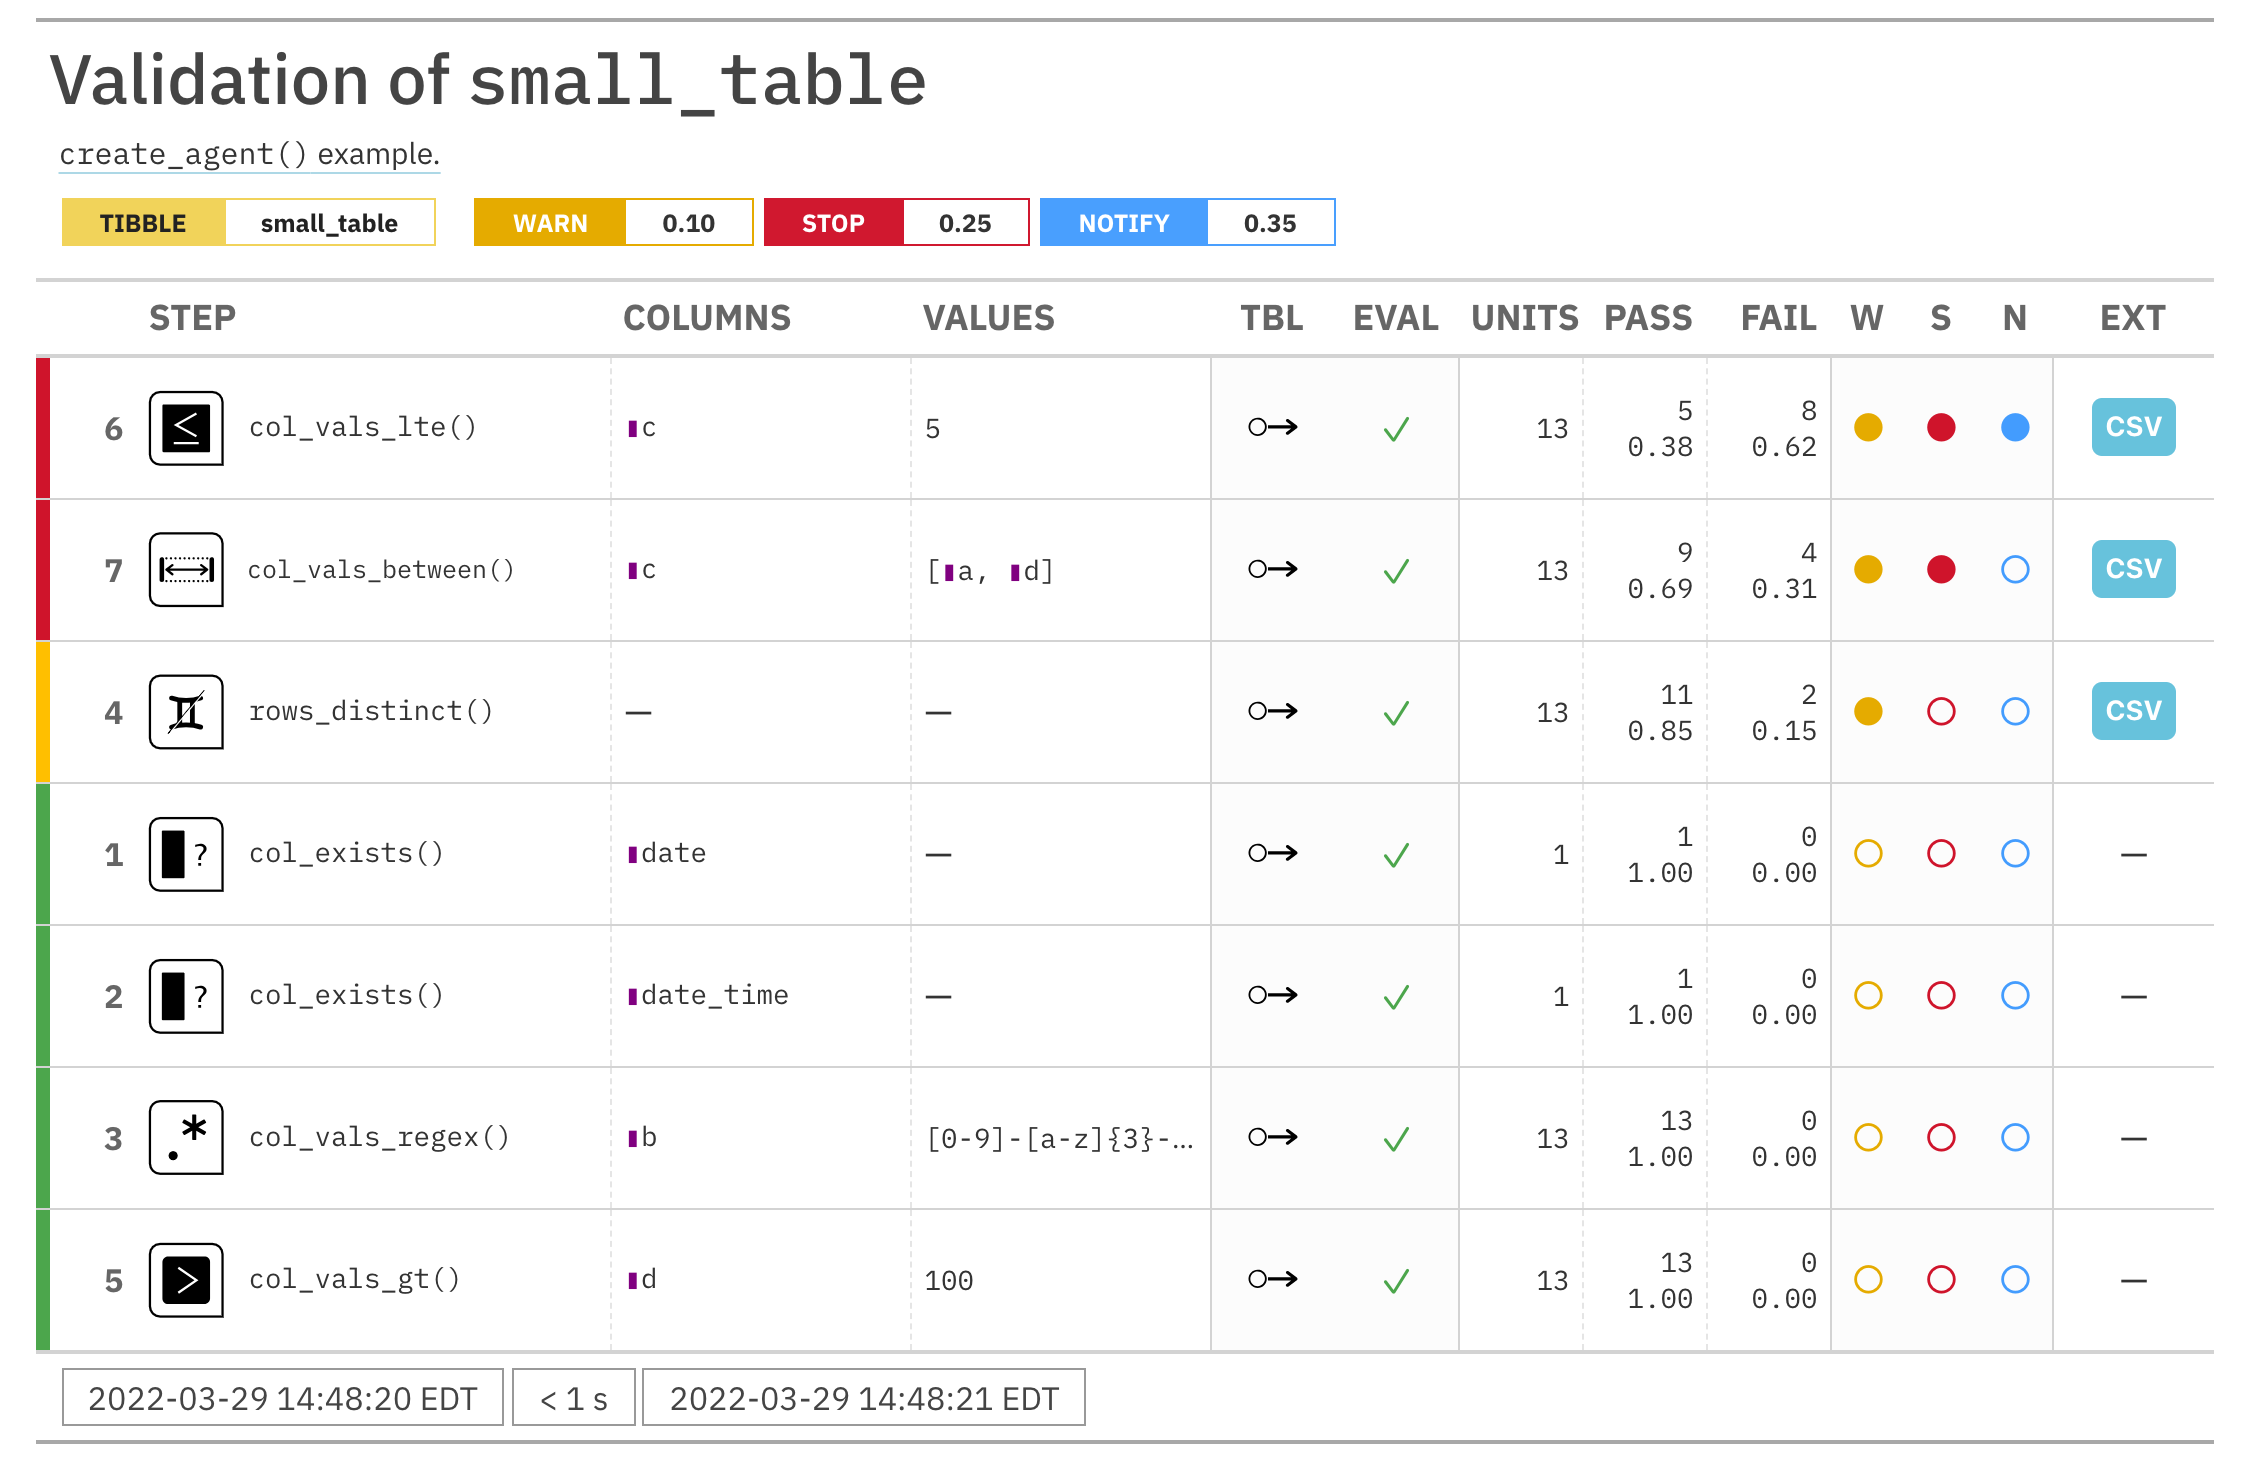
Post-interrogation operations
We can use the agent object with a variety of functions to get at more
of the information collected during interrogation.
We can see from the validation report that Step 4 (which used the
rows_distinct() validation function) had two test units, corresponding to
duplicated rows, that failed. We can see those rows with
get_data_extracts().
agent %>% get_data_extracts(i = 4)
## # A tibble: 2 × 8 ## date_time date a b c d e f ## <dttm> <date> <int> <chr> <dbl> <dbl> <lgl> <chr> ## 1 2016-01-20 04:30:00 2016-01-20 3 5-bce-6… 9 838. FALSE high ## 2 2016-01-20 04:30:00 2016-01-20 3 5-bce-6… 9 838. FALSE high
We can get an x-list for the entire validation process (7 steps), or, just
for the 4th step with get_agent_x_list().
xl_step_4 <- agent %>% get_agent_x_list(i = 4)
And then we can peruse the different parts of the list. Let's get the fraction of test units that failed.
xl_step_4$f_failed
#> [1] 0.15385
An x-list not specific to any step will have way more information and a
slightly different structure. See help(get_agent_x_list) for more info.
Function ID
1-2
See Also
Other Planning and Prep:
action_levels(),
create_informant(),
db_tbl(),
draft_validation(),
file_tbl(),
scan_data(),
tbl_get(),
tbl_source(),
tbl_store(),
validate_rmd()
Create a pointblank informant object
Description
The create_informant() function creates an informant object, which is
used in an information management workflow. The overall aim of this
workflow is to record, collect, and generate useful information on data
tables. We can supply any information that is useful for describing a
particular data table. The informant object created by the
create_informant() function takes information-focused functions:
info_columns(), info_tabular(), info_section(), and info_snippet().
The info_*() series of functions allows for a progressive build up of
information about the target table. The info_columns() and info_tabular()
functions facilitate the entry of info text that concerns the table columns
and the table proper; the info_section() function allows for the creation
of arbitrary sections that can have multiple subsections full of additional
info text. The system allows for dynamic values culled from the target
table by way of info_snippet(), for getting named text extracts from
queries, and the use of {<snippet_name>} in the info text. To make the
use of info_snippet() more convenient for common queries, a set of
snip_*() functions are provided in the package (snip_list(),
snip_stats(), snip_lowest(), and snip_highest()) though you are free to
use your own expressions.
Because snippets need to query the target table to return fragments of info
text, the incorporate() function needs to be used to initiate this action.
This is also necessary for the informant to update other metadata elements
such as row and column counts. Once the incorporation process is complete,
snippets and other metadata will be updated. Calling the informant itself
will result in a reporting table. This reporting can also be accessed with
the get_informant_report() function, where there are more reporting
options.
Usage
create_informant( tbl = NULL, tbl_name = NULL, label = NULL, agent = NULL, lang = NULL, locale = NULL, read_fn = NULL )create_informant( tbl = NULL, tbl_name = NULL, label = NULL, agent = NULL, lang = NULL, locale = NULL, read_fn = NULL )
Arguments
tbl |
Table or expression for reading in one
The input table. This can be a data frame, a tibble, a |
tbl_name |
A table name
A optional name to assign to the input table object. If no value is provided, a name will be generated based on whatever information is available. |
label |
An optional label for the information report
An optional label for the information report. If no value is provided, a label will be generated based on the current system time. Markdown can be used here to make the label more visually appealing (it will appear in the header area of the information report). |
agent |
The pointblank agent object
A pointblank agent object. The table from this object can be extracted
and used in the new informant instead of supplying a table in |
lang |
Reporting language
The language to use for the information report (a summary table that
provides all of the available information for the table. By default, |
locale |
Locale for value formatting within reports
An optional locale ID to use for formatting values in the information
report according the locale's rules. Examples include |
read_fn |
Deprecated Table reading function
The |
Value
A ptblank_informant object.
Supported Input Tables
The types of data tables that are officially supported are:
-
data frames (
data.frame) and tibbles (tbl_df) -
Spark DataFrames (
tbl_spark) -
the following database tables (
tbl_dbi):-
PostgreSQL tables (using the
RPostgres::Postgres()as driver) -
MySQL tables (with
RMySQL::MySQL()) -
Microsoft SQL Server tables (via odbc)
-
BigQuery tables (using
bigrquery::bigquery()) -
DuckDB tables (through
duckdb::duckdb()) -
SQLite (with
RSQLite::SQLite())
-
Other database tables may work to varying degrees but they haven't been formally tested (so be mindful of this when using unsupported backends with pointblank).
YAML
A pointblank informant can be written to YAML with yaml_write() and the
resulting YAML can be used to regenerate an informant (with
yaml_read_informant()) or perform the 'incorporate' action using the target
table (via yaml_informant_incorporate()). Here is an example of how a
complex call of create_informant() is expressed in R code and in the
corresponding YAML representation.
R statement:
create_informant( tbl = ~ small_table, tbl_name = "small_table", label = "An example.", lang = "fr", locale = "fr_CA" )
YAML representation:
type: informant
tbl: ~small_table
tbl_name: small_table
info_label: An example.
lang: fr
locale: fr_CA
table:
name: small_table
_columns: 8
_rows: 13.0
_type: tbl_df
columns:
date_time:
_type: POSIXct, POSIXt
date:
_type: Date
a:
_type: integer
b:
_type: character
c:
_type: numeric
d:
_type: numeric
e:
_type: logical
f:
_type: character
The generated YAML includes some top-level keys where type and tbl are
mandatory, and, two metadata sections: table and columns. Keys that begin
with an underscore character are those that are updated whenever
incorporate() is called on an informant. The table metadata section can
have multiple subsections with info text. The columns metadata section
can similarly have have multiple subsections, so long as they are children to
each of the column keys (in the above YAML example, date_time and date
are column keys and they match the table's column names). Additional sections
can be added but they must have key names on the top level that don't
duplicate the default set (i.e., type, table, columns, etc. are treated
as reserved keys).
Writing an Informant to Disk
An informant object can be written to disk with the x_write_disk()
function. Informants are stored in the serialized RDS format and can be
easily retrieved with the x_read_disk() function.
It's recommended that table-prep formulas are supplied to the tbl argument
of create_informant(). In this way, when an informant is read from disk
through x_read_disk(), it can be reused to access the target table (which
may changed, hence the need to use an expression for this).
Examples
Let's walk through how we can generate some useful information for a really
small table. It's actually called small_table and we can find it as a
dataset in this package.
small_table #> # A tibble: 13 x 8 #> date_time date a b c d e f #> <dttm> <date> <int> <chr> <dbl> <dbl> <lgl> <chr> #> 1 2016-01-04 11:00:00 2016-01-04 2 1-bcd-345 3 3423. TRUE high #> 2 2016-01-04 00:32:00 2016-01-04 3 5-egh-163 8 10000. TRUE low #> 3 2016-01-05 13:32:00 2016-01-05 6 8-kdg-938 3 2343. TRUE high #> 4 2016-01-06 17:23:00 2016-01-06 2 5-jdo-903 NA 3892. FALSE mid #> 5 2016-01-09 12:36:00 2016-01-09 8 3-ldm-038 7 284. TRUE low #> 6 2016-01-11 06:15:00 2016-01-11 4 2-dhe-923 4 3291. TRUE mid #> 7 2016-01-15 18:46:00 2016-01-15 7 1-knw-093 3 843. TRUE high #> 8 2016-01-17 11:27:00 2016-01-17 4 5-boe-639 2 1036. FALSE low #> 9 2016-01-20 04:30:00 2016-01-20 3 5-bce-642 9 838. FALSE high #> 10 2016-01-20 04:30:00 2016-01-20 3 5-bce-642 9 838. FALSE high #> 11 2016-01-26 20:07:00 2016-01-26 4 2-dmx-010 7 834. TRUE low #> 12 2016-01-28 02:51:00 2016-01-28 2 7-dmx-010 8 108. FALSE low #> 13 2016-01-30 11:23:00 2016-01-30 1 3-dka-303 NA 2230. TRUE high
Create a pointblank informant object with create_informant() and the
small_table dataset.
informant <-
create_informant(
tbl = pointblank::small_table,
tbl_name = "small_table",
label = "`create_informant()` example."
)
This function creates some information without any extra help by profiling
the supplied table object. It adds the COLUMNS section with stubs for each
of the target table's columns. We can use the info_columns() or
info_columns_from_tbl() to provide descriptions for each of the columns.
The informant object can be printed to see the information report in the
Viewer.
informant

If we want to make use of more report display options, we can alternatively
use the get_informant_report() function.
report <-
get_informant_report(
informant,
title = "Data Dictionary for `small_table`"
)
report
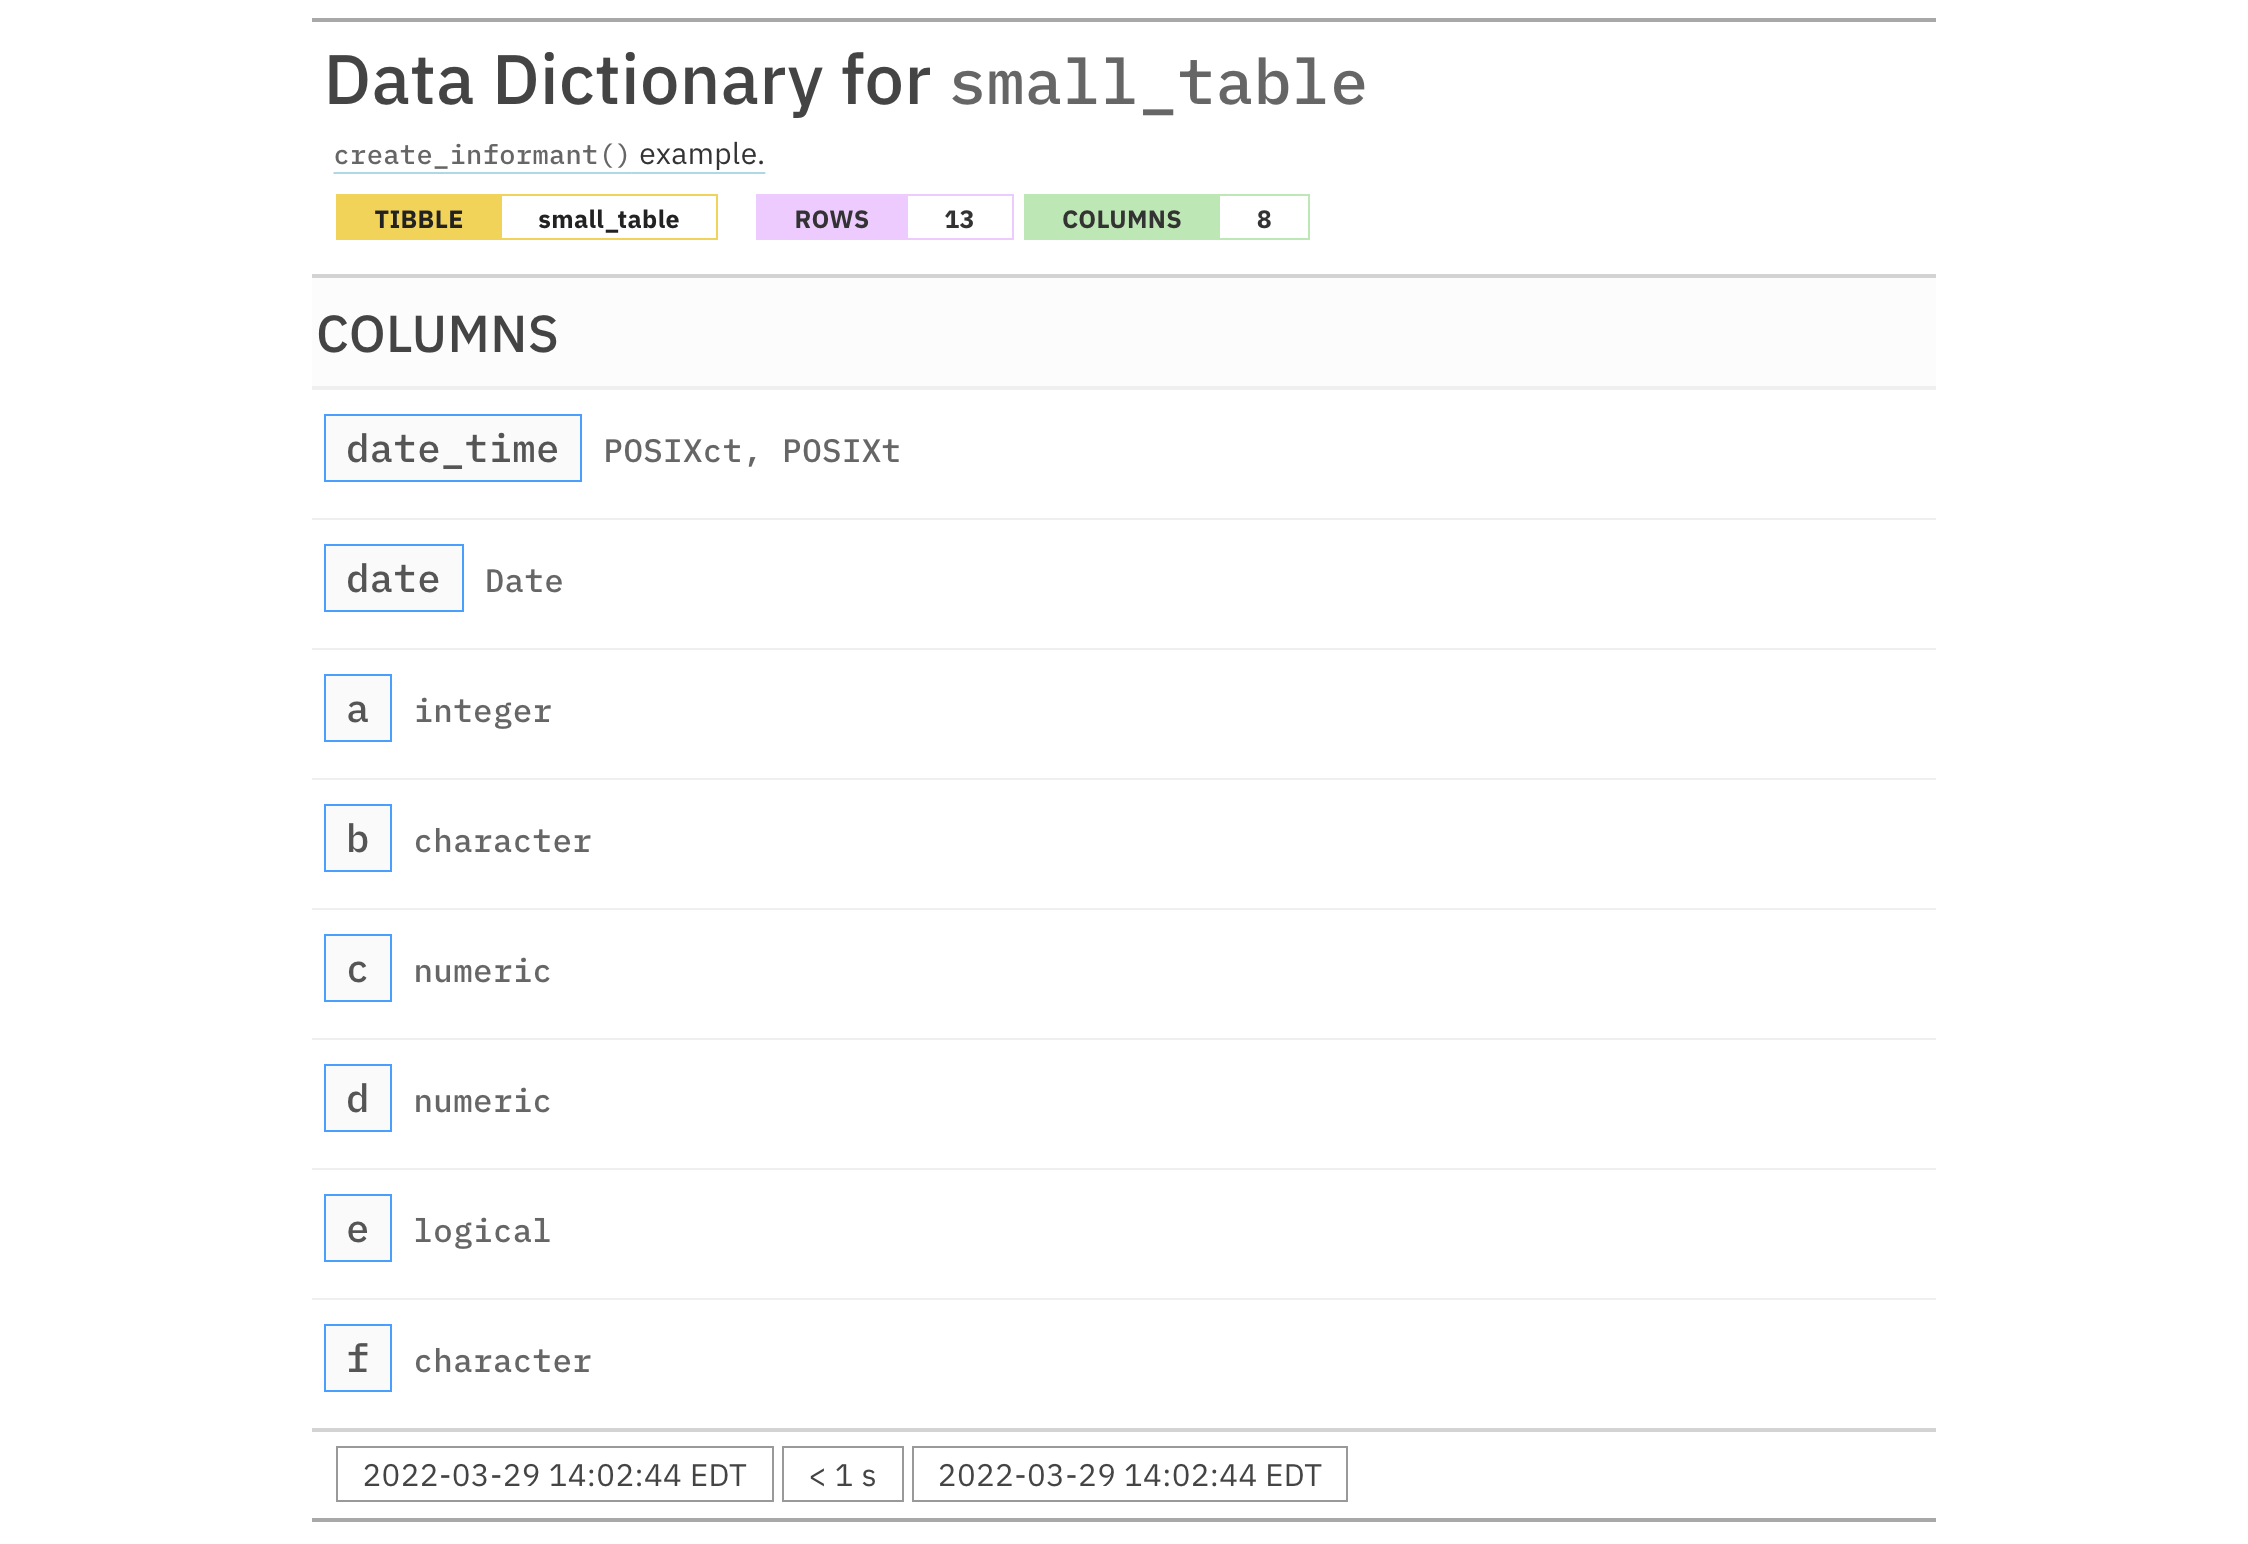
Function ID
1-3
See Also
Other Planning and Prep:
action_levels(),
create_agent(),
db_tbl(),
draft_validation(),
file_tbl(),
scan_data(),
tbl_get(),
tbl_source(),
tbl_store(),
validate_rmd()
Create a pointblank multiagent object
Description
Multiple agents can be part of a single object called the multiagent.
This can be useful when gathering multiple agents that have performed
interrogations in the past (perhaps saved to disk with x_write_disk()).
When be part of a multiagent, we can get a report that shows how data
quality evolved over time. This can be of interest when it's important to
monitor data quality and even the evolution of the validation plan itself.
The reporting table, generated by printing a ptblank_multiagent object or
by using the get_multiagent_report() function, is, by default, organized by
the interrogation time and it automatically recognizes which validation steps
are equivalent across interrogations.
Usage
create_multiagent(..., lang = NULL, locale = NULL)create_multiagent(..., lang = NULL, locale = NULL)
Arguments
... |
Pointblank agents
One or more pointblank agent objects. |
lang |
Reporting language
The language to use for any reporting that will be generated from the
multiagent. (e.g., individual agent reports, multiagent reports,
etc.). By default, |
locale |
Locale for value formatting within reports
An optional locale ID to use for formatting values in the reporting outputs
according the locale's rules. Examples include |
Value
A ptblank_multiagent object.
Examples
For the example below, we'll use two different, yet simple tables.
First, tbl_1:
tbl_1 <-
dplyr::tibble(
a = c(5, 5, 5, 5, 5, 5),
b = c(1, 1, 1, 2, 2, 2),
c = c(1, 1, 1, 2, 3, 4),
d = LETTERS[a],
e = LETTERS[b],
f = LETTERS[c]
)
tbl_1
#> # A tibble: 6 x 6
#> a b c d e f
#> <dbl> <dbl> <dbl> <chr> <chr> <chr>
#> 1 5 1 1 E A A
#> 2 5 1 1 E A A
#> 3 5 1 1 E A A
#> 4 5 2 2 E B B
#> 5 5 2 3 E B C
#> 6 5 2 4 E B D
And next, tbl_2:
tbl_2 <-
dplyr::tibble(
a = c(5, 7, 6, 5, 8, 7),
b = LETTERS[1:6]
)
tbl_2
#> # A tibble: 6 x 2
#> a b
#> <dbl> <chr>
#> 1 5 A
#> 2 7 B
#> 3 6 C
#> 4 5 D
#> 5 8 E
#> 6 7 F
Next, we'll create two different agents, each interrogating a different table.
First up, is agent_1:
agent_1 <-
create_agent(
tbl = tbl_1,
tbl_name = "tbl_1",
label = "Example table 1."
) %>%
col_vals_gt(columns = a, value = 4) %>%
interrogate()
Then, agent_2:
agent_2 <-
create_agent(
tbl = tbl_2,
tbl_name = "tbl_2",
label = "Example table 2."
) %>%
col_is_character(columns = b) %>%
interrogate()
Now, we'll combine the two agents into a multiagent with the
create_multiagent() function. Printing the "ptblank_multiagent" object
displays the multiagent report with its default options (i.e., a 'long'
report view).
multiagent <- create_multiagent(agent_1, agent_2) multiagent
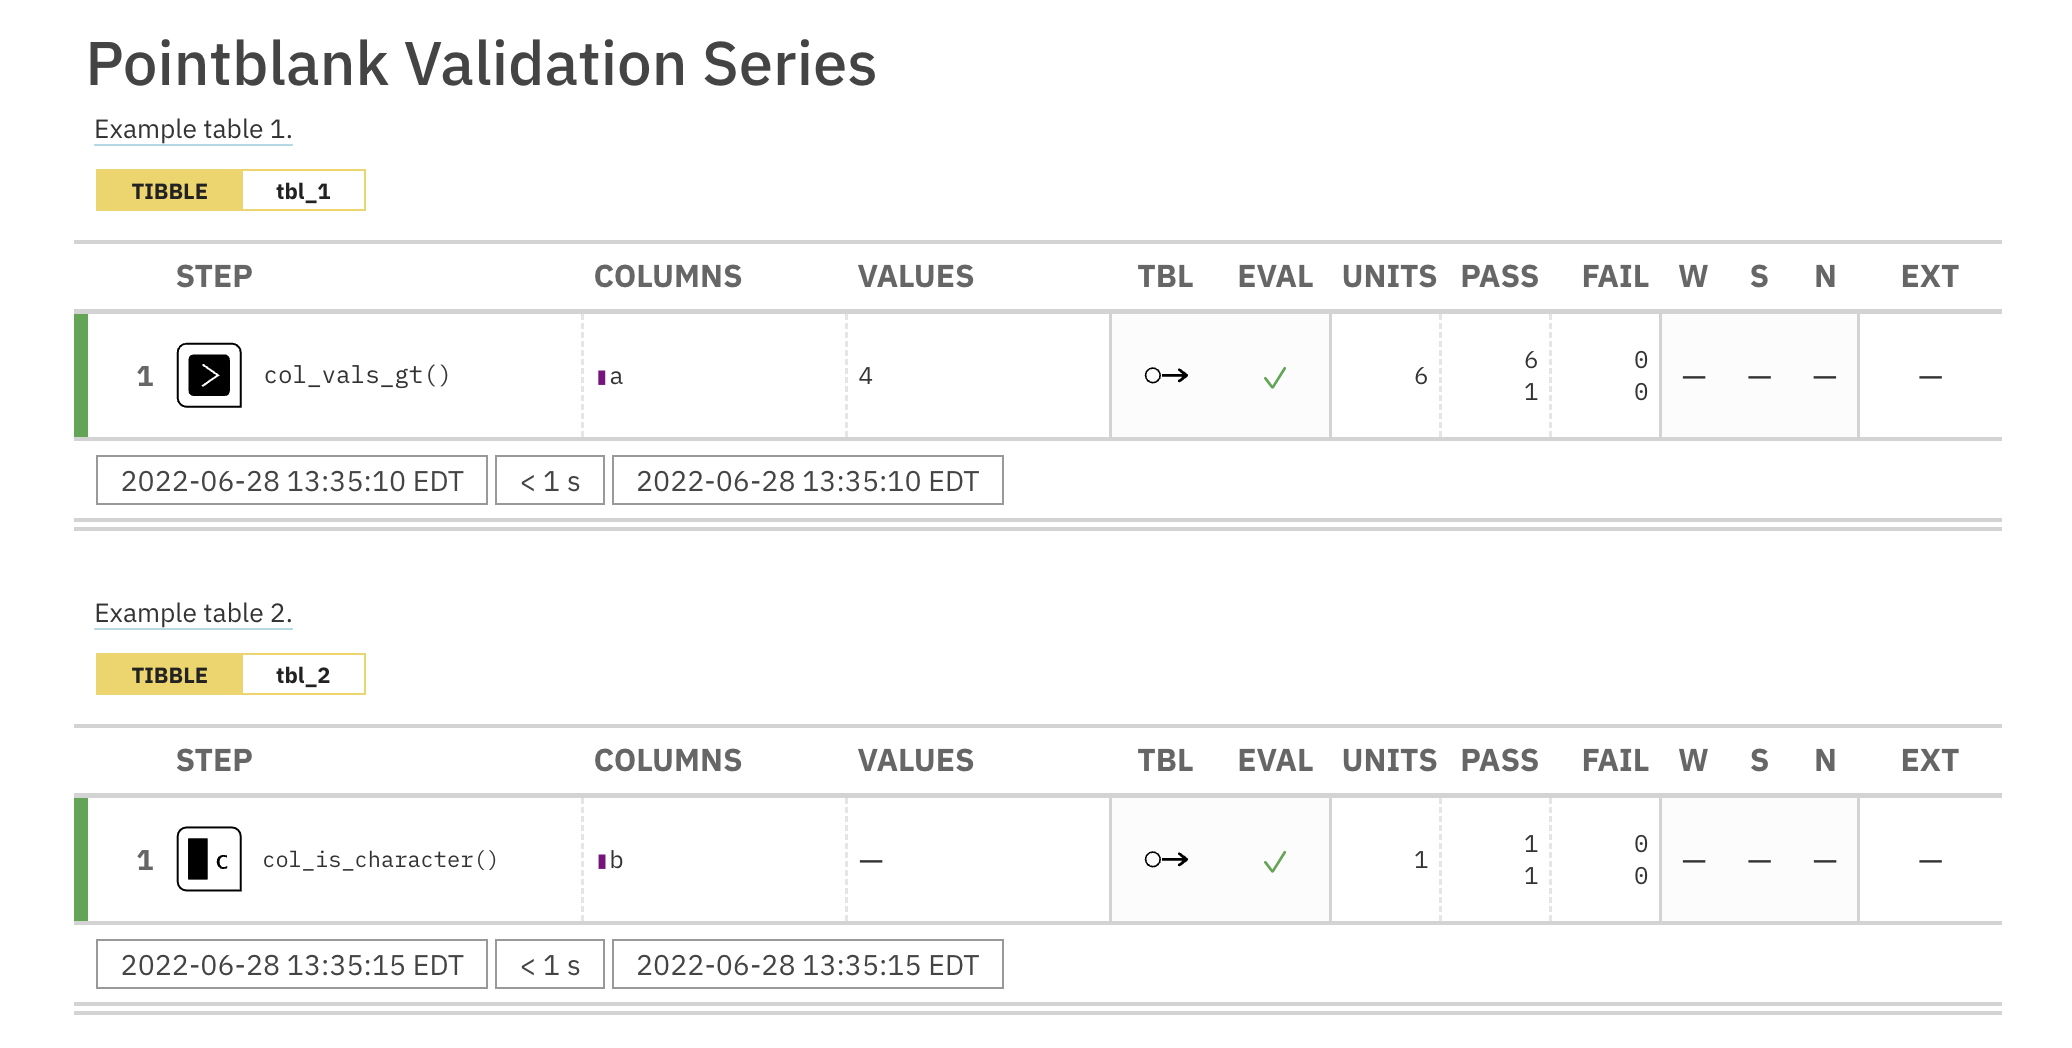
To take advantage of more display options, we could use the
get_multiagent_report() function. The added functionality there allows for
a 'wide' view of the data (useful for monitoring validations of the same
table over repeated interrogations), the ability to modify the title of the
multiagent report, and a means to export the report to HTML (via
export_report()).
Function ID
10-1
See Also
Other The multiagent:
get_multiagent_report(),
read_disk_multiagent()
Get a table from a database
Description
If your target table is in a database, the db_tbl() function is a handy way
of accessing it. This function simplifies the process of getting a tbl_dbi
object, which usually involves a combination of building a connection to a
database and using the dplyr::tbl() function with the connection and the
table name (or a reference to a table in a schema). You can use db_tbl() as
the basis for obtaining a database table for the tbl parameter in
create_agent() or create_informant(). Another great option is supplying a
table-prep formula involving db_tbl() to tbl_store() so that you have
access to database tables though single names via a table store.
The username and password are supplied through environment variable names. If
desired, values for the username and password can be supplied directly by
enclosing such values in I().
Usage
db_tbl( table, dbtype, dbname = NULL, host = NULL, port = NULL, user = NULL, password = NULL, bq_project = NULL, bq_dataset = NULL, bq_billing = bq_project )db_tbl( table, dbtype, dbname = NULL, host = NULL, port = NULL, user = NULL, password = NULL, bq_project = NULL, bq_dataset = NULL, bq_billing = bq_project )
Arguments
table |
The name of the table, or, a reference to a table in a schema
(two-element vector with the names of schema and table). Alternatively,
this can be supplied as a data table to copy into an in-memory database
connection. This only works if: (1) the |
dbtype |
Either an appropriate driver function (e.g.,
|
dbname |
The database name. |
host, port
|
The database host and optional port number. |
user, password
|
The environment variables used to access the username
and password for the database. Enclose in |
bq_project, bq_dataset, bq_billing
|
If accessing a table from a
BigQuery data source, there's the requirement to provide the table's
associated project ( |
Value
A tbl_dbi object.
Examples
Obtaining in-memory database tables
You can use an in-memory database table and by supplying it with an in-memory
table. This works with the DuckDB database and the key thing is to use
dbname = ":memory" in the db_tbl() call.
small_table_duckdb <-
db_tbl(
table = small_table,
dbtype = "duckdb",
dbname = ":memory:"
)
small_table_duckdb
## # Source: table<small_table> [?? x 8] ## # Database: duckdb_connection ## date_time date a b c d e f ## <dttm> <date> <int> <chr> <dbl> <dbl> <lgl> <chr> ## 1 2016-01-04 11:00:00 2016-01-04 2 1-bc… 3 3423. TRUE high ## 2 2016-01-04 00:32:00 2016-01-04 3 5-eg… 8 10000. TRUE low ## 3 2016-01-05 13:32:00 2016-01-05 6 8-kd… 3 2343. TRUE high ## 4 2016-01-06 17:23:00 2016-01-06 2 5-jd… NA 3892. FALSE mid ## 5 2016-01-09 12:36:00 2016-01-09 8 3-ld… 7 284. TRUE low ## 6 2016-01-11 06:15:00 2016-01-11 4 2-dh… 4 3291. TRUE mid ## 7 2016-01-15 18:46:00 2016-01-15 7 1-kn… 3 843. TRUE high ## 8 2016-01-17 11:27:00 2016-01-17 4 5-bo… 2 1036. FALSE low ## 9 2016-01-20 04:30:00 2016-01-20 3 5-bc… 9 838. FALSE high ## 10 2016-01-20 04:30:00 2016-01-20 3 5-bc… 9 838. FALSE high ## # … with more rows
The in-memory option also works using the SQLite database. The only change
required is setting the dbtype to "sqlite":
small_table_sqlite <-
db_tbl(
table = small_table,
dbtype = "sqlite",
dbname = ":memory:"
)
small_table_sqlite
## # Source: table<small_table> [?? x 8] ## # Database: sqlite 3.37.0 [:memory:] ## date_time date a b c d e f ## <dbl> <dbl> <int> <chr> <dbl> <dbl> <int> <chr> ## 1 1451905200 16804 2 1-bcd-345 3 3423. 1 high ## 2 1451867520 16804 3 5-egh-163 8 10000. 1 low ## 3 1452000720 16805 6 8-kdg-938 3 2343. 1 high ## 4 1452100980 16806 2 5-jdo-903 NA 3892. 0 mid ## 5 1452342960 16809 8 3-ldm-038 7 284. 1 low ## 6 1452492900 16811 4 2-dhe-923 4 3291. 1 mid ## 7 1452883560 16815 7 1-knw-093 3 843. 1 high ## 8 1453030020 16817 4 5-boe-639 2 1036. 0 low ## 9 1453264200 16820 3 5-bce-642 9 838. 0 high ## 10 1453264200 16820 3 5-bce-642 9 838. 0 high ## # … with more rows
It's also possible to obtain a table from a remote file and shove it into an
in-memory database. For this, we can use the all-powerful file_tbl() +
db_tbl() combo.
all_revenue_large_duckdb <-
db_tbl(
table = file_tbl(
file = from_github(
file = "sj_all_revenue_large.rds",
repo = "rich-iannone/intendo",
subdir = "data-large"
)
),
dbtype = "duckdb",
dbname = ":memory:"
)
all_revenue_large_duckdb
## # Source: table<sj_all_revenue_large.rds> [?? x 11] ## # Database: duckdb_connection ## player_id session_id session_start time ## <chr> <chr> <dttm> <dttm> ## 1 IRZKSAOYUJME796 IRZKSAOYUJM… 2015-01-01 00:18:41 2015-01-01 00:18:53 ## 2 CJVYRASDZTXO674 CJVYRASDZTX… 2015-01-01 01:13:01 2015-01-01 01:13:07 ## 3 CJVYRASDZTXO674 CJVYRASDZTX… 2015-01-01 01:13:01 2015-01-01 01:23:37 ## 4 CJVYRASDZTXO674 CJVYRASDZTX… 2015-01-01 01:13:01 2015-01-01 01:24:37 ## 5 CJVYRASDZTXO674 CJVYRASDZTX… 2015-01-01 01:13:01 2015-01-01 01:31:01 ## 6 CJVYRASDZTXO674 CJVYRASDZTX… 2015-01-01 01:13:01 2015-01-01 01:31:43 ## 7 CJVYRASDZTXO674 CJVYRASDZTX… 2015-01-01 01:13:01 2015-01-01 01:36:01 ## 8 ECPANOIXLZHF896 ECPANOIXLZH… 2015-01-01 01:31:03 2015-01-01 01:31:27 ## 9 ECPANOIXLZHF896 ECPANOIXLZH… 2015-01-01 01:31:03 2015-01-01 01:36:57 ## 10 ECPANOIXLZHF896 ECPANOIXLZH… 2015-01-01 01:31:03 2015-01-01 01:37:45 ## # … with more rows, and 7 more variables: item_type <chr>, ## # item_name <chr>, item_revenue <dbl>, session_duration <dbl>, ## # start_day <date>, acquisition <chr>, country <chr>
And that's really it.
Obtaining remote database tables
For remote databases, we have to specify quite a few things but it's a
one-step process nonetheless. Here's an example that accesses the rna table
(in the RNA Central public database) using db_tbl(). Here, for the user
and password entries we are using the literal username and password values
(publicly available when visiting the RNA Central website) by enclosing the
values in I().
rna_db_tbl <-
db_tbl(
table = "rna",
dbtype = "postgres",
dbname = "pfmegrnargs",
host = "hh-pgsql-public.ebi.ac.uk",
port = 5432,
user = I("reader"),
password = I("NWDMCE5xdipIjRrp")
)
rna_db_tbl
## # Source: table<rna> [?? x 9] ## # Database: postgres ## # [[email protected]:5432/pfmegrnargs] ## id upi timestamp userstamp crc64 len seq_short ## <int64> <chr> <dttm> <chr> <chr> <int> <chr> ## 1 25222431 URS00… 2019-12-02 13:26:46 rnacen E65C… 521 AGAGTTTG… ## 2 25222432 URS00… 2019-12-02 13:26:46 rnacen 6B91… 520 AGAGTTCG… ## 3 25222433 URS00… 2019-12-02 13:26:46 rnacen 03B8… 257 TACGTAGG… ## 4 25222434 URS00… 2019-12-02 13:26:46 rnacen E925… 533 AGGGTTTG… ## 5 25222435 URS00… 2019-12-02 13:26:46 rnacen C2D0… 504 GACGAACG… ## 6 25222436 URS00… 2019-12-02 13:26:46 rnacen 9EF6… 253 TACAGAGG… ## 7 25222437 URS00… 2019-12-02 13:26:46 rnacen 685A… 175 GAGGCAGC… ## 8 25222438 URS00… 2019-12-02 13:26:46 rnacen 4228… 556 AAAACATC… ## 9 25222439 URS00… 2019-12-02 13:26:46 rnacen B7CC… 515 AGGGTTCG… ## 10 25222440 URS00… 2019-12-02 13:26:46 rnacen 038B… 406 ATTGAACG… ## # … with more rows, and 2 more variables: seq_long <chr>, md5 <chr>
You'd normally want to use the names of environment variables (envvars) to more securely access the appropriate username and password values when connecting to a DB. Here are all the necessary inputs:
example_db_tbl <-
db_tbl(
table = "<table_name>",
dbtype = "<database_type_shortname>",
dbname = "<database_name>",
host = "<connection_url>",
port = "<connection_port>",
user = "<DB_USER_NAME>",
password = "<DB_PASSWORD>"
)
Environment variables can be created by editing the user .Renviron file and
the usethis::edit_r_environ() function makes this pretty easy to do.
DB table access and prep via the table store
Using table-prep formulas in a centralized table store can make it easier to
work with DB tables in pointblank. Here's how to generate a table store
with two named entries for table preparations involving the tbl_store() and
db_tbl() functions.
store <-
tbl_store(
small_table_duck ~ db_tbl(
table = pointblank::small_table,
dbtype = "duckdb",
dbname = ":memory:"
),
small_high_duck ~ {{ small_table_duck }} %>%
dplyr::filter(f == "high")
)
Now it's easy to obtain either of these tables via tbl_get(). We can
reference the table in the store by its name (given to the left of the ~).
tbl_get(tbl = "small_table_duck", store = store)
## # Source: table<pointblank::small_table> [?? x 8] ## # Database: duckdb_connection ## date_time date a b c d e ## <dttm> <date> <int> <chr> <dbl> <dbl> <lgl> ## 1 2016-01-04 11:00:00 2016-01-04 2 1-bcd-… 3 3423. TRUE ## 2 2016-01-04 00:32:00 2016-01-04 3 5-egh-… 8 10000. TRUE ## 3 2016-01-05 13:32:00 2016-01-05 6 8-kdg-… 3 2343. TRUE ## 4 2016-01-06 17:23:00 2016-01-06 2 5-jdo-… NA 3892. FALSE ## 5 2016-01-09 12:36:00 2016-01-09 8 3-ldm-… 7 284. TRUE ## 6 2016-01-11 06:15:00 2016-01-11 4 2-dhe-… 4 3291. TRUE ## 7 2016-01-15 18:46:00 2016-01-15 7 1-knw-… 3 843. TRUE ## 8 2016-01-17 11:27:00 2016-01-17 4 5-boe-… 2 1036. FALSE ## 9 2016-01-20 04:30:00 2016-01-20 3 5-bce-… 9 838. FALSE ## 10 2016-01-20 04:30:00 2016-01-20 3 5-bce-… 9 838. FALSE ## # … with more rows, and 1 more variable: f <chr>
The second table in the table store is a mutated
version of the first. It's just as easily obtainable via tbl_get():
tbl_get(tbl = "small_high_duck", store = store)
## # Source: lazy query [?? x 8] ## # Database: duckdb_connection ## date_time date a b c d e ## <dttm> <date> <int> <chr> <dbl> <dbl> <lgl> ## 1 2016-01-04 11:00:00 2016-01-04 2 1-bcd-345 3 3423. TRUE ## 2 2016-01-05 13:32:00 2016-01-05 6 8-kdg-938 3 2343. TRUE ## 3 2016-01-15 18:46:00 2016-01-15 7 1-knw-093 3 843. TRUE ## 4 2016-01-20 04:30:00 2016-01-20 3 5-bce-642 9 838. FALSE ## 5 2016-01-20 04:30:00 2016-01-20 3 5-bce-642 9 838. FALSE ## 6 2016-01-30 11:23:00 2016-01-30 1 3-dka-303 NA 2230. TRUE ## # … with more rows, and 1 more variable: f <chr>
The table-prep formulas in the store object could also be used in functions
with a tbl argument (like create_agent() and create_informant()). This
is accomplished most easily with the tbl_source() function.
agent <-
create_agent(
tbl = ~ tbl_source(
tbl = "small_table_duck",
store = tbls
)
)
informant <-
create_informant(
tbl = ~ tbl_source(
tbl = "small_high_duck",
store = tbls
)
)
Function ID
1-6
See Also
Other Planning and Prep:
action_levels(),
create_agent(),
create_informant(),
draft_validation(),
file_tbl(),
scan_data(),
tbl_get(),
tbl_source(),
tbl_store(),
validate_rmd()
Deactivate one or more of an agent's validation steps
Description
Should the deactivation of one or more validation steps be necessary after
creation of the validation plan for an agent, the deactivate_steps()
function will be helpful for that. This has the same effect as using the
active = FALSE option (active is an argument in all validation functions)
for the selected validation steps. Please note that this directly edits the
validation step, wiping out any function that may have been defined for
whether the step should be active or not.
Usage
deactivate_steps(agent, i = NULL)deactivate_steps(agent, i = NULL)
Arguments
agent |
The pointblank agent object
A pointblank agent object that is commonly created through the use of
the |
i |
A validation step number
The validation step number, which is assigned to each validation step in
the order of definition. If |
Value
A ptblank_agent object.
Function ID
9-6
See Also
For the opposite behavior, use the activate_steps() function.
Other Object Ops:
activate_steps(),
export_report(),
remove_steps(),
set_tbl(),
x_read_disk(),
x_write_disk()
Examples
# Create an agent that has the # `small_table` object as the # target table, add a few # validation steps, and then use # `interrogate()` agent_1 <- create_agent( tbl = small_table, tbl_name = "small_table", label = "An example." ) %>% col_exists(columns = date) %>% col_vals_regex( columns = b, regex = "[0-9]-[a-z]{3}-[0-9]" ) %>% interrogate() # The second validation step is # now being reconsidered and may # be either phased out or improved # upon; in the interim period it # was decided that the step should # be deactivated for now agent_2 <- agent_1 %>% deactivate_steps(i = 2) %>% interrogate()# Create an agent that has the # `small_table` object as the # target table, add a few # validation steps, and then use # `interrogate()` agent_1 <- create_agent( tbl = small_table, tbl_name = "small_table", label = "An example." ) %>% col_exists(columns = date) %>% col_vals_regex( columns = b, regex = "[0-9]-[a-z]{3}-[0-9]" ) %>% interrogate() # The second validation step is # now being reconsidered and may # be either phased out or improved # upon; in the interim period it # was decided that the step should # be deactivated for now agent_2 <- agent_1 %>% deactivate_steps(i = 2) %>% interrogate()
Draft a starter pointblank validation .R/.Rmd file with a data table
Description
Generate a draft validation plan in a new .R or .Rmd file using an input data table. Using this workflow, the data table will be scanned to learn about its column data and a set of starter validation steps (constituting a validation plan) will be written. It's best to use a data extract that contains at least 1000 rows and is relatively free of spurious data.
Once in the file, it's possible to tweak the validation steps to better fit
the expectations to the particular domain. While column inference is used to
generate reasonable validation plans, it is difficult to infer the acceptable
values without domain expertise. However, using draft_validation() could
get you started on floor 10 of tackling data quality issues and is in any
case better than starting with an empty code editor view.
Usage
draft_validation( tbl, tbl_name = NULL, filename = tbl_name, path = NULL, lang = NULL, output_type = c("R", "Rmd"), add_comments = TRUE, overwrite = FALSE, quiet = FALSE )draft_validation( tbl, tbl_name = NULL, filename = tbl_name, path = NULL, lang = NULL, output_type = c("R", "Rmd"), add_comments = TRUE, overwrite = FALSE, quiet = FALSE )
Arguments
tbl |
A data table
The input table. This can be a data frame, tibble, a |
tbl_name |
A table name
A optional name to assign to the input table object. If no value is
provided, a name will be generated based on whatever information is
available. This table name will be displayed in the header area of the
agent report generated by printing the agent or calling
|
filename |
File name
An optional name for the .R or .Rmd file. This should be a name without an
extension. By default, this is taken from the |
path |
File path
A path can be specified here if there shouldn't be an attempt to place the generated file in the working directory. |
lang |
Commenting language
The language to use when creating comments for the automatically- generated
validation steps. By default, |
output_type |
The output file type
An option for choosing what type of output should be generated. By default,
this is an .R script ( |
add_comments |
Add comments to the generated validation plan
Should there be comments that explain the features of the validation plan in the generated document? |
overwrite |
Overwrite a previous file of the same name
Should a file of the same name be overwritten? |
quiet |
Inform (or not) upon file writing
Should the function not inform when the file is written? |
Value
Invisibly returns TRUE if the file has been written.
Supported Input Tables
The types of data tables that are officially supported are:
-
data frames (
data.frame) and tibbles (tbl_df) -
Spark DataFrames (
tbl_spark) -
the following database tables (
tbl_dbi):-
PostgreSQL tables (using the
RPostgres::Postgres()as driver) -
MySQL tables (with
RMySQL::MySQL()) -
Microsoft SQL Server tables (via odbc)
-
BigQuery tables (using
bigrquery::bigquery()) -
DuckDB tables (through
duckdb::duckdb()) -
SQLite (with
RSQLite::SQLite())
-
Other database tables may work to varying degrees but they haven't been formally tested (so be mindful of this when using unsupported backends with pointblank).
Examples
Let's draft a validation plan for the dplyr::storms dataset.
dplyr::storms #> # A tibble: 19,537 x 13 #> name year month day hour lat long status category wind pressure #> <chr> <dbl> <dbl> <int> <dbl> <dbl> <dbl> <fct> <dbl> <int> <int> #> 1 Amy 1975 6 27 0 27.5 -79 tropical d~ NA 25 1013 #> 2 Amy 1975 6 27 6 28.5 -79 tropical d~ NA 25 1013 #> 3 Amy 1975 6 27 12 29.5 -79 tropical d~ NA 25 1013 #> 4 Amy 1975 6 27 18 30.5 -79 tropical d~ NA 25 1013 #> 5 Amy 1975 6 28 0 31.5 -78.8 tropical d~ NA 25 1012 #> 6 Amy 1975 6 28 6 32.4 -78.7 tropical d~ NA 25 1012 #> 7 Amy 1975 6 28 12 33.3 -78 tropical d~ NA 25 1011 #> 8 Amy 1975 6 28 18 34 -77 tropical d~ NA 30 1006 #> 9 Amy 1975 6 29 0 34.4 -75.8 tropical s~ NA 35 1004 #> 10 Amy 1975 6 29 6 34 -74.8 tropical s~ NA 40 1002 #> # i 19,527 more rows #> # i 2 more variables: tropicalstorm_force_diameter <int>, #> # hurricane_force_diameter <int>
The draft_validation() function creates an .R file by default. Using just
the defaults with dplyr::storms will yield the "dplyr__storms.R" file
in the working directory. Here are the contents of the file:
library(pointblank)
agent <-
create_agent(
tbl = ~ dplyr::storms,
actions = action_levels(
warn_at = 0.05,
stop_at = 0.10
),
tbl_name = "dplyr::storms",
label = "Validation plan generated by `draft_validation()`."
) %>%
# Expect that column `name` is of type: character
col_is_character(
columns = name
) %>%
# Expect that column `year` is of type: numeric
col_is_numeric(
columns = year
) %>%
# Expect that values in `year` should be between `1975` and `2020`
col_vals_between(
columns = year,
left = 1975,
right = 2020
) %>%
# Expect that column `month` is of type: numeric
col_is_numeric(
columns = month
) %>%
# Expect that values in `month` should be between `1` and `12`
col_vals_between(
columns = month,
left = 1,
right = 12
) %>%
# Expect that column `day` is of type: integer
col_is_integer(
columns = day
) %>%
# Expect that values in `day` should be between `1` and `31`
col_vals_between(
columns = day,
left = 1,
right = 31
) %>%
# Expect that column `hour` is of type: numeric
col_is_numeric(
columns = hour
) %>%
# Expect that values in `hour` should be between `0` and `23`
col_vals_between(
columns = hour,
left = 0,
right = 23
) %>%
# Expect that column `lat` is of type: numeric
col_is_numeric(
columns = lat
) %>%
# Expect that values in `lat` should be between `-90` and `90`
col_vals_between(
columns = lat,
left = -90,
right = 90
) %>%
# Expect that column `long` is of type: numeric
col_is_numeric(
columns = long
) %>%
# Expect that values in `long` should be between `-180` and `180`
col_vals_between(
columns = long,
left = -180,
right = 180
) %>%
# Expect that column `status` is of type: character
col_is_character(
columns = status
) %>%
# Expect that column `category` is of type: factor
col_is_factor(
columns = category
) %>%
# Expect that column `wind` is of type: integer
col_is_integer(
columns = wind
) %>%
# Expect that values in `wind` should be between `10` and `160`
col_vals_between(
columns = wind,
left = 10,
right = 160
) %>%
# Expect that column `pressure` is of type: integer
col_is_integer(
columns = pressure
) %>%
# Expect that values in `pressure` should be between `882` and `1022`
col_vals_between(
columns = pressure,
left = 882,
right = 1022
) %>%
# Expect that column `tropicalstorm_force_diameter` is of type: integer
col_is_integer(
columns = tropicalstorm_force_diameter
) %>%
# Expect that values in `tropicalstorm_force_diameter` should be between
# `0` and `870`
col_vals_between(
columns = tropicalstorm_force_diameter,
left = 0,
right = 870,
na_pass = TRUE
) %>%
# Expect that column `hurricane_force_diameter` is of type: integer
col_is_integer(
columns = hurricane_force_diameter
) %>%
# Expect that values in `hurricane_force_diameter` should be between
# `0` and `300`
col_vals_between(
columns = hurricane_force_diameter,
left = 0,
right = 300,
na_pass = TRUE
) %>%
# Expect entirely distinct rows across all columns
rows_distinct() %>%
# Expect that column schemas match
col_schema_match(
schema = col_schema(
name = "character",
year = "numeric",
month = "numeric",
day = "integer",
hour = "numeric",
lat = "numeric",
long = "numeric",
status = "character",
category = c("ordered", "factor"),
wind = "integer",
pressure = "integer",
tropicalstorm_force_diameter = "integer",
hurricane_force_diameter = "integer"
)
) %>%
interrogate()
agent
This is runnable as is, and the promise is that the interrogation should produce no failing test units. After execution, we get the following validation report:
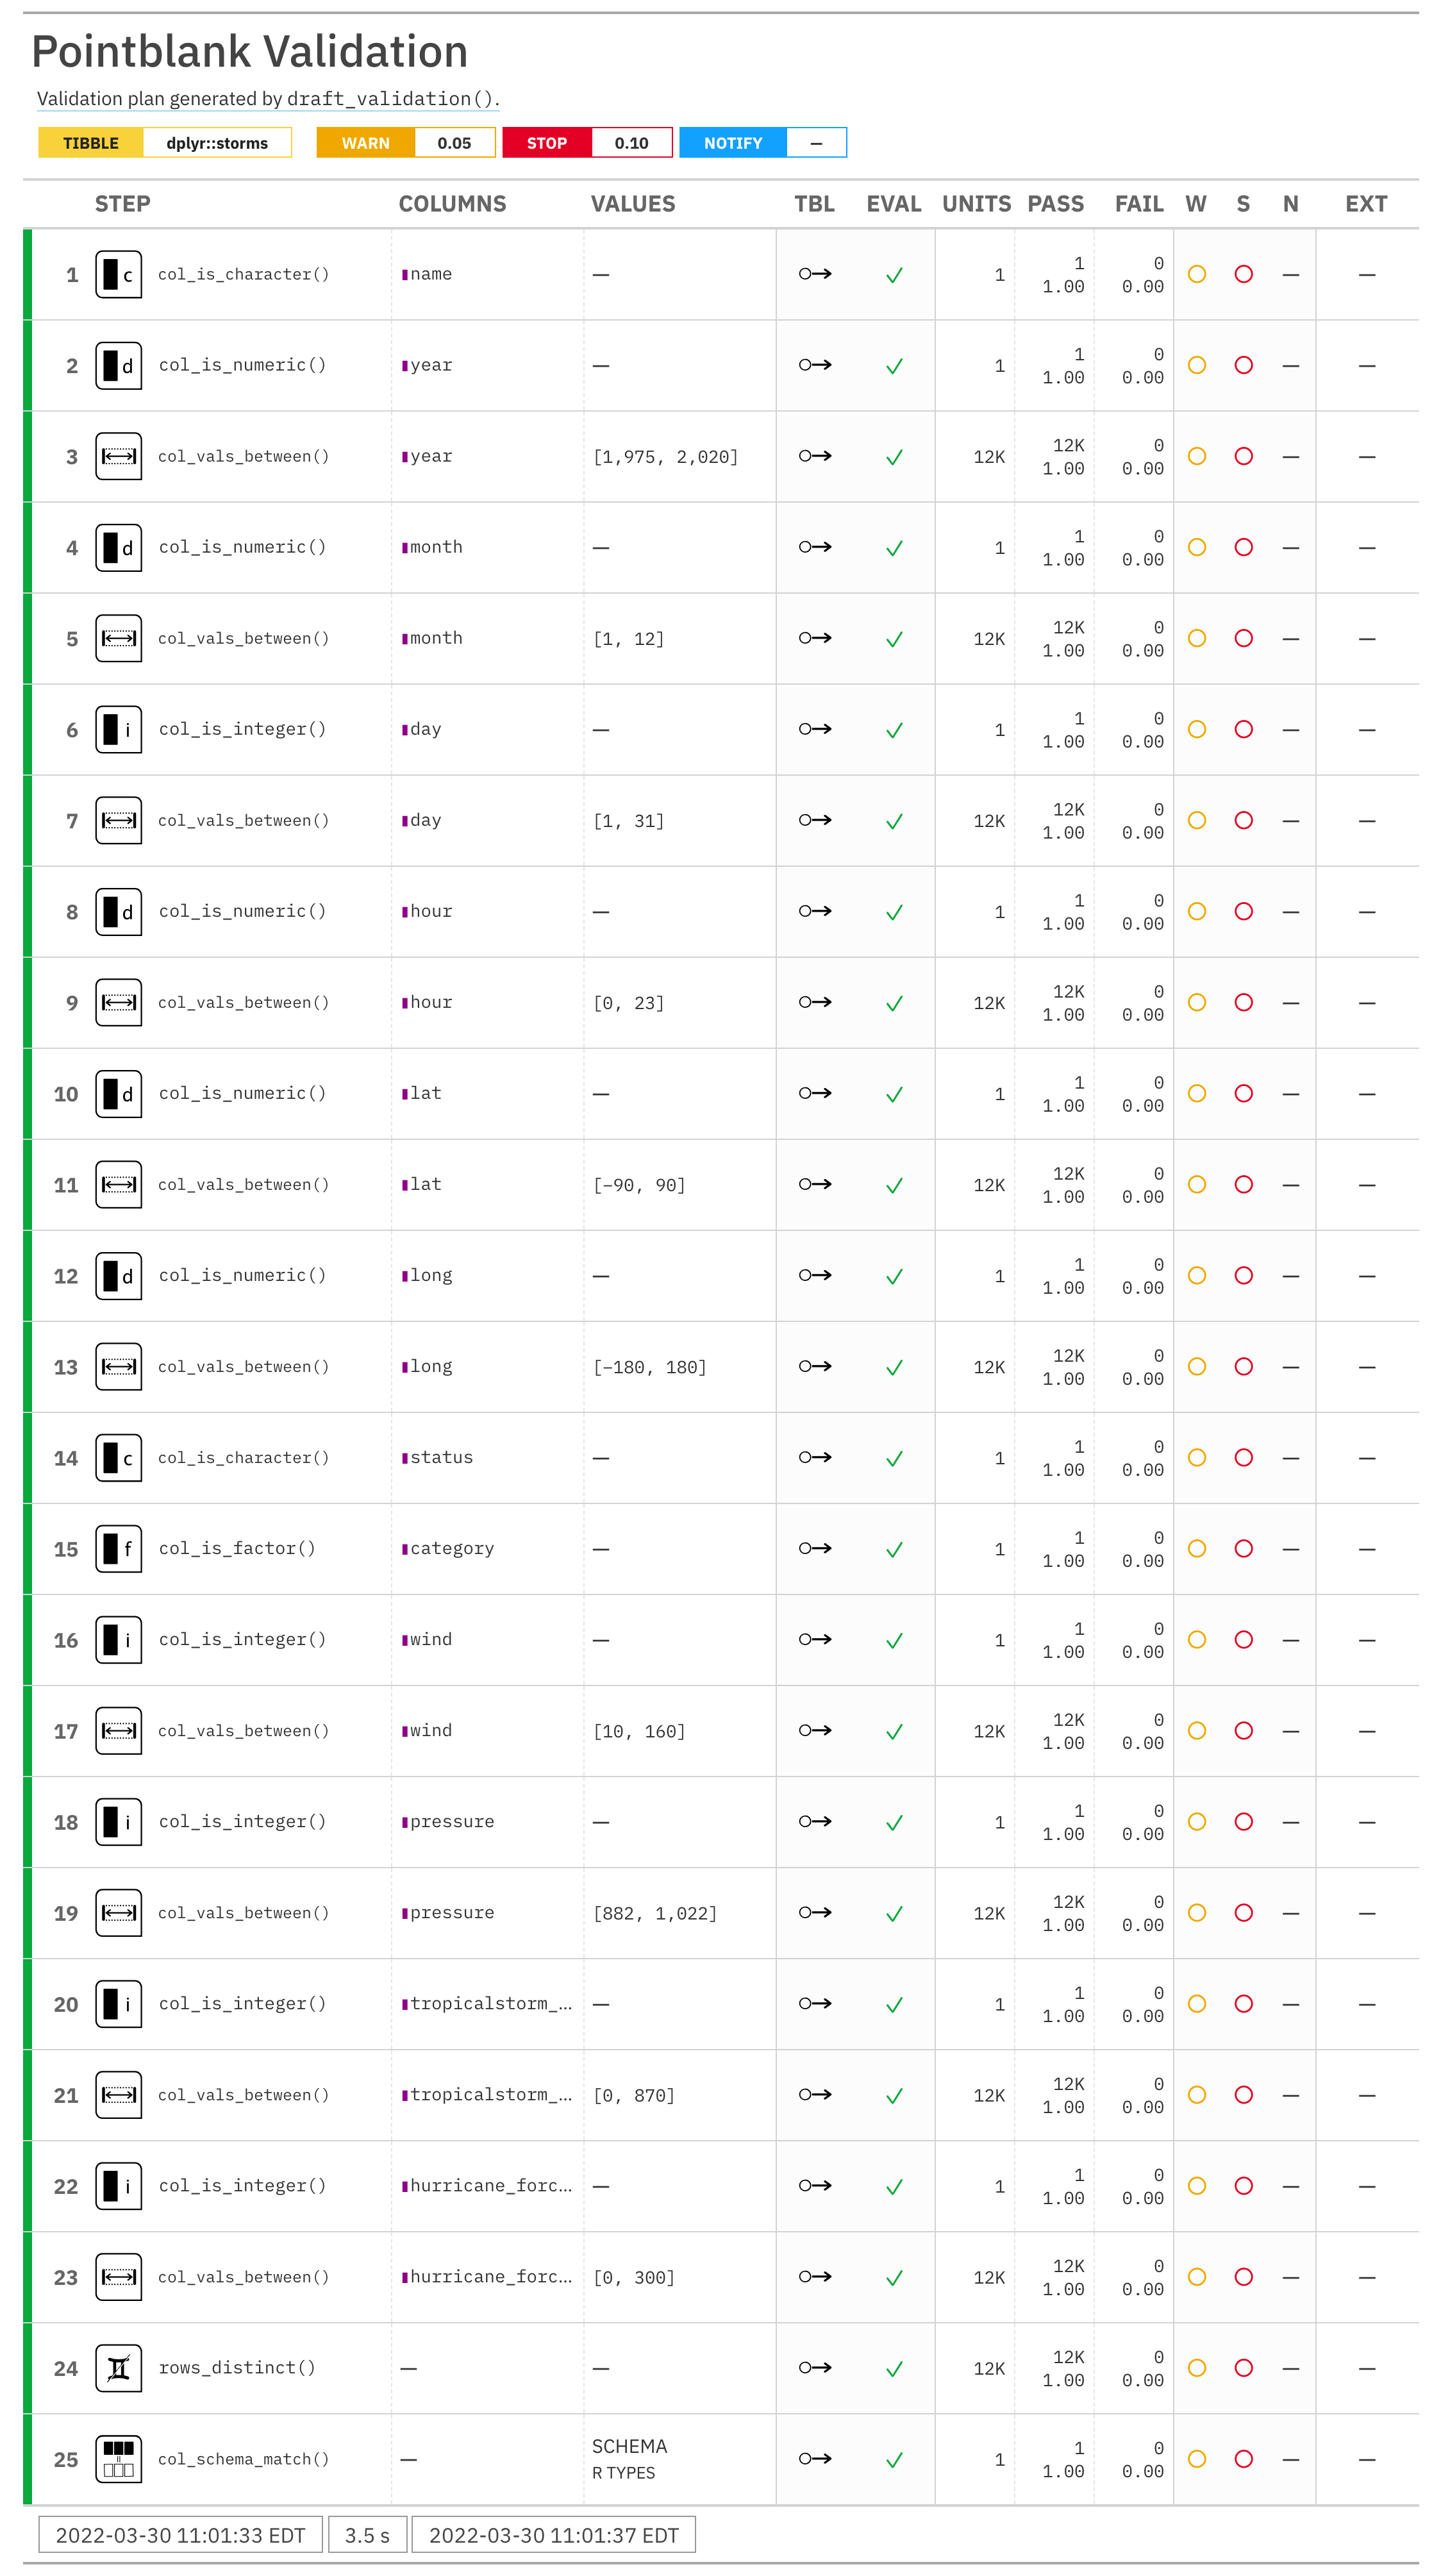
All of the expressions in the resulting file constitute just a rough
approximation of what a validation plan should be for a dataset. Certainly,
the value ranges in the emitted col_vals_between() may not be realistic for
the wind column and may require some modification (the provided left and
right values are just the limits of the provided data). However, note that
the lat and long (latitude and longitude) columns have acceptable ranges
(providing the limits of valid lat/lon values). This is thanks to
pointblank's column inference routines, which is able to understand what
certain columns contain.
For an evolving dataset that will experience changes (either in the form of revised data and addition/deletion of rows or columns), the emitted validation will serve as a good first step and changes can more easily be made since there is a foundation to build from.
Function ID
1-11
See Also
Other Planning and Prep:
action_levels(),
create_agent(),
create_informant(),
db_tbl(),
file_tbl(),
scan_data(),
tbl_get(),
tbl_source(),
tbl_store(),
validate_rmd()
Conditionally send email during interrogation
Description
The email_blast() function is useful for sending an email message that
explains the result of a pointblank validation. It is powered by the
blastula and glue packages. This function should be invoked as part
of the end_fns argument of create_agent(). It's also possible to invoke
email_blast() as part of the fns argument of the action_levels()
function (i.e., to send multiple email messages at the granularity of
different validation steps exceeding failure thresholds).
To better get a handle on emailing with email_blast(), the analogous
email_create() function can be used with a pointblank agent object.
Usage
email_blast( x, to, from, credentials = NULL, msg_subject = NULL, msg_header = NULL, msg_body = stock_msg_body(), msg_footer = stock_msg_footer(), send_condition = ~TRUE %in% x$notify )email_blast( x, to, from, credentials = NULL, msg_subject = NULL, msg_header = NULL, msg_body = stock_msg_body(), msg_footer = stock_msg_footer(), send_condition = ~TRUE %in% x$notify )
Arguments
x |
A reference to the x-list object prepared internally by the agent.
This version of the x-list is the same as that generated via
|
to, from
|
The email addresses for the recipients and of the sender. |
credentials |
A credentials list object that is produced by either of
the |
msg_subject |
The subject line of the email message. |
msg_header, msg_body, msg_footer
|
Content for the header, body, and footer components of the HTML email message. |
send_condition |
An expression that should evaluate to a logical vector
of length 1. If evaluated as |
Value
Nothing is returned. The end result is the side-effect of email-sending if certain conditions are met.
YAML
A pointblank agent can be written to YAML with yaml_write() and the
resulting YAML can be used to regenerate an agent (with yaml_read_agent())
or interrogate the target table (via yaml_agent_interrogate()). Here is an
example of how the use of email_blast() inside the end_fns argument of
create_agent() is expressed in R code and in the corresponding YAML
representation.
R statement:
create_agent(
tbl = ~ small_table,
tbl_name = "small_table",
label = "An example.",
actions = al,
end_fns = list(
~ email_blast(
x,
to = "[email protected]",
from = "[email protected]",
msg_subject = "Table Validation",
credentials = blastula::creds_key(
id = "smtp2go"
)
)
)
) %>%
col_vals_gt(a, 1) %>%
col_vals_lt(a, 7)
YAML representation:
type: agent tbl: ~small_table tbl_name: small_table label: An example. lang: en locale: en actions: warn_count: 1.0 notify_count: 2.0 end_fns: ~email_blast(x, to = "[email protected]", from = "[email protected]", msg_subject = "Table Validation", credentials = blastula::creds_key(id = "smtp2go"), ) embed_report: true steps: - col_vals_gt: columns: c(a) value: 1.0 - col_vals_lt: columns: c(a) value: 7.0
Examples
For the example provided here, we'll use the included small_table dataset.
We are also going to create an action_levels() list object since this is
useful for demonstrating an emailing scenario. It will have absolute values
for the warn and notify states (with thresholds of 1 and 2 'fail'
units, respectively, for the two states).
al <-
action_levels(
warn_at = 1,
notify_at = 2
)
Validate that values in column a from small_tbl are always greater than
1 (with the col_vals_gt() validation function), and, that values in a
or are always less than 7.
The email_blast() function call is used in a list given to the end_fns
argument of create_agent(). The email_blast() call itself has a
send_condition argument that determines whether or not an email will be
sent. By default this is set to ~ TRUE %in% x$notify. Let's unpack this a
bit. The variable x is a list (we call it an x-list) and it will be
populated with elements pertaining to the agent. After interrogation, and
only if action levels were set for the notify state, x$notify will be
present as a logical vector where the length corresponds to the number of
validation steps. Thus, if any of those steps entered the notify state
(here, it would take two or more failing test units, per step, for that to
happen), then the statement as a whole is TRUE and the email of the
interrogation report will be sent. Here is the complete set of statements for
the creation of an agent, the addition of validation steps, and the
interrogation of data in small_table:
agent <-
create_agent(
tbl = small_table,
tbl_name = "small_table",
label = "An example.",
actions = al,
end_fns = list(
~ email_blast(
x,
to = "[email protected]",
from = "[email protected]",
msg_subject = "Table Validation",
credentials = blastula::creds_key(id = "smtp2go"),
send_condition = ~ TRUE %in% x$notify
)
)
) %>%
col_vals_gt(a, value = 1) %>%
col_vals_lt(a, value = 7) %>%
interrogate()
The reason for the ~ present in the statements:
-
~ email_blast(...)and -
~ TRUE %in% x$notify
is because this defers evocation of the emailing functionality (and also
defers evaluation of the send_condition value) until interrogation is
complete (with interrogate()).
Function ID
4-1
See Also
Other Emailing:
email_create(),
stock_msg_body(),
stock_msg_footer()
Create an email object from a pointblank agent
Description
The email_create() function produces an email message object that could be
sent using the blastula package. By supplying a pointblank agent, a
blastula email_message message object will be created and printing it
will make the HTML email message appear in the Viewer.
Usage
email_create( x, msg_header = NULL, msg_body = stock_msg_body(), msg_footer = stock_msg_footer() )email_create( x, msg_header = NULL, msg_body = stock_msg_body(), msg_footer = stock_msg_footer() )
Arguments
x |
The pointblank agent object
A pointblank agent object that is commonly created through the use of
the |
msg_header, msg_body, msg_footer
|
Content for the header, body, and footer components of the HTML email message. |
Value
A blastula email_message object.
Examples
For the example provided here, we'll use the included small_table dataset.
We are also going to create an action_levels() list object since this is
useful for demonstrating an emailing scenario. It will have absolute values
for the warn and notify states (with thresholds of 1 and 2 'fail'
units, respectively, for the two states).
al <-
action_levels(
warn_at = 1,
notify_at = 2
)
In a workflow that involves an agent object, we can make use of the
end_fns argument and programmatically email the report with the
email_blast() function. However, an alternate workflow that is demonstrated
here is to produce the email object directly. This provides the flexibility
to send the email outside of the pointblank API. The email_create()
function lets us do this with an agent object. We can then view the HTML
email just by printing email_object. It should appear in the Viewer.
email_object <-
create_agent(
tbl = small_table,
tbl_name = "small_table",
label = "An example.",
actions = al
) %>%
col_vals_gt(a, value = 1) %>%
col_vals_lt(a, value = 7) %>%
interrogate() %>%
email_create()
email_object
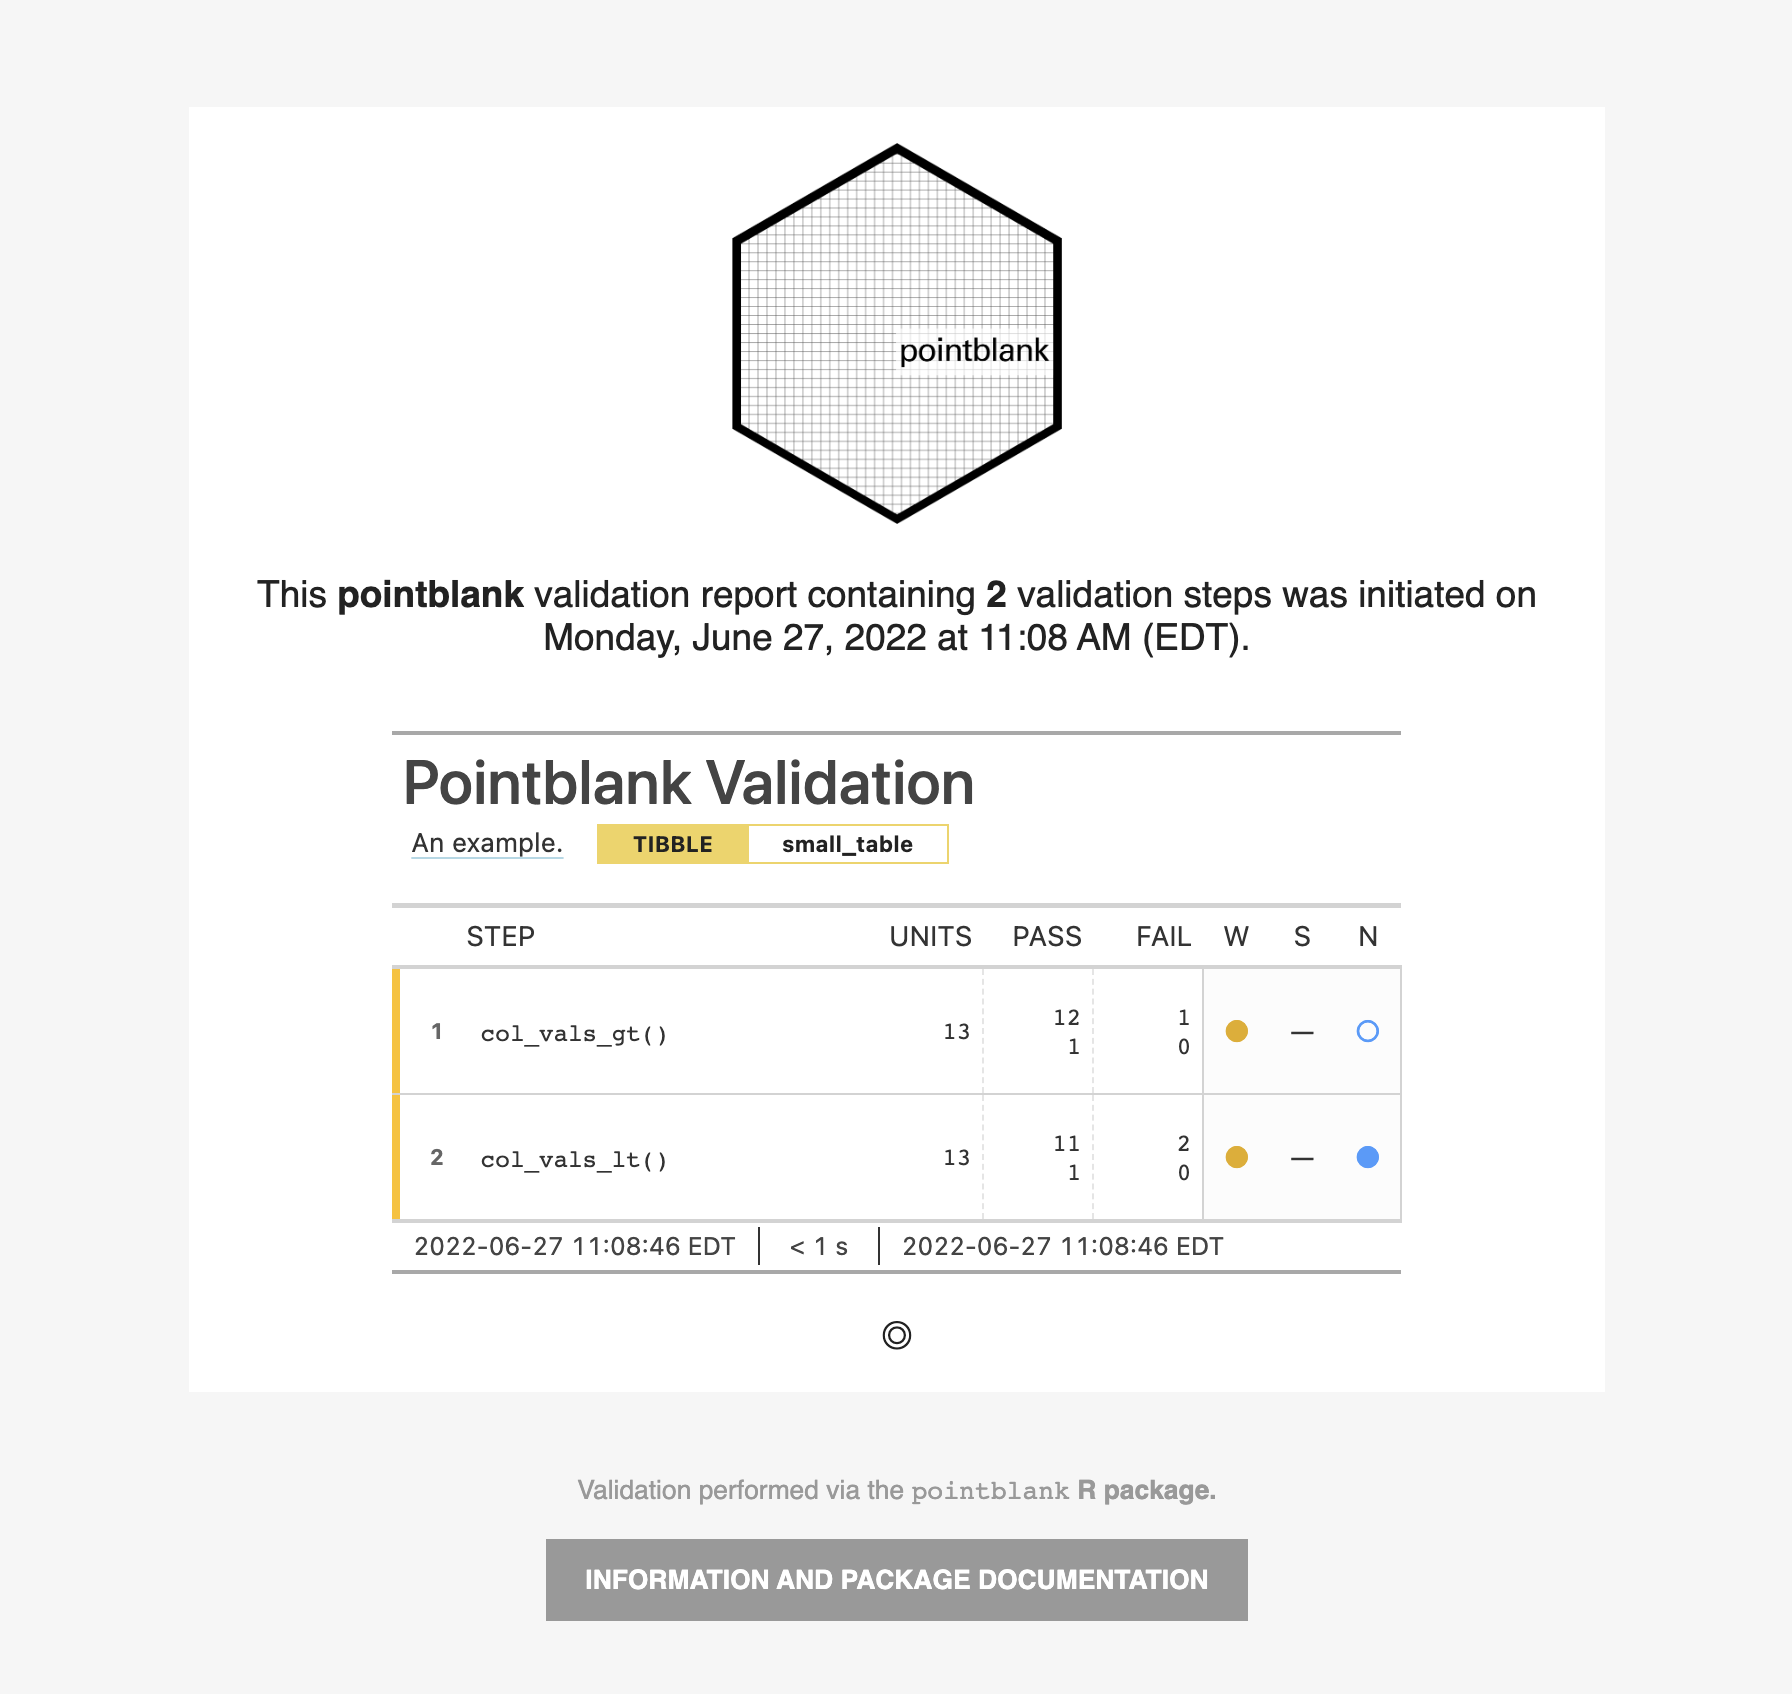
Function ID
4-2
See Also
Other Emailing:
email_blast(),
stock_msg_body(),
stock_msg_footer()
Export an agent, informant, multiagent, or table scan to HTML
Description
The agent, informant, multiagent, and the table scan object can be
easily written as HTML with export_report(). Furthermore, any report
objects from the agent, informant, and multiagent (generated using
get_agent_report(), get_informant_report(), and
get_multiagent_report()) can be provided here for HTML export. Each HTML
document written to disk is self-contained and easily viewable in a web
browser.
Usage
export_report(x, filename, path = NULL, quiet = FALSE)export_report(x, filename, path = NULL, quiet = FALSE)
Arguments
x |
One of several types of objects
An agent object of class |
filename |
File name
The filename to create on disk for the HTML export of the object provided.
It's recommended that the extension |
path |
File path
An optional path to which the file should be saved (this is automatically
combined with |
quiet |
Inform (or not) upon file writing
Should the function not inform when the file is written? |
Value
Invisibly returns TRUE if the file has been written.
Examples
A: Writing an agent report as HTML
Let's go through the process of (1) developing an agent with a validation
plan (to be used for the data quality analysis of the small_table
dataset), (2) interrogating the agent with the interrogate() function, and
(3) writing the agent and all its intel to a file.
Creating an action_levels object is a common workflow step when creating a
pointblank agent. We designate failure thresholds to the warn, stop, and
notify states using action_levels().
al <-
action_levels(
warn_at = 0.10,
stop_at = 0.25,
notify_at = 0.35
)
Now create a pointblank agent object and give it the al object (which
serves as a default for all validation steps which can be overridden). The
data will be referenced in the tbl argument with a leading ~.
agent <-
create_agent(
tbl = ~ small_table,
tbl_name = "small_table",
label = "`export_report()`",
actions = al
)
As with any agent object, we can add steps to the validation plan by using as
many validation functions as we want. Then, we interrogate().
agent <-
agent %>%
col_exists(columns = c(date, date_time)) %>%
col_vals_regex(
columns = b,
regex = "[0-9]-[a-z]{3}-[0-9]{3}"
) %>%
rows_distinct() %>%
col_vals_gt(columns = d, value = 100) %>%
col_vals_lte(columns = c, value = 5) %>%
interrogate()
The agent report can be written to an HTML file with export_report().
export_report( agent, filename = "agent-small_table.html" )
If you're consistently writing agent reports when periodically checking data,
we could make use of affix_date() or affix_datetime() depending on the
granularity you need. Here's an example that writes the file with the format:
"<filename>-YYYY-mm-dd_HH-MM-SS.html".
export_report(
agent,
filename = affix_datetime(
"agent-small_table.html"
)
)
B: Writing an informant report as HTML
Let's go through the process of (1) creating an informant object that
minimally describes the small_table dataset, (2) ensuring that data is
captured from the target table using the incorporate() function, and (3)
writing the informant report to HTML.
Create a pointblank informant object with create_informant() and the
small_table dataset. Use incorporate() so that info snippets are
integrated into the text.
informant <-
create_informant(
tbl = ~ small_table,
tbl_name = "small_table",
label = "`export_report()`"
) %>%
info_snippet(
snippet_name = "high_a",
fn = snip_highest(column = "a")
) %>%
info_snippet(
snippet_name = "low_a",
fn = snip_lowest(column = "a")
) %>%
info_columns(
columns = a,
info = "From {low_a} to {high_a}."
) %>%
info_columns(
columns = starts_with("date"),
info = "Time-based values."
) %>%
info_columns(
columns = date,
info = "The date part of `date_time`."
) %>%
incorporate()
The informant report can be written to an HTML file with export_report().
Let's do this with affix_date() so the filename has a datestamp.
export_report(
informant,
filename = affix_date(
"informant-small_table.html"
)
)
C: Writing a table scan as HTML
We can get a report that describes all of the data in the storms dataset.
tbl_scan <- scan_data(tbl = dplyr::storms)
The table scan object can be written to an HTML file with export_report().
export_report( tbl_scan, filename = "tbl_scan-storms.html" )
Function ID
9-3
See Also
Other Object Ops:
activate_steps(),
deactivate_steps(),
remove_steps(),
set_tbl(),
x_read_disk(),
x_write_disk()
Get a table from a local or remote file
Description
If your target table is in a file, stored either locally or remotely, the
file_tbl() function can make it possible to access it in a single function
call. Compatible file types for this function are: CSV (.csv), TSV
(.tsv), RDA (.rda), and RDS (.rds) files. This function generates an
in-memory tbl_df object, which can be used as a target table for
create_agent() and create_informant(). Another great option is supplying
a table-prep formula involving file_tbl() to tbl_store() so that you have
access to tables based on flat files though single names via a table store.
In the remote data use case, we can specify a URL starting with http://,
https://, etc., and ending with the file containing the data table. If data
files are available in a GitHub repository then we can use the
from_github() function to specify the name and location of the table data
in a repository.
Usage
file_tbl(file, type = NULL, ..., keep = FALSE, verify = TRUE)file_tbl(file, type = NULL, ..., keep = FALSE, verify = TRUE)
Arguments
file |
The complete file path leading to a compatible data table either
in the user system or at a |
type |
The file type. This is normally inferred by file extension and is
by default |
... |
Options passed to readr's |
keep |
In the case of a downloaded file, should it be stored in the
working directory ( |
verify |
If |
Value
A tbl_df object.
Examples
Producing tables from CSV files
A local CSV file can be obtained as a tbl object by supplying a path to the
file and some CSV reading options (the ones used by readr::read_csv()) to
the file_tbl() function. For this example we could obtain a path to a CSV
file in the pointblank package with system.file().
csv_path <-
system.file(
"data_files", "small_table.csv",
package = "pointblank"
)
Then use that path in file_tbl() with the option to specify the column
types in that CSV.
tbl <-
file_tbl(
file = csv_path,
col_types = "TDdcddlc"
)
tbl
## # A tibble: 13 × 8 ## date_time date a b c d e f ## <dttm> <date> <dbl> <chr> <dbl> <dbl> <lgl> <chr> ## 1 2016-01-04 11:00:00 2016-01-04 2 1-bcd-… 3 3423. TRUE high ## 2 2016-01-04 00:32:00 2016-01-04 3 5-egh-… 8 10000. TRUE low ## 3 2016-01-05 13:32:00 2016-01-05 6 8-kdg-… 3 2343. TRUE high ## 4 2016-01-06 17:23:00 2016-01-06 2 5-jdo-… NA 3892. FALSE mid ## 5 2016-01-09 12:36:00 2016-01-09 8 3-ldm-… 7 284. TRUE low ## 6 2016-01-11 06:15:00 2016-01-11 4 2-dhe-… 4 3291. TRUE mid ## 7 2016-01-15 18:46:00 2016-01-15 7 1-knw-… 3 843. TRUE high ## 8 2016-01-17 11:27:00 2016-01-17 4 5-boe-… 2 1036. FALSE low ## 9 2016-01-20 04:30:00 2016-01-20 3 5-bce-… 9 838. FALSE high ## 10 2016-01-20 04:30:00 2016-01-20 3 5-bce-… 9 838. FALSE high ## 11 2016-01-26 20:07:00 2016-01-26 4 2-dmx-… 7 834. TRUE low ## 12 2016-01-28 02:51:00 2016-01-28 2 7-dmx-… 8 108. FALSE low ## 13 2016-01-30 11:23:00 2016-01-30 1 3-dka-… NA 2230. TRUE high
Now that we have a 'tbl' object that is a tibble it could be introduced to
create_agent() for validation.
agent <- create_agent(tbl = tbl)
A different strategy is to provide the data-reading function call directly to
create_agent():
agent <-
create_agent(
tbl = ~ file_tbl(
file = system.file(
"data_files", "small_table.csv",
package = "pointblank"
),
col_types = "TDdcddlc"
)
) %>%
col_vals_gt(columns = a, value = 0)
All of the file-reading instructions are encapsulated in the tbl expression
(with the leading ~) so the agent will always obtain the most recent
version of the table (and the logic can be translated to YAML, for later
use).
Producing tables from files on GitHub
A CSV can be obtained from a public GitHub repo by using the from_github()
helper function. Let's create an agent a supply a table-prep formula that
gets the same CSV file from the GitHub repository for the pointblank package.
agent <-
create_agent(
tbl = ~ file_tbl(
file = from_github(
file = "inst/data_files/small_table.csv",
repo = "rstudio/pointblank"
),
col_types = "TDdcddlc"
),
tbl_name = "small_table",
label = "`file_tbl()` example.",
) %>%
col_vals_gt(columns = a, value = 0) %>%
interrogate()
agent

This interrogated the data that was obtained from the remote source file, and, there's nothing to clean up (by default, the downloaded file goes into a system temp directory).
File access, table creation, and prep via the table store
Using table-prep formulas in a centralized table store can make it easier to
work with tables from disparate sources. Here's how to generate a table store
with two named entries for table preparations involving the tbl_store() and
file_tbl() functions.
store <-
tbl_store(
small_table_file ~ file_tbl(
file = system.file(
"data_files", "small_table.csv",
package = "pointblank"
),
col_types = "TDdcddlc"
),
small_high_file ~ {{ small_table_file }} %>%
dplyr::filter(f == "high")
)
Now it's easy to access either of these tables via tbl_get(). We can
reference the table in the store by its name (given to the left of the ~).
tbl_get(tbl = "small_table_file", store = store)
## # A tibble: 13 × 8 ## date_time date a b c d e f ## <dttm> <date> <dbl> <chr> <dbl> <dbl> <lgl> <chr> ## 1 2016-01-04 11:00:00 2016-01-04 2 1-bcd-… 3 3423. TRUE high ## 2 2016-01-04 00:32:00 2016-01-04 3 5-egh-… 8 10000. TRUE low ## 3 2016-01-05 13:32:00 2016-01-05 6 8-kdg-… 3 2343. TRUE high ## 4 2016-01-06 17:23:00 2016-01-06 2 5-jdo-… NA 3892. FALSE mid ## 5 2016-01-09 12:36:00 2016-01-09 8 3-ldm-… 7 284. TRUE low ## 6 2016-01-11 06:15:00 2016-01-11 4 2-dhe-… 4 3291. TRUE mid ## 7 2016-01-15 18:46:00 2016-01-15 7 1-knw-… 3 843. TRUE high ## 8 2016-01-17 11:27:00 2016-01-17 4 5-boe-… 2 1036. FALSE low ## 9 2016-01-20 04:30:00 2016-01-20 3 5-bce-… 9 838. FALSE high ## 10 2016-01-20 04:30:00 2016-01-20 3 5-bce-… 9 838. FALSE high ## 11 2016-01-26 20:07:00 2016-01-26 4 2-dmx-… 7 834. TRUE low ## 12 2016-01-28 02:51:00 2016-01-28 2 7-dmx-… 8 108. FALSE low ## 13 2016-01-30 11:23:00 2016-01-30 1 3-dka-… NA 2230. TRUE high
The second table in the table store is a mutated version of the first. It's
just as easily obtainable via tbl_get():
tbl_get(tbl = "small_high_file", store = store)
## # A tibble: 6 × 8 ## date_time date a b c d e f ## <dttm> <date> <dbl> <chr> <dbl> <dbl> <lgl> <chr> ## 1 2016-01-04 11:00:00 2016-01-04 2 1-bcd-345 3 3423. TRUE high ## 2 2016-01-05 13:32:00 2016-01-05 6 8-kdg-938 3 2343. TRUE high ## 3 2016-01-15 18:46:00 2016-01-15 7 1-knw-093 3 843. TRUE high ## 4 2016-01-20 04:30:00 2016-01-20 3 5-bce-642 9 838. FALSE high ## 5 2016-01-20 04:30:00 2016-01-20 3 5-bce-642 9 838. FALSE high ## 6 2016-01-30 11:23:00 2016-01-30 1 3-dka-303 NA 2230. TRUE high
The table-prep formulas in the store object could also be used in functions
with a tbl argument (like create_agent() and create_informant()). This
is accomplished most easily with the tbl_source() function.
agent <-
create_agent(
tbl = ~ tbl_source(
tbl = "small_table_file",
store = store
)
)
informant <-
create_informant(
tbl = ~ tbl_source(
tbl = "small_high_file",
store = store
)
)
Function ID
1-7
See Also
Other Planning and Prep:
action_levels(),
create_agent(),
create_informant(),
db_tbl(),
draft_validation(),
scan_data(),
tbl_get(),
tbl_source(),
tbl_store(),
validate_rmd()
Specify a file for download from GitHub
Description
The from_github() function is helpful for generating a valid URL that
points to a data file in a public GitHub repository. This function can be
used in the file argument of the file_tbl() function or anywhere else
where GitHub URLs for raw user content are needed.
Usage
from_github(file, repo, subdir = NULL, default_branch = "main")from_github(file, repo, subdir = NULL, default_branch = "main")
Arguments
file |
The name of the file to target in a GitHub repository. This can
be a path leading to and including the file. This is combined with any path
given in |
repo |
The GitHub repository address in the format
|
subdir |
A path string representing a subdirectory in the GitHub
repository. This is combined with any path components included in |
default_branch |
The name of the default branch for the repo. This is
usually |
Value
A character vector of length 1 that contains a URL.
Function ID
13-6
See Also
Other Utility and Helper Functions:
affix_date(),
affix_datetime(),
col_schema(),
has_columns(),
stop_if_not()
Examples
# A valid URL to a data file in GitHub can be # obtained from the HEAD of the default branch # from_github( # file = "inst/data_files/small_table.csv", # repo = "rstudio/pointblank" # ) # The path to the file location can be supplied # fully or partially to `subdir` # from_github( # file = "small_table.csv", # repo = "rstudio/pointblank", # subdir = "inst/data_files" # ) # We can use the first call in combination with # `file_tbl()` and `create_agent()`; this # supplies a table-prep formula that gets # a CSV file from the GitHub repository for the # pointblank package # agent <- # create_agent( # tbl = ~ file_tbl( # file = from_github( # file = "inst/data_files/small_table.csv", # repo = "rstudio/pointblank" # ), # col_types = "TDdcddlc" # ) # ) %>% # col_vals_gt(a, 0) %>% # interrogate() # The `from_github()` helper function is # pretty powerful and can get at lots of # different files in a repository # A data file from GitHub can be obtained from # a commit at release time # from_github( # file = "inst/extdata/small_table.csv", # repo = "rstudio/[email protected]" # ) # A file may also be obtained from a repo at the # point in time of a specific commit (partial or # full SHA-1 hash for the commit can be used) # from_github( # file = "data-raw/small_table.csv", # repo = "rstudio/pointblank@e04a71" # ) # A file may also be obtained from an # *open* pull request # from_github( # file = "data-raw/small_table.csv", # repo = "rstudio/pointblank#248" # )# A valid URL to a data file in GitHub can be # obtained from the HEAD of the default branch # from_github( # file = "inst/data_files/small_table.csv", # repo = "rstudio/pointblank" # ) # The path to the file location can be supplied # fully or partially to `subdir` # from_github( # file = "small_table.csv", # repo = "rstudio/pointblank", # subdir = "inst/data_files" # ) # We can use the first call in combination with # `file_tbl()` and `create_agent()`; this # supplies a table-prep formula that gets # a CSV file from the GitHub repository for the # pointblank package # agent <- # create_agent( # tbl = ~ file_tbl( # file = from_github( # file = "inst/data_files/small_table.csv", # repo = "rstudio/pointblank" # ), # col_types = "TDdcddlc" # ) # ) %>% # col_vals_gt(a, 0) %>% # interrogate() # The `from_github()` helper function is # pretty powerful and can get at lots of # different files in a repository # A data file from GitHub can be obtained from # a commit at release time # from_github( # file = "inst/extdata/small_table.csv", # repo = "rstudio/[email protected]" # ) # A file may also be obtained from a repo at the # point in time of a specific commit (partial or # full SHA-1 hash for the commit can be used) # from_github( # file = "data-raw/small_table.csv", # repo = "rstudio/pointblank@e04a71" # ) # A file may also be obtained from an # *open* pull request # from_github( # file = "data-raw/small_table.csv", # repo = "rstudio/pointblank#248" # )
A table with game revenue data
Description
This table is a subset of the sj_all_revenue table from the intendo
data package. It's the first 2,000 rows from that table where revenue records
range from 2015-01-01 to 2015-01-21.
Usage
game_revenuegame_revenue
Format
A tibble with 2,000 rows and 11 variables:
- player_id
-
A
charactercolumn with unique identifiers for each user/player. - session_id
-
A
charactercolumn that contains unique identifiers for each player session. - session_start
-
A date-time column that indicates when the session (containing the revenue event) started.
- time
-
A date-time column that indicates exactly when the player purchase (or revenue event) occurred.
- item_type
-
A
charactercolumn that provides the class of the item purchased. - item_name
-
A
charactercolumn that provides the name of the item purchased. - item_revenue
-
A
numericcolumn with the revenue amounts per item purchased. - session_duration
-
A
numericcolumn that states the length of the session (in minutes) for which the purchase occurred. - start_day
-
A
Datecolumn that provides the date of first login for the player making a purchase. - acquisition
-
A
charactercolumn that provides the method of acquisition for the player. - country
-
A
charactercolumn that provides the probable country of residence for the player.
Function ID
14-4
See Also
Other Datasets:
game_revenue_info,
small_table,
small_table_sqlite(),
specifications
Examples
# Here is a glimpse at the data # available in `game_revenue` dplyr::glimpse(game_revenue)# Here is a glimpse at the data # available in `game_revenue` dplyr::glimpse(game_revenue)
A table with metadata for the game_revenue dataset
Description
This table contains metadata for the game_revenue table. The first column
(named column) provides the column names from game_revenue. The second
column (info) contains descriptions for each of the columns in that
dataset. This table is in the correct format for use in the
info_columns_from_tbl() function.
Usage
game_revenue_infogame_revenue_info
Format
A tibble with 11 rows and 2 variables:
- column
-
A
charactercolumn with unique identifiers for each user/player. - info
-
A
charactercolumn that contains unique identifiers for each player session.
Function ID
14-5
See Also
Other Datasets:
game_revenue,
small_table,
small_table_sqlite(),
specifications
Examples
# Here is a glimpse at the data # available in `game_revenue_info` dplyr::glimpse(game_revenue_info)# Here is a glimpse at the data # available in `game_revenue_info` dplyr::glimpse(game_revenue_info)
Get a summary report from an agent
Description
We can get an informative summary table from an agent by using the
get_agent_report() function. The table can be provided in two substantially
different forms: as a gt based display table (the default), or, as a
tibble. The amount of fields with intel is different depending on whether or
not the agent performed an interrogation (with the interrogate() function).
Basically, before interrogate() is called, the agent will contain just the
validation plan (however many rows it has depends on how many validation
functions were supplied a part of that plan). Post-interrogation, information
on the passing and failing test units is provided, along with indicators on
whether certain failure states were entered (provided they were set through
actions). The display table variant of the agent report, the default form,
will have the following columns:
-
i (unlabeled): the validation step number.
-
STEP: the name of the validation function used for the validation step,
-
COLUMNS: the names of the target columns used in the validation step (if applicable).
-
VALUES: the values used in the validation step, where applicable; this could be as literal values, as column names, an expression, etc.
-
TBL: indicates whether any there were any changes to the target table just prior to interrogation. A rightward arrow from a small circle indicates that there was no mutation of the table. An arrow from a circle to a purple square indicates that preconditions were used to modify the target table. An arrow from a circle to a half-filled circle indicates that the target table has been segmented.
-
EVAL: a symbol that denotes the success of interrogation evaluation for each step. A checkmark indicates no issues with evaluation. A warning sign indicates that a warning occurred during evaluation. An explosion symbol indicates that evaluation failed due to an error. Hover over the symbol for details on each condition.
-
UNITS: the total number of test units for the validation step
-
PASS: on top is the absolute number of passing test units and below that is the fraction of passing test units over the total number of test units.
-
FAIL: on top is the absolute number of failing test units and below that is the fraction of failing test units over the total number of test units.
-
W, S, N: indicators that show whether the
warn,stop, ornotifystates were entered; unset states appear as dashes, states that are set with thresholds appear as unfilled circles when not entered and filled when thresholds are exceeded (colors for W, S, and N are amber, red, and blue) -
EXT: a column that provides buttons to download data extracts as CSV files for row-based validation steps having failing test units. Buttons only appear when there is data to collect.
The small version of the display table (obtained using size = "small")
omits the COLUMNS, TBL, and EXT columns. The width of the small table
is 575px; the standard table is 875px wide.
The ptblank_agent_report can be exported to a standalone HTML document
with the export_report() function.
If choosing to get a tibble (with display_table = FALSE), it will have the
following columns:
-
i: the validation step number.
-
type: the name of the validation function used for the validation step.
-
columns: the names of the target columns used in the validation step (if applicable).
-
values: the values used in the validation step, where applicable; for a
conjointly()validation step, this is a listing of all sub-validations. -
precon: indicates whether any there are any preconditions to apply before interrogation and, if so, the number of statements used.
-
active: a logical value that indicates whether a validation step is set to
"active"during an interrogation. -
eval: a character value that denotes the success of interrogation evaluation for each step. A value of
"OK"indicates no issues with evaluation. The"WARNING"value indicates a warning occurred during evaluation. The"ERROR"VALUES indicates that evaluation failed due to an error. With"W+E"both warnings and an error occurred during evaluation. -
units: the total number of test units for the validation step.
-
n_pass: the number of passing test units.
-
f_pass: the fraction of passing test units.
-
W, S, N: logical value stating whether the
warn,stop, ornotifystates were entered. Will beNAfor states that are unset. -
extract: an integer value that indicates the number of rows available in a data extract. Will be
NAif no extract is available.
Usage
get_agent_report( agent, arrange_by = c("i", "severity"), keep = c("all", "fail_states"), display_table = TRUE, size = "standard", title = ":default:", lang = NULL, locale = NULL )get_agent_report( agent, arrange_by = c("i", "severity"), keep = c("all", "fail_states"), display_table = TRUE, size = "standard", title = ":default:", lang = NULL, locale = NULL )
Arguments
agent |
The pointblank agent object
A pointblank agent object that is commonly created through the use of
the |
arrange_by |
Method of arranging the report's table rows
A choice to arrange the report table rows by the validation step number
( |
keep |
Which table rows should be kept?
An option to keep |
display_table |
Return a display-table report via gt
Should a display table be generated? If |
size |
Size option for display-table report
The size of the display table, which can be either |
title |
Title customization options
Options for customizing the title of the report. The default is the keyword
|
lang |
Reporting language
The language to use for automatic creation of briefs (short descriptions
for each validation step) and for the agent report (a summary table that
provides the validation plan and the results from the interrogation. By
default, |
locale |
Locale for value formatting
An optional locale ID to use for formatting values in the
agent report summary table according the locale's rules. Examples include
|
Value
A ptblank_agent_report object if display_table = TRUE or a tibble
if display_table = FALSE.
Examples
For the example here, we'll use a simple table with a single numerical column
a.
tbl <- dplyr::tibble(a = c(5, 7, 8, 5)) tbl #> # A tibble: 4 x 1 #> a #> <dbl> #> 1 5 #> 2 7 #> 3 8 #> 4 5
Let's create an agent and validate that values in column a are always
greater than 4.
agent <-
create_agent(
tbl = tbl,
tbl_name = "small_table",
label = "An example."
) %>%
col_vals_gt(columns = a, value = 4) %>%
interrogate()
We can get a tibble-based report from the agent by using get_agent_report()
with display_table = FALSE.
agent %>% get_agent_report(display_table = FALSE)
## # A tibble: 1 × 14 ## i type columns values precon active eval units n_pass ## <int> <chr> <chr> <chr> <chr> <lgl> <chr> <dbl> <dbl> ## 1 1 col_va… a 4 NA TRUE OK 4 4 ## # … with 5 more variables: f_pass <dbl>, W <lgl>, S <lgl>, ## # N <lgl>, extract <int>
The full-featured display-table-based report can be viewed by printing the
agent object, but, we can get a "ptblank_agent_report" object returned to
us when using display_table = TRUE (the default for get_agent_report).
report <- get_agent_report(agent) report
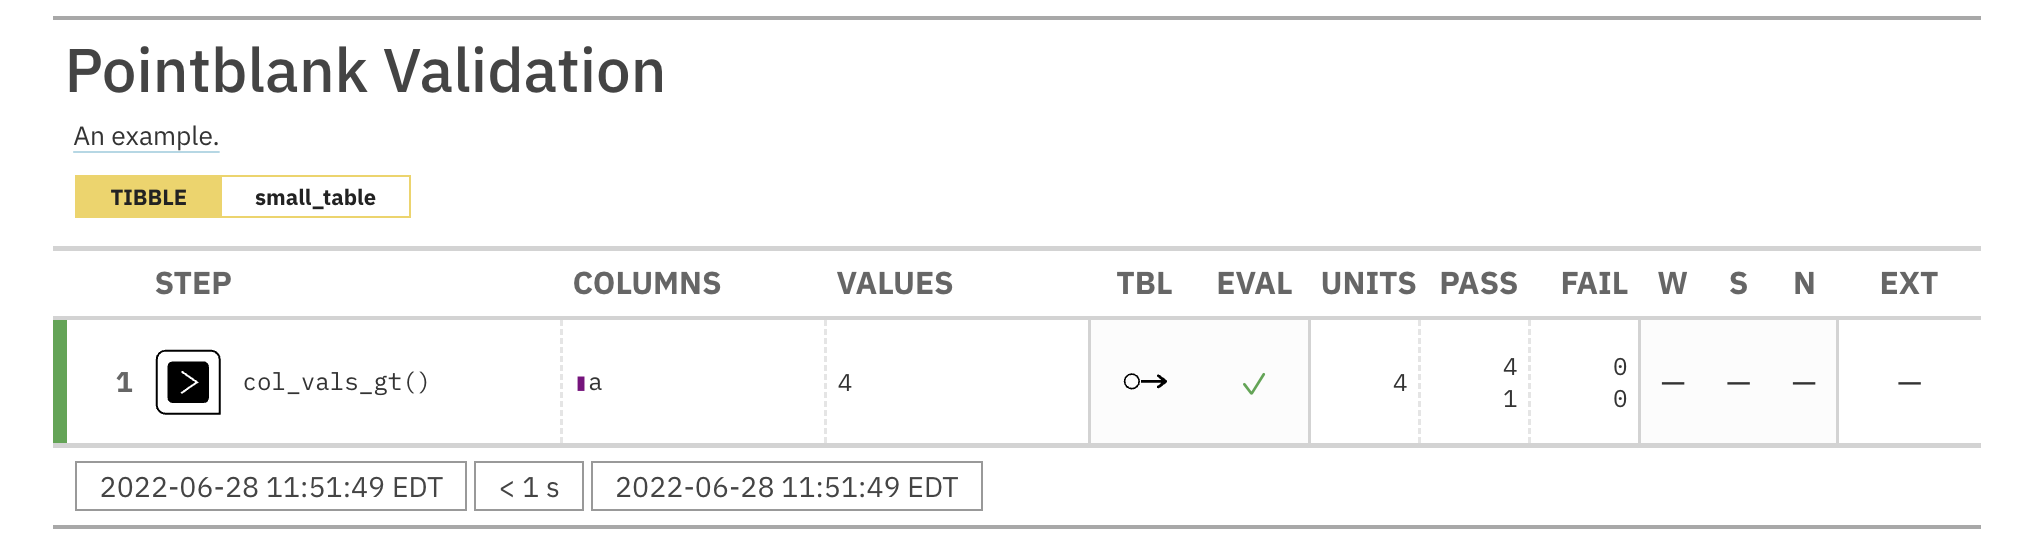
What can you do with the report object? Print it at will wherever, and, it
can serve as an input to the export_report() function.
However, the better reason to use get_agent_report() over just printing the
agent for display-table purposes is to make use of the different display
options.
The agent report as a gt display table comes in two sizes: "standard"
(the default, 875px wide) and "small" (575px wide). Let's take a look at
the smaller-sized version of the report.
small_report <-
get_agent_report(
agent = agent,
size = "small"
)
small_report

We can use our own title by supplying it to the title argument, or, use
a special keyword like ":tbl_name:" to get the table name (set in the
create_agent() call) as the title.
report_title <- get_agent_report(agent, title = ":tbl_name:") report_title
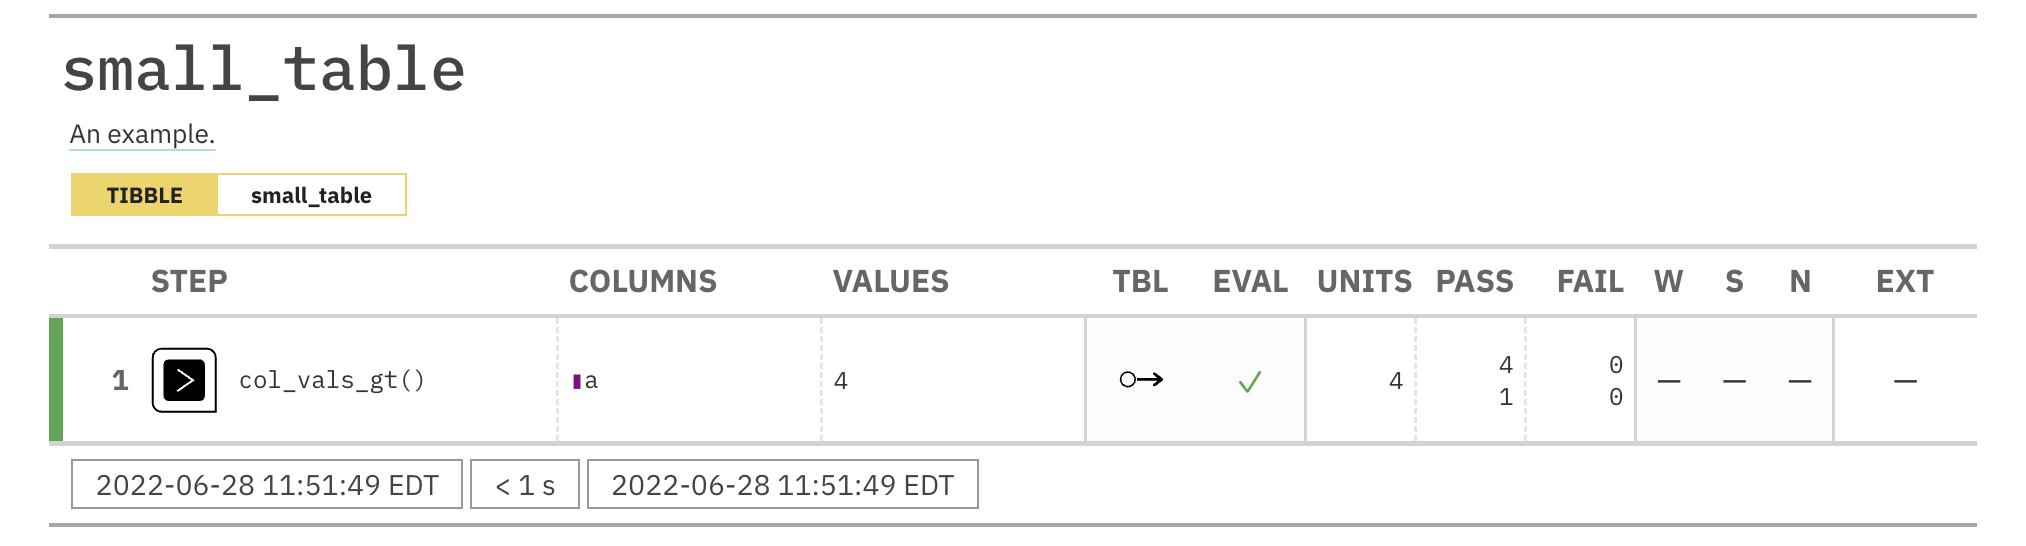
There are more options! You can change the language of the display table with
the lang argument (this overrides the language set in create_agent()),
validation steps can be rearranged using the arrange_by argument, and we
can also apply some filtering with the keep argument in
get_agent_report().
Function ID
6-2
See Also
Other Interrogate and Report:
interrogate()
Get the agent's x-list
Description
The agent's x-list is a record of information that the agent possesses at
any given time. The x-list will contain the most complete information
after an interrogation has taken place (before then, the data largely
reflects the validation plan). The x-list can be constrained to a
particular validation step (by supplying the step number to the i
argument), or, we can get the information for all validation steps by leaving
i unspecified. The x-list is indeed an R list object that contains a
veritable cornucopia of information.
For an x-list obtained with i specified for a validation step, the
following components are available:
-
time_start: the time at which the interrogation began (POSIXct [0 or 1]) -
time_end: the time at which the interrogation ended (POSIXct [0 or 1]) -
label: the optional label given to the agent (chr [1]) -
tbl_name: the name of the table object, if available (chr [1]) -
tbl_src: the type of table used in the validation (chr [1]) -
tbl_src_details: if the table is a database table, this provides further details for the DB table (chr [1]) -
tbl: the table object itself -
col_names: the table's column names (chr [ncol(tbl)]) -
col_types: the table's column types (chr [ncol(tbl)]) -
i: the validation step index (int [1]) -
type: the type of validation, value is validation function name (chr [1]) -
columns: the columns specified for the validation function (chr [variable length]) -
values: the values specified for the validation function (mixed types [variable length]) -
briefs: the brief for the validation step in the specifiedlang(chr [1]) -
eval_error,eval_warning: indicates whether the evaluation of the step function, during interrogation, resulted in an error or a warning (lgl [1]) -
capture_stack: a list of captured errors or warnings during step-function evaluation at interrogation time (list [1]) -
n: the number of test units for the validation step (num [1]) -
n_passed,n_failed: the number of passing and failing test units for the validation step (num [1]) -
f_passed: the fraction of passing test units for the validation step,n_passed/n(num [1]) -
f_failed: the fraction of failing test units for the validation step,n_failed/n(num [1]) -
warn,stop,notify: a logical value indicating whether the level of failing test units caused the corresponding conditions to be entered (lgl [1]) -
lang: the two-letter language code that indicates which language should be used for all briefs, the agent report, and the reporting generated by thescan_data()function (chr [1])
If i is unspecified (i.e., not constrained to a specific validation step)
then certain length-one components in the x-list will be expanded to the
total number of validation steps (these are: i, type, columns,
values, briefs, eval_error, eval_warning, capture_stack, n,
n_passed, n_failed, f_passed, f_failed, warn, stop, and
notify). The x-list will also have additional components when i is
NULL, which are:
-
report_object: a gt table object, which is also presented as the default print method for aptblank_agent -
email_object: a blastulaemail_messageobject with a default set of components -
report_html: the HTML source for thereport_object, provided as a length-one character vector -
report_html_small: the HTML source for a narrower, more condensed version ofreport_object, provided as a length-one character vector; The HTML has inlined styles, making it more suitable for email message bodies
Usage
get_agent_x_list(agent, i = NULL)get_agent_x_list(agent, i = NULL)
Arguments
agent |
The pointblank agent object
A pointblank agent object that is commonly created through the use of
the |
i |
A validation step number
The validation step number, which is assigned to each validation step in
the order of invocation. If |
Value
An x_list object.
Examples
Create a simple data frame with a column of numerical values.
tbl <- dplyr::tibble(a = c(5, 7, 8, 5)) tbl #> # A tibble: 4 x 1 #> a #> <dbl> #> 1 5 #> 2 7 #> 3 8 #> 4 5
Create an action_levels() list with fractional values for the warn,
stop, and notify states.
al <-
action_levels(
warn_at = 0.2,
stop_at = 0.8,
notify_at = 0.345
)
Create an agent (giving it the tbl and the al objects), supply two
validation step functions, then interrogate.
agent <-
create_agent(
tbl = tbl,
actions = al
) %>%
col_vals_gt(columns = a, value = 7) %>%
col_is_numeric(columns = a) %>%
interrogate()
Get the f_passed component of the agent x-list.
x <- get_agent_x_list(agent) x$f_passed
#> [1] 0.25 1.00
Function ID
8-1
See Also
Other Post-interrogation:
all_passed(),
get_data_extracts(),
get_sundered_data(),
write_testthat_file()
Collect data extracts from a validation step
Description
In an agent-based workflow (i.e., initiating with create_agent()), after
interrogation with interrogate(), we can extract the row data that didn't
pass row-based validation steps with the get_data_extracts() function.
There is one discrete extract per row-based validation step and the amount of
data available in a particular extract depends on both the fraction of test
units that didn't pass the validation step and the level of sampling or
explicit collection from that set of units. These extracts can be collected
programmatically through get_data_extracts() but they may also be
downloaded as CSV files from the HTML report generated by the agent's print
method or through the use of get_agent_report().
The availability of data extracts for each row-based validation step depends
on whether extract_failed is set to TRUE within the interrogate() call
(it is by default). The amount of fail rows extracted depends on the
collection parameters in interrogate(), and the default behavior is to
collect up to the first 5000 fail rows.
Row-based validation steps are based on those validation functions of the
form col_vals_*() and also include conjointly() and rows_distinct().
Only functions from that combined set of validation functions can yield data
extracts.
Usage
get_data_extracts(agent, i = NULL)get_data_extracts(agent, i = NULL)
Arguments
agent |
The pointblank agent object
A pointblank agent object that is commonly created through the use of
the |
i |
A validation step number
The validation step number, which is assigned to each validation step by
pointblank in the order of definition. If |
Value
A list of tables if i is not provided, or, a standalone table if
i is given.
Examples
Create a series of two validation steps focused on testing row values for
part of the small_table object. Use interrogate() right after that.
agent <-
create_agent(
tbl = small_table %>%
dplyr::select(a:f),
label = "`get_data_extracts()`"
) %>%
col_vals_gt(d, value = 1000) %>%
col_vals_between(
columns = c,
left = vars(a), right = vars(d),
na_pass = TRUE
) %>%
interrogate()
Using get_data_extracts() with its defaults returns of a list of tables,
where each table is named after the validation step that has an extract
available.
agent %>% get_data_extracts()
## $`1` ## # A tibble: 6 × 6 ## a b c d e f ## <int> <chr> <dbl> <dbl> <lgl> <chr> ## 1 8 3-ldm-038 7 284. TRUE low ## 2 7 1-knw-093 3 843. TRUE high ## 3 3 5-bce-642 9 838. FALSE high ## 4 3 5-bce-642 9 838. FALSE high ## 5 4 2-dmx-010 7 834. TRUE low ## 6 2 7-dmx-010 8 108. FALSE low ## ## $`2` ## # A tibble: 4 × 6 ## a b c d e f ## <int> <chr> <dbl> <dbl> <lgl> <chr> ## 1 6 8-kdg-938 3 2343. TRUE high ## 2 8 3-ldm-038 7 284. TRUE low ## 3 7 1-knw-093 3 843. TRUE high ## 4 4 5-boe-639 2 1036. FALSE low
We can get an extract for a specific step by specifying it in the i
argument. Let's get the failing rows from the first validation step (the
col_vals_gt() one).
agent %>% get_data_extracts(i = 1)
## # A tibble: 6 × 6 ## a b c d e f ## <int> <chr> <dbl> <dbl> <lgl> <chr> ## 1 8 3-ldm-038 7 284. TRUE low ## 2 7 1-knw-093 3 843. TRUE high ## 3 3 5-bce-642 9 838. FALSE high ## 4 3 5-bce-642 9 838. FALSE high ## 5 4 2-dmx-010 7 834. TRUE low ## 6 2 7-dmx-010 8 108. FALSE low
Function ID
8-2
See Also
Other Post-interrogation:
all_passed(),
get_agent_x_list(),
get_sundered_data(),
write_testthat_file()
Get a table information report from an informant object
Description
We can get a table information report from an informant object that's
generated by the create_informant() function. The report is provided as a
gt based display table. The amount of information shown depends on the
extent of that added via the use of the info_*() functions or through
direct editing of a pointblank YAML file (an informant can be written
to pointblank YAML with yaml_write(informant = <informant>, ...)).
Usage
get_informant_report( informant, size = "standard", title = ":default:", lang = NULL, locale = NULL )get_informant_report( informant, size = "standard", title = ":default:", lang = NULL, locale = NULL )
Arguments
informant |
The pointblank informant object
A pointblank informant object that is commonly created through the
use of the |
size |
Size option for display-table report
The size of the display table, which can be either |
title |
Title customization options
Options for customizing the title of the report. The default is the keyword
|
lang |
Reporting language
The language to use for the information report. By default, |
locale |
Locale for value formatting
An optional locale ID to use for formatting values in the
information report summary table according the locale's rules. Examples
include |
Value
A gt table object.
Function ID
7-2
See Also
Other Incorporate and Report:
incorporate()
Examples
# Generate an informant object using # the `small_table` dataset informant <- create_informant(small_table) # This function creates some information # without any extra help by profiling # the supplied table object; it adds # the sections 'table' and columns' and # we can print the object to see the # table information report # Alternatively, we can get the same report # by using `get_informant_report()` report <- get_informant_report(informant) class(report)# Generate an informant object using # the `small_table` dataset informant <- create_informant(small_table) # This function creates some information # without any extra help by profiling # the supplied table object; it adds # the sections 'table' and columns' and # we can print the object to see the # table information report # Alternatively, we can get the same report # by using `get_informant_report()` report <- get_informant_report(informant) class(report)
Get a summary report using multiple agents
Description
We can get an informative summary table from a collective of agents by using
the get_multiagent_report() function. Information from multiple agent can
be provided in three very forms: (1) the Long Display (stacked reports),
(2) the Wide Display (a comparison report), (3) as a tibble with packed
columns.
Usage
get_multiagent_report( multiagent, display_table = TRUE, display_mode = c("long", "wide"), title = ":default:", lang = NULL, locale = NULL )get_multiagent_report( multiagent, display_table = TRUE, display_mode = c("long", "wide"), title = ":default:", lang = NULL, locale = NULL )
Arguments
multiagent |
A multiagent object of class |
display_table |
Should a display table be generated? If |
display_mode |
If we are getting a display table, should the agent data
be presented in a |
title |
Options for customizing the title of the report when
|
lang |
Reporting language
The language to use for the long or wide report forms. By default, |
locale |
Locale for value formatting
An optional locale ID to use for formatting values in the long or wide
report forms (according the locale's rules). Examples include |
Value
A gt table object if display_table = TRUE or a tibble if
display_table = FALSE.
The Long Display
When displayed as "long" the multiagent report will stack individual agent
reports in a single document in the order of the agents in the multiagent
object.
Each validation plan (possibly with interrogation info) will be provided and
the output for each is equivalent to calling get_agent_report() on each
of the agents within the multiagent object.
The Wide Display
When displayed as "wide" the multiagent report will show data from
individual agents as columns, with rows standing as validation steps common
across the agents.
Each validation step is represented with an icon (standing in for the name of the validation function) and the associated SHA1 hash. This is a highly trustworthy way for ascertaining which validation steps are effectively identical across interrogations. This way of organizing the report is beneficial because different agents may have used different steps and we want to track the validation results where the validation step doesn't change but the target table does (i.e., new rows are added, existing rows are updated, etc.).
The single table from this display mode will have the following columns:
-
STEP: the SHA1 hash for the validation step, possibly shared among several interrogations.
-
subsequent columns: each column beyond
STEPrepresents a separate interrogation from an agent object. The time stamp for the completion of each interrogation is shown as the column label.
Examples
Let's walk through several theoretical data quality analyses of an extremely
small table. that table is called small_table and we can find it as a
dataset in this package.
small_table #> # A tibble: 13 x 8 #> date_time date a b c d e f #> <dttm> <date> <int> <chr> <dbl> <dbl> <lgl> <chr> #> 1 2016-01-04 11:00:00 2016-01-04 2 1-bcd-345 3 3423. TRUE high #> 2 2016-01-04 00:32:00 2016-01-04 3 5-egh-163 8 10000. TRUE low #> 3 2016-01-05 13:32:00 2016-01-05 6 8-kdg-938 3 2343. TRUE high #> 4 2016-01-06 17:23:00 2016-01-06 2 5-jdo-903 NA 3892. FALSE mid #> 5 2016-01-09 12:36:00 2016-01-09 8 3-ldm-038 7 284. TRUE low #> 6 2016-01-11 06:15:00 2016-01-11 4 2-dhe-923 4 3291. TRUE mid #> 7 2016-01-15 18:46:00 2016-01-15 7 1-knw-093 3 843. TRUE high #> 8 2016-01-17 11:27:00 2016-01-17 4 5-boe-639 2 1036. FALSE low #> 9 2016-01-20 04:30:00 2016-01-20 3 5-bce-642 9 838. FALSE high #> 10 2016-01-20 04:30:00 2016-01-20 3 5-bce-642 9 838. FALSE high #> 11 2016-01-26 20:07:00 2016-01-26 4 2-dmx-010 7 834. TRUE low #> 12 2016-01-28 02:51:00 2016-01-28 2 7-dmx-010 8 108. FALSE low #> 13 2016-01-30 11:23:00 2016-01-30 1 3-dka-303 NA 2230. TRUE high
To set failure limits and signal conditions, we designate proportional
failure thresholds to the warn, stop, and notify states using
action_levels().
al <-
action_levels(
warn_at = 0.05,
stop_at = 0.10,
notify_at = 0.20
)
We will create four different agents and have slightly different validation
steps in each of them. In the first, agent_1, eight different validation
steps are created and the agent will interrogate the small_table.
agent_1 <-
create_agent(
tbl = small_table,
label = "An example.",
actions = al
) %>%
col_vals_gt(
columns = date_time,
value = vars(date),
na_pass = TRUE
) %>%
col_vals_gt(
columns = b,
value = vars(g),
na_pass = TRUE
) %>%
rows_distinct() %>%
col_vals_equal(
columns = d,
value = vars(d),
na_pass = TRUE
) %>%
col_vals_between(
columns = c,
left = vars(a), right = vars(d)
) %>%
col_vals_not_between(
columns = c,
left = 10, right = 20,
na_pass = TRUE
) %>%
rows_distinct(columns = d, e, f) %>%
col_is_integer(columns = a) %>%
interrogate()
The second agent, agent_2, retains all of the steps of agent_1 and adds
two more (the last of which is inactive).
agent_2 <-
agent_1 %>%
col_exists(columns = date, date_time) %>%
col_vals_regex(
columns = b,
regex = "[0-9]-[a-z]{3}-[0-9]{3}",
active = FALSE
) %>%
interrogate()
The third agent, agent_3, adds a single validation step, removes the fifth
one, and deactivates the first.
agent_3 <-
agent_2 %>%
col_vals_in_set(
columns = f,
set = c("low", "mid", "high")
) %>%
remove_steps(i = 5) %>%
deactivate_steps(i = 1) %>%
interrogate()
The fourth and final agent, agent_4, reactivates steps 1 and 10, and
removes the sixth step.
agent_4 <- agent_3 %>% activate_steps(i = 1) %>% activate_steps(i = 10) %>% remove_steps(i = 6) %>% interrogate()
While all the agents are slightly different from each other, we can still get a combined report of them by creating a 'multiagent'.
multiagent <-
create_multiagent(
agent_1, agent_2, agent_3, agent_4
)
Calling multiagent in the console prints the multiagent report. But we can
generate a "ptblank_multiagent_report" object with the
get_multiagent_report() function and specify options for layout and
presentation.
By default, get_multiagent_report() gives you a long report with agent
reports being stacked. Think of this "long" option as the serial mode of
agent reports. However if we want to view interrogation results of the same
table over time, the wide view may be preferable. In this way we can see
whether the results of common validation steps improved or worsened over
consecutive interrogations of the data.
report_wide <-
get_multiagent_report(
multiagent,
display_mode = "wide"
)
report_wide
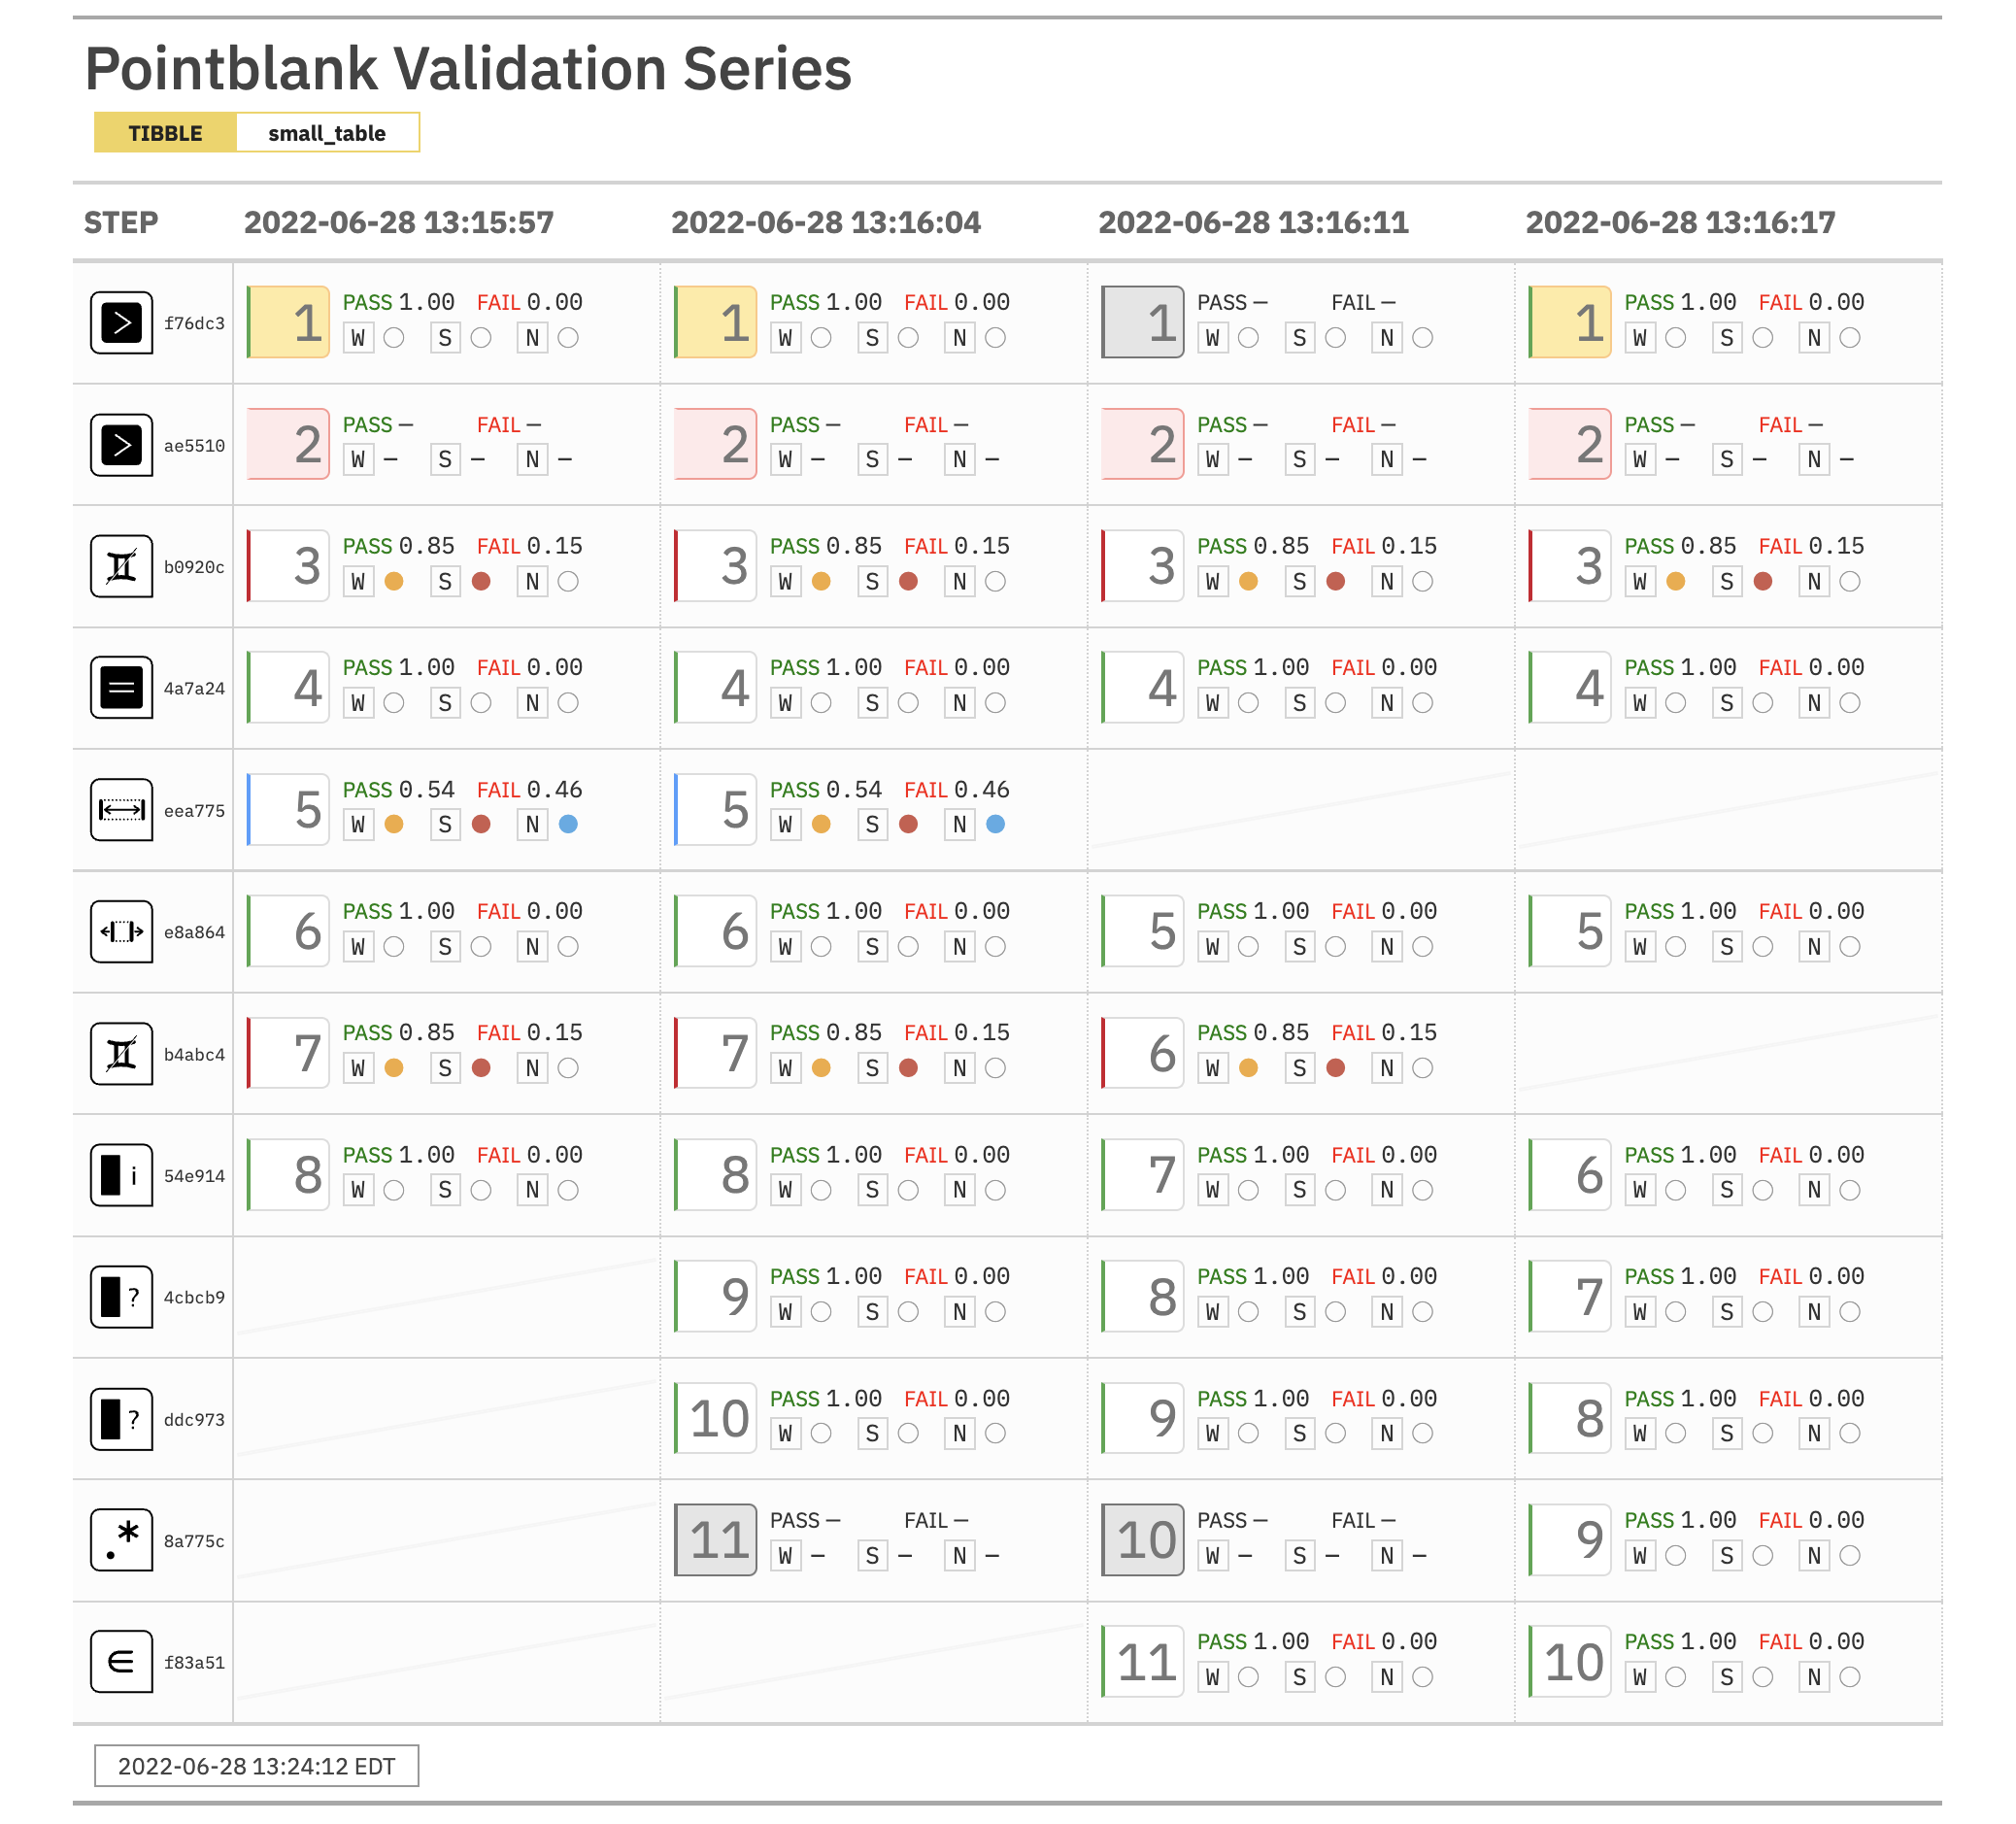
Function ID
10-3
See Also
Other The multiagent:
create_multiagent(),
read_disk_multiagent()
Sunder the data, splitting it into 'pass' and 'fail' pieces
Description
Validation of the data is one thing but, sometimes, you want to use the best
part of the input dataset for something else. The get_sundered_data()
function works with an agent object that has intel (i.e., post
interrogate()) and gets either the 'pass' data piece (rows with no failing
test units across all row-based validation functions), or, the 'fail' data
piece (rows with at least one failing test unit across the same series of
validations). As a final option, we can have emit all the data with a new
column (called .pb_combined) which labels each row as passing or failing
across validation steps. These labels are "pass" and "fail" by default
but their values can be easily customized.
Usage
get_sundered_data( agent, type = c("pass", "fail", "combined"), pass_fail = c("pass", "fail"), id_cols = NULL )get_sundered_data( agent, type = c("pass", "fail", "combined"), pass_fail = c("pass", "fail"), id_cols = NULL )
Arguments
agent |
The pointblank agent object
A pointblank agent object that is commonly created through the use of
the |
type |
The desired piece of data resulting from the splitting. Options
for returning a single table are |
pass_fail |
A vector for encoding the flag column with 'pass' and 'fail'
values when |
id_cols |
An optional specification of one or more identifying columns.
When taken together, we can count on this single column or grouping of
columns to distinguish rows. If the table undergoing validation is not a
data frame or tibble, then columns need to be specified for |
Details
There are some caveats to sundering. The validation steps considered for this
splitting has to be of the row-based variety (e.g., the col_vals_*()
functions or conjointly(), but not rows_distinct()). Furthermore,
validation steps that experienced evaluation issues during interrogation are
not considered, and, validation steps where active = FALSE will be
disregarded. The collection of validation steps that fulfill the above
requirements for sundering are termed in-consideration validation steps.
If using any preconditions for validation steps, we must ensure that all
in-consideration validation steps use the same specified preconditions
function. Put another way, we cannot split the target table using a
collection of in-consideration validation steps that use different forms of
the input table.
Value
A list of table objects if type is NULL, or, a single table if a
type is given.
Examples
Create a series of two validation steps focused on testing row values for
part of the small_table object. Then, use interrogate() to put the
validation plan into action.
agent <-
create_agent(
tbl = small_table %>%
dplyr::select(a:f),
label = "`get_sundered_data()`"
) %>%
col_vals_gt(columns = d, value = 1000) %>%
col_vals_between(
columns = c,
left = vars(a), right = vars(d),
na_pass = TRUE
) %>%
interrogate()
Get the sundered data piece that contains only rows that passed both validation steps (the default piece). This yields 5 of 13 total rows.
agent %>% get_sundered_data()
## # A tibble: 5 × 6 ## a b c d e f ## <int> <chr> <dbl> <dbl> <lgl> <chr> ## 1 2 1-bcd-345 3 3423. TRUE high ## 2 3 5-egh-163 8 10000. TRUE low ## 3 2 5-jdo-903 NA 3892. FALSE mid ## 4 4 2-dhe-923 4 3291. TRUE mid ## 5 1 3-dka-303 NA 2230. TRUE high
Get the complementary data piece: all of those rows that failed either of the two validation steps. This yields 8 of 13 total rows.
agent %>% get_sundered_data(type = "fail")
## # A tibble: 8 × 6 ## a b c d e f ## <int> <chr> <dbl> <dbl> <lgl> <chr> ## 1 6 8-kdg-938 3 2343. TRUE high ## 2 8 3-ldm-038 7 284. TRUE low ## 3 7 1-knw-093 3 843. TRUE high ## 4 4 5-boe-639 2 1036. FALSE low ## 5 3 5-bce-642 9 838. FALSE high ## 6 3 5-bce-642 9 838. FALSE high ## 7 4 2-dmx-010 7 834. TRUE low ## 8 2 7-dmx-010 8 108. FALSE low
We can get all of the input data returned with a flag column (called
.pb_combined). This is done by using type = "combined" and that rightmost
column will contain "pass" and "fail" values.
agent %>% get_sundered_data(type = "combined")
## # A tibble: 13 × 7 ## a b c d e f .pb_combined ## <int> <chr> <dbl> <dbl> <lgl> <chr> <chr> ## 1 2 1-bcd-345 3 3423. TRUE high pass ## 2 3 5-egh-163 8 10000. TRUE low pass ## 3 6 8-kdg-938 3 2343. TRUE high fail ## 4 2 5-jdo-903 NA 3892. FALSE mid pass ## 5 8 3-ldm-038 7 284. TRUE low fail ## 6 4 2-dhe-923 4 3291. TRUE mid pass ## 7 7 1-knw-093 3 843. TRUE high fail ## 8 4 5-boe-639 2 1036. FALSE low fail ## 9 3 5-bce-642 9 838. FALSE high fail ## 10 3 5-bce-642 9 838. FALSE high fail ## 11 4 2-dmx-010 7 834. TRUE low fail ## 12 2 7-dmx-010 8 108. FALSE low fail ## 13 1 3-dka-303 NA 2230. TRUE high pass
We can change the "pass" or "fail" text values to another type of coding
with the pass_fail argument. One possibility is TRUE/FALSE.
agent %>%
get_sundered_data(
type = "combined",
pass_fail = c(TRUE, FALSE)
)
## # A tibble: 13 × 7 ## a b c d e f .pb_combined ## <int> <chr> <dbl> <dbl> <lgl> <chr> <lgl> ## 1 2 1-bcd-345 3 3423. TRUE high TRUE ## 2 3 5-egh-163 8 10000. TRUE low TRUE ## 3 6 8-kdg-938 3 2343. TRUE high FALSE ## 4 2 5-jdo-903 NA 3892. FALSE mid TRUE ## 5 8 3-ldm-038 7 284. TRUE low FALSE ## 6 4 2-dhe-923 4 3291. TRUE mid TRUE ## 7 7 1-knw-093 3 843. TRUE high FALSE ## 8 4 5-boe-639 2 1036. FALSE low FALSE ## 9 3 5-bce-642 9 838. FALSE high FALSE ## 10 3 5-bce-642 9 838. FALSE high FALSE ## 11 4 2-dmx-010 7 834. TRUE low FALSE ## 12 2 7-dmx-010 8 108. FALSE low FALSE ## 13 1 3-dka-303 NA 2230. TRUE high TRUE
...and using 0 and 1 might be worthwhile in some situations.
agent %>%
get_sundered_data(
type = "combined",
pass_fail = 0:1
)
## # A tibble: 13 × 7 ## a b c d e f .pb_combined ## <int> <chr> <dbl> <dbl> <lgl> <chr> <int> ## 1 2 1-bcd-345 3 3423. TRUE high 0 ## 2 3 5-egh-163 8 10000. TRUE low 0 ## 3 6 8-kdg-938 3 2343. TRUE high 1 ## 4 2 5-jdo-903 NA 3892. FALSE mid 0 ## 5 8 3-ldm-038 7 284. TRUE low 1 ## 6 4 2-dhe-923 4 3291. TRUE mid 0 ## 7 7 1-knw-093 3 843. TRUE high 1 ## 8 4 5-boe-639 2 1036. FALSE low 1 ## 9 3 5-bce-642 9 838. FALSE high 1 ## 10 3 5-bce-642 9 838. FALSE high 1 ## 11 4 2-dmx-010 7 834. TRUE low 1 ## 12 2 7-dmx-010 8 108. FALSE low 1 ## 13 1 3-dka-303 NA 2230. TRUE high 0
Function ID
8-3
See Also
Other Post-interrogation:
all_passed(),
get_agent_x_list(),
get_data_extracts(),
write_testthat_file()
Get a parameter value from a summary table
Description
The get_tt_param() function can help you to obtain a single parameter value
from a summary table generated by the tt_*() functions
tt_summary_stats(), tt_string_info(), tt_tbl_dims(), or
tt_tbl_colnames(). The following parameters are to be used depending on the
input tbl:
-
from
tt_summary_stats():"min","p05","q_1","med","q_3","p95","max","iqr","range" -
from
tt_string_info():"length_mean","length_min","length_max" -
from
tt_tbl_dims():"rows","columns" -
from
tt_tbl_colnames(): any integer present in the.param.column
The tt_summary_stats() and tt_string_info() functions will generate
summary tables with columns that mirror the numeric and character columns
in their input tables, respectively. For that reason, a column name must be
supplied to the column argument in get_tt_param().
Usage
get_tt_param(tbl, param, column = NULL)get_tt_param(tbl, param, column = NULL)
Arguments
tbl |
Summary table generated by specific transformer functions
A summary table generated by either of the |
param |
Parameter name
The parameter name associated to the value that is to be gotten. These
parameter names are always available in the first column ( |
column |
The target column
The column in the summary table for which the data value should be
obtained. This must be supplied for summary tables generated by
|
Value
A scalar value.
Examples
Get summary statistics for the first quarter of the game_revenue dataset
that's included in the pointblank package.
stats_tbl <- game_revenue %>% tt_time_slice(slice_point = 0.25) %>% tt_summary_stats() stats_tbl #> # A tibble: 9 x 3 #> .param. item_revenue session_duration #> <chr> <dbl> <dbl> #> 1 min 0.02 5.1 #> 2 p05 0.03 11 #> 3 q_1 0.08 17.2 #> 4 med 0.28 28.3 #> 5 q_3 1.37 32 #> 6 p95 40.0 37.1 #> 7 max 143. 41 #> 8 iqr 1.28 14.8 #> 9 range 143. 35.9
Sometimes you need a single value from the table generated by the
tt_summary_stats() function. For that, we can use the get_tt_param()
function. So if we wanted to test whether the maximum session duration during
the rest of the time period (the remaining 0.75) is never higher than that of
the first quarter of the year, we can supply a value from stats_tbl to
test_col_vals_lte():
game_revenue %>%
tt_time_slice(
slice_point = 0.25,
keep = "right"
) %>%
test_col_vals_lte(
columns = session_duration,
value = get_tt_param(
tbl = stats_tbl,
param = "max",
column = "session_duration"
)
)
#> [1] TRUE
Function ID
12-7
See Also
Other Table Transformers:
tt_string_info(),
tt_summary_stats(),
tt_tbl_colnames(),
tt_tbl_dims(),
tt_time_shift(),
tt_time_slice()
Determine if one or more columns exist in a table
Description
This utility function can help you easily determine whether a column of a
specified name is present in a table object. This function works well enough
on a table object but it can also be used as part of a formula in any
validation function's active argument. Using active = ~ . %>% has_columns(column_1) means that the validation step will be inactive if
the target table doesn't contain a column named column_1. We can also use
multiple columns in c(), so having active = ~ . %>% has_columns(c(column_1, column_2)) in a validation step will make it
inactive at interrogate() time unless the columns column_1 and column_2
are both present.
Usage
has_columns(x, columns)has_columns(x, columns)
Arguments
x |
A data table
The input table. This can be a data frame, tibble, a |
columns |
The target columns
One or more columns or column-selecting expressions. Each element is
checked for a match in the table |
Value
A length-1 logical vector.
Examples
The small_table dataset in the package has the columns date_time, date,
and the a through f columns.
small_table #> # A tibble: 13 x 8 #> date_time date a b c d e f #> <dttm> <date> <int> <chr> <dbl> <dbl> <lgl> <chr> #> 1 2016-01-04 11:00:00 2016-01-04 2 1-bcd-345 3 3423. TRUE high #> 2 2016-01-04 00:32:00 2016-01-04 3 5-egh-163 8 10000. TRUE low #> 3 2016-01-05 13:32:00 2016-01-05 6 8-kdg-938 3 2343. TRUE high #> 4 2016-01-06 17:23:00 2016-01-06 2 5-jdo-903 NA 3892. FALSE mid #> 5 2016-01-09 12:36:00 2016-01-09 8 3-ldm-038 7 284. TRUE low #> 6 2016-01-11 06:15:00 2016-01-11 4 2-dhe-923 4 3291. TRUE mid #> 7 2016-01-15 18:46:00 2016-01-15 7 1-knw-093 3 843. TRUE high #> 8 2016-01-17 11:27:00 2016-01-17 4 5-boe-639 2 1036. FALSE low #> 9 2016-01-20 04:30:00 2016-01-20 3 5-bce-642 9 838. FALSE high #> 10 2016-01-20 04:30:00 2016-01-20 3 5-bce-642 9 838. FALSE high #> 11 2016-01-26 20:07:00 2016-01-26 4 2-dmx-010 7 834. TRUE low #> 12 2016-01-28 02:51:00 2016-01-28 2 7-dmx-010 8 108. FALSE low #> 13 2016-01-30 11:23:00 2016-01-30 1 3-dka-303 NA 2230. TRUE high
With has_columns() we can check for column existence by using it directly
on the table.
small_table %>% has_columns(columns = date)
## [1] TRUE
Multiple column names can be supplied. The following is TRUE because both
columns are present in small_table.
small_table %>% has_columns(columns = c(a, b))
## [1] TRUE
It's possible to use a tidyselect helper as well:
small_table %>% has_columns(columns = c(a, starts_with("b")))
## [1] TRUE
Because column h isn't present, this returns FALSE (all specified columns
need to be present to obtain TRUE).
small_table %>% has_columns(columns = c(a, h))
## [1] FALSE
The same holds in the case of tidyselect helpers. Because no columns start
with "h", including starts_with("h") returns FALSE for the entire
check.
small_table %>% has_columns(columns = starts_with("h"))
small_table %>% has_columns(columns = c(a, starts_with("h")))
## [1] FALSE ## [1] FALSE
The has_columns() function can be useful in expressions that involve the
target table, especially if it is uncertain that the table will contain a
column that's involved in a validation.
In the following agent-based validation, the first two steps will be 'active'
because all columns checked for in the expressions are present. The third
step becomes inactive because column j isn't there (without the active
statement there we would get an evaluation failure in the agent report).
agent <-
create_agent(
tbl = small_table,
tbl_name = "small_table"
) %>%
col_vals_gt(
columns = c, value = vars(a),
active = ~ . %>% has_columns(c(a, c))
) %>%
col_vals_lt(
columns = h, value = vars(d),
preconditions = ~ . %>% dplyr::mutate(h = d - a),
active = ~ . %>% has_columns(c(a, d))
) %>%
col_is_character(
columns = j,
active = ~ . %>% has_columns(j)
) %>%
interrogate()
Through the agent's x-list, we can verify that no evaluation error (any
evaluation at all, really) had occurred. The third value, representative of
the third validation step, is actually NA instead of FALSE because the
step became inactive.
x_list <- get_agent_x_list(agent = agent) x_list$eval_warning
## [1] FALSE FALSE NA
Function ID
13-2
See Also
Other Utility and Helper Functions:
affix_date(),
affix_datetime(),
col_schema(),
from_github(),
stop_if_not()
Given an informant object, update and incorporate table snippets
Description
When the informant object has a number of snippets available (by using
info_snippet()) and the strings to use them (by using the info_*()
functions and {<snippet_name>} in the text elements), the process of
incorporating aspects of the table into the info text can occur by
using the incorporate() function. After that, the information will be fully
updated (getting the current state of table dimensions, re-rendering the
info text, etc.) and we can print the informant object or use the
get_informant_report() function to see the information report.
Usage
incorporate(informant)incorporate(informant)
Arguments
informant |
The pointblank informant object
A pointblank informant object that is commonly created through the
use of the |
Value
A ptblank_informant object.
Examples
Take the small_table and assign it to changing_table (we'll modify it
later):
changing_table <- small_table changing_table #> # A tibble: 13 x 8 #> date_time date a b c d e f #> <dttm> <date> <int> <chr> <dbl> <dbl> <lgl> <chr> #> 1 2016-01-04 11:00:00 2016-01-04 2 1-bcd-345 3 3423. TRUE high #> 2 2016-01-04 00:32:00 2016-01-04 3 5-egh-163 8 10000. TRUE low #> 3 2016-01-05 13:32:00 2016-01-05 6 8-kdg-938 3 2343. TRUE high #> 4 2016-01-06 17:23:00 2016-01-06 2 5-jdo-903 NA 3892. FALSE mid #> 5 2016-01-09 12:36:00 2016-01-09 8 3-ldm-038 7 284. TRUE low #> 6 2016-01-11 06:15:00 2016-01-11 4 2-dhe-923 4 3291. TRUE mid #> 7 2016-01-15 18:46:00 2016-01-15 7 1-knw-093 3 843. TRUE high #> 8 2016-01-17 11:27:00 2016-01-17 4 5-boe-639 2 1036. FALSE low #> 9 2016-01-20 04:30:00 2016-01-20 3 5-bce-642 9 838. FALSE high #> 10 2016-01-20 04:30:00 2016-01-20 3 5-bce-642 9 838. FALSE high #> 11 2016-01-26 20:07:00 2016-01-26 4 2-dmx-010 7 834. TRUE low #> 12 2016-01-28 02:51:00 2016-01-28 2 7-dmx-010 8 108. FALSE low #> 13 2016-01-30 11:23:00 2016-01-30 1 3-dka-303 NA 2230. TRUE high
Use create_informant() to generate an informant object with
changing_table given to the tbl argument with a leading ~ (ensures that
the table will be fetched each time it is needed, instead of being statically
stored in the object). We'll add two snippets with info_snippet(), add
information with the info_columns() and info_section() functions and then
use incorporate() to work the snippets into the info text.
informant <-
create_informant(
tbl = ~ changing_table,
tbl_name = "changing_table",
label = "`informant()` example"
) %>%
info_snippet(
snippet_name = "row_count",
fn = ~ . %>% nrow()
) %>%
info_snippet(
snippet_name = "col_count",
fn = ~ . %>% ncol()
) %>%
info_columns(
columns = a,
info = "In the range of 1 to 10. ((SIMPLE))"
) %>%
info_columns(
columns = starts_with("date"),
info = "Time-based values (e.g., `Sys.time()`)."
) %>%
info_columns(
columns = date,
info = "The date part of `date_time`. ((CALC))"
) %>%
info_section(
section_name = "rows",
row_count = "There are {row_count} rows available."
) %>%
incorporate()
We can print the resulting object to see the information report.
informant

Let's modify test_table to give it more rows and an extra column.
changing_table <- dplyr::bind_rows(changing_table, changing_table) %>% dplyr::mutate(h = a + c)
Using incorporate() will cause the snippets to be reprocessed and
accordingly the content of the report will be updated to keep up with the
current state of the changing_table.
informant <- informant %>% incorporate()
When printed again, we'll also see that the row and column counts in the
header have been updated to reflect the new dimensions of the target table.
Furthermore, the info text in the ROWS section has updated text
("There are 26 rows available.").
informant

Function ID
7-1
See Also
Other Incorporate and Report:
get_informant_report()
Add information that focuses on aspects of a data table's columns
Description
Upon creation of an informant object (with the create_informant()
function), there are two sections containing properties: (1) 'table' and (2)
'columns'. The 'columns' section is initialized with the table's column names
and their types (as _type). Beyond that, it is useful to provide details
about the nature of each column and we can do that with the info_columns()
function. A single column (or multiple columns) is targeted, and then a
series of named arguments (in the form entry_name = "The *info text*.")
serves as additional information for the column or columns.
Usage
info_columns(x, columns, ..., .add = TRUE)info_columns(x, columns, ..., .add = TRUE)
Arguments
x |
The pointblank informant object
A pointblank informant object that is commonly created through the
use of the |
columns |
The target columns
The column or set of columns to focus on. Can be defined as a column name
in quotes (e.g., |
... |
Information entries
Information entries as a series of named arguments. The names refer to
subsection titles within |
.add |
Add to existing info text
Should new text be added to existing text? This is |
Value
A ptblank_informant object.
Info Text
The info text that's used for any of the info_*() functions readily
accepts Markdown formatting, and, there are a few Text Tricks that can be
used to spice up the presentation. Markdown links written as < link url >
or [ link text ]( link url ) will get nicely-styled links. Any dates
expressed in the ISO-8601 standard with parentheses, "(2004-12-01)", will
be styled with a font variation (monospaced) and underlined in purple. Spans
of text can be converted to label-style text by using: (1) double parentheses
around text for a rectangular border as in ((label text)), or (2) triple
parentheses around text for a rounded-rectangular border like (((label text))).
CSS style rules can be applied to spans of info text with the following form:
[[ info text ]]<< CSS style rules >>
As an example of this in practice suppose you'd like to change the color of some text to red and make the font appear somewhat thinner. A variation on the following might be used:
"This is a [[factor]]<<color: red; font-weight: 300;>> value."
The are quite a few CSS style rules that can be used to great effect. Here are a few you might like:
-
color: <a color value>;(text color) -
background-color: <a color value>;(the text's background color) -
text-decoration: (overline | line-through | underline); -
text-transform: (uppercase | lowercase | capitalize); -
letter-spacing: <a +/- length value>; -
word-spacing: <a +/- length value>; -
font-style: (normal | italic | oblique); -
font-weight: (normal | bold | 100-900); -
font-variant: (normal | bold | 100-900); -
border: <a color value> <a length value> (solid | dashed | dotted);
In the above examples, 'length value' refers to a CSS length which can be
expressed in different units of measure (e.g., 12px, 1em, etc.). Some
lengths can be expressed as positive or negative values (e.g., for
letter-spacing). Color values can be expressed in a few ways, the most
common being in the form of hexadecimal color values or as CSS color names.
YAML
A pointblank informant can be written to YAML with yaml_write() and the
resulting YAML can be used to regenerate an informant (with
yaml_read_informant()) or perform the 'incorporate' action using the target
table (via yaml_informant_incorporate()). The way that information on table
columns is represented in YAML works like this: info text goes into
subsections of YAML keys named for the columns, which are themselves part of
the top-level columns key. Here is an example of how several calls of
info_columns() are expressed in R code and how the result corresponds to
the YAML representation.
# R statement
informant %>%
info_columns(
columns = date_time,
info = "*info text* 1."
) %>%
info_columns(
columns = date,
info = "*info text* 2."
) %>%
info_columns(
columns = item_count,
info = "*info text* 3. Statistics: {snippet_1}."
) %>%
info_columns(
columns = c(date, date_time),
info = "UTC time."
)
# YAML representation
columns:
date_time:
_type: POSIXct, POSIXt
info: '*info text* 1. UTC time.'
date:
_type: Date
info: '*info text* 2. UTC time.'
item_count:
_type: integer
info: '*info text* 3. Statistics: {snippet_1}.'
Subsections represented as column names are automatically generated when
creating an informant. Within these, there can be multiple subsections used
for holding info text on each column. The subsections used across the
different columns needn't be the same either, the only commonality that
should be enforced is the presence of the _type key (automatically updated
at every incorporate() invocation).
It's safest to use single quotation marks around any info text if directly
editing it in a YAML file. Note that Markdown formatting and info snippet
placeholders (shown here as {snippet_1}, see info_snippet() for more
information) are preserved in the YAML. The Markdown to HTML conversion is
done when printing an informant (or invoking get_informant_report() on an
informant) and the processing of snippets (generation and insertion) is
done when using the incorporate() function. Thus, the source text is always
maintained in the YAML representation and is never written in processed form.
Examples
Create a pointblank informant object with create_informant(). We can
specify a tbl with the ~ followed by a statement that gets the
small_table dataset.
informant <-
create_informant(
tbl = ~ small_table,
tbl_name = "small_table",
label = "An example."
)
We can add info text to describe the table with the various info_*()
functions. In this example, we'll use info_columns() multiple times to
describe some of the columns in the small_table dataset. Note here that
info text calls are additive to the existing content inside of the
various subsections (i.e., the text will be appended and won't overwrite
existing if it lands in the same area).
informant <-
informant %>%
info_columns(
columns = a,
info = "In the range of 1 to 10. ((SIMPLE))"
) %>%
info_columns(
columns = starts_with("date"),
info = "Time-based values (e.g., `Sys.time()`)."
) %>%
info_columns(
columns = date,
info = "The date part of `date_time`. ((CALC))"
)
Upon printing the informant object, we see the additions made to the
'Columns' section.
informant
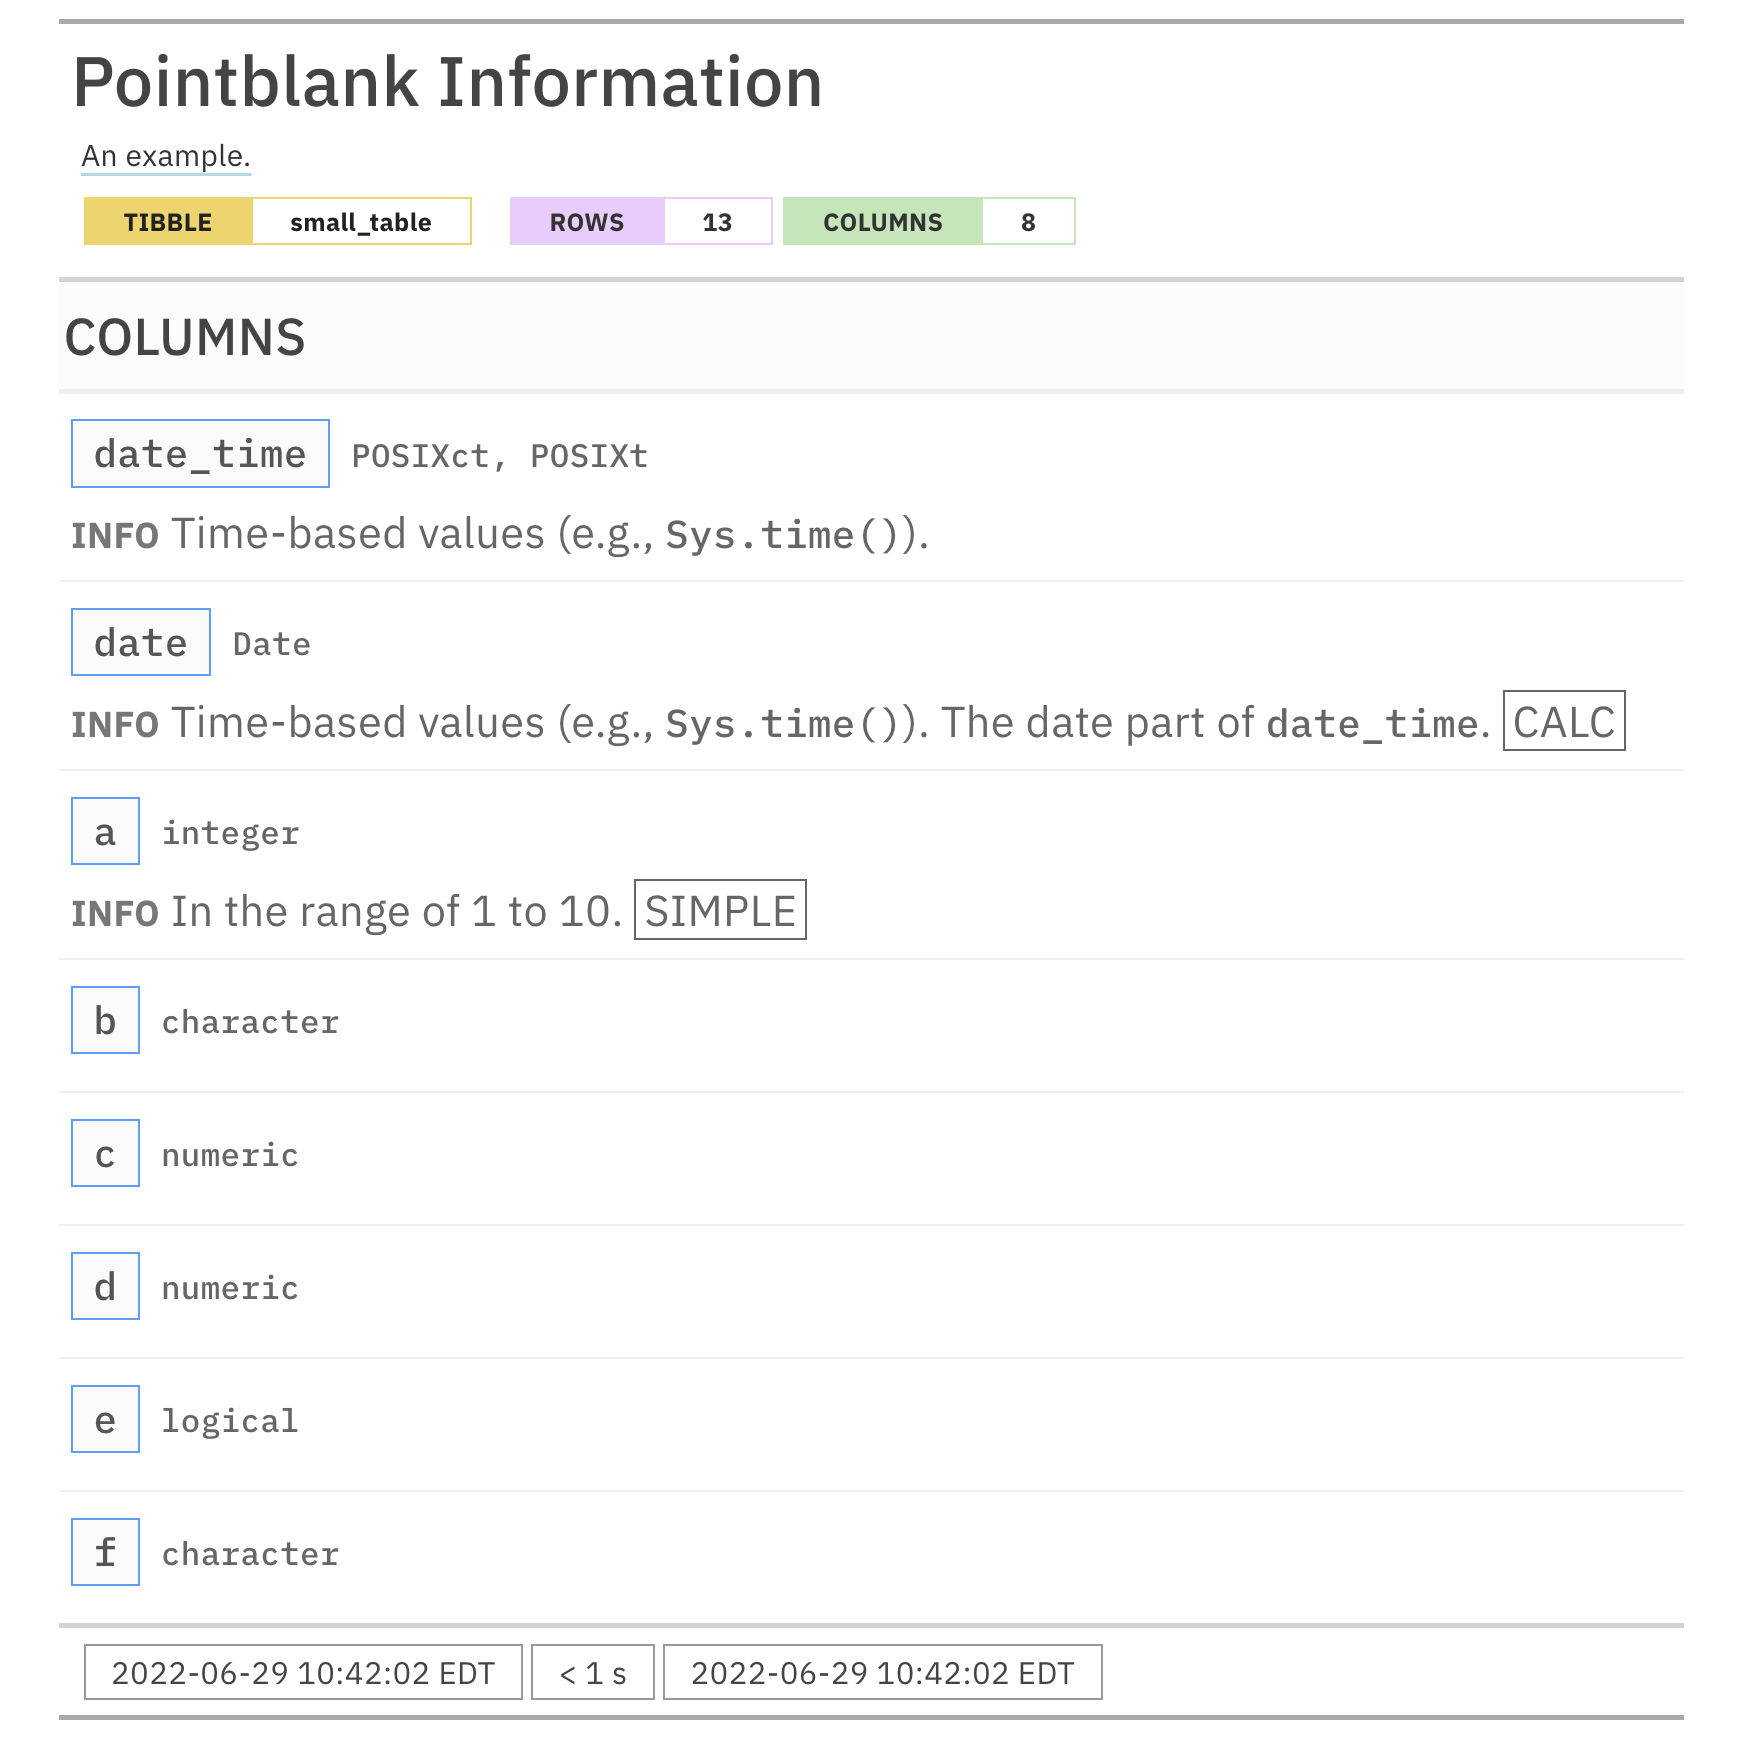
Function ID
3-2
See Also
Other Information Functions:
info_columns_from_tbl(),
info_section(),
info_snippet(),
info_tabular(),
snip_highest(),
snip_list(),
snip_lowest(),
snip_stats()
Add column information from another data table
Description
The info_columns_from_tbl() function is a wrapper around the
info_columns() function and is useful if you wish to apply info text to
columns where that information already exists in a data frame (or in some
form that can readily be coaxed into a data frame). The form of the input
tbl (the one that contains column metadata) has a few basic requirements:
-
the data frame must have two columns
-
both columns must be of class
character -
the first column should contain column names and the second should contain the info text
Each column that matches across tables (i.e., the tbl and the target table
of the informant) will have a new entry for the "info" property. Empty or
missing info text will be pruned from tbl.
Usage
info_columns_from_tbl(x, tbl, .add = TRUE)info_columns_from_tbl(x, tbl, .add = TRUE)
Arguments
x |
The pointblank informant object
A pointblank informant object that is commonly created through the
use of the |
tbl |
Metadata table with column information
The two-column data frame which contains metadata about the target table in the informant object. |
.add |
Add to existing info text
Should new text be added to existing text? This is |
Value
A ptblank_informant object.
Examples
Create a pointblank informant object with create_informant(). We can
specify a tbl with the ~ followed by a statement that gets the
game_revenue dataset.
informant <-
create_informant(
tbl = ~ game_revenue,
tbl_name = "game_revenue",
label = "An example."
)
We can add info text to describe the data in the various columns of the
table by using info_columns() or information in another table (with
info_columns_from_tbl()). Here, we'll do the latter. The
game_revenue_info dataset is included in pointblank and it contains
metadata for game_revenue.
game_revenue_info #> # A tibble: 11 x 2 #> column info #> <chr> <chr> #> 1 player_id A `character` column with unique identifiers for each user/~ #> 2 session_id A `character` column that contains unique identifiers for e~ #> 3 session_start A date-time column that indicates when the session (contain~ #> 4 time A date-time column that indicates exactly when the player p~ #> 5 item_type A `character` column that provides the class of the item pu~ #> 6 item_name A `character` column that provides the name of the item pur~ #> 7 item_revenue A `numeric` column with the revenue amounts per item purcha~ #> 8 session_duration A `numeric` column that states the length of the session (i~ #> 9 start_day A `Date` column that provides the date of first login for t~ #> 10 acquisition A `character` column that provides the method of acquisitio~ #> 11 country A `character` column that provides the probable country of ~
The info_columns_from_tbl() function takes a table object where the first
column has the column names and the second contains the info text.
informant <- informant %>% info_columns_from_tbl(tbl = game_revenue_info)
Upon printing the informant object, we see the additions made to the
'Columns' section by the info_columns_from_tbl(tbl = game_revenue_info)
call.
informant

We can continue to add more info text to describe the columns since the
process is additive. The info_columns_from_tbl() function populates the
info subsection and any calls of info_columns() that also target a info
subsection will append text. Here, we'll add content for the item_revenue
and acquisition columns and view the updated report.
informant <-
informant %>%
info_columns(
columns = item_revenue,
info = "Revenue reported in USD."
) %>%
info_columns(
columns = acquisition,
`top list` = "{top5_aq}"
) %>%
info_snippet(
snippet_name = "top5_aq",
fn = snip_list(column = "acquisition")
) %>%
incorporate()
informant

Function ID
3-3
See Also
The info_columns() function, which allows for manual entry of
info text.
Other Information Functions:
info_columns(),
info_section(),
info_snippet(),
info_tabular(),
snip_highest(),
snip_list(),
snip_lowest(),
snip_stats()
Add information that focuses on some key aspect of the data table
Description
While the info_tabular() and info_columns() functions allow us to
add/modify info text for specific sections, the info_section() makes it
possible to add sections of our own choosing and the information that make
sense for those sections. Define a section_name and provide a series of
named arguments (in the form entry_name = "The *info text*.") to build the
informational content for that section.
Usage
info_section(x, section_name, ...)info_section(x, section_name, ...)
Arguments
x |
The pointblank informant object
A pointblank informant object that is commonly created through the
use of the |
section_name |
The section name
The name of the section for which this information pertains. |
... |
Information entries
Information entries as a series of named arguments. The names refer to
subsection titles within the section defined as |
Value
A ptblank_informant object.
Info Text
The info text that's used for any of the info_*() functions readily
accepts Markdown formatting, and, there are a few Text Tricks that can be
used to spice up the presentation. Markdown links written as < link url >
or [ link text ]( link url ) will get nicely-styled links. Any dates
expressed in the ISO-8601 standard with parentheses, "(2004-12-01)", will
be styled with a font variation (monospaced) and underlined in purple. Spans
of text can be converted to label-style text by using: (1) double parentheses
around text for a rectangular border as in ((label text)), or (2) triple
parentheses around text for a rounded-rectangular border like (((label text))).
CSS style rules can be applied to spans of info text with the following form:
[[ info text ]]<< CSS style rules >>
As an example of this in practice suppose you'd like to change the color of some text to red and make the font appear somewhat thinner. A variation on the following might be used:
"This is a [[factor]]<<color: red; font-weight: 300;>> value."
The are quite a few CSS style rules that can be used to great effect. Here are a few you might like:
-
color: <a color value>;(text color) -
background-color: <a color value>;(the text's background color) -
text-decoration: (overline | line-through | underline); -
text-transform: (uppercase | lowercase | capitalize); -
letter-spacing: <a +/- length value>; -
word-spacing: <a +/- length value>; -
font-style: (normal | italic | oblique); -
font-weight: (normal | bold | 100-900); -
font-variant: (normal | bold | 100-900); -
border: <a color value> <a length value> (solid | dashed | dotted);
In the above examples, 'length value' refers to a CSS length which can be
expressed in different units of measure (e.g., 12px, 1em, etc.). Some
lengths can be expressed as positive or negative values (e.g., for
letter-spacing). Color values can be expressed in a few ways, the most
common being in the form of hexadecimal color values or as CSS color names.
YAML
A pointblank informant can be written to YAML with yaml_write() and the
resulting YAML can be used to regenerate an informant (with
yaml_read_informant()) or perform the 'incorporate' action using the target
table (via yaml_informant_incorporate()). Extra sections (i.e., neither the
table nor the columns sections) can be generated and filled with info
text by using one or more calls of info_section(). This is how it is
expressed in both R code and in the YAML representation.
# R statement
informant %>%
info_section(
section_name = "History",
Changes = "
- Change 1
- Change 2
- Change 3",
`Last Update` = "(2020-10-23) at 3:28 PM."
) %>%
info_section(
section_name = "Additional Notes",
`Notes 1` = "Notes with a {snippet}.",
`Notes 2` = "**Bold notes**."
)
# YAML representation
History:
Changes: |2-
- Change 1
- Change 2
- Change 3
Last Update: (2020-10-23) at 3:28 PM.
Additional Notes:
Notes 1: Notes with a {snippet}.
Notes 2: '**Bold notes**.'
Subsections represented as column names are automatically generated when
creating an informant. Within each of the top-level sections (i.e., History
and Additional Notes) there can be multiple subsections used for holding
info text.
It's safest to use single quotation marks around any info text if directly
editing it in a YAML file. Note that Markdown formatting and info snippet
placeholders (shown here as {snippet}, see info_snippet() for more
information) are preserved in the YAML. The Markdown to HTML conversion is
done when printing an informant (or invoking get_informant_report() on an
informant) and the processing of snippets (generation and insertion) is
done when using the incorporate() function. Thus, the source text is always
maintained in the YAML representation and is never written in processed form.
Examples
Create a pointblank informant object with create_informant(). We can
specify a tbl with the ~ followed by a statement that gets the
small_table dataset.
informant <-
create_informant(
tbl = ~ small_table,
tbl_name = "small_table",
label = "An example."
)
An informant typically has the 'Table' and 'Columns' sections. We can also
create entirely different sections (that follow these) with their
own properties using the info_section() function. Let's create a subsection
in the report called "Notes" and add text to two parts of that:
"creation" and "usage".
informant <-
informant %>%
info_section(
section_name = "Notes",
creation = "Dataset generated on (2020-01-15).",
usage = "`small_table %>% dplyr::glimpse()`"
) %>%
incorporate()
Upon printing the informant object, we see the addition of the 'Notes'
section and its own information.
informant

Function ID
3-4
See Also
Other Information Functions:
info_columns(),
info_columns_from_tbl(),
info_snippet(),
info_tabular(),
snip_highest(),
snip_list(),
snip_lowest(),
snip_stats()
Generate a useful text 'snippet' from the target table
Description
Getting little snippets of information from a table goes hand-in-hand with
mixing those bits of info with your table info. Call info_snippet() to
define a snippet and how you'll get that from the target table. The snippet
definition is supplied either with a formula, or, with a
pointblank-supplied snip_*() function. So long as you know how to
interact with a table and extract information, you can easily define snippets
for a informant object. And once those snippets are defined, you can insert
them into the info text as defined through the other info_*() functions
(info_tabular(), info_columns(), and info_section()). Use curly braces
with just the snippet_name inside (e.g., "This column has {n_cat} categories.").
Usage
info_snippet(x, snippet_name, fn)info_snippet(x, snippet_name, fn)
Arguments
x |
The pointblank informant object
A pointblank informant object that is commonly created through the
use of the |
snippet_name |
The snippet name
The name for snippet, which is used for interpolating the result of the
snippet formula into info text defined by an |
fn |
Function for snippet text generation
A formula that obtains a snippet of data from the target table. It's best
to use a leading dot ( |
Value
A ptblank_informant object.
Snip functions provided in pointblank
For convenience, there are several snip_*() functions provided in the
package that work on column data from the informant's target table. These
are:
-
snip_list(): get a list of column categories -
snip_stats(): get an inline statistical summary -
snip_lowest(): get the lowest value from a column -
snip_highest(): get the highest value from a column
As it's understood what the target table is, only the column in each of
these functions is necessary for obtaining the resultant text.
YAML
A pointblank informant can be written to YAML with yaml_write() and the
resulting YAML can be used to regenerate an informant (with
yaml_read_informant()) or perform the 'incorporate' action using the target
table (via yaml_informant_incorporate()). Snippets are stored in the YAML
representation and here is is how they are expressed in both R code and in
the YAML output (showing both the meta_snippets and columns keys to
demonstrate their relationship here).
# R statement
informant %>%
info_columns(
columns = date_time,
`Latest Date` = "The latest date is {latest_date}."
) %>%
info_snippet(
snippet_name = "latest_date",
fn = ~ . %>% dplyr::pull(date) %>% max(na.rm = TRUE)
) %>%
incorporate()
# YAML representation
meta_snippets:
latest_date: ~. %>% dplyr::pull(date) %>% max(na.rm = TRUE)
...
columns:
date_time:
_type: POSIXct, POSIXt
Latest Date: The latest date is {latest_date}.
date:
_type: Date
item_count:
_type: integer
Examples
Take the small_table dataset included in pointblank and assign it to
test_table. We'll modify it later.
test_table <- small_table
Generate an informant object, add two snippets with info_snippet(),
add information with some other info_*() functions and then incorporate()
the snippets into the info text. The first snippet will be made with the
expression ~ . %>% nrow() (giving us the number of rows in the dataset) and
the second uses the snip_highest() function with column a (giving us
the highest value in that column).
informant <-
create_informant(
tbl = ~ test_table,
tbl_name = "test_table",
label = "An example."
) %>%
info_snippet(
snippet_name = "row_count",
fn = ~ . %>% nrow()
) %>%
info_snippet(
snippet_name = "max_a",
fn = snip_highest(column = "a")
) %>%
info_columns(
columns = a,
info = "In the range of 1 to {max_a}. ((SIMPLE))"
) %>%
info_columns(
columns = starts_with("date"),
info = "Time-based values (e.g., `Sys.time()`)."
) %>%
info_columns(
columns = date,
info = "The date part of `date_time`. ((CALC))"
) %>%
info_section(
section_name = "rows",
row_count = "There are {row_count} rows available."
) %>%
incorporate()
We can print the informant object to see the information report.
informant

Let's modify test_table with some dplyr to give it more rows and an
extra column.
test_table <- dplyr::bind_rows(test_table, test_table) %>% dplyr::mutate(h = a + c)
Using incorporate() on the informant object will cause the snippets to be
reprocessed, and, the info text to be updated.
informant <- informant %>% incorporate() informant

Function ID
3-5
See Also
Other Information Functions:
info_columns(),
info_columns_from_tbl(),
info_section(),
info_tabular(),
snip_highest(),
snip_list(),
snip_lowest(),
snip_stats()
Add information that focuses on aspects of the data table as a whole
Description
When an informant object is created with the create_informant() function,
it has two starter sections: (1) 'table' and (2) 'columns'. The 'table'
section should contain a few properties upon creation, such as the supplied
table name (name) and table dimensions (as _columns and _rows). We can
add more table-based properties with the info_tabular() function. By
providing a series of named arguments (in the form entry_name = "The *info text*."), we can add more information that makes sense for describing the
table as a whole.
Usage
info_tabular(x, ...)info_tabular(x, ...)
Arguments
x |
The pointblank informant object
A pointblank informant object that is commonly created through the
use of the |
... |
Information entries
Information entries as a series of named arguments. The names refer to
subsection titles within the |
Value
A ptblank_informant object.
Info Text
The info text that's used for any of the info_*() functions readily
accepts Markdown formatting, and, there are a few Text Tricks that can be
used to spice up the presentation. Markdown links written as < link url >
or [ link text ]( link url ) will get nicely-styled links. Any dates
expressed in the ISO-8601 standard with parentheses, "(2004-12-01)", will
be styled with a font variation (monospaced) and underlined in purple. Spans
of text can be converted to label-style text by using: (1) double parentheses
around text for a rectangular border as in ((label text)), or (2) triple
parentheses around text for a rounded-rectangular border like (((label text))).
CSS style rules can be applied to spans of info text with the following form:
[[ info text ]]<< CSS style rules >>
As an example of this in practice suppose you'd like to change the color of some text to red and make the font appear somewhat thinner. A variation on the following might be used:
"This is a [[factor]]<<color: red; font-weight: 300;>> value."
The are quite a few CSS style rules that can be used to great effect. Here are a few you might like:
-
color: <a color value>;(text color) -
background-color: <a color value>;(the text's background color) -
text-decoration: (overline | line-through | underline); -
text-transform: (uppercase | lowercase | capitalize); -
letter-spacing: <a +/- length value>; -
word-spacing: <a +/- length value>; -
font-style: (normal | italic | oblique); -
font-weight: (normal | bold | 100-900); -
font-variant: (normal | bold | 100-900); -
border: <a color value> <a length value> (solid | dashed | dotted);
In the above examples, 'length value' refers to a CSS length which can be
expressed in different units of measure (e.g., 12px, 1em, etc.). Some
lengths can be expressed as positive or negative values (e.g., for
letter-spacing). Color values can be expressed in a few ways, the most
common being in the form of hexadecimal color values or as CSS color names.
YAML
A pointblank informant can be written to YAML with yaml_write() and the
resulting YAML can be used to regenerate an informant (with
yaml_read_informant()) or perform the 'incorporate' action using the target
table (via yaml_informant_incorporate()). When info_tabular() is
represented in YAML, info text goes into subsections of the top-level
table key. Here is an example of how a call of info_tabular() is
expressed in R code and in the corresponding YAML representation.
R statement:
informant %>%
info_tabular(
section_1 = "*info text* 1.",
`section 2` = "*info text* 2 and {snippet_1}"
)
YAML representation:
table:
_columns: 23
_rows: 205.0
_type: tbl_df
section_1: '*info text* 1.'
section 2: '*info text* 2 and {snippet_1}'
Subsection titles as defined in info_tabular() can be set in backticks if
they are not syntactically correct as an argument name without them (e.g.,
when using spaces, hyphens, etc.).
It's safest to use single quotation marks around any info text if directly
editing it in a YAML file. Note that Markdown formatting and info snippet
placeholders (shown here as {snippet_1}, see info_snippet() for more
information) are preserved in the YAML. The Markdown to HTML conversion is
done when printing an informant (or invoking get_informant_report() on an
informant) and the processing of snippets (generation and insertion) is
done when using the incorporate() function. Thus, the source text is always
maintained in the YAML representation and is never written in processed form.
Examples
Create a pointblank informant object with create_informant(). We can
specify a tbl with the ~ followed by a statement that gets the
small_table dataset.
informant <-
create_informant(
tbl = ~ small_table,
tbl_name = "small_table",
label = "An example."
)
We can add info text to describe the table with the various info_*()
functions. In this example, we'll use info_tabular() to generally describe
the small_table dataset.
informant <-
informant %>%
info_tabular(
`Row Definition` = "A row has randomized values.",
Source = c(
"- From the **pointblank** package.",
"- [https://rstudio.github.io/pointblank/]()"
)
)
Upon printing the informant object, we see the additions made to the
'Table' section of the report.
informant
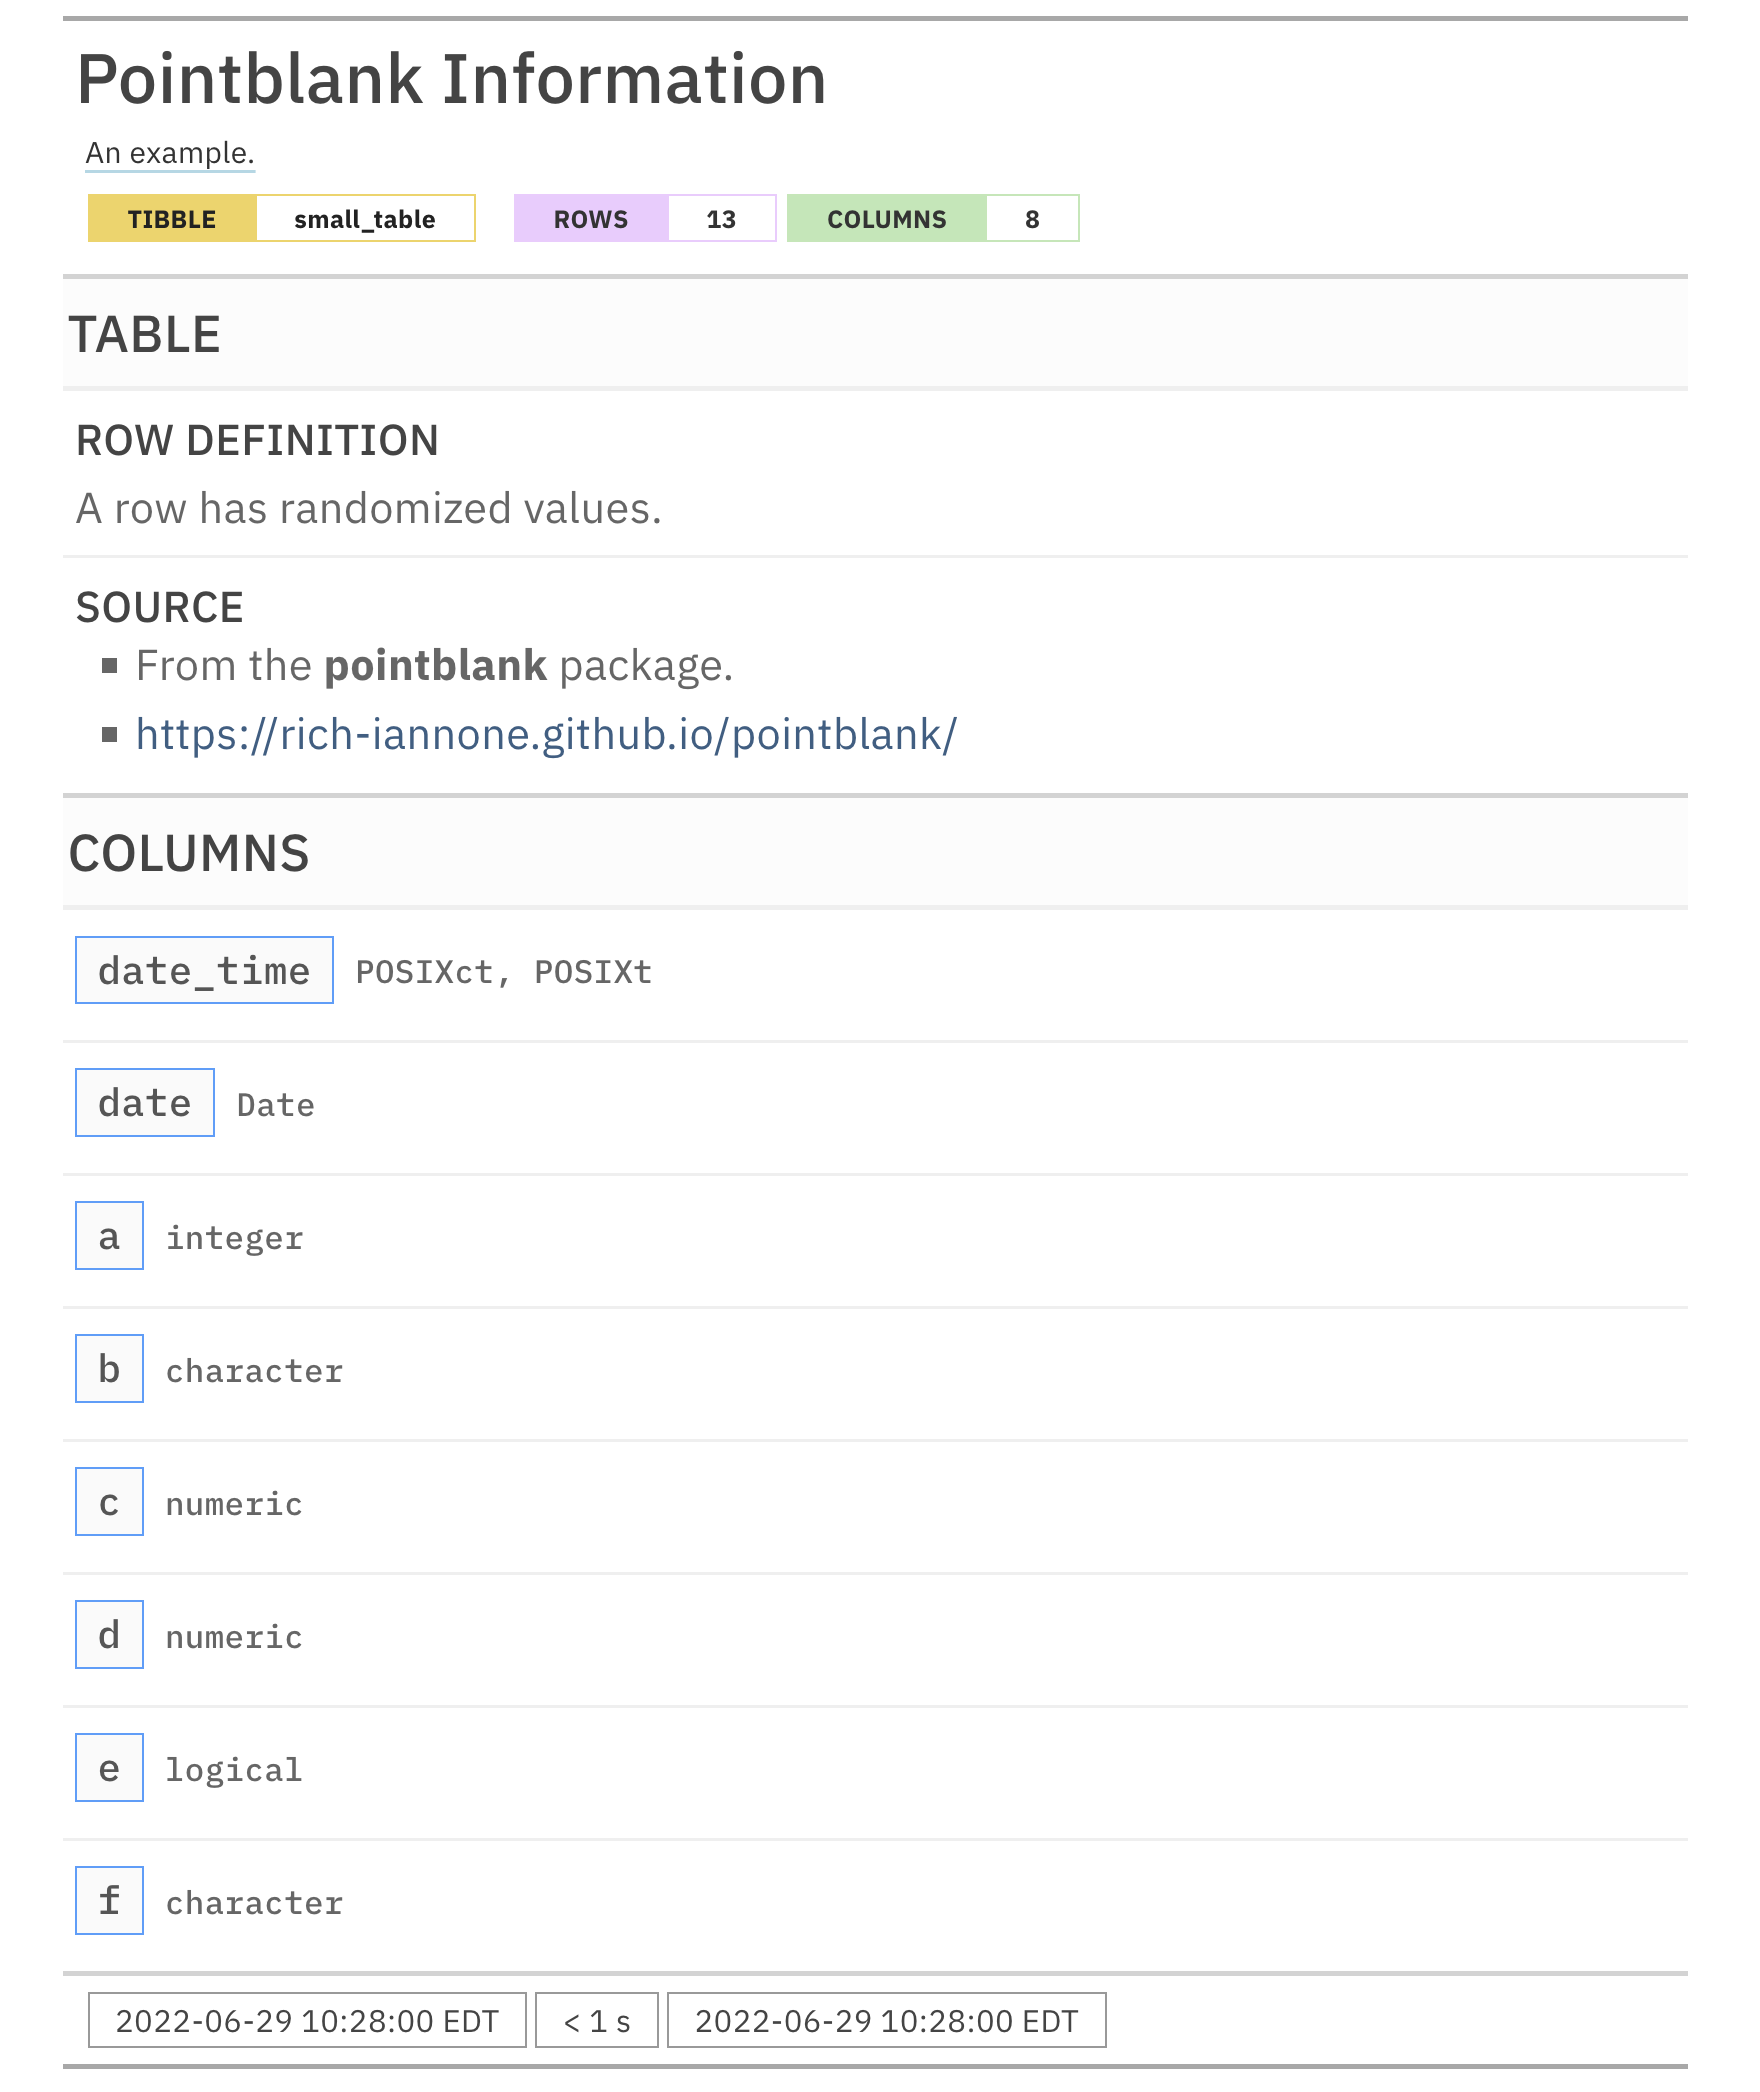
Function ID
3-1
See Also
Other Information Functions:
info_columns(),
info_columns_from_tbl(),
info_section(),
info_snippet(),
snip_highest(),
snip_list(),
snip_lowest(),
snip_stats()
Given an agent that has a validation plan, perform an interrogation
Description
When the agent has all the information on what to do (i.e., a validation plan
which is a series of validation steps), the interrogation process can occur
according its plan. After that, the agent will have gathered intel, and we
can use functions like get_agent_report() and all_passed() to understand
how the interrogation went down.
Usage
interrogate( agent, extract_failed = TRUE, extract_tbl_checked = TRUE, get_first_n = NULL, sample_n = NULL, sample_frac = NULL, sample_limit = 5000, show_step_label = FALSE, progress = interactive() )interrogate( agent, extract_failed = TRUE, extract_tbl_checked = TRUE, get_first_n = NULL, sample_n = NULL, sample_frac = NULL, sample_limit = 5000, show_step_label = FALSE, progress = interactive() )
Arguments
agent |
The pointblank agent object
A pointblank agent object that is commonly created through the use of
the |
extract_failed |
Collect failed rows as data extracts
An option to collect rows that didn't pass a particular validation step.
The default is |
extract_tbl_checked |
Collect validation results from each step
An option to collect processed data frames produced by executing the
validation steps. This information is necessary for some functions
(e.g., |
get_first_n |
Get the first n values
If the option to collect non-passing rows is chosen, there is the option
here to collect the first |
sample_n |
Sample n values
If the option to collect non-passing rows is chosen, this option allows for
the sampling of |
sample_frac |
Sample a fraction of values
If the option to collect non-passing rows is chosen, this option allows for
the sampling of a fraction of those rows. Provide a number in the range of
|
sample_limit |
Row limit for sampling
A value that limits the possible number of rows returned when sampling
non-passing rows using the |
show_step_label |
Show step labels in progress
Whether to show the |
progress |
Show interrogation progress
Whether to show the progress of an agent's interrogation in the console.
Defaults to |
Value
A ptblank_agent object.
Examples
Create a simple table with two columns of numerical values.
tbl <-
dplyr::tibble(
a = c(5, 7, 6, 5, 8, 7),
b = c(7, 1, 0, 0, 0, 3)
)
tbl
#> # A tibble: 6 x 2
#> a b
#> <dbl> <dbl>
#> 1 5 7
#> 2 7 1
#> 3 6 0
#> 4 5 0
#> 5 8 0
#> 6 7 3
Validate that values in column a from tbl are always less than 5. Using
interrogate() carries out the validation plan and completes the whole
process.
agent <-
create_agent(
tbl = tbl,
label = "`interrogate()` example"
) %>%
col_vals_gt(columns = a, value = 5) %>%
interrogate()
We can print the resulting object to see the validation report.
agent

Function ID
6-1
See Also
Other Interrogate and Report:
get_agent_report()
Enable logging of failure conditions at the validation step level
Description
The log4r_step() function can be used as an action in the action_levels()
function (as a list component for the fns list). Place a call to this
function in every failure condition that should produce a log (i.e., warn,
stop, notify). Only the failure condition with the highest severity for a
given validation step will produce a log entry (skipping failure conditions
with lower severity) so long as the call to log4r_step() is present.
Usage
log4r_step(x, message = NULL, append_to = "pb_log_file")log4r_step(x, message = NULL, append_to = "pb_log_file")
Arguments
x |
A reference to the x-list object prepared by the |
message |
The message to use for the log entry. When not provided, a
default glue string is used for the messaging. This is dynamic since the
internal |
append_to |
The file to which log entries at the warn level are appended. This can alternatively be one or more log4r appenders. |
Value
Nothing is returned however log files may be written in very specific conditions.
YAML
A pointblank agent can be written to YAML with yaml_write() and the
resulting YAML can be used to regenerate an agent (with yaml_read_agent())
or interrogate the target table (via yaml_agent_interrogate()). Here is an
example of how log4r_step() can be expressed in R code (within
action_levels(), itself inside create_agent()) and in the corresponding
YAML representation.
R statement:
create_agent(
tbl = ~ small_table,
tbl_name = "small_table",
label = "An example.",
actions = action_levels(
warn_at = 1,
fns = list(
warn = ~ log4r_step(
x, append_to = "example_log"
)
)
)
)
YAML representation:
type: agent
tbl: ~small_table
tbl_name: small_table
label: An example.
lang: en
locale: en
actions:
warn_count: 1.0
fns:
warn: ~log4r_step(x, append_to = "example_log")
steps: []
Should you need to preview the transformation of an agent to YAML (without
any committing anything to disk), use the yaml_agent_string() function. If
you already have a .yml file that holds an agent, you can get a glimpse
of the R expressions that are used to regenerate that agent with
yaml_agent_show_exprs().
Examples
For the example provided here, we'll use the included small_table dataset.
We are also going to create an action_levels() list object since this is
useful for demonstrating a logging scenario. It will have a threshold for
the warn state, and, an associated function that should be invoked
whenever the warn state is entered. Here, the function call with
log4r_step() will be invoked whenever there is one failing test unit.
al <-
action_levels(
warn_at = 1,
fns = list(
warn = ~ log4r_step(
x, append_to = "example_log"
)
)
)
Within the action_levels()-produced object, it's important to match things
up: notice that warn_at is given a threshold and the list of functions
given to fns has a warn component.
Printing al will show us the settings for the action_levels object:
al #> -- The `action_levels` settings #> WARN failure threshold of 1test units. #> \fns\ ~ log4r_step(x, append_to = "example_log") #> ----
Let's create an agent with small_table as the target table. We'll apply the
action_levels object created above as al, add two validation steps, and
then interrogate() the data.
agent <-
create_agent(
tbl = ~ small_table,
tbl_name = "small_table",
label = "An example.",
actions = al
) %>%
col_vals_gt(columns = d, 300) %>%
col_vals_in_set(columns = f, c("low", "high")) %>%
interrogate()
agent
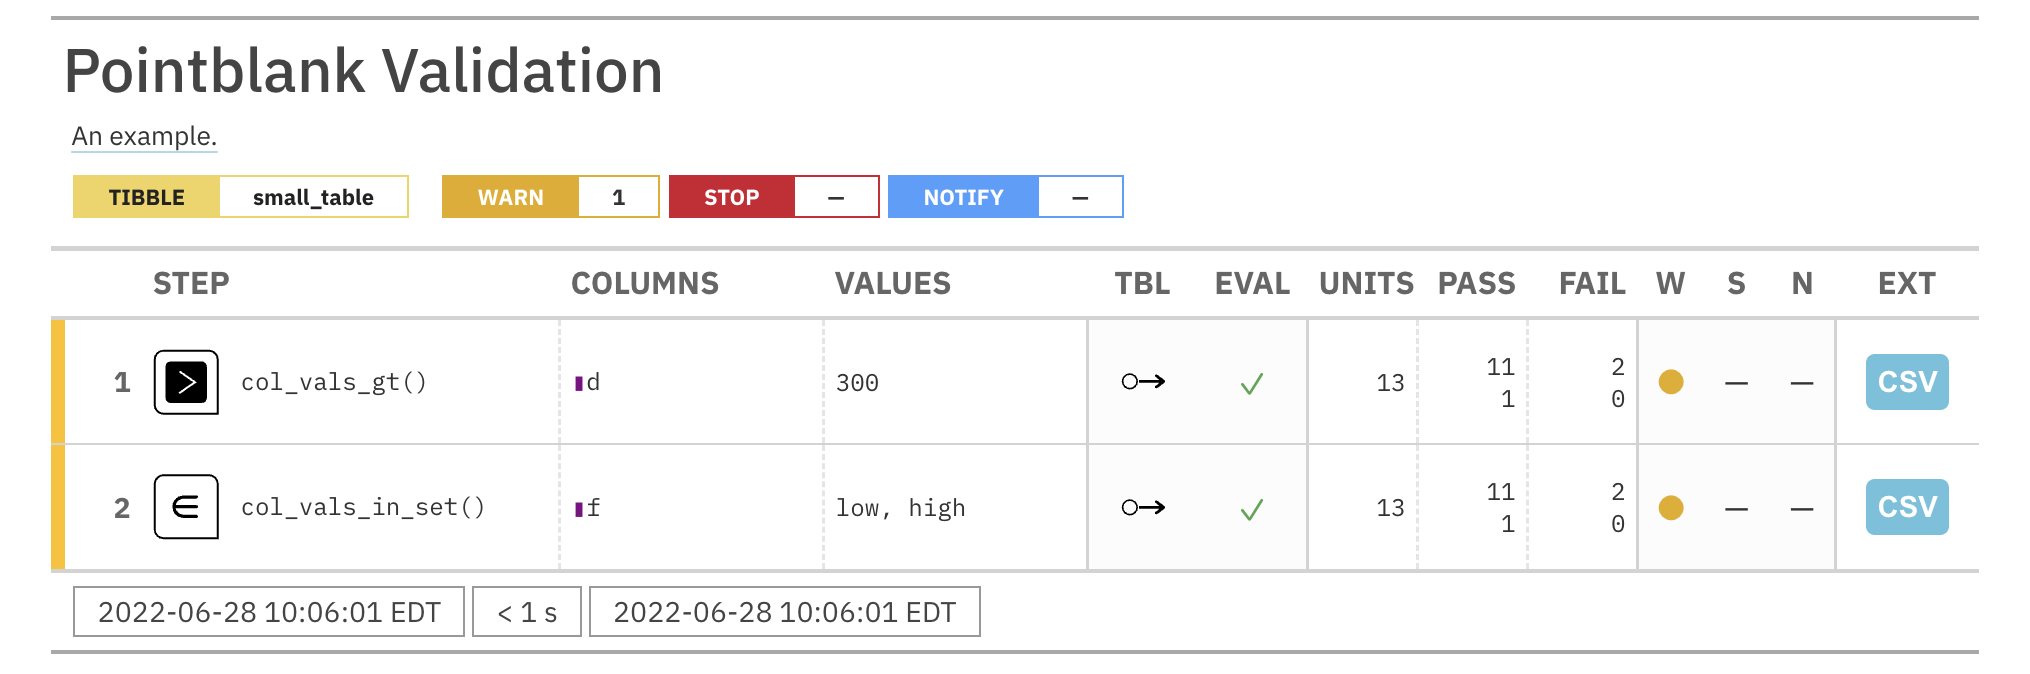
From the agent report, we can see that both steps have yielded warnings upon
interrogation (i.e., filled yellow circles in the W column).
What's not immediately apparent is that when entering the warn state
in each validation step during interrogation, the log4r_step() function
call was twice invoked! This generated an "example_log" file in the working
directory (since it was not present before the interrogation) and log entries
were appended to the file. Here are the contents of the file:
WARN [2022-06-28 10:06:01] Step 1 exceeded the WARN failure threshold (f_failed = 0.15385) ['col_vals_gt'] WARN [2022-06-28 10:06:01] Step 2 exceeded the WARN failure threshold (f_failed = 0.15385) ['col_vals_in_set']
Function ID
5-1
Read pointblank agents stored on disk as a multiagent
Description
An agent or informant can be written to disk with the x_write_disk()
function. While useful for later retrieving the stored agent with
x_read_disk() it's also possible to read a series of on-disk agents with
the read_disk_multiagent() function, which creates a ptblank_multiagent
object. A multiagent object can also be generated via the
create_multiagent() function but is less convenient to use if one is just
using agents that have been previously written to disk.
Usage
read_disk_multiagent(filenames = NULL, pattern = NULL, path = NULL)read_disk_multiagent(filenames = NULL, pattern = NULL, path = NULL)
Arguments
filenames |
File names
The names of files (holding agent objects) that were previously written
by |
pattern |
Regex pattern
A regex pattern for accessing saved-to-disk agent files located in a
directory (specified in the |
path |
File path
A path to a collection of files. This is either optional in the case that
files are specified in |
Value
A ptblank_multiagent object.
Function ID
10-2
See Also
Other The multiagent:
create_multiagent(),
get_multiagent_report()
Remove one or more of an agent's validation steps
Description
Validation steps can be removed from an agent object through use of the
remove_steps() function. This is useful, for instance, when getting an
agent from disk (via the x_read_disk() function) and omitting one or more
steps from the agent's validation plan. Please note that when removing
validation steps all stored data extracts will be removed from the agent.
Usage
remove_steps(agent, i = NULL)remove_steps(agent, i = NULL)
Arguments
agent |
The pointblank agent object
A pointblank agent object that is commonly created through the use of
the |
i |
A validation step number
The validation step number, which is assigned to each validation step in
the order of definition. If |
Value
A ptblank_agent object.
A ptblank_agent object.
Function ID
9-7
See Also
Instead of removal, the deactivate_steps() function will simply
change the active status of one or more validation steps to FALSE (and
activate_steps() will do the opposite).
Other Object Ops:
activate_steps(),
deactivate_steps(),
export_report(),
set_tbl(),
x_read_disk(),
x_write_disk()
Examples
# Create an agent that has the # `small_table` object as the # target table, add a few # validation steps, and then use # `interrogate()` agent_1 <- create_agent( tbl = small_table, tbl_name = "small_table", label = "An example." ) %>% col_exists(columns = date) %>% col_vals_regex( columns = b, regex = "[0-9]-[a-z]{3}-[0-9]" ) %>% interrogate() # The second validation step has # been determined to be unneeded and # is to be removed; this can be done # by using `remove_steps()` with the # agent object agent_2 <- agent_1 %>% remove_steps(i = 2) %>% interrogate()# Create an agent that has the # `small_table` object as the # target table, add a few # validation steps, and then use # `interrogate()` agent_1 <- create_agent( tbl = small_table, tbl_name = "small_table", label = "An example." ) %>% col_exists(columns = date) %>% col_vals_regex( columns = b, regex = "[0-9]-[a-z]{3}-[0-9]" ) %>% interrogate() # The second validation step has # been determined to be unneeded and # is to be removed; this can be done # by using `remove_steps()` with the # agent object agent_2 <- agent_1 %>% remove_steps(i = 2) %>% interrogate()
Does the row count match that of a different table?
Description
The row_count_match() validation function, the expect_row_count_match()
expectation function, and the test_row_count_match() test function all
check whether the row count in the target table matches that of a comparison
table. The validation function can be used directly on a data table or with
an agent object (technically, a ptblank_agent object) whereas the
expectation and test functions can only be used with a data table. As a
validation step or as an expectation, there is a single test unit that hinges
on whether the row counts for the two tables are the same (after any
preconditions have been applied).
Usage
row_count_match( x, count, preconditions = NULL, segments = NULL, actions = NULL, step_id = NULL, label = NULL, brief = NULL, active = TRUE, tbl_compare = NULL ) expect_row_count_match( object, count, preconditions = NULL, threshold = 1, tbl_compare = NULL ) test_row_count_match( object, count, preconditions = NULL, threshold = 1, tbl_compare = NULL )row_count_match( x, count, preconditions = NULL, segments = NULL, actions = NULL, step_id = NULL, label = NULL, brief = NULL, active = TRUE, tbl_compare = NULL ) expect_row_count_match( object, count, preconditions = NULL, threshold = 1, tbl_compare = NULL ) test_row_count_match( object, count, preconditions = NULL, threshold = 1, tbl_compare = NULL )
Arguments
x |
A pointblank agent or a data table
A data frame, tibble ( |
count |
The count comparison
Either a literal value for the number of rows, or, a table to compare
against the target table in terms of row count values. If supplying a
comparison table, it can either be a table object such as a data frame, a
tibble, a |
preconditions |
Input table modification prior to validation
An optional expression for mutating the input table before proceeding with
the validation. This can either be provided as a one-sided R formula using
a leading |
segments |
Expressions for segmenting the target table
An optional expression or set of expressions (held in a list) that serve to segment the target table by column values. Each expression can be given in one of two ways: (1) as column names, or (2) as a two-sided formula where the LHS holds a column name and the RHS contains the column values to segment on. See the Segments section for more details on this. |
actions |
Thresholds and actions for different states
A list containing threshold levels so that the validation step can react
accordingly when exceeding the set levels for different states. This is to
be created with the |
step_id |
Manual setting of the step ID value
One or more optional identifiers for the single or multiple validation
steps generated from calling a validation function. The use of step IDs
serves to distinguish validation steps from each other and provide an
opportunity for supplying a more meaningful label compared to the step
index. By default this is |
label |
Optional label for the validation step
Optional label for the validation step. This label appears in the agent report and, for the best appearance, it should be kept quite short. See the Labels section for more information. |
brief |
Brief description for the validation step
A brief is a short, text-based description for the validation step. If
nothing is provided here then an autobrief is generated by the agent,
using the language provided in |
active |
Is the validation step active?
A logical value indicating whether the validation step should be active. If
the validation function is working with an agent, |
tbl_compare |
Deprecated Comparison table
The |
object |
A data table for expectations or tests
A data frame, tibble ( |
threshold |
The failure threshold
A simple failure threshold value for use with the expectation ( |
Value
For the validation function, the return value is either a
ptblank_agent object or a table object (depending on whether an agent
object or a table was passed to x). The expectation function invisibly
returns its input but, in the context of testing data, the function is
called primarily for its potential side-effects (e.g., signaling failure).
The test function returns a logical value.
Supported Input Tables
The types of data tables that are officially supported are:
-
data frames (
data.frame) and tibbles (tbl_df) -
Spark DataFrames (
tbl_spark) -
the following database tables (
tbl_dbi):-
PostgreSQL tables (using the
RPostgres::Postgres()as driver) -
MySQL tables (with
RMySQL::MySQL()) -
Microsoft SQL Server tables (via odbc)
-
BigQuery tables (using
bigrquery::bigquery()) -
DuckDB tables (through
duckdb::duckdb()) -
SQLite (with
RSQLite::SQLite())
-
Other database tables may work to varying degrees but they haven't been formally tested (so be mindful of this when using unsupported backends with pointblank).
Preconditions
Providing expressions as preconditions means pointblank will preprocess
the target table during interrogation as a preparatory step. It might happen
that this particular validation requires some operation on the target table
before the row count comparison takes place. Using preconditions can be
useful at times since since we can develop a large validation plan with a
single target table and make minor adjustments to it, as needed, along the
way.
The table mutation is totally isolated in scope to the validation step(s)
where preconditions is used. Using dplyr code is suggested here since
the statements can be translated to SQL if necessary (i.e., if the target
table resides in a database). The code is most easily supplied as a one-sided
R formula (using a leading ~). In the formula representation, the .
serves as the input data table to be transformed. Alternatively, a function
could instead be supplied.
Segments
By using the segments argument, it's possible to define a particular
validation with segments (or row slices) of the target table. An optional
expression or set of expressions that serve to segment the target table by
column values. Each expression can be given in one of two ways: (1) as column
names, or (2) as a two-sided formula where the LHS holds a column name and
the RHS contains the column values to segment on.
As an example of the first type of expression that can be used,
vars(a_column) will segment the target table in however many unique values
are present in the column called a_column. This is great if every unique
value in a particular column (like different locations, or different dates)
requires it's own repeating validation.
With a formula, we can be more selective with which column values should be
used for segmentation. Using a_column ~ c("group_1", "group_2") will
attempt to obtain two segments where one is a slice of data where the value
"group_1" exists in the column named "a_column", and, the other is a
slice where "group_2" exists in the same column. Each group of rows
resolved from the formula will result in a separate validation step.
Segmentation will always occur after preconditions (i.e., statements that
mutate the target table), if any, are applied. With this type of one-two
combo, it's possible to generate labels for segmentation using an expression
for preconditions and refer to those labels in segments without having to
generate a separate version of the target table.
Actions
Often, we will want to specify actions for the validation. This argument,
present in every validation function, takes a specially-crafted list object
that is best produced by the action_levels() function. Read that function's
documentation for the lowdown on how to create reactions to above-threshold
failure levels in validation. The basic gist is that you'll want at least a
single threshold level (specified as either the fraction of test units
failed, or, an absolute value), often using the warn_at argument. Using
action_levels(warn_at = 1) or action_levels(stop_at = 1) are good choices
depending on the situation (the first produces a warning, the other
stop()s).
Labels
label may be a single string or a character vector that matches the number
of expanded steps. label also supports {glue} syntax and exposes the
following dynamic variables contextualized to the current step:
-
"{.step}": The validation step name -
"{.seg_col}": The current segment's column name -
"{.seg_val}": The current segment's value/group
The glue context also supports ordinary expressions for further flexibility
(e.g., "{toupper(.step)}") as long as they return a length-1 string.
Briefs
Want to describe this validation step in some detail? Keep in mind that this
is only useful if x is an agent. If that's the case, brief the agent
with some text that fits. Don't worry if you don't want to do it. The
autobrief protocol is kicked in when brief = NULL and a simple brief will
then be automatically generated.
YAML
A pointblank agent can be written to YAML with yaml_write() and the
resulting YAML can be used to regenerate an agent (with yaml_read_agent())
or interrogate the target table (via yaml_agent_interrogate()). When
row_count_match() is represented in YAML (under the top-level steps key
as a list member), the syntax closely follows the signature of the validation
function. Here is an example of how a complex call of row_count_match() as
a validation step is expressed in R code and in the corresponding YAML
representation.
R statement:
agent %>%
row_count_match(
count = ~ file_tbl(
file = from_github(
file = "sj_all_revenue_large.rds",
repo = "rich-iannone/intendo",
subdir = "data-large"
)
),
preconditions = ~ . %>% dplyr::filter(a < 10),
segments = b ~ c("group_1", "group_2"),
actions = action_levels(warn_at = 0.1, stop_at = 0.2),
label = "The `row_count_match()` step.",
active = FALSE
)
YAML representation:
steps:
- row_count_match:
count: ~ file_tbl(
file = from_github(
file = "sj_all_revenue_large.rds",
repo = "rich-iannone/intendo",
subdir = "data-large"
)
)
preconditions: ~. %>% dplyr::filter(a < 10)
segments: b ~ c("group_1", "group_2")
actions:
warn_fraction: 0.1
stop_fraction: 0.2
label: The `row_count_match()` step.
active: false
In practice, both of these will often be shorter. Arguments with default
values won't be written to YAML when using yaml_write() (though it is
acceptable to include them with their default when generating the YAML by
other means). It is also possible to preview the transformation of an agent
to YAML without any writing to disk by using the yaml_agent_string()
function.
Examples
Create a simple table with three columns and four rows of values.
tbl <-
dplyr::tibble(
a = c(5, 7, 6, 5),
b = c(7, 1, 0, 0),
c = c(1, 1, 1, 3)
)
tbl
#> # A tibble: 4 x 3
#> a b c
#> <dbl> <dbl> <dbl>
#> 1 5 7 1
#> 2 7 1 1
#> 3 6 0 1
#> 4 5 0 3
Create a second table which is quite different but has the same number of
rows as tbl.
tbl_2 <-
dplyr::tibble(
e = c("a", NA, "a", "c"),
f = c(2.6, 1.2, 0, NA)
)
tbl_2
#> # A tibble: 4 x 2
#> e f
#> <chr> <dbl>
#> 1 a 2.6
#> 2 <NA> 1.2
#> 3 a 0
#> 4 c NA
A: Using an agent with validation functions and then interrogate()
Validate that the count of rows in the target table (tbl) matches that of
the comparison table (tbl_2).
agent <- create_agent(tbl = tbl) %>% row_count_match(count = tbl_2) %>% interrogate()
Printing the agent in the console shows the validation report in the
Viewer. Here is an excerpt of validation report, showing the single entry
that corresponds to the validation step demonstrated here.

B: Using the validation function directly on the data (no agent)
This way of using validation functions acts as a data filter. Data is passed
through but should stop() if there is a single test unit failing. The
behavior of side effects can be customized with the actions option.
tbl %>% row_count_match(count = tbl_2) #> # A tibble: 4 x 3 #> a b c #> <dbl> <dbl> <dbl> #> 1 5 7 1 #> 2 7 1 1 #> 3 6 0 1 #> 4 5 0 3
C: Using the expectation function
With the expect_*() form, we would typically perform one validation at a
time. This is primarily used in testthat tests.
expect_row_count_match(tbl, count = tbl_2)
D: Using the test function
With the test_*() form, we should get a single logical value returned to
us.
tbl %>% test_row_count_match(count = 4) #> [1] TRUE
Function ID
2-31
See Also
Other validation functions:
col_count_match(),
col_exists(),
col_is_character(),
col_is_date(),
col_is_factor(),
col_is_integer(),
col_is_logical(),
col_is_numeric(),
col_is_posix(),
col_schema_match(),
col_vals_between(),
col_vals_decreasing(),
col_vals_equal(),
col_vals_expr(),
col_vals_gt(),
col_vals_gte(),
col_vals_in_set(),
col_vals_increasing(),
col_vals_lt(),
col_vals_lte(),
col_vals_make_set(),
col_vals_make_subset(),
col_vals_not_between(),
col_vals_not_equal(),
col_vals_not_in_set(),
col_vals_not_null(),
col_vals_null(),
col_vals_regex(),
col_vals_within_spec(),
conjointly(),
rows_complete(),
rows_distinct(),
serially(),
specially(),
tbl_match()
Are row data complete?
Description
The rows_complete() validation function, the expect_rows_complete()
expectation function, and the test_rows_complete() test function all check
whether rows contain any NA/NULL values (optionally constrained to a
selection of specified columns). The validation function can be used
directly on a data table or with an agent object (technically, a
ptblank_agent object) whereas the expectation and test functions can only
be used with a data table. As a validation step or as an expectation, this
will operate over the number of test units that is equal to the number of
rows in the table (after any preconditions have been applied).
Usage
rows_complete( x, columns = tidyselect::everything(), preconditions = NULL, segments = NULL, actions = NULL, step_id = NULL, label = NULL, brief = NULL, active = TRUE ) expect_rows_complete( object, columns = tidyselect::everything(), preconditions = NULL, threshold = 1 ) test_rows_complete( object, columns = tidyselect::everything(), preconditions = NULL, threshold = 1 )rows_complete( x, columns = tidyselect::everything(), preconditions = NULL, segments = NULL, actions = NULL, step_id = NULL, label = NULL, brief = NULL, active = TRUE ) expect_rows_complete( object, columns = tidyselect::everything(), preconditions = NULL, threshold = 1 ) test_rows_complete( object, columns = tidyselect::everything(), preconditions = NULL, threshold = 1 )
Arguments
x |
A pointblank agent or a data table
A data frame, tibble ( |
columns |
The target columns
A column-selecting expression, as one would use inside |
preconditions |
Input table modification prior to validation
An optional expression for mutating the input table before proceeding with
the validation. This can either be provided as a one-sided R formula using
a leading |
segments |
Expressions for segmenting the target table
An optional expression or set of expressions (held in a list) that serve to segment the target table by column values. Each expression can be given in one of two ways: (1) as column names, or (2) as a two-sided formula where the LHS holds a column name and the RHS contains the column values to segment on. See the Segments section for more details on this. |
actions |
Thresholds and actions for different states
A list containing threshold levels so that the validation step can react
accordingly when exceeding the set levels for different states. This is to
be created with the |
step_id |
Manual setting of the step ID value
One or more optional identifiers for the single or multiple validation
steps generated from calling a validation function. The use of step IDs
serves to distinguish validation steps from each other and provide an
opportunity for supplying a more meaningful label compared to the step
index. By default this is |
label |
Optional label for the validation step
Optional label for the validation step. This label appears in the agent report and, for the best appearance, it should be kept quite short. See the Labels section for more information. |
brief |
Brief description for the validation step
A brief is a short, text-based description for the validation step. If
nothing is provided here then an autobrief is generated by the agent,
using the language provided in |
active |
Is the validation step active?
A logical value indicating whether the validation step should be active. If
the validation function is working with an agent, |
object |
A data table for expectations or tests
A data frame, tibble ( |
threshold |
The failure threshold
A simple failure threshold value for use with the expectation ( |
Value
For the validation function, the return value is either a
ptblank_agent object or a table object (depending on whether an agent
object or a table was passed to x). The expectation function invisibly
returns its input but, in the context of testing data, the function is
called primarily for its potential side-effects (e.g., signaling failure).
The test function returns a logical value.
Supported Input Tables
The types of data tables that are officially supported are:
-
data frames (
data.frame) and tibbles (tbl_df) -
Spark DataFrames (
tbl_spark) -
the following database tables (
tbl_dbi):-
PostgreSQL tables (using the
RPostgres::Postgres()as driver) -
MySQL tables (with
RMySQL::MySQL()) -
Microsoft SQL Server tables (via odbc)
-
BigQuery tables (using
bigrquery::bigquery()) -
DuckDB tables (through
duckdb::duckdb()) -
SQLite (with
RSQLite::SQLite())
-
Other database tables may work to varying degrees but they haven't been formally tested (so be mindful of this when using unsupported backends with pointblank).
Preconditions
Providing expressions as preconditions means pointblank will preprocess
the target table during interrogation as a preparatory step. It might happen
that a particular validation requires a calculated column, some filtering of
rows, or the addition of columns via a join, etc. Especially for an
agent-based report this can be advantageous since we can develop a large
validation plan with a single target table and make minor adjustments to it,
as needed, along the way.
The table mutation is totally isolated in scope to the validation step(s)
where preconditions is used. Using dplyr code is suggested here since
the statements can be translated to SQL if necessary (i.e., if the target
table resides in a database). The code is most easily supplied as a one-sided
R formula (using a leading ~). In the formula representation, the .
serves as the input data table to be transformed (e.g., ~ . %>% dplyr::mutate(col_b = col_a + 10)). Alternatively, a function could instead
be supplied (e.g., function(x) dplyr::mutate(x, col_b = col_a + 10)).
Segments
By using the segments argument, it's possible to define a particular
validation with segments (or row slices) of the target table. An optional
expression or set of expressions that serve to segment the target table by
column values. Each expression can be given in one of two ways: (1) as column
names, or (2) as a two-sided formula where the LHS holds a column name and
the RHS contains the column values to segment on.
As an example of the first type of expression that can be used,
vars(a_column) will segment the target table in however many unique values
are present in the column called a_column. This is great if every unique
value in a particular column (like different locations, or different dates)
requires it's own repeating validation.
With a formula, we can be more selective with which column values should be
used for segmentation. Using a_column ~ c("group_1", "group_2") will
attempt to obtain two segments where one is a slice of data where the value
"group_1" exists in the column named "a_column", and, the other is a
slice where "group_2" exists in the same column. Each group of rows
resolved from the formula will result in a separate validation step.
Segmentation will always occur after preconditions (i.e., statements that
mutate the target table), if any, are applied. With this type of one-two
combo, it's possible to generate labels for segmentation using an expression
for preconditions and refer to those labels in segments without having to
generate a separate version of the target table.
Actions
Often, we will want to specify actions for the validation. This argument,
present in every validation function, takes a specially-crafted list object
that is best produced by the action_levels() function. Read that function's
documentation for the lowdown on how to create reactions to above-threshold
failure levels in validation. The basic gist is that you'll want at least a
single threshold level (specified as either the fraction of test units
failed, or, an absolute value), often using the warn_at argument. This is
especially true when x is a table object because, otherwise, nothing
happens. Using action_levels(warn_at = 0.25) or action_levels(stop_at = 0.25) are good choices depending on the situation (the first produces a
warning when a quarter of the total test units fails, the other stop()s at
the same threshold level).
Labels
label may be a single string or a character vector that matches the number
of expanded steps. label also supports {glue} syntax and exposes the
following dynamic variables contextualized to the current step:
-
"{.step}": The validation step name -
"{.col}": The current column name -
"{.seg_col}": The current segment's column name -
"{.seg_val}": The current segment's value/group
The glue context also supports ordinary expressions for further flexibility
(e.g., "{toupper(.step)}") as long as they return a length-1 string.
Briefs
Want to describe this validation step in some detail? Keep in mind that this
is only useful if x is an agent. If that's the case, brief the agent
with some text that fits. Don't worry if you don't want to do it. The
autobrief protocol is kicked in when brief = NULL and a simple brief will
then be automatically generated.
YAML
A pointblank agent can be written to YAML with yaml_write() and the
resulting YAML can be used to regenerate an agent (with yaml_read_agent())
or interrogate the target table (via yaml_agent_interrogate()). When
rows_complete() is represented in YAML (under the top-level steps key as
a list member), the syntax closely follows the signature of the validation
function. Here is an example of how a complex call of rows_complete() as a
validation step is expressed in R code and in the corresponding YAML
representation.
R statement:
agent %>%
rows_complete(
columns = c(a, b),
preconditions = ~ . %>% dplyr::filter(a < 10),
segments = b ~ c("group_1", "group_2"),
actions = action_levels(warn_at = 0.1, stop_at = 0.2),
label = "The `rows_complete()` step.",
active = FALSE
)
YAML representation:
steps:
- rows_complete:
columns: c(a, b)
preconditions: ~. %>% dplyr::filter(a < 10)
segments: b ~ c("group_1", "group_2")
actions:
warn_fraction: 0.1
stop_fraction: 0.2
label: The `rows_complete()` step.
active: false
In practice, both of these will often be shorter. A value for columns is
only necessary if checking for unique values across a subset of columns.
Arguments with default values won't be written to YAML when using
yaml_write() (though it is acceptable to include them with their default
when generating the YAML by other means). It is also possible to preview the
transformation of an agent to YAML without any writing to disk by using the
yaml_agent_string() function.
Examples
Create a simple table with three columns of numerical values.
tbl <-
dplyr::tibble(
a = c(5, 7, 6, 5, 8, 7),
b = c(7, 1, 0, 0, 8, 3),
c = c(1, 1, 1, 3, 3, 3)
)
tbl
#> # A tibble: 6 x 3
#> a b c
#> <dbl> <dbl> <dbl>
#> 1 5 7 1
#> 2 7 1 1
#> 3 6 0 1
#> 4 5 0 3
#> 5 8 8 3
#> 6 7 3 3
A: Using an agent with validation functions and then interrogate()
Validate that when considering only data in columns a and b, there are
only complete rows (i.e., all rows have no NA values).
agent <- create_agent(tbl = tbl) %>% rows_complete(columns = c(a, b)) %>% interrogate()
Printing the agent in the console shows the validation report in the
Viewer. Here is an excerpt of validation report, showing the single entry
that corresponds to the validation step demonstrated here.

B: Using the validation function directly on the data (no agent)
This way of using validation functions acts as a data filter. Data is passed
through but should stop() if there is a single test unit failing. The
behavior of side effects can be customized with the actions option.
tbl %>% rows_complete(columns = c(a, b)) %>% dplyr::pull(a) #> [1] 5 7 6 5 8 7
C: Using the expectation function
With the expect_*() form, we would typically perform one validation at a
time. This is primarily used in testthat tests.
expect_rows_complete(tbl, columns = c(a, b))
D: Using the test function
With the test_*() form, we should get a single logical value returned to
us.
test_rows_complete(tbl, columns = c(a, b)) #> [1] TRUE
Function ID
2-21
See Also
Other validation functions:
col_count_match(),
col_exists(),
col_is_character(),
col_is_date(),
col_is_factor(),
col_is_integer(),
col_is_logical(),
col_is_numeric(),
col_is_posix(),
col_schema_match(),
col_vals_between(),
col_vals_decreasing(),
col_vals_equal(),
col_vals_expr(),
col_vals_gt(),
col_vals_gte(),
col_vals_in_set(),
col_vals_increasing(),
col_vals_lt(),
col_vals_lte(),
col_vals_make_set(),
col_vals_make_subset(),
col_vals_not_between(),
col_vals_not_equal(),
col_vals_not_in_set(),
col_vals_not_null(),
col_vals_null(),
col_vals_regex(),
col_vals_within_spec(),
conjointly(),
row_count_match(),
rows_distinct(),
serially(),
specially(),
tbl_match()
Are row data distinct?
Description
The rows_distinct() validation function, the expect_rows_distinct()
expectation function, and the test_rows_distinct() test function all check
whether row values (optionally constrained to a selection of specified
columns) are, when taken as a complete unit, distinct from all other units
in the table. The validation function can be used directly on a data table or
with an agent object (technically, a ptblank_agent object) whereas the
expectation and test functions can only be used with a data table. As a
validation step or as an expectation, this will operate over the number of
test units that is equal to the number of rows in the table (after any
preconditions have been applied).
Usage
rows_distinct( x, columns = tidyselect::everything(), preconditions = NULL, segments = NULL, actions = NULL, step_id = NULL, label = NULL, brief = NULL, active = TRUE ) expect_rows_distinct( object, columns = tidyselect::everything(), preconditions = NULL, threshold = 1 ) test_rows_distinct( object, columns = tidyselect::everything(), preconditions = NULL, threshold = 1 )rows_distinct( x, columns = tidyselect::everything(), preconditions = NULL, segments = NULL, actions = NULL, step_id = NULL, label = NULL, brief = NULL, active = TRUE ) expect_rows_distinct( object, columns = tidyselect::everything(), preconditions = NULL, threshold = 1 ) test_rows_distinct( object, columns = tidyselect::everything(), preconditions = NULL, threshold = 1 )
Arguments
x |
A pointblank agent or a data table
A data frame, tibble ( |
columns |
The target columns
A column-selecting expression, as one would use inside |
preconditions |
Input table modification prior to validation
An optional expression for mutating the input table before proceeding with
the validation. This can either be provided as a one-sided R formula using
a leading |
segments |
Expressions for segmenting the target table
An optional expression or set of expressions (held in a list) that serve to segment the target table by column values. Each expression can be given in one of two ways: (1) as column names, or (2) as a two-sided formula where the LHS holds a column name and the RHS contains the column values to segment on. See the Segments section for more details on this. |
actions |
Thresholds and actions for different states
A list containing threshold levels so that the validation step can react
accordingly when exceeding the set levels for different states. This is to
be created with the |
step_id |
Manual setting of the step ID value
One or more optional identifiers for the single or multiple validation
steps generated from calling a validation function. The use of step IDs
serves to distinguish validation steps from each other and provide an
opportunity for supplying a more meaningful label compared to the step
index. By default this is |
label |
Optional label for the validation step
Optional label for the validation step. This label appears in the agent report and, for the best appearance, it should be kept quite short. See the Labels section for more information. |
brief |
Brief description for the validation step
A brief is a short, text-based description for the validation step. If
nothing is provided here then an autobrief is generated by the agent,
using the language provided in |
active |
Is the validation step active?
A logical value indicating whether the validation step should be active. If
the validation function is working with an agent, |
object |
A data table for expectations or tests
A data frame, tibble ( |
threshold |
The failure threshold
A simple failure threshold value for use with the expectation ( |
Value
For the validation function, the return value is either a
ptblank_agent object or a table object (depending on whether an agent
object or a table was passed to x). The expectation function invisibly
returns its input but, in the context of testing data, the function is
called primarily for its potential side-effects (e.g., signaling failure).
The test function returns a logical value.
Supported Input Tables
The types of data tables that are officially supported are:
-
data frames (
data.frame) and tibbles (tbl_df) -
Spark DataFrames (
tbl_spark) -
the following database tables (
tbl_dbi):-
PostgreSQL tables (using the
RPostgres::Postgres()as driver) -
MySQL tables (with
RMySQL::MySQL()) -
Microsoft SQL Server tables (via odbc)
-
BigQuery tables (using
bigrquery::bigquery()) -
DuckDB tables (through
duckdb::duckdb()) -
SQLite (with
RSQLite::SQLite())
-
Other database tables may work to varying degrees but they haven't been formally tested (so be mindful of this when using unsupported backends with pointblank).
Preconditions
Providing expressions as preconditions means pointblank will preprocess
the target table during interrogation as a preparatory step. It might happen
that a particular validation requires a calculated column, some filtering of
rows, or the addition of columns via a join, etc. Especially for an
agent-based report this can be advantageous since we can develop a large
validation plan with a single target table and make minor adjustments to it,
as needed, along the way.
The table mutation is totally isolated in scope to the validation step(s)
where preconditions is used. Using dplyr code is suggested here since
the statements can be translated to SQL if necessary (i.e., if the target
table resides in a database). The code is most easily supplied as a one-sided
R formula (using a leading ~). In the formula representation, the .
serves as the input data table to be transformed (e.g., ~ . %>% dplyr::mutate(col_b = col_a + 10)). Alternatively, a function could instead
be supplied (e.g., function(x) dplyr::mutate(x, col_b = col_a + 10)).
Segments
By using the segments argument, it's possible to define a particular
validation with segments (or row slices) of the target table. An optional
expression or set of expressions that serve to segment the target table by
column values. Each expression can be given in one of two ways: (1) as column
names, or (2) as a two-sided formula where the LHS holds a column name and
the RHS contains the column values to segment on.
As an example of the first type of expression that can be used,
vars(a_column) will segment the target table in however many unique values
are present in the column called a_column. This is great if every unique
value in a particular column (like different locations, or different dates)
requires it's own repeating validation.
With a formula, we can be more selective with which column values should be
used for segmentation. Using a_column ~ c("group_1", "group_2") will
attempt to obtain two segments where one is a slice of data where the value
"group_1" exists in the column named "a_column", and, the other is a
slice where "group_2" exists in the same column. Each group of rows
resolved from the formula will result in a separate validation step.
Segmentation will always occur after preconditions (i.e., statements that
mutate the target table), if any, are applied. With this type of one-two
combo, it's possible to generate labels for segmentation using an expression
for preconditions and refer to those labels in segments without having to
generate a separate version of the target table.
Actions
Often, we will want to specify actions for the validation. This argument,
present in every validation function, takes a specially-crafted list object
that is best produced by the action_levels() function. Read that function's
documentation for the lowdown on how to create reactions to above-threshold
failure levels in validation. The basic gist is that you'll want at least a
single threshold level (specified as either the fraction of test units
failed, or, an absolute value), often using the warn_at argument. This is
especially true when x is a table object because, otherwise, nothing
happens. Using action_levels(warn_at = 0.25) or action_levels(stop_at = 0.25) are good choices depending on the situation (the first produces a
warning when a quarter of the total test units fails, the other stop()s at
the same threshold level).
Labels
label may be a single string or a character vector that matches the number
of expanded steps. label also supports {glue} syntax and exposes the
following dynamic variables contextualized to the current step:
-
"{.step}": The validation step name -
"{.col}": The current column name -
"{.seg_col}": The current segment's column name -
"{.seg_val}": The current segment's value/group
The glue context also supports ordinary expressions for further flexibility
(e.g., "{toupper(.step)}") as long as they return a length-1 string.
Briefs
Want to describe this validation step in some detail? Keep in mind that this
is only useful if x is an agent. If that's the case, brief the agent
with some text that fits. Don't worry if you don't want to do it. The
autobrief protocol is kicked in when brief = NULL and a simple brief will
then be automatically generated.
YAML
A pointblank agent can be written to YAML with yaml_write() and the
resulting YAML can be used to regenerate an agent (with yaml_read_agent())
or interrogate the target table (via yaml_agent_interrogate()). When
rows_distinct() is represented in YAML (under the top-level steps key as
a list member), the syntax closely follows the signature of the validation
function. Here is an example of how a complex call of rows_distinct() as a
validation step is expressed in R code and in the corresponding YAML
representation.
R statement:
agent %>%
rows_distinct(
columns = c(a, b),
preconditions = ~ . %>% dplyr::filter(a < 10),
segments = b ~ c("group_1", "group_2"),
actions = action_levels(warn_at = 0.1, stop_at = 0.2),
label = "The `rows_distinct()` step.",
active = FALSE
)
YAML representation:
steps:
- rows_distinct:
columns: c(a, b)
preconditions: ~. %>% dplyr::filter(a < 10)
segments: b ~ c("group_1", "group_2")
actions:
warn_fraction: 0.1
stop_fraction: 0.2
label: The `rows_distinct()` step.
active: false
In practice, both of these will often be shorter. A value for columns is
only necessary if checking for unique values across a subset of columns.
Arguments with default values won't be written to YAML when using
yaml_write() (though it is acceptable to include them with their default
when generating the YAML by other means). It is also possible to preview the
transformation of an agent to YAML without any writing to disk by using the
yaml_agent_string() function.
Examples
Create a simple table with three columns of numerical values.
tbl <-
dplyr::tibble(
a = c(5, 7, 6, 5, 8, 7),
b = c(7, 1, 0, 0, 8, 3),
c = c(1, 1, 1, 3, 3, 3)
)
tbl
#> # A tibble: 6 x 3
#> a b c
#> <dbl> <dbl> <dbl>
#> 1 5 7 1
#> 2 7 1 1
#> 3 6 0 1
#> 4 5 0 3
#> 5 8 8 3
#> 6 7 3 3
A: Using an agent with validation functions and then interrogate()
Validate that when considering only data in columns a and b, there are no
duplicate rows (i.e., all rows are distinct).
agent <- create_agent(tbl = tbl) %>% rows_distinct(columns = c(a, b)) %>% interrogate()
Printing the agent in the console shows the validation report in the
Viewer. Here is an excerpt of validation report, showing the single entry
that corresponds to the validation step demonstrated here.

B: Using the validation function directly on the data (no agent)
This way of using validation functions acts as a data filter. Data is passed
through but should stop() if there is a single test unit failing. The
behavior of side effects can be customized with the actions option.
tbl %>% rows_distinct(columns = c(a, b)) %>% dplyr::pull(a) #> [1] 5 7 6 5 8 7
C: Using the expectation function
With the expect_*() form, we would typically perform one validation at a
time. This is primarily used in testthat tests.
expect_rows_distinct(tbl, columns = c(a, b))
D: Using the test function
With the test_*() form, we should get a single logical value returned to
us.
test_rows_distinct(tbl, columns = c(a, b)) #> [1] TRUE
Function ID
2-20
See Also
Other validation functions:
col_count_match(),
col_exists(),
col_is_character(),
col_is_date(),
col_is_factor(),
col_is_integer(),
col_is_logical(),
col_is_numeric(),
col_is_posix(),
col_schema_match(),
col_vals_between(),
col_vals_decreasing(),
col_vals_equal(),
col_vals_expr(),
col_vals_gt(),
col_vals_gte(),
col_vals_in_set(),
col_vals_increasing(),
col_vals_lt(),
col_vals_lte(),
col_vals_make_set(),
col_vals_make_subset(),
col_vals_not_between(),
col_vals_not_equal(),
col_vals_not_in_set(),
col_vals_not_null(),
col_vals_null(),
col_vals_regex(),
col_vals_within_spec(),
conjointly(),
row_count_match(),
rows_complete(),
serially(),
specially(),
tbl_match()
Thoroughly scan a table to better understand it
Description
Generate an HTML report that scours the input table data. Before calling up an agent to validate the data, it's a good idea to understand the data with some level of precision. Make this the initial step of a well-balanced data quality reporting workflow. The reporting output contains several sections to make everything more digestible, and these are:
- Overview
-
Table dimensions, duplicate row counts, column types, and reproducibility information
- Variables
-
A summary for each table variable and further statistics and summaries depending on the variable type
- Interactions
-
A matrix plot that shows interactions between variables
- Correlations
-
A set of correlation matrix plots for numerical variables
- Missing Values
-
A summary figure that shows the degree of missingness across variables
- Sample
-
A table that provides the head and tail rows of the dataset
The resulting object can be printed to make it viewable in the RStudio
Viewer. It's also a "shiny.tag.list" object and so can be integrated in R
Markdown HTML output or in Shiny applications. If you need the output HTML,
it's to export that to a file with the export_report() function.
Usage
scan_data( tbl, sections = "OVICMS", navbar = TRUE, width = NULL, lang = NULL, locale = NULL )scan_data( tbl, sections = "OVICMS", navbar = TRUE, width = NULL, lang = NULL, locale = NULL )
Arguments
tbl |
A data table
The input table. This can be a data frame, tibble, a |
sections |
Sections to include
The sections to include in the finalized |
navbar |
Include navigation in HTML report
Should there be a navigation bar anchored to the top of the report page? |
width |
Width option for HTML report
An optional fixed width (in pixels) for the HTML report. By default, no fixed width is applied. |
lang |
Reporting language
The language to use for label text in the report. By default, |
locale |
Locale for value formatting within reports
An optional locale ID to use for formatting values in the report according
the locale's rules. Examples include |
Value
A ptblank_tbl_scan object.
Examples
Get an HTML document that describes all of the data in the dplyr::storms
dataset.
tbl_scan <- scan_data(tbl = dplyr::storms)
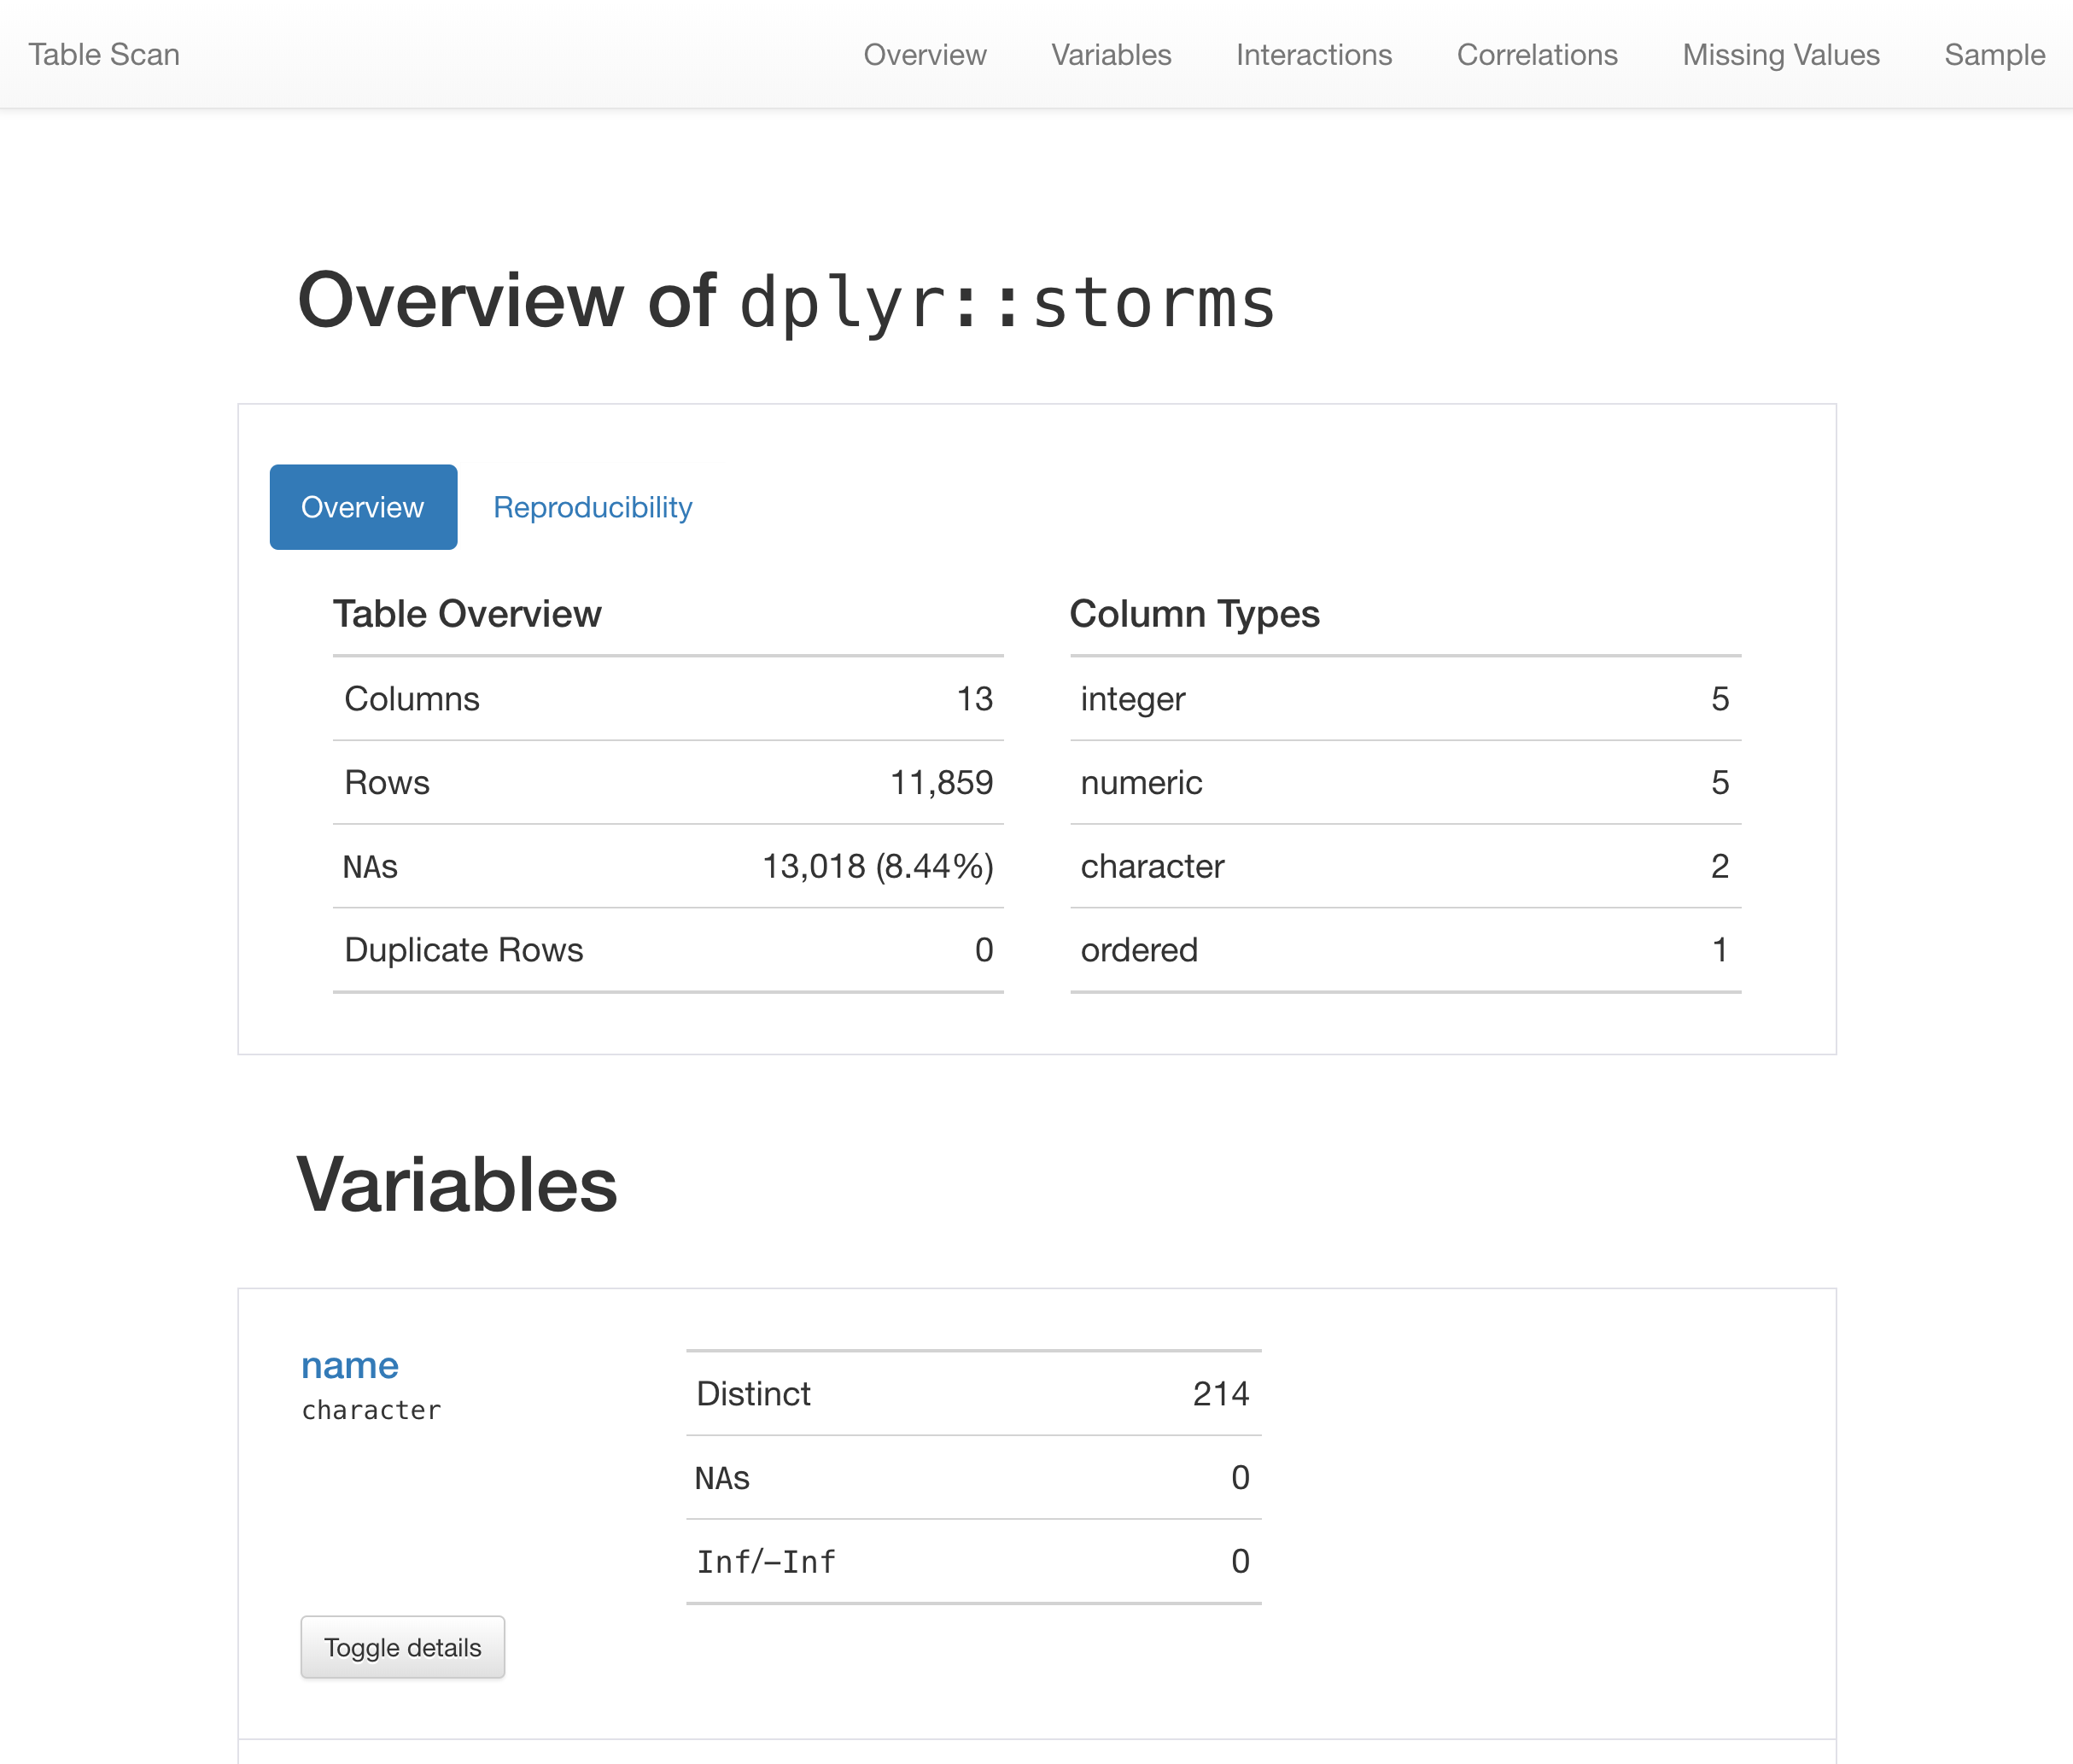
Function ID
1-1
See Also
Other Planning and Prep:
action_levels(),
create_agent(),
create_informant(),
db_tbl(),
draft_validation(),
file_tbl(),
tbl_get(),
tbl_source(),
tbl_store(),
validate_rmd()
Run several tests and a final validation in a serial manner
Description
The serially() validation function allows for a series of tests to run in
sequence before either culminating in a final validation step or simply
exiting the series. This construction allows for pre-testing that may make
sense before a validation step. For example, there may be situations where
it's vital to check a column type before performing a validation on the same
column (since having the wrong type can result in an evaluation error for the
subsequent validation). Another serial workflow might entail having a bundle
of checks in a prescribed order and, if all pass, then the goal of this
testing has been achieved (e.g., checking if a table matches another through
a series of increasingly specific tests).
A series as specified inside serially() is composed with a listing of
calls, and we would draw upon test functions (T) to describe tests and
optionally provide a finalizing call with a validation function (V).
The following constraints apply:
-
there must be at least one test function in the series (T -> V is good, V is not)
-
there can only be one validation function call, V; it's optional but, if included, it must be placed at the end (T -> T -> V is good, these sequences are bad: (1) T -> V -> T, (2) T -> T -> V -> V)
-
a validation function call (V), if included, mustn't itself yield multiple validation steps (this may happen when providing multiple
columnsor anysegments)
Here's an example of how to arrange expressions:
~ test_col_exists(., columns = count), ~ test_col_is_numeric(., columns = count), ~ col_vals_gt(., columns = count, value = 2)
This series concentrates on the column called count and first checks
whether the column exists, then checks if that column is numeric, and then
finally validates whether all values in the column are greater than 2.
Note that in the above listing of calls, the . stands in for the target
table and is always necessary here. Also important is that all test_*()
functions have a threshold argument that is set to 1 by default. Should
you need to bump up the threshold value it can be changed to a different
integer value (as an absolute threshold of failing test units) or a
decimal value between 0 and 1 (serving as a fractional threshold of
failing test units).
Usage
serially( x, ..., .list = list2(...), preconditions = NULL, actions = NULL, step_id = NULL, label = NULL, brief = NULL, active = TRUE ) expect_serially( object, ..., .list = list2(...), preconditions = NULL, threshold = 1 ) test_serially( object, ..., .list = list2(...), preconditions = NULL, threshold = 1 )serially( x, ..., .list = list2(...), preconditions = NULL, actions = NULL, step_id = NULL, label = NULL, brief = NULL, active = TRUE ) expect_serially( object, ..., .list = list2(...), preconditions = NULL, threshold = 1 ) test_serially( object, ..., .list = list2(...), preconditions = NULL, threshold = 1 )
Arguments
x |
A pointblank agent or a data table
A data frame, tibble ( |
... |
Test/validation expressions
A collection one-sided formulas that consist of |
.list |
Alternative to
Allows for the use of a list as an input alternative to |
preconditions |
Input table modification prior to validation
An optional expression for mutating the input table before proceeding with
the validation. This can either be provided as a one-sided R formula using
a leading |
actions |
Thresholds and actions for different states
A list containing threshold levels so that the validation step can react
accordingly when exceeding the set levels for different states. This is to
be created with the |
step_id |
Manual setting of the step ID value
One or more optional identifiers for the single or multiple validation
steps generated from calling a validation function. The use of step IDs
serves to distinguish validation steps from each other and provide an
opportunity for supplying a more meaningful label compared to the step
index. By default this is |
label |
Optional label for the validation step
Optional label for the validation step. This label appears in the agent report and, for the best appearance, it should be kept quite short. See the Labels section for more information. |
brief |
Brief description for the validation step
A brief is a short, text-based description for the validation step. If
nothing is provided here then an autobrief is generated by the agent,
using the language provided in |
active |
Is the validation step active?
A logical value indicating whether the validation step should be active. If
the validation function is working with an agent, |
object |
A data table for expectations or tests
A data frame, tibble ( |
threshold |
The failure threshold
A simple failure threshold value for use with the expectation ( |
Value
For the validation function, the return value is either a
ptblank_agent object or a table object (depending on whether an agent
object or a table was passed to x). The expectation function invisibly
returns its input but, in the context of testing data, the function is
called primarily for its potential side-effects (e.g., signaling failure).
The test function returns a logical value.
Supported Input Tables
The types of data tables that are officially supported are:
-
data frames (
data.frame) and tibbles (tbl_df) -
Spark DataFrames (
tbl_spark) -
the following database tables (
tbl_dbi):-
PostgreSQL tables (using the
RPostgres::Postgres()as driver) -
MySQL tables (with
RMySQL::MySQL()) -
Microsoft SQL Server tables (via odbc)
-
BigQuery tables (using
bigrquery::bigquery()) -
DuckDB tables (through
duckdb::duckdb()) -
SQLite (with
RSQLite::SQLite())
-
Other database tables may work to varying degrees but they haven't been formally tested (so be mindful of this when using unsupported backends with pointblank).
Column Names
columns may be a single column (as symbol a or string "a") or a vector
of columns (c(a, b, c) or c("a", "b", "c")). {tidyselect} helpers
are also supported, such as contains("date") and where(is.double). If
passing an external vector of columns, it should be wrapped in all_of().
When multiple columns are selected by columns, the result will be an
expansion of validation steps to that number of columns (e.g.,
c(col_a, col_b) will result in the entry of two validation steps).
Previously, columns could be specified in vars(). This continues to work,
but c() offers the same capability and supersedes vars() in columns.
Preconditions
Providing expressions as preconditions means pointblank will preprocess
the target table during interrogation as a preparatory step. It might happen
that a particular validation requires a calculated column, some filtering of
rows, or the addition of columns via a join, etc. Especially for an
agent-based report this can be advantageous since we can develop a large
validation plan with a single target table and make minor adjustments to it,
as needed, along the way.
The table mutation is totally isolated in scope to the validation step(s)
where preconditions is used. Using dplyr code is suggested here since
the statements can be translated to SQL if necessary (i.e., if the target
table resides in a database). The code is most easily supplied as a one-sided
R formula (using a leading ~). In the formula representation, the .
serves as the input data table to be transformed (e.g., ~ . %>% dplyr::mutate(col_b = col_a + 10)). Alternatively, a function could instead
be supplied (e.g., function(x) dplyr::mutate(x, col_b = col_a + 10)).
Actions
Often, we will want to specify actions for the validation. This argument,
present in every validation function, takes a specially-crafted list
object that is best produced by the action_levels() function. Read that
function's documentation for the lowdown on how to create reactions to
above-threshold failure levels in validation. The basic gist is that you'll
want at least a single threshold level (specified as either the fraction of
test units failed, or, an absolute value), often using the warn_at
argument. This is especially true when x is a table object because,
otherwise, nothing happens. For the col_vals_*()-type functions, using
action_levels(warn_at = 0.25) or action_levels(stop_at = 0.25) are good
choices depending on the situation (the first produces a warning when a
quarter of the total test units fails, the other stop()s at the same
threshold level).
Labels
label may be a single string or a character vector that matches the number
of expanded steps. label also supports {glue} syntax and exposes the
following dynamic variables contextualized to the current step:
-
"{.step}": The validation step name
The glue context also supports ordinary expressions for further flexibility
(e.g., "{toupper(.step)}") as long as they return a length-1 string.
Briefs
Want to describe this validation step in some detail? Keep in mind that this
is only useful if x is an agent. If that's the case, brief the agent
with some text that fits. Don't worry if you don't want to do it. The
autobrief protocol is kicked in when brief = NULL and a simple brief will
then be automatically generated.
YAML
A pointblank agent can be written to YAML with yaml_write() and the
resulting YAML can be used to regenerate an agent (with yaml_read_agent())
or interrogate the target table (via yaml_agent_interrogate()). When
serially() is represented in YAML (under the top-level steps key as a
list member), the syntax closely follows the signature of the validation
function. Here is an example of how a complex call of serially() as a
validation step is expressed in R code and in the corresponding YAML
representation.
R statement:
agent %>%
serially(
~ test_col_vals_lt(., columns = a, value = 8),
~ test_col_vals_gt(., columns = c, value = vars(a)),
~ col_vals_not_null(., columns = b),
preconditions = ~ . %>% dplyr::filter(a < 10),
actions = action_levels(warn_at = 0.1, stop_at = 0.2),
label = "The `serially()` step.",
active = FALSE
)
YAML representation:
steps:
- serially:
fns:
- ~test_col_vals_lt(., columns = a, value = 8)
- ~test_col_vals_gt(., columns = c, value = vars(a))
- ~col_vals_not_null(., columns = b)
preconditions: ~. %>% dplyr::filter(a < 10)
actions:
warn_fraction: 0.1
stop_fraction: 0.2
label: The `serially()` step.
active: false
In practice, both of these will often be shorter as only the expressions for
validation steps are necessary. Arguments with default values won't be
written to YAML when using yaml_write() (though it is acceptable to include
them with their default when generating the YAML by other means). It is also
possible to preview the transformation of an agent to YAML without any
writing to disk by using the yaml_agent_string() function.
Examples
For all examples here, we'll use a simple table with three numeric columns
(a, b, and c). This is a very basic table but it'll be more useful when
explaining things later.
tbl <-
dplyr::tibble(
a = c(5, 2, 6),
b = c(6, 4, 9),
c = c(1, 2, 3)
)
tbl
#> # A tibble: 3 x 3
#> a b c
#> <dbl> <dbl> <dbl>
#> 1 5 6 1
#> 2 2 4 2
#> 3 6 9 3
A: Using an agent with validation functions and then interrogate()
The serially() function can be set up to perform a series of tests and then
perform a validation (only if all tests pass). Here, we are going to (1) test
whether columns a and b are numeric, (2) check that both don't have any
NA values, and (3) perform a finalizing validation that checks whether
values in b are greater than values in a. We'll determine if this
validation has any failing test units (there are 4 tests and a final
validation).
agent_1 <-
create_agent(tbl = tbl) %>%
serially(
~ test_col_is_numeric(., columns = c(a, b)),
~ test_col_vals_not_null(., columns = c(a, b)),
~ col_vals_gt(., columns = b, value = vars(a))
) %>%
interrogate()
Printing the agent in the console shows the validation report in the
Viewer. Here is an excerpt of validation report, showing the single entry
that corresponds to the validation step demonstrated here.

What's going on? All four of the tests passed and so the final validation occurred. There were no failing test units in that either!
The final validation is optional and so here is a variation where only the serial tests are performed.
agent_2 <-
create_agent(tbl = tbl) %>%
serially(
~ test_col_is_numeric(., columns = c(a, b)),
~ test_col_vals_not_null(., columns = c(a, b))
) %>%
interrogate()
Everything is good here too:

B: Using the validation function directly on the data (no agent)
This way of using validation functions acts as a data filter. Data is passed
through but should stop() if there is a single test unit failing. The
behavior of side effects can be customized with the actions option.
tbl %>%
serially(
~ test_col_is_numeric(., columns = c(a, b)),
~ test_col_vals_not_null(., columns = c(a, b)),
~ col_vals_gt(., columns = b, value = vars(a))
)
#> # A tibble: 3 x 3
#> a b c
#> <dbl> <dbl> <dbl>
#> 1 5 6 1
#> 2 2 4 2
#> 3 6 9 3
C: Using the expectation function
With the expect_*() form, we would typically perform one validation at a
time. This is primarily used in testthat tests.
expect_serially( tbl, ~ test_col_is_numeric(., columns = c(a, b)), ~ test_col_vals_not_null(., columns = c(a, b)), ~ col_vals_gt(., columns = b, value = vars(a)) )
D: Using the test function
With the test_*() form, we should get a single logical value returned to
us.
tbl %>%
test_serially(
~ test_col_is_numeric(., columns = c(a, b)),
~ test_col_vals_not_null(., columns = c(a, b)),
~ col_vals_gt(., columns = b, value = vars(a))
)
#> [1] TRUE
Function ID
2-35
See Also
Other validation functions:
col_count_match(),
col_exists(),
col_is_character(),
col_is_date(),
col_is_factor(),
col_is_integer(),
col_is_logical(),
col_is_numeric(),
col_is_posix(),
col_schema_match(),
col_vals_between(),
col_vals_decreasing(),
col_vals_equal(),
col_vals_expr(),
col_vals_gt(),
col_vals_gte(),
col_vals_in_set(),
col_vals_increasing(),
col_vals_lt(),
col_vals_lte(),
col_vals_make_set(),
col_vals_make_subset(),
col_vals_not_between(),
col_vals_not_equal(),
col_vals_not_in_set(),
col_vals_not_null(),
col_vals_null(),
col_vals_regex(),
col_vals_within_spec(),
conjointly(),
row_count_match(),
rows_complete(),
rows_distinct(),
specially(),
tbl_match()
Set a data table to an agent or an informant
Description
Setting a data table to an agent or an informant with set_tbl()
replaces any associated table (a data frame, a tibble, objects of class
tbl_dbi or tbl_spark).
Usage
set_tbl(x, tbl, tbl_name = NULL, label = NULL)set_tbl(x, tbl, tbl_name = NULL, label = NULL)
Arguments
x |
A pointblank agent or informant object
An agent object of class |
tbl |
Table or expression for reading in one
The input table for the agent or the informant. This can be a data
frame, a tibble, a |
tbl_name |
A table name
A optional name to assign to the new input table object. If no value is provided, a name will be generated based on whatever information is available. |
label |
An optional label for reporting
An optional label for the validation plan or information report. If no value is provided then any existing label will be retained. |
Examples
Set proportional failure thresholds to the warn, stop, and notify
states using action_levels().
al <-
action_levels(
warn_at = 0.10,
stop_at = 0.25,
notify_at = 0.35
)
Create an agent that has small_table set as the target table via tbl.
Apply the actions, add some validation steps and then interrogate the data.
agent_1 <-
create_agent(
tbl = small_table,
tbl_name = "small_table",
label = "An example.",
actions = al
) %>%
col_exists(columns = c(date, date_time)) %>%
col_vals_regex(
columns = b,
regex = "[0-9]-[a-z]{3}-[0-9]{3}"
) %>%
rows_distinct() %>%
interrogate()
Replace the agent's association to small_table with a mutated version of it
(one that removes duplicate rows). Then, interrogate the new target table.
agent_2 <-
agent_1 %>%
set_tbl(
tbl = small_table %>% dplyr::distinct()
) %>%
interrogate()
Function ID
9-4
See Also
Other Object Ops:
activate_steps(),
deactivate_steps(),
export_report(),
remove_steps(),
x_read_disk(),
x_write_disk()
A small table that is useful for testing
Description
This is a small table with a few different types of columns. It's probably
just useful when testing the functions from pointblank. Rows 9 and 10 are
exact duplicates. The c column contains two NA values.
Usage
small_tablesmall_table
Format
A tibble with 13 rows and 8 variables:
- date_time
-
A date-time column (of the
POSIXctclass) with dates that correspond exactly to those in thedatecolumn. Time values are somewhat randomized but all 'seconds' values are00. - date
-
A
Datecolumn with dates from2016-01-04to2016-01-30. - a
-
An
integercolumn with values ranging from1to8. - b
-
A
charactercolumn with values that adhere to a common pattern. - c
-
An
integercolumn with values ranging from2to9. Contains twoNAvalues. - d
-
A numeric column with values ranging from
108to10000. - e
-
A
logicalcolumn. - f
-
A
charactercolumn with"low","mid", and"high"values.
Function ID
14-1
See Also
Other Datasets:
game_revenue,
game_revenue_info,
small_table_sqlite(),
specifications
Examples
# Here is a glimpse at the data # available in `small_table` dplyr::glimpse(small_table)# Here is a glimpse at the data # available in `small_table` dplyr::glimpse(small_table)
An SQLite version of the small_table dataset
Description
The small_table_sqlite() function creates an SQLite, tbl_dbi version of
the small_table dataset. A requirement is the availability of the DBI
and RSQLite packages. These packages can be installed by using
install.packages("DBI") and install.packages("RSQLite").
Usage
small_table_sqlite()small_table_sqlite()
Function ID
14-2
See Also
Other Datasets:
game_revenue,
game_revenue_info,
small_table,
specifications
Examples
# Use `small_table_sqlite()` to # create an SQLite version of the # `small_table` table # # small_table_sqlite <- small_table_sqlite()# Use `small_table_sqlite()` to # create an SQLite version of the # `small_table` table # # small_table_sqlite <- small_table_sqlite()
A fn for info_snippet(): get the highest value from a column
Description
The snip_highest() function can be used as an info_snippet() function
(i.e., provided to fn) to get the highest numerical, time value, or
alphabetical value from a column in the target table.
Usage
snip_highest(column)snip_highest(column)
Arguments
column |
The target column
The name of the column that contains the target values. |
Value
A formula needed for info_snippet()'s fn argument.
Examples
Generate an informant object, add a snippet with info_snippet() and
snip_highest() (giving us a method to get the highest value in column a);
define a location for the snippet result in { } and then incorporate()
the snippet into the info text. Note here that the order of the
info_columns() and info_snippet() calls doesn't matter.
informant <-
create_informant(
tbl = ~ small_table,
tbl_name = "small_table",
label = "An example."
) %>%
info_columns(
columns = a,
`Highest Value` = "Highest value is {highest_a}."
) %>%
info_snippet(
snippet_name = "highest_a",
fn = snip_highest(column = "a")
) %>%
incorporate()
We can print the informant object to see the information report.
informant
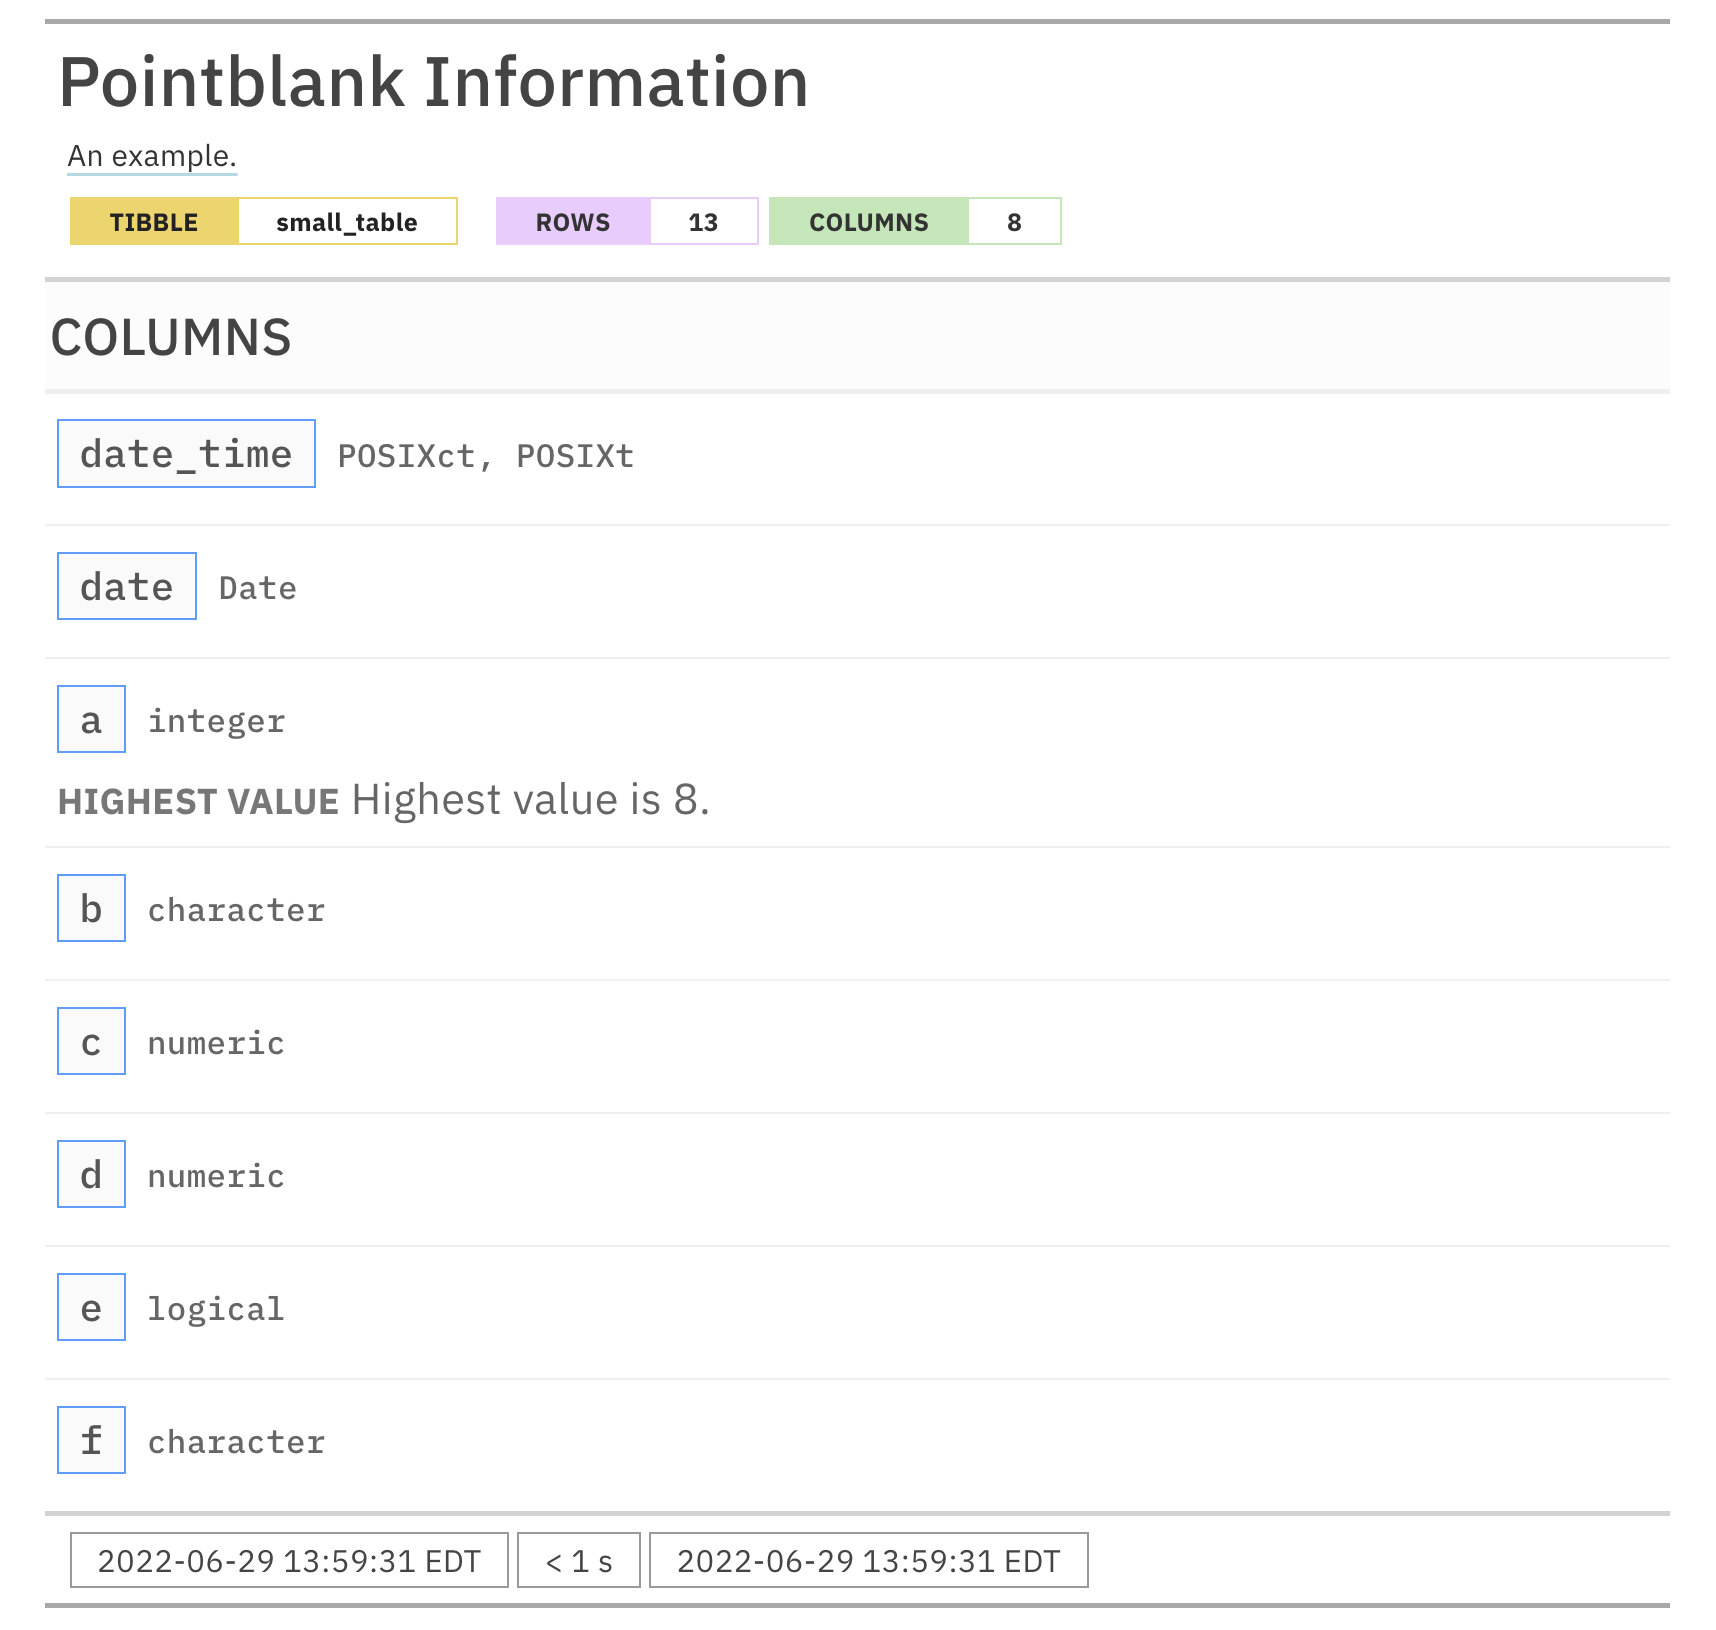
Function ID
3-9
See Also
Other Information Functions:
info_columns(),
info_columns_from_tbl(),
info_section(),
info_snippet(),
info_tabular(),
snip_list(),
snip_lowest(),
snip_stats()
A fn for info_snippet(): get a list of column categories
Description
The snip_list() function can be used as an info_snippet() function (i.e.,
provided to fn) to get a catalog list from a table column. You can limit
the of items in that list with the limit value.
Usage
snip_list( column, limit = 5, sorting = c("inorder", "infreq", "inseq"), reverse = FALSE, sep = ",", and_or = NULL, oxford = TRUE, as_code = TRUE, quot_str = NULL, na_rm = FALSE, lang = NULL )snip_list( column, limit = 5, sorting = c("inorder", "infreq", "inseq"), reverse = FALSE, sep = ",", and_or = NULL, oxford = TRUE, as_code = TRUE, quot_str = NULL, na_rm = FALSE, lang = NULL )
Arguments
column |
The target column
The name of the column that contains the target values. |
limit |
Limit for list length
A limit of items put into the generated list. The returned text will state
the remaining number of items beyond the |
sorting |
Type of sorting within list
A keyword used to designate the type of sorting to use for the list. The
three options are |
reverse |
Reversal of list order
An option to reverse the ordering of list items. By default, this is
|
sep |
Separator text for list
The separator to use between list items. By default, this is a comma. |
and_or |
Use of 'and' or 'or' within list
The type of conjunction to use between the final and penultimate list items
(should the item length be below the |
oxford |
Usage of oxford comma
Whether to use an Oxford comma under certain conditions. |
as_code |
Treat items as code
Should each list item appear in a 'code font' (i.e., as monospaced text)?
By default this is |
quot_str |
Set items in double quotes
An option for whether list items should be set in double quotes. If |
na_rm |
Remove NA values from list
An option for whether NA values should be counted as an item in the list. |
lang |
Reporting language
The language to use for any joining words (from the |
Value
A formula needed for info_snippet()'s fn argument.
Examples
Generate an informant object, add a snippet with info_snippet() and
snip_list() (giving us a method to get a distinct list of column values for
column f). Define a location for the snippet result in { } and then
incorporate() the snippet into the info text. Note here that the order of
the info_columns() and info_snippet() calls doesn't matter.
informant <-
create_informant(
tbl = ~ small_table,
tbl_name = "small_table",
label = "An example."
) %>%
info_columns(
columns = f,
`Items` = "This column contains {values_f}."
) %>%
info_snippet(
snippet_name = "values_f",
fn = snip_list(column = "f")
) %>%
incorporate()
We can print the informant object to see the information report.
informant

Function ID
3-6
See Also
Other Information Functions:
info_columns(),
info_columns_from_tbl(),
info_section(),
info_snippet(),
info_tabular(),
snip_highest(),
snip_lowest(),
snip_stats()
A fn for info_snippet(): get the lowest value from a column
Description
The snip_lowest() function can be used as an info_snippet() function
(i.e., provided to fn) to get the lowest numerical, time value, or
alphabetical value from a column in the target table.
Usage
snip_lowest(column)snip_lowest(column)
Arguments
column |
The target column
The name of the column that contains the target values. |
Value
A formula needed for info_snippet()'s fn argument.
Examples
Generate an informant object, add a snippet with info_snippet() and
snip_lowest() (giving us a method to get the lowest value in column a).
Define a location for the snippet result in { } and then incorporate()
the snippet into the info text. Note here that the order of the
info_columns() and info_snippet() calls doesn't matter.
informant <-
create_informant(
tbl = ~ small_table,
tbl_name = "small_table",
label = "An example."
) %>%
info_columns(
columns = a,
`Lowest Value` = "Lowest value is {lowest_a}."
) %>%
info_snippet(
snippet_name = "lowest_a",
fn = snip_lowest(column = "a")
) %>%
incorporate()
We can print the informant object to see the information report.
informant

Function ID
3-8
See Also
Other Information Functions:
info_columns(),
info_columns_from_tbl(),
info_section(),
info_snippet(),
info_tabular(),
snip_highest(),
snip_list(),
snip_stats()
A fn for info_snippet(): get an inline statistical summary
Description
The snip_stats() function can be used as an info_snippet() function
(i.e., provided to fn) to produce a five- or seven-number statistical
summary. This inline summary works well within a paragraph of text and can
help in describing the distribution of numerical values in a column.
For a given column, three different types of inline statistical summaries can be provided:
-
a five-number summary (
"5num"): minimum, Q1, median, Q3, maximum -
a seven-number summary (
"7num"): P2, P9, Q1, median, Q3, P91, P98 -
Bowley's seven-figure summary (
"bowley"): minimum, P10, Q1, median, Q3, P90, maximum
Usage
snip_stats(column, type = c("5num", "7num", "bowley"))snip_stats(column, type = c("5num", "7num", "bowley"))
Arguments
column |
The target column
The name of the column that contains the target values. |
type |
Type of statistical summary
The type of summary. By default, the |
Value
A formula needed for info_snippet()'s fn argument.
Examples
Generate an informant object, add a snippet with info_snippet() and
snip_stats() (giving us a method to get some summary stats for column d).
Define a location for the snippet result in { } and then incorporate()
the snippet into the info text. Note here that the order of the
info_columns() and info_snippet() calls doesn't matter.
informant <-
create_informant(
tbl = ~ small_table,
tbl_name = "small_table",
label = "An example."
) %>%
info_columns(
columns = d,
`Stats` = "Stats (fivenum): {stats_d}."
) %>%
info_snippet(
snippet_name = "stats_d",
fn = snip_stats(column = "d")
) %>%
incorporate()
We can print the informant object to see the information report.
informant
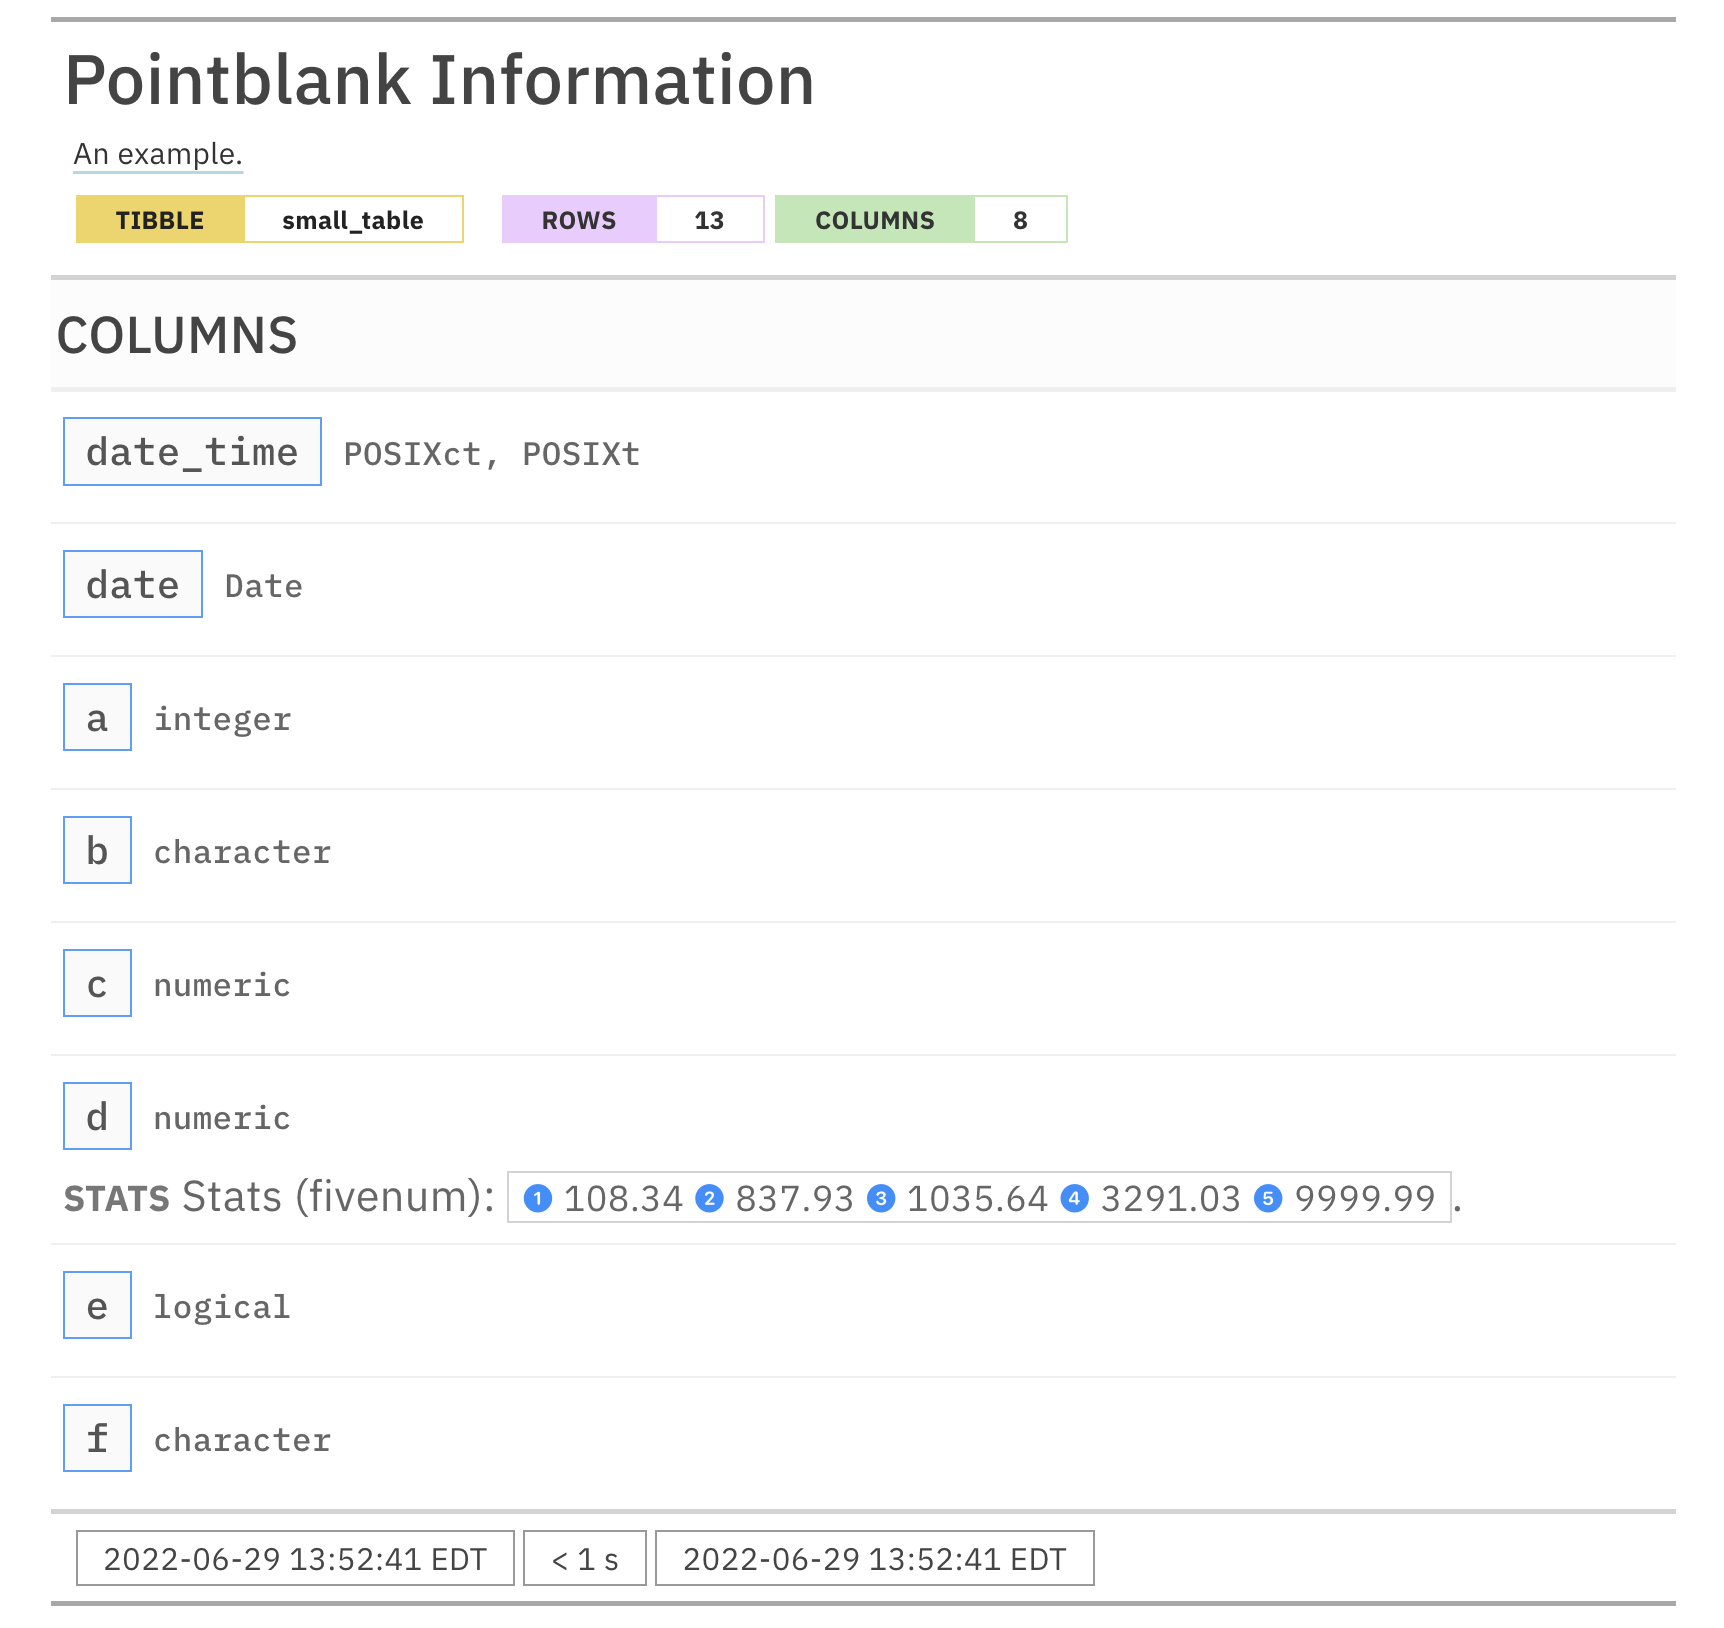
Function ID
3-7
See Also
Other Information Functions:
info_columns(),
info_columns_from_tbl(),
info_section(),
info_snippet(),
info_tabular(),
snip_highest(),
snip_list(),
snip_lowest()
Perform a specialized validation with a user-defined function
Description
The specially() validation function allows for custom validation with a
function that you provide. The major proviso for the provided function is
that it must either return a logical vector or a table where the final column
is logical. The function will operate on the table object, or, because you
can do whatever you like, it could also operate on other types of objects. To
do this, you can transform the input table in preconditions or inject an
entirely different object there. During interrogation, there won't be any
checks to ensure that the data is a table object.
Usage
specially( x, fn, preconditions = NULL, actions = NULL, step_id = NULL, label = NULL, brief = NULL, active = TRUE ) expect_specially(object, fn, preconditions = NULL, threshold = 1) test_specially(object, fn, preconditions = NULL, threshold = 1)specially( x, fn, preconditions = NULL, actions = NULL, step_id = NULL, label = NULL, brief = NULL, active = TRUE ) expect_specially(object, fn, preconditions = NULL, threshold = 1) test_specially(object, fn, preconditions = NULL, threshold = 1)
Arguments
x |
A pointblank agent or a data table
A data frame, tibble ( |
fn |
Specialized validation function
A function that performs the specialized validation on the data. It must either return a logical vector or a table where the last column is a logical column. |
preconditions |
Input table modification prior to validation
An optional expression for mutating the input table before proceeding with
the validation. This can either be provided as a one-sided R formula using
a leading |
actions |
Thresholds and actions for different states
A list containing threshold levels so that the validation step can react
accordingly when exceeding the set levels for different states. This is to
be created with the |
step_id |
Manual setting of the step ID value
One or more optional identifiers for the single or multiple validation
steps generated from calling a validation function. The use of step IDs
serves to distinguish validation steps from each other and provide an
opportunity for supplying a more meaningful label compared to the step
index. By default this is |
label |
Optional label for the validation step
Optional label for the validation step. This label appears in the agent report and, for the best appearance, it should be kept quite short. See the Labels section for more information. |
brief |
Brief description for the validation step
A brief is a short, text-based description for the validation step. If
nothing is provided here then an autobrief is generated by the agent,
using the language provided in |
active |
Is the validation step active?
A logical value indicating whether the validation step should be active. If
the validation function is working with an agent, |
object |
A data table for expectations or tests
A data frame, tibble ( |
threshold |
The failure threshold
A simple failure threshold value for use with the expectation ( |
Value
For the validation function, the return value is either a
ptblank_agent object or a table object (depending on whether an agent
object or a table was passed to x). The expectation function invisibly
returns its input but, in the context of testing data, the function is
called primarily for its potential side-effects (e.g., signaling failure).
The test function returns a logical value.
Supported Input Tables
The types of data tables that are officially supported are:
-
data frames (
data.frame) and tibbles (tbl_df) -
Spark DataFrames (
tbl_spark) -
the following database tables (
tbl_dbi):-
PostgreSQL tables (using the
RPostgres::Postgres()as driver) -
MySQL tables (with
RMySQL::MySQL()) -
Microsoft SQL Server tables (via odbc)
-
BigQuery tables (using
bigrquery::bigquery()) -
DuckDB tables (through
duckdb::duckdb()) -
SQLite (with
RSQLite::SQLite())
-
Other database tables may work to varying degrees but they haven't been formally tested (so be mindful of this when using unsupported backends with pointblank).
Preconditions
Providing expressions as preconditions means pointblank will preprocess
the target table during interrogation as a preparatory step. It might happen
that a particular validation requires a calculated column, some filtering of
rows, or the addition of columns via a join, etc. Especially for an
agent-based report this can be advantageous since we can develop a large
validation plan with a single target table and make minor adjustments to it,
as needed, along the way. Within specially(), because this function is
special, there won't be internal checking as to whether the
preconditions-based output is a table.
The table mutation is totally isolated in scope to the validation step(s)
where preconditions is used. Using dplyr code is suggested here since
the statements can be translated to SQL if necessary (i.e., if the target
table resides in a database). The code is most easily supplied as a one-sided
R formula (using a leading ~). In the formula representation, the .
serves as the input data table to be transformed (e.g., ~ . %>% dplyr::mutate(col_b = col_a + 10)). Alternatively, a function could instead
be supplied (e.g., function(x) dplyr::mutate(x, col_b = col_a + 10)).
Actions
Often, we will want to specify actions for the validation. This argument,
present in every validation function, takes a specially-crafted list
object that is best produced by the action_levels() function. Read that
function's documentation for the lowdown on how to create reactions to
above-threshold failure levels in validation. The basic gist is that you'll
want at least a single threshold level (specified as either the fraction of
test units failed, or, an absolute value), often using the warn_at
argument. This is especially true when x is a table object because,
otherwise, nothing happens. For the col_vals_*()-type functions, using
action_levels(warn_at = 0.25) or action_levels(stop_at = 0.25) are good
choices depending on the situation (the first produces a warning when a
quarter of the total test units fails, the other stop()s at the same
threshold level).
Labels
label may be a single string or a character vector that matches the number
of expanded steps. label also supports {glue} syntax and exposes the
following dynamic variables contextualized to the current step:
-
"{.step}": The validation step name
The glue context also supports ordinary expressions for further flexibility
(e.g., "{toupper(.step)}") as long as they return a length-1 string.
Briefs
Want to describe this validation step in some detail? Keep in mind that this
is only useful if x is an agent. If that's the case, brief the agent
with some text that fits. Don't worry if you don't want to do it. The
autobrief protocol is kicked in when brief = NULL and a simple brief will
then be automatically generated.
YAML
A pointblank agent can be written to YAML with yaml_write() and the
resulting YAML can be used to regenerate an agent (with yaml_read_agent())
or interrogate the target table (via yaml_agent_interrogate()). When
specially() is represented in YAML (under the top-level steps key as a
list member), the syntax closely follows the signature of the validation
function. Here is an example of how a complex call of specially() as a
validation step is expressed in R code and in the corresponding YAML
representation.
R statement:
agent %>%
specially(
fn = function(x) { ... },
preconditions = ~ . %>% dplyr::filter(a < 10),
actions = action_levels(warn_at = 0.1, stop_at = 0.2),
label = "The `specially()` step.",
active = FALSE
)
YAML representation:
steps:
- specially:
fn: function(x) { ... }
preconditions: ~. %>% dplyr::filter(a < 10)
actions:
warn_fraction: 0.1
stop_fraction: 0.2
label: The `specially()` step.
active: false
In practice, both of these will often be shorter as only the expressions for
validation steps are necessary. Arguments with default values won't be
written to YAML when using yaml_write() (though it is acceptable to include
them with their default when generating the YAML by other means). It is also
possible to preview the transformation of an agent to YAML without any
writing to disk by using the yaml_agent_string() function.
Examples
For all examples here, we'll use a simple table with three numeric columns
(a, b, and c). This is a very basic table but it'll be more useful when
explaining things later.
tbl <-
dplyr::tibble(
a = c(5, 2, 6),
b = c(3, 4, 6),
c = c(9, 8, 7)
)
tbl
#> # A tibble: 3 x 3
#> a b c
#> <dbl> <dbl> <dbl>
#> 1 5 3 9
#> 2 2 4 8
#> 3 6 6 7
A: Using an agent with validation functions and then interrogate()
Validate that the target table has exactly three rows. This single validation
with specially() has 1 test unit since the function executed on x (the
target table) results in a logical vector with a length of 1. We'll determine
if this validation has any failing test units (there is 1 test unit).
agent <- create_agent(tbl = tbl) %>% specially(fn = function(x) nrow(x) == 3) %>% interrogate()
Printing the agent in the console shows the validation report in the
Viewer. Here is an excerpt of validation report, showing the single entry
that corresponds to the validation step demonstrated here.

B: Using the validation function directly on the data (no agent)
This way of using validation functions acts as a data filter. Data is passed
through but should stop() if there is a single test unit failing. The
behavior of side effects can be customized with the actions option.
tbl %>% specially(fn = function(x) nrow(x) == 3) #> # A tibble: 3 x 3 #> a b c #> <dbl> <dbl> <dbl> #> 1 5 3 9 #> 2 2 4 8 #> 3 6 6 7
C: Using the expectation function
With the expect_*() form, we would typically perform one validation at a
time. This is primarily used in testthat tests.
expect_specially(tbl, fn = function(x) nrow(x) == 3)
D: Using the test function
With the test_*() form, we should get a single logical value returned to
us.
tbl %>% test_specially(fn = function(x) nrow(x) == 3) #> [1] TRUE
Variations
We can do more complex things with specially() and its variants.
Check the class of the target table.
tbl %>%
test_specially(
fn = function(x) {
inherits(x, "data.frame")
}
)
#> [1] TRUE
Check that the number of rows in the target table is less than small_table.
tbl %>%
test_specially(
fn = function(x) {
nrow(x) < nrow(small_table)
}
)
#> [1] TRUE
Check that all numbers across all numeric column are less than 10.
tbl %>%
test_specially(
fn = function(x) {
(x %>%
dplyr::select(where(is.numeric)) %>%
unlist()
) < 10
}
)
#> [1] TRUE
Check that all values in column c are greater than b and greater than a
(in each row) and always less than 10. This creates a table with the new
column d which is a logical column (that is used as the evaluation of test
units).
tbl %>%
test_specially(
fn = function(x) {
x %>%
dplyr::mutate(
d = c > b & c > a & c < 10
)
}
)
#> [1] TRUE
Check that the game_revenue table (which is not the target table) has
exactly 2000 rows.
tbl %>%
test_specially(
fn = function(x) {
nrow(game_revenue) == 2000
}
)
#> [1] TRUE
Function ID
2-36
See Also
Other validation functions:
col_count_match(),
col_exists(),
col_is_character(),
col_is_date(),
col_is_factor(),
col_is_integer(),
col_is_logical(),
col_is_numeric(),
col_is_posix(),
col_schema_match(),
col_vals_between(),
col_vals_decreasing(),
col_vals_equal(),
col_vals_expr(),
col_vals_gt(),
col_vals_gte(),
col_vals_in_set(),
col_vals_increasing(),
col_vals_lt(),
col_vals_lte(),
col_vals_make_set(),
col_vals_make_subset(),
col_vals_not_between(),
col_vals_not_equal(),
col_vals_not_in_set(),
col_vals_not_null(),
col_vals_null(),
col_vals_regex(),
col_vals_within_spec(),
conjointly(),
row_count_match(),
rows_complete(),
rows_distinct(),
serially(),
tbl_match()
A table containing data pertaining to various specifications
Description
The specifications dataset is useful for testing the
col_vals_within_spec(), test_col_vals_within_spec(), and
expect_col_vals_within_spec() functions. For each column, holding character
values for different specifications, rows 1-5 contain valid values, the 6th
row is an NA value, and the final two values (rows 7 and 8) are invalid.
Different specification (spec) keywords apply to each of columns when
validating with any of the aforementioned functions.
Usage
specificationsspecifications
Format
A tibble with 8 rows and 12 variables:
- isbn_numbers
-
ISBN-13 numbers; can be validated with the
"isbn"specification. - vin_numbers
-
VIN numbers (identifiers for motor vehicles); can be validated with the
"vin"specification. - zip_codes
-
Postal codes for the U.S.; can be validated with the
"postal[USA]"specification or its"zip"alias. - credit_card_numbers
-
Credit card numbers; can be validated with the
"credit_card"specification or the"cc"alias. - iban_austria
-
IBAN numbers for Austrian accounts; can be validated with the
"iban[AUT]"specification. - swift_numbers
-
Swift-BIC numbers; can be validated with the
"swift"specification. - phone_numbers
-
Phone numbers; can be validated with the
"phone"specification. - email_addresses
-
Email addresses; can be validated with the
"email"specification. - urls
-
URLs; can be validated with the
"url"specification. - ipv4_addresses
-
IPv4 addresses; can be validated with the
"ipv4"specification - ipv6_addresses
-
IPv6 addresses; can be validated with the
"ipv6"specification - mac_addresses
-
MAC addresses; can be validated with the
"mac"specification
Function ID
14-3
See Also
Other Datasets:
game_revenue,
game_revenue_info,
small_table,
small_table_sqlite()
Examples
# Here is a glimpse at the data # available in `specifications` dplyr::glimpse(specifications)# Here is a glimpse at the data # available in `specifications` dplyr::glimpse(specifications)
Provide simple email message body components: body
Description
The stock_msg_body() function simply provides some stock text for an email
message sent via email_blast() or obtained as a standalone object through
email_create().
Usage
stock_msg_body()stock_msg_body()
Value
Text suitable for the msg_body argument of email_blast() and
email_create().
Function ID
4-3
See Also
Other Emailing:
email_blast(),
email_create(),
stock_msg_footer()
A specialized version of stopifnot() for pointblank: stop_if_not()
Description
This variation of stopifnot() works well as a standalone replacement for
stopifnot() but is also customized for use in validation checks in R
Markdown documents where pointblank is loaded and validate_rmd() is
invoked. Using stop_if_not() in a code chunk where the validate = TRUE
option is set will yield the correct reporting of successes and failures
whereas stopifnot() does not.
Usage
stop_if_not(...)stop_if_not(...)
Arguments
... |
R expressions that should each evaluate to (a logical vector of
all) |
Value
NULL if all statements in ... are TRUE.
Function ID
13-5
See Also
Other Utility and Helper Functions:
affix_date(),
affix_datetime(),
col_schema(),
from_github(),
has_columns()
Examples
# This checks whether the number of # rows in `small_table` is greater # than `10` stop_if_not(nrow(small_table) > 10) # This will stop for sure: there # isn't a `time` column in `small_table` # (but there are the `date_time` and # `date` columns) # stop_if_not("time" %in% colnames(small_table)) # You're not bound to using tabular # data here, any statements that # evaluate to logical vectors will work stop_if_not(1 < 20:25 - 18)# This checks whether the number of # rows in `small_table` is greater # than `10` stop_if_not(nrow(small_table) > 10) # This will stop for sure: there # isn't a `time` column in `small_table` # (but there are the `date_time` and # `date` columns) # stop_if_not("time" %in% colnames(small_table)) # You're not bound to using tabular # data here, any statements that # evaluate to logical vectors will work stop_if_not(1 < 20:25 - 18)
Obtain a materialized table via a table store
Description
The tbl_get() function gives us the means to materialize a table that has
an entry in a table store (i.e., has a table-prep formula with a unique
name). The table store that is used for this can be in the form of a
tbl_store object (created with the tbl_store() function) or an on-disk
YAML representation of a table store (created by using yaml_write() with a
tbl_store object).
Should you want a table-prep formula from a table store to use as a value for
tbl (in create_agent(), create_informant(), or set_tbl()), then have
a look at the tbl_source() function.
Usage
tbl_get(tbl, store = NULL)tbl_get(tbl, store = NULL)
Arguments
tbl |
The table to retrieve from a table |
store |
Either a table store object created by the |
Value
A table object.
Examples
Define a tbl_store object by adding several table-prep formulas in
tbl_store().
store <-
tbl_store(
small_table_duck ~ db_tbl(
table = small_table,
dbname = ":memory:",
dbtype = "duckdb"
),
~ db_tbl(
table = "rna",
dbname = "pfmegrnargs",
dbtype = "postgres",
host = "hh-pgsql-public.ebi.ac.uk",
port = 5432,
user = I("reader"),
password = I("NWDMCE5xdipIjRrp")
),
sml_table ~ pointblank::small_table
)
Once this object is available, we can access the tables named:
"small_table_duck", "rna", and "sml_table". Let's check that the
"rna" table is accessible through tbl_get():
tbl_get( tbl = "rna", store = store )
## # Source: table<rna> [?? x 9] ## # Database: postgres [[email protected]:5432/pfmegrnargs] ## id upi timestamp userstamp crc64 len seq_short ## <int64> <chr> <dttm> <chr> <chr> <int> <chr> ## 1 24583872 URS000177… 2019-12-02 13:26:08 rnacen C380… 511 ATTGAACG… ## 2 24583873 URS000177… 2019-12-02 13:26:08 rnacen BC42… 390 ATGGGCGA… ## 3 24583874 URS000177… 2019-12-02 13:26:08 rnacen 19A5… 422 CTACGGGA… ## 4 24583875 URS000177… 2019-12-02 13:26:08 rnacen 66E1… 534 AGGGTTCG… ## 5 24583876 URS000177… 2019-12-02 13:26:08 rnacen CC8F… 252 TACGTAGG… ## 6 24583877 URS000177… 2019-12-02 13:26:08 rnacen 19E4… 413 ATGGGCGA… ## 7 24583878 URS000177… 2019-12-02 13:26:08 rnacen AE91… 253 TACGAAGG… ## 8 24583879 URS000177… 2019-12-02 13:26:08 rnacen E21A… 304 CAGCAGTA… ## 9 24583880 URS000177… 2019-12-02 13:26:08 rnacen 1AA7… 460 CCTACGGG… ## 10 24583881 URS000177… 2019-12-02 13:26:08 rnacen 2046… 440 CCTACGGG… ## # … with more rows, and 2 more variables: seq_long <chr>, md5 <chr>
An alternative method for getting the same table materialized is by using $
to get the formula of choice from tbls and passing that to tbl_get(). The
benefit of this is that we can use autocompletion to show us what's available
in the table store (i.e., appears after typing the $).
store$small_table_duck %>% tbl_get()
## # Source: table<small_table> [?? x 8] ## # Database: duckdb_connection ## date_time date a b c d e f ## <dttm> <date> <int> <chr> <dbl> <dbl> <lgl> <chr> ## 1 2016-01-04 11:00:00 2016-01-04 2 1-bcd-345 3 3423. TRUE high ## 2 2016-01-04 00:32:00 2016-01-04 3 5-egh-163 8 10000. TRUE low ## 3 2016-01-05 13:32:00 2016-01-05 6 8-kdg-938 3 2343. TRUE high ## 4 2016-01-06 17:23:00 2016-01-06 2 5-jdo-903 NA 3892. FALSE mid ## 5 2016-01-09 12:36:00 2016-01-09 8 3-ldm-038 7 284. TRUE low ## 6 2016-01-11 06:15:00 2016-01-11 4 2-dhe-923 4 3291. TRUE mid ## 7 2016-01-15 18:46:00 2016-01-15 7 1-knw-093 3 843. TRUE high ## 8 2016-01-17 11:27:00 2016-01-17 4 5-boe-639 2 1036. FALSE low ## 9 2016-01-20 04:30:00 2016-01-20 3 5-bce-642 9 838. FALSE high ## 10 2016-01-20 04:30:00 2016-01-20 3 5-bce-642 9 838. FALSE high ## # … with more rows
Function ID
1-10
See Also
Other Planning and Prep:
action_levels(),
create_agent(),
create_informant(),
db_tbl(),
draft_validation(),
file_tbl(),
scan_data(),
tbl_source(),
tbl_store(),
validate_rmd()
Does the target table match a comparison table?
Description
The tbl_match() validation function, the expect_tbl_match() expectation
function, and the test_tbl_match() test function all check whether the
target table's composition matches that of a comparison table. The validation
function can be used directly on a data table or with an agent object
(technically, a ptblank_agent object) whereas the expectation and test
functions can only be used with a data table. The types of data tables that
can be used include data frames, tibbles, database tables (tbl_dbi), and
Spark DataFrames (tbl_spark). As a validation step or as an expectation,
there is a single test unit that hinges on whether the two tables are the
same (after any preconditions have been applied).
Usage
tbl_match( x, tbl_compare, preconditions = NULL, segments = NULL, actions = NULL, step_id = NULL, label = NULL, brief = NULL, active = TRUE ) expect_tbl_match(object, tbl_compare, preconditions = NULL, threshold = 1) test_tbl_match(object, tbl_compare, preconditions = NULL, threshold = 1)tbl_match( x, tbl_compare, preconditions = NULL, segments = NULL, actions = NULL, step_id = NULL, label = NULL, brief = NULL, active = TRUE ) expect_tbl_match(object, tbl_compare, preconditions = NULL, threshold = 1) test_tbl_match(object, tbl_compare, preconditions = NULL, threshold = 1)
Arguments
x |
A pointblank agent or a data table
A data frame, tibble ( |
tbl_compare |
A data table for comparison
A table to compare against the target table. This can either be a table
object, a table-prep formula. This can be a table object such as a data
frame, a tibble, a |
preconditions |
Input table modification prior to validation
An optional expression for mutating the input table before proceeding with
the validation. This can either be provided as a one-sided R formula using
a leading |
segments |
Expressions for segmenting the target table
An optional expression or set of expressions (held in a list) that serve to segment the target table by column values. Each expression can be given in one of two ways: (1) as column names, or (2) as a two-sided formula where the LHS holds a column name and the RHS contains the column values to segment on. See the Segments section for more details on this. |
actions |
Thresholds and actions for different states
A list containing threshold levels so that the validation step can react
accordingly when exceeding the set levels for different states. This is to
be created with the |
step_id |
Manual setting of the step ID value
One or more optional identifiers for the single or multiple validation
steps generated from calling a validation function. The use of step IDs
serves to distinguish validation steps from each other and provide an
opportunity for supplying a more meaningful label compared to the step
index. By default this is |
label |
Optional label for the validation step
Optional label for the validation step. This label appears in the agent report and, for the best appearance, it should be kept quite short. See the Labels section for more information. |
brief |
Brief description for the validation step
A brief is a short, text-based description for the validation step. If
nothing is provided here then an autobrief is generated by the agent,
using the language provided in |
active |
Is the validation step active?
A logical value indicating whether the validation step should be active. If
the validation function is working with an agent, |
object |
A data table for expectations or tests
A data frame, tibble ( |
threshold |
The failure threshold
A simple failure threshold value for use with the expectation ( |
Value
For the validation function, the return value is either a
ptblank_agent object or a table object (depending on whether an agent
object or a table was passed to x). The expectation function invisibly
returns its input but, in the context of testing data, the function is
called primarily for its potential side-effects (e.g., signaling failure).
The test function returns a logical value.
Supported Input Tables
The types of data tables that are officially supported are:
-
data frames (
data.frame) and tibbles (tbl_df) -
Spark DataFrames (
tbl_spark) -
the following database tables (
tbl_dbi):-
PostgreSQL tables (using the
RPostgres::Postgres()as driver) -
MySQL tables (with
RMySQL::MySQL()) -
Microsoft SQL Server tables (via odbc)
-
BigQuery tables (using
bigrquery::bigquery()) -
DuckDB tables (through
duckdb::duckdb()) -
SQLite (with
RSQLite::SQLite())
-
Preconditions
Providing expressions as preconditions means pointblank will preprocess
the target table during interrogation as a preparatory step. It might happen
that this particular validation requires some operation on the target table
before the comparison takes place. Using preconditions can be useful at
times since since we can develop a large validation plan with a single target
table and make minor adjustments to it, as needed, along the way.
The table mutation is totally isolated in scope to the validation step(s)
where preconditions is used. Using dplyr code is suggested here since
the statements can be translated to SQL if necessary (i.e., if the target
table resides in a database). The code is most easily supplied as a one-sided
R formula (using a leading ~). In the formula representation, the .
serves as the input data table to be transformed. Alternatively, a function
could instead be supplied.
Segments
By using the segments argument, it's possible to define a particular
validation with segments (or row slices) of the target table. An optional
expression or set of expressions that serve to segment the target table by
column values. Each expression can be given in one of two ways: (1) as column
names, or (2) as a two-sided formula where the LHS holds a column name and
the RHS contains the column values to segment on.
As an example of the first type of expression that can be used,
vars(a_column) will segment the target table in however many unique values
are present in the column called a_column. This is great if every unique
value in a particular column (like different locations, or different dates)
requires it's own repeating validation.
With a formula, we can be more selective with which column values should be
used for segmentation. Using a_column ~ c("group_1", "group_2") will
attempt to obtain two segments where one is a slice of data where the value
"group_1" exists in the column named "a_column", and, the other is a
slice where "group_2" exists in the same column. Each group of rows
resolved from the formula will result in a separate validation step.
Segmentation will always occur after preconditions (i.e., statements that
mutate the target table), if any, are applied. With this type of one-two
combo, it's possible to generate labels for segmentation using an expression
for preconditions and refer to those labels in segments without having to
generate a separate version of the target table.
Actions
Often, we will want to specify actions for the validation. This argument,
present in every validation function, takes a specially-crafted list object
that is best produced by the action_levels() function. Read that function's
documentation for the lowdown on how to create reactions to above-threshold
failure levels in validation. The basic gist is that you'll want at least a
single threshold level (specified as either the fraction of test units
failed, or, an absolute value), often using the warn_at argument. Using
action_levels(warn_at = 1) or action_levels(stop_at = 1) are good choices
depending on the situation (the first produces a warning, the other
stop()s).
Labels
label may be a single string or a character vector that matches the number
of expanded steps. label also supports {glue} syntax and exposes the
following dynamic variables contextualized to the current step:
-
"{.step}": The validation step name -
"{.seg_col}": The current segment's column name -
"{.seg_val}": The current segment's value/group
The glue context also supports ordinary expressions for further flexibility
(e.g., "{toupper(.step)}") as long as they return a length-1 string.
Briefs
Want to describe this validation step in some detail? Keep in mind that this
is only useful if x is an agent. If that's the case, brief the agent
with some text that fits. Don't worry if you don't want to do it. The
autobrief protocol is kicked in when brief = NULL and a simple brief will
then be automatically generated.
YAML
A pointblank agent can be written to YAML with yaml_write() and the
resulting YAML can be used to regenerate an agent (with yaml_read_agent())
or interrogate the target table (via yaml_agent_interrogate()). When
tbl_match() is represented in YAML (under the top-level steps key as a
list member), the syntax closely follows the signature of the validation
function. Here is an example of how a complex call of tbl_match() as a
validation step is expressed in R code and in the corresponding YAML
representation.
R statement:
agent %>%
tbl_match(
tbl_compare = ~ file_tbl(
file = from_github(
file = "sj_all_revenue_large.rds",
repo = "rich-iannone/intendo",
subdir = "data-large"
)
),
preconditions = ~ . %>% dplyr::filter(a < 10),
segments = b ~ c("group_1", "group_2"),
actions = action_levels(warn_at = 0.1, stop_at = 0.2),
label = "The `tbl_match()` step.",
active = FALSE
)
YAML representation:
steps:
- tbl_match:
tbl_compare: ~ file_tbl(
file = from_github(
file = "sj_all_revenue_large.rds",
repo = "rich-iannone/intendo",
subdir = "data-large"
)
)
preconditions: ~. %>% dplyr::filter(a < 10)
segments: b ~ c("group_1", "group_2")
actions:
warn_fraction: 0.1
stop_fraction: 0.2
label: The `tbl_match()` step.
active: false
In practice, both of these will often be shorter. Arguments with default
values won't be written to YAML when using yaml_write() (though it is
acceptable to include them with their default when generating the YAML by
other means). It is also possible to preview the transformation of an agent
to YAML without any writing to disk by using the yaml_agent_string()
function.
Examples
Create a simple table with three columns and four rows of values.
tbl <-
dplyr::tibble(
a = c(5, 7, 6, 5),
b = c(7, 1, 0, 0),
c = c(1, 1, 1, 3)
)
tbl
#> # A tibble: 4 x 3
#> a b c
#> <dbl> <dbl> <dbl>
#> 1 5 7 1
#> 2 7 1 1
#> 3 6 0 1
#> 4 5 0 3
Create a second table which is the same as tbl.
tbl_2 <-
dplyr::tibble(
a = c(5, 7, 6, 5),
b = c(7, 1, 0, 0),
c = c(1, 1, 1, 3)
)
tbl_2
#> # A tibble: 4 x 3
#> a b c
#> <dbl> <dbl> <dbl>
#> 1 5 7 1
#> 2 7 1 1
#> 3 6 0 1
#> 4 5 0 3
A: Using an agent with validation functions and then interrogate()
Validate that the target table (tbl) and the comparison table (tbl_2) are
equivalent in terms of content.
agent <- create_agent(tbl = tbl) %>% tbl_match(tbl_compare = tbl_2) %>% interrogate()
Printing the agent in the console shows the validation report in the
Viewer. Here is an excerpt of validation report, showing the single entry
that corresponds to the validation step demonstrated here.

B: Using the validation function directly on the data (no agent)
This way of using validation functions acts as a data filter. Data is passed
through but should stop() if there is a single test unit failing. The
behavior of side effects can be customized with the actions option.
tbl %>% tbl_match(tbl_compare = tbl_2) #> # A tibble: 4 x 3 #> a b c #> <dbl> <dbl> <dbl> #> 1 5 7 1 #> 2 7 1 1 #> 3 6 0 1 #> 4 5 0 3
C: Using the expectation function
With the expect_*() form, we would typically perform one validation at a
time. This is primarily used in testthat tests.
expect_tbl_match(tbl, tbl_compare = tbl_2)
D: Using the test function
With the test_*() form, we should get a single logical value returned to
us.
tbl %>% test_tbl_match(tbl_compare = tbl_2) #> [1] TRUE
Function ID
2-33
See Also
Other validation functions:
col_count_match(),
col_exists(),
col_is_character(),
col_is_date(),
col_is_factor(),
col_is_integer(),
col_is_logical(),
col_is_numeric(),
col_is_posix(),
col_schema_match(),
col_vals_between(),
col_vals_decreasing(),
col_vals_equal(),
col_vals_expr(),
col_vals_gt(),
col_vals_gte(),
col_vals_in_set(),
col_vals_increasing(),
col_vals_lt(),
col_vals_lte(),
col_vals_make_set(),
col_vals_make_subset(),
col_vals_not_between(),
col_vals_not_equal(),
col_vals_not_in_set(),
col_vals_not_null(),
col_vals_null(),
col_vals_regex(),
col_vals_within_spec(),
conjointly(),
row_count_match(),
rows_complete(),
rows_distinct(),
serially(),
specially()
Obtain a table-prep formula from a table store
Description
The tbl_source() function provides a convenient means to access a
table-prep formula from either a tbl_store object or a table store YAML
file (which can be created with the yaml_write() function). A call to
tbl_source() is most useful as an input to the tbl argument of
create_agent(), create_informant(), or set_tbl().
Should you need to obtain the table itself (that is generated via the
table-prep formula), then the tbl_get() function should be used for that.
Usage
tbl_source(tbl, store = NULL)tbl_source(tbl, store = NULL)
Arguments
tbl |
The table name associated with a table-prep formula. This is part
of the table |
store |
Either a table store object created by the |
Value
A table-prep formula.
Examples
Let's create a tbl_store object by giving two table-prep formulas to
tbl_store().
store <-
tbl_store(
small_table_duck ~ db_tbl(
table = small_table,
dbname = ":memory:",
dbtype = "duckdb"
),
sml_table ~ pointblank::small_table
)
We can pass a table-prep formula to create_agent() via tbl_source(), add
some validation steps, and interrogate the table shortly thereafter.
agent_1 <-
create_agent(
tbl = ~ tbl_source("sml_table", store),
label = "`tbl_source()` example",
actions = action_levels(warn_at = 0.10)
) %>%
col_exists(columns = c(date, date_time)) %>%
interrogate()
The agent_1 object can be printed to see the validation report in the
Viewer.
agent_1
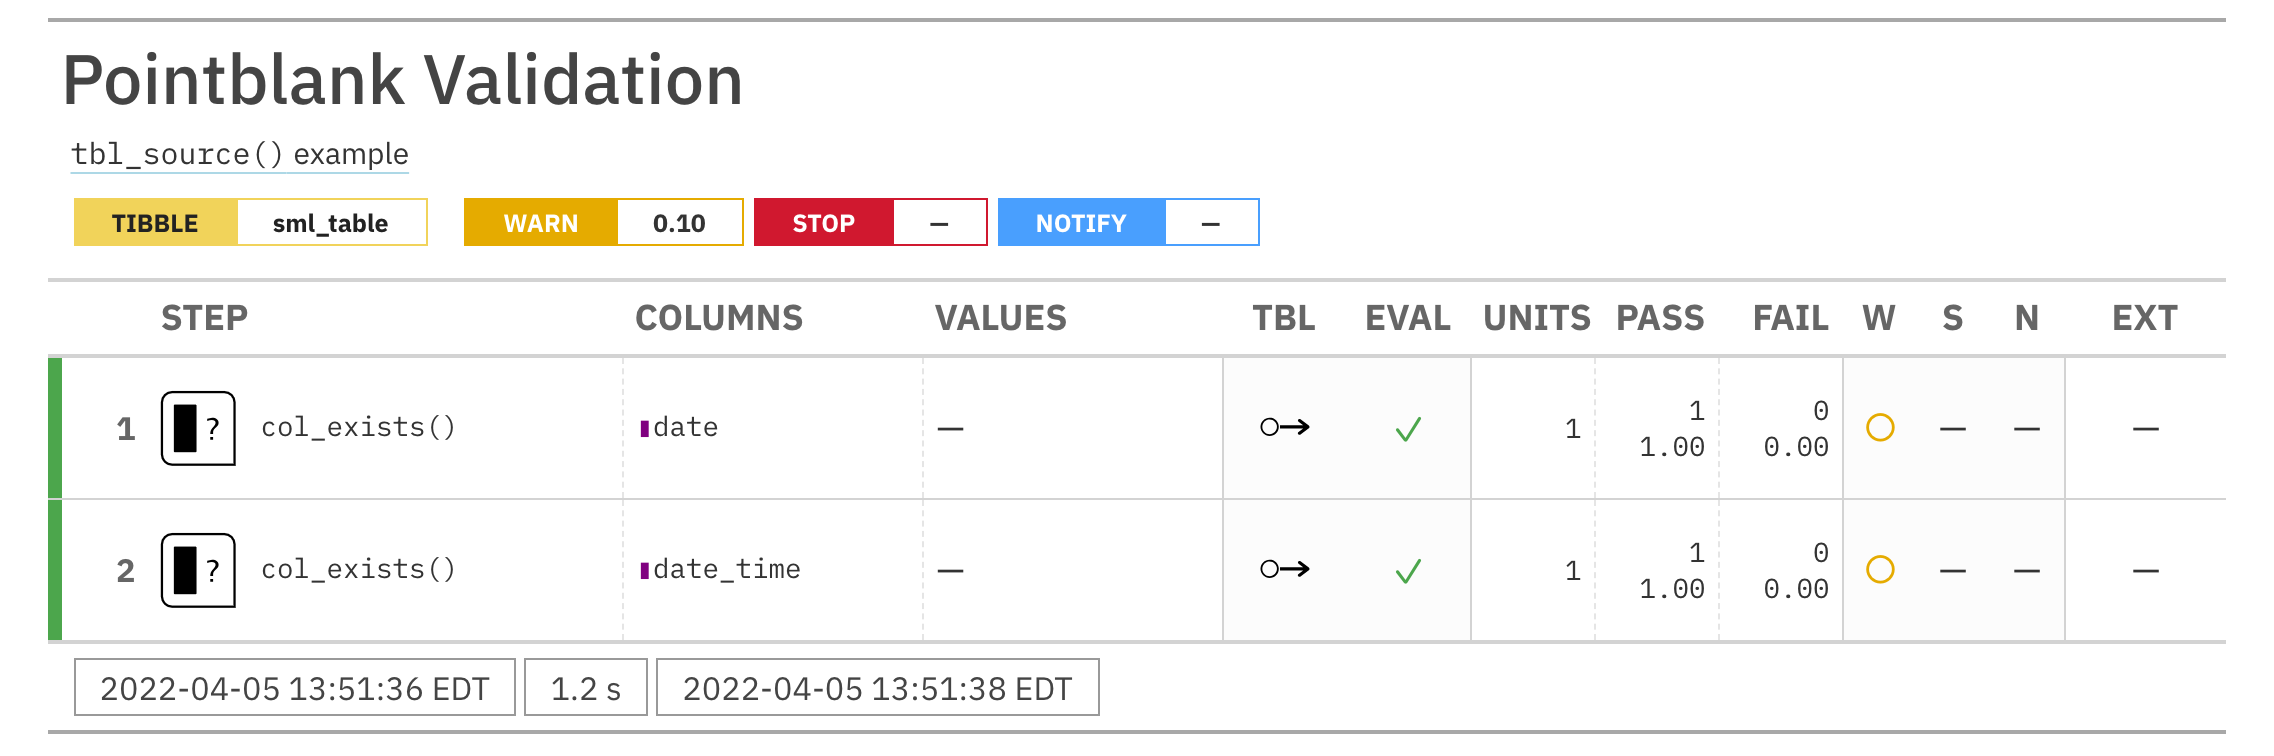
The tbl_store object can be transformed to YAML with the yaml_write()
function. The following statement writes the tbl_store.yml file by default
(but a different name could be used with the filename argument):
yaml_write(store)
Let's modify the agent's target to point to the table labeled as
"sml_table" in the YAML representation of the tbl_store.
agent_2 <-
agent_1 %>%
set_tbl(
~ tbl_source(
tbl = "sml_table",
store = "tbl_store.yml"
)
)
We can likewise write the agent to a YAML file with yaml_write() (writes to
agent-sml_table.yml by default but the filename allows for any filename
you want).
yaml_write(agent_2)
Now that both the agent and the associated table store are present as on-disk
YAML, interrogations can be done by using yaml_agent_interrogate().
agent <- yaml_agent_interrogate(filename = "agent-sml_table.yml")
Function ID
1-9
See Also
Other Planning and Prep:
action_levels(),
create_agent(),
create_informant(),
db_tbl(),
draft_validation(),
file_tbl(),
scan_data(),
tbl_get(),
tbl_store(),
validate_rmd()
Define a store of tables with table-prep formulas: a table store
Description
It can be useful to set up all the data sources you need and just draw from
them when necessary. This upfront configuration with tbl_store() lets us
define the methods for obtaining tabular data from mixed sources (e.g.,
database tables, tables generated from flat files, etc.) and provide
identifiers for these data preparation procedures.
What results from this work is a convenient way to materialize tables with
tbl_get(). We can also get any table-prep formula from the table store
with tbl_source(). The content of a table-prep formulas can involve reading
a table from a location, or, it can involve data transformation. One can
imagine scenarios where we might (1) procure several mutated variations of
the same source table, (2) generate a table using disparate data sources, or
(3) filter the rows of a database table according to the system time. Another
nice aspect of organizing table-prep formulas in a single object is supplying
it to the tbl argument of create_agent() or create_informant() via $
notation (e.g, create_agent(tbl = <tbl_store>$<name>)) or with
tbl_source() (e.g.,
create_agent(tbl = ~ tbl_source("<name>", <tbl_store>))).
Usage
tbl_store(..., .list = list2(...), .init = NULL)tbl_store(..., .list = list2(...), .init = NULL)
Arguments
... |
Expressions that contain table-prep formulas and table names for
data retrieval. Two-sided formulas (e.g, |
.list |
Allows for the use of a list as an input alternative to |
.init |
We can optionally provide an initialization statement (in a
one-sided formula) that should be executed whenever any of tables in the
table store are obtained. This is useful, for instance, for including a
|
Value
A tbl_store object that contains table-prep formulas.
YAML
A pointblank table store can be written to YAML with yaml_write() and
the resulting YAML can be used in several ways. The ideal scenario is to have
pointblank agents and informants also in YAML form. This way the agent and
informant can refer to the table store YAML (via tbl_source()), and, the
processing of both agents and informants can be performed with
yaml_agent_interrogate() and yaml_informant_incorporate(). With the
following R code, a table store with two table-prep formulas is generated and
written to YAML (if no filename is given then the YAML is written to
"tbl_store.yml").
R statement for generating the "tbl_store.yml" file:
tbl_store( tbl_duckdb ~ db_tbl(small_table, dbname = ":memory:", dbtype = "duckdb"), sml_table_high ~ small_table %>% dplyr::filter(f == "high"), .init = ~ library(tidyverse) ) %>% yaml_write()
YAML representation ("tbl_store.yml"):
type: tbl_store tbls: tbl_duckdb: ~ db_tbl(small_table, dbname = ":memory:", dbtype = "duckdb") sml_table_high: ~ small_table %>% dplyr::filter(f == "high") init: ~library(tidyverse)
This is useful when you want to get fresh pulls of prepared data from a
source materialized in an R session (with the tbl_get() function. For
example, the sml_table_high table can be obtained by using
tbl_get("sml_table_high", "tbl_store.yml"). To get an agent to check this
prepared data periodically, then the following example with tbl_source()
will be useful:
R code to generate agent that checks sml_table_high and writing the agent
to YAML:
create_agent(
tbl = ~ tbl_source("sml_table_high", "tbl_store.yml"),
label = "An example that uses a table store.",
actions = action_levels(warn_at = 0.10)
) %>%
col_exists(c(date, date_time)) %>%
write_yaml()
The YAML representation ("agent-sml_table_high.yml"):
tbl: ~ tbl_source("sml_table_high", "tbl_store.yml")
tbl_name: sml_table_high
label: An example that uses a table store.
actions:
warn_fraction: 0.1
locale: en
steps:
- col_exists:
columns: c(date, date_time)
Now, whenever the sml_table_high table needs to be validated, it can be
done with yaml_agent_interrogate() (e.g.,
yaml_agent_interrogate("agent-sml_table_high.yml")).
Examples
Creating an in-memory table store and adding table-prep formulas
The table store provides a way to get the tables we need fairly easily. Think of an identifier for the table you'd like and then provide the code necessary to obtain that table. Then repeat as many times as you like!
Here we'll define two tables that can be materialized later: tbl_duckdb (an
in-memory DuckDB database table with pointblank's small_table dataset)
and sml_table_high (a filtered version of tbl_duckdb):
store_1 <-
tbl_store(
tbl_duckdb ~
db_tbl(
pointblank::small_table,
dbname = ":memory:",
dbtype = "duckdb"
),
sml_table_high ~
db_tbl(
pointblank::small_table,
dbname = ":memory:",
dbtype = "duckdb"
) %>%
dplyr::filter(f == "high")
)
We can see what's in the table store store_1 by printing it out:
store_1
## -- The `table_store` table-prep formulas ## 1 tbl_duckdb // ~ db_tbl(pointblank::small_table, dbname = ":memory:", ## dbtype = "duckdb") ## 2 sml_table_high // ~ db_tbl(pointblank::small_table, dbname = ":memory:", ## dbtype = "duckdb") %>% dplyr::filter(f == "high") ## ----
It's good to check that the tables can be obtained without error. We can do
this with the tbl_get() function. With that function, we need to supply the
given name of the table-prep formula (in quotes) and the table store object.
tbl_get(tbl = "tbl_duckdb", store = store_1)
## # Source: table<pointblank::small_table> [?? x 8] ## # Database: duckdb_connection ## date_time date a b c d e f ## <dttm> <date> <int> <chr> <dbl> <dbl> <lgl> <chr> ## 1 2016-01-04 11:00:00 2016-01-04 2 1-bcd-345 3 3423. TRUE high ## 2 2016-01-04 00:32:00 2016-01-04 3 5-egh-163 8 10000. TRUE low ## 3 2016-01-05 13:32:00 2016-01-05 6 8-kdg-938 3 2343. TRUE high ## 4 2016-01-06 17:23:00 2016-01-06 2 5-jdo-903 NA 3892. FALSE mid ## 5 2016-01-09 12:36:00 2016-01-09 8 3-ldm-038 7 284. TRUE low ## 6 2016-01-11 06:15:00 2016-01-11 4 2-dhe-923 4 3291. TRUE mid ## 7 2016-01-15 18:46:00 2016-01-15 7 1-knw-093 3 843. TRUE high ## 8 2016-01-17 11:27:00 2016-01-17 4 5-boe-639 2 1036. FALSE low ## 9 2016-01-20 04:30:00 2016-01-20 3 5-bce-642 9 838. FALSE high ## 10 2016-01-20 04:30:00 2016-01-20 3 5-bce-642 9 838. FALSE high ## # … with more rows
tbl_get(tbl = "sml_table_high", store = store_1)
## # Source: lazy query [?? x 8] ## # Database: duckdb_connection ## date_time date a b c d e f ## <dttm> <date> <int> <chr> <dbl> <dbl> <lgl> <chr> ## 1 2016-01-04 11:00:00 2016-01-04 2 1-bcd-345 3 3423. TRUE high ## 2 2016-01-05 13:32:00 2016-01-05 6 8-kdg-938 3 2343. TRUE high ## 3 2016-01-15 18:46:00 2016-01-15 7 1-knw-093 3 843. TRUE high ## 4 2016-01-20 04:30:00 2016-01-20 3 5-bce-642 9 838. FALSE high ## 5 2016-01-20 04:30:00 2016-01-20 3 5-bce-642 9 838. FALSE high ## 6 2016-01-30 11:23:00 2016-01-30 1 3-dka-303 NA 2230. TRUE high
We can shorten the tbl_store() statement with some syntax that
pointblank provides. The sml_table_high table-prep is simply a
transformation of tbl_duckdb, so, we can use {{ tbl_duckdb }} in place of
the repeated statement. Additionally, we can provide a library() call to
the .init argument of tbl_store() so that dplyr is available (thus
allowing us to use filter(...) instead of dplyr::filter(...)). Here is
the revised tbl_store() call:
store_2 <-
tbl_store(
tbl_duckdb ~
db_tbl(
pointblank::small_table,
dbname = ":memory:",
dbtype = "duckdb"
),
sml_table_high ~
{{ tbl_duckdb }} %>%
filter(f == "high"),
.init = ~ library(tidyverse)
)
Printing the table store store_2 now shows that we used an .init
statement:
store_2
## -- The `table_store` table-prep formulas
## 1 tbl_duckdb // ~ db_tbl(pointblank::small_table, dbname = ":memory:",
## dbtype = "duckdb")
## 2 sml_table_high // ~ {{tbl_duckdb}} %>% filter(f == "high")
## ----
## INIT // ~library(tidyverse)
## ----
Checking again with tbl_get() should provide the same tables as before:
tbl_get(tbl = "tbl_duckdb", store = store_2)
## # Source: table<pointblank::small_table> [?? x 8] ## # Database: duckdb_connection ## date_time date a b c d e f ## <dttm> <date> <int> <chr> <dbl> <dbl> <lgl> <chr> ## 1 2016-01-04 11:00:00 2016-01-04 2 1-bcd-345 3 3423. TRUE high ## 2 2016-01-04 00:32:00 2016-01-04 3 5-egh-163 8 10000. TRUE low ## 3 2016-01-05 13:32:00 2016-01-05 6 8-kdg-938 3 2343. TRUE high ## 4 2016-01-06 17:23:00 2016-01-06 2 5-jdo-903 NA 3892. FALSE mid ## 5 2016-01-09 12:36:00 2016-01-09 8 3-ldm-038 7 284. TRUE low ## 6 2016-01-11 06:15:00 2016-01-11 4 2-dhe-923 4 3291. TRUE mid ## 7 2016-01-15 18:46:00 2016-01-15 7 1-knw-093 3 843. TRUE high ## 8 2016-01-17 11:27:00 2016-01-17 4 5-boe-639 2 1036. FALSE low ## 9 2016-01-20 04:30:00 2016-01-20 3 5-bce-642 9 838. FALSE high ## 10 2016-01-20 04:30:00 2016-01-20 3 5-bce-642 9 838. FALSE high ## # … with more rows
tbl_get(tbl = "sml_table_high", store = store_2)
## # Source: lazy query [?? x 8] ## # Database: duckdb_connection ## date_time date a b c d e f ## <dttm> <date> <int> <chr> <dbl> <dbl> <lgl> <chr> ## 1 2016-01-04 11:00:00 2016-01-04 2 1-bcd-345 3 3423. TRUE high ## 2 2016-01-05 13:32:00 2016-01-05 6 8-kdg-938 3 2343. TRUE high ## 3 2016-01-15 18:46:00 2016-01-15 7 1-knw-093 3 843. TRUE high ## 4 2016-01-20 04:30:00 2016-01-20 3 5-bce-642 9 838. FALSE high ## 5 2016-01-20 04:30:00 2016-01-20 3 5-bce-642 9 838. FALSE high ## 6 2016-01-30 11:23:00 2016-01-30 1 3-dka-303 NA 2230. TRUE high
Using a table store in a data validation workflow
Define a tbl_store object by adding table-prep formulas inside the
tbl_store() call.
store_3 <-
tbl_store(
small_table_duck ~ db_tbl(
table = small_table,
dbname = ":memory:",
dbtype = "duckdb"
),
~ db_tbl(
table = "rna",
dbname = "pfmegrnargs",
dbtype = "postgres",
host = "hh-pgsql-public.ebi.ac.uk",
port = 5432,
user = I("reader"),
password = I("NWDMCE5xdipIjRrp")
),
all_revenue ~ db_tbl(
table = file_tbl(
file = from_github(
file = "sj_all_revenue_large.rds",
repo = "rich-iannone/intendo",
subdir = "data-large"
)
),
dbname = ":memory:",
dbtype = "duckdb"
),
sml_table ~ pointblank::small_table
)
Let's get a summary of what's in the table store store_3 through printing:
store_3
## -- The `table_store` table-prep formulas
## 1 small_table_duck // ~ db_tbl(table = small_table, dbname = ":memory:",
## dbtype = "duckdb")
## 2 rna // ~db_tbl(table = "rna", dbname = "pfmegrnargs", dbtype =
## "postgres", host = "hh-pgsql-public.ebi.ac.uk", port = 5432, user =
## I("reader"), password = I("NWDMCE5xdipIjRrp"))
## 3 all_revenue // ~ db_tbl(table = file_tbl(file = from_github(file =
## "sj_all_revenue_large.rds", repo = "rich-iannone/intendo", subdir =
## "data-large")), dbname = ":memory:", dbtype = "duckdb")
## 4 sml_table // ~ pointblank::small_table
## ----
Once this object is available, you can check that the table of interest is
produced to your specification with the tbl_get() function.
tbl_get( tbl = "small_table_duck", store = store_3 )
## # Source: table<small_table> [?? x 8] ## # Database: duckdb_connection ## date_time date a b c d e f ## <dttm> <date> <int> <chr> <dbl> <dbl> <lgl> <chr> ## 1 2016-01-04 11:00:00 2016-01-04 2 1-bcd-345 3 3423. TRUE high ## 2 2016-01-04 00:32:00 2016-01-04 3 5-egh-163 8 10000. TRUE low ## 3 2016-01-05 13:32:00 2016-01-05 6 8-kdg-938 3 2343. TRUE high ## 4 2016-01-06 17:23:00 2016-01-06 2 5-jdo-903 NA 3892. FALSE mid ## 5 2016-01-09 12:36:00 2016-01-09 8 3-ldm-038 7 284. TRUE low ## 6 2016-01-11 06:15:00 2016-01-11 4 2-dhe-923 4 3291. TRUE mid ## 7 2016-01-15 18:46:00 2016-01-15 7 1-knw-093 3 843. TRUE high ## 8 2016-01-17 11:27:00 2016-01-17 4 5-boe-639 2 1036. FALSE low ## 9 2016-01-20 04:30:00 2016-01-20 3 5-bce-642 9 838. FALSE high ## 10 2016-01-20 04:30:00 2016-01-20 3 5-bce-642 9 838. FALSE high ## # … with more rows
Another way to get the same table materialized is by using $ to get the
entry of choice for tbl_get().
store_3$small_table_duck %>% tbl_get()
## # Source: table<small_table> [?? x 8] ## # Database: duckdb_connection ## date_time date a b c d e f ## <dttm> <date> <int> <chr> <dbl> <dbl> <lgl> <chr> ## 1 2016-01-04 11:00:00 2016-01-04 2 1-bcd-345 3 3423. TRUE high ## 2 2016-01-04 00:32:00 2016-01-04 3 5-egh-163 8 10000. TRUE low ## 3 2016-01-05 13:32:00 2016-01-05 6 8-kdg-938 3 2343. TRUE high ## 4 2016-01-06 17:23:00 2016-01-06 2 5-jdo-903 NA 3892. FALSE mid ## 5 2016-01-09 12:36:00 2016-01-09 8 3-ldm-038 7 284. TRUE low ## 6 2016-01-11 06:15:00 2016-01-11 4 2-dhe-923 4 3291. TRUE mid ## 7 2016-01-15 18:46:00 2016-01-15 7 1-knw-093 3 843. TRUE high ## 8 2016-01-17 11:27:00 2016-01-17 4 5-boe-639 2 1036. FALSE low ## 9 2016-01-20 04:30:00 2016-01-20 3 5-bce-642 9 838. FALSE high ## 10 2016-01-20 04:30:00 2016-01-20 3 5-bce-642 9 838. FALSE high ## # … with more rows
Creating an agent is easy when all table-prep formulas are encapsulated in a
tbl_store object. Use $ notation to pass the appropriate procedure for
reading a table to the tbl argument.
agent_1 <-
create_agent(
tbl = store_3$small_table_duck
)
There are other ways to use the table store to assign a target table to an
agent, like using the tbl_source() function (which extracts the table-prep
formula from the table store).
agent_2 <-
create_agent(
tbl = ~ tbl_source(
tbl = "small_table_duck",
store = store_3
)
)
Writing a table store to a YAML file
The table store can be moved to YAML with yaml_write and the tbl_source()
call could then refer to that on-disk table store. Let's do that YAML
conversion.
yaml_write(store_3)
The above writes the tbl_store.yml file (by not providing a filename this
default filename is chosen).
It can be convenient to read table-prep formulas from a YAML file that's a
table store. To achieve this, we can modify the tbl_source() statement in
the create_agent() call so that store refers to the on-disk YAML file.
agent_3 <-
create_agent(
tbl = ~ tbl_source(
tbl = "small_table_duck",
store = "tbl_store.yml"
)
)
Function ID
1-8
See Also
Other Planning and Prep:
action_levels(),
create_agent(),
create_informant(),
db_tbl(),
draft_validation(),
file_tbl(),
scan_data(),
tbl_get(),
tbl_source(),
validate_rmd()
Table Transformer: obtain a summary table for string columns
Description
With any table object, you can produce a summary table that is scoped to
string-based columns. The output summary table will have a leading column
called ".param." with labels for each of the three rows, each corresponding
to the following pieces of information pertaining to string length:
-
Mean String Length (
"length_mean") -
Minimum String Length (
"length_min") -
Maximum String Length (
"length_max")
Only string data from the input table will generate columns in the output table. Column names from the input will be used in the output, preserving order as well.
Usage
tt_string_info(tbl)tt_string_info(tbl)
Arguments
tbl |
A data table
A table object to be used as input for the transformation. This can be a
data frame, a tibble, a |
Value
A tibble object.
Examples
Get string information for the string-based columns in the game_revenue
dataset that is included in the pointblank package.
tt_string_info(tbl = game_revenue) #> # A tibble: 3 x 7 #> .param. player_id session_id item_type item_name acquisition country #> <chr> <dbl> <dbl> <dbl> <dbl> <dbl> <dbl> #> 1 length_mean 15 24 2.22 7.35 7.97 8.53 #> 2 length_min 15 24 2 5 5 5 #> 3 length_max 15 24 3 11 14 14
Ensure that player_id and session_id values always have the same fixed
numbers of characters (15 and 24, respectively) throughout the table.
tt_string_info(tbl = game_revenue) %>%
col_vals_equal(
columns = player_id,
value = 15
) %>%
col_vals_equal(
columns = session_id,
value = 24
)
#> # A tibble: 3 x 7
#> .param. player_id session_id item_type item_name acquisition country
#> <chr> <dbl> <dbl> <dbl> <dbl> <dbl> <dbl>
#> 1 length_mean 15 24 2.22 7.35 7.97 8.53
#> 2 length_min 15 24 2 5 5 5
#> 3 length_max 15 24 3 11 14 14
We see data, and not an error, so both validations were successful!
Let's use a tt_string_info()-transformed table with the
test_col_vals_lte() to check that the maximum string length in column f
of the small_table dataset is no greater than 4.
tt_string_info(tbl = small_table) %>%
test_col_vals_lte(
columns = f,
value = 4
)
#> [1] TRUE
Function ID
12-2
See Also
Other Table Transformers:
get_tt_param(),
tt_summary_stats(),
tt_tbl_colnames(),
tt_tbl_dims(),
tt_time_shift(),
tt_time_slice()
Table Transformer: obtain a summary stats table for numeric columns
Description
With any table object, you can produce a summary table that is scoped to the
numeric column values. The output summary table will have a leading column
called ".param." with labels for each of the nine rows, each corresponding
to the following summary statistics:
-
Minimum (
"min") -
5th Percentile (
"p05") -
1st Quartile (
"q_1") -
Median (
"med") -
3rd Quartile (
"q_3") -
95th Percentile (
"p95") -
Maximum (
"max") -
Interquartile Range (
"iqr") -
Range (
"range")
Only numerical data from the input table will generate columns in the output table. Column names from the input will be used in the output, preserving order as well.
Usage
tt_summary_stats(tbl)tt_summary_stats(tbl)
Arguments
tbl |
A data table
A table object to be used as input for the transformation. This can be a
data frame, a tibble, a |
Value
A tibble object.
Examples
Get summary statistics for the game_revenue dataset that is included in the
pointblank package.
tt_summary_stats(tbl = game_revenue) #> # A tibble: 9 x 3 #> .param. item_revenue session_duration #> <chr> <dbl> <dbl> #> 1 min 0 3.2 #> 2 p05 0.02 8.2 #> 3 q_1 0.09 18.5 #> 4 med 0.38 26.5 #> 5 q_3 1.25 33.8 #> 6 p95 22.0 39.5 #> 7 max 143. 41 #> 8 iqr 1.16 15.3 #> 9 range 143. 37.8
Table transformers work great in conjunction with validation functions. Let's
ensure that the maximum revenue for individual purchases in the
game_revenue table is less than $150.
tt_summary_stats(tbl = game_revenue) %>%
col_vals_lt(
columns = item_revenue,
value = 150,
segments = .param. ~ "max"
)
#> # A tibble: 9 x 3
#> .param. item_revenue session_duration
#> <chr> <dbl> <dbl>
#> 1 min 0 3.2
#> 2 p05 0.02 8.2
#> 3 q_1 0.09 18.5
#> 4 med 0.38 26.5
#> 5 q_3 1.25 33.8
#> 6 p95 22.0 39.5
#> 7 max 143. 41
#> 8 iqr 1.16 15.3
#> 9 range 143. 37.8
We see data, and not an error, so the validation was successful!
Let's do another: for in-app purchases in the game_revenue table, check
that the median revenue is somewhere between $8 and $12.
game_revenue %>%
dplyr::filter(item_type == "iap") %>%
tt_summary_stats() %>%
col_vals_between(
columns = item_revenue,
left = 8, right = 12,
segments = .param. ~ "med"
)
#> # A tibble: 9 x 3
#> .param. item_revenue session_duration
#> <chr> <dbl> <dbl>
#> 1 min 0.4 3.2
#> 2 p05 1.39 5.99
#> 3 q_1 4.49 14.0
#> 4 med 10.5 22.6
#> 5 q_3 20.3 30.6
#> 6 p95 66.0 38.8
#> 7 max 143. 41
#> 8 iqr 15.8 16.7
#> 9 range 143. 37.8
We can get more creative with this transformer. Why not use a transformed
table in a validation plan? While performing validations of the
game_revenue table with an agent we can include the same revenue check as
above by using tt_summary_stats() in the preconditions argument. This
transforms the target table into a summary table for the validation step. The
final step of the transformation in preconditions is a dplyr::filter()
step that isolates the row of the median statistic.
agent <-
create_agent(
tbl = game_revenue,
tbl_name = "game_revenue",
label = "`tt_summary_stats()` example.",
actions = action_levels(
warn_at = 0.10,
stop_at = 0.25,
notify_at = 0.35
)
) %>%
rows_complete() %>%
rows_distinct() %>%
col_vals_between(
columns = item_revenue,
left = 8, right = 12,
preconditions = ~ . %>%
dplyr::filter(item_type == "iap") %>%
tt_summary_stats() %>%
dplyr::filter(.param. == "med")
) %>%
interrogate()
Printing the agent in the console shows the validation report in the
Viewer. Here is an excerpt of validation report. Take note of the final step
(STEP 3) as it shows the entry that corresponds to the col_vals_between()
validation step that uses the summary stats table as its target.

Function ID
12-1
See Also
Other Table Transformers:
get_tt_param(),
tt_string_info(),
tt_tbl_colnames(),
tt_tbl_dims(),
tt_time_shift(),
tt_time_slice()
Table Transformer: get a table's column names
Description
With any table object, you can produce a summary table that contains table's
column names. The output summary table will have two columns and as many rows
as there are columns in the input table. The first column is the ".param."
column, which is an integer-based column containing the indices of the
columns from the input table. The second column, "value", contains the
column names from the input table.
Usage
tt_tbl_colnames(tbl)tt_tbl_colnames(tbl)
Arguments
tbl |
A data table
A table object to be used as input for the transformation. This can be a
data frame, a tibble, a |
Value
A tibble object.
Examples
Get the column names of the game_revenue dataset that is included in the
pointblank package.
tt_tbl_colnames(tbl = game_revenue) #> # A tibble: 11 x 2 #> .param. value #> <int> <chr> #> 1 1 player_id #> 2 2 session_id #> 3 3 session_start #> 4 4 time #> 5 5 item_type #> 6 6 item_name #> 7 7 item_revenue #> 8 8 session_duration #> 9 9 start_day #> 10 10 acquisition #> 11 11 country
This output table is useful when you want to validate the column names of the
table. Here, we check that game_revenue table, included in the
pointblank package, has certain column names present with
test_col_vals_make_subset().
tt_tbl_colnames(tbl = game_revenue) %>%
test_col_vals_make_subset(
columns = value,
set = c("acquisition", "country")
)
#> [1] TRUE
We can check to see whether the column names in the specifications table
are all less than 15 characters in length. For this, we would use the
combination of tt_tbl_colnames(), then tt_string_info(), and finally
test_col_vals_lt() to perform the test.
specifications %>%
tt_tbl_colnames() %>%
tt_string_info() %>%
test_col_vals_lt(
columns = value,
value = 15
)
#> [1] FALSE
This returned FALSE and this is because the column name
credit_card_numbers is 16 characters long.
Function ID
12-4
See Also
Other Table Transformers:
get_tt_param(),
tt_string_info(),
tt_summary_stats(),
tt_tbl_dims(),
tt_time_shift(),
tt_time_slice()
Table Transformer: get the dimensions of a table
Description
With any table object, you can produce a summary table that contains nothing
more than the table's dimensions: the number of rows and the number of
columns. The output summary table will have two columns and two rows. The
first is the ".param." column with the labels "rows" and "columns"; the
second column, "value", contains the row and column counts.
Usage
tt_tbl_dims(tbl)tt_tbl_dims(tbl)
Arguments
tbl |
A data table
A table object to be used as input for the transformation. This can be a
data frame, a tibble, a |
Value
A tibble object.
Examples
Get the dimensions of the game_revenue dataset that is included in the
pointblank package.
tt_tbl_dims(tbl = game_revenue) #> # A tibble: 2 x 2 #> .param. value #> <chr> <int> #> 1 rows 2000 #> 2 columns 11
This output table is useful when a table validation depends on its
dimensions. Here, we check that game_revenue has at least 1500 rows.
tt_tbl_dims(tbl = game_revenue) %>%
dplyr::filter(.param. == "rows") %>%
test_col_vals_gt(
columns = value,
value = 1500
)
#> [1] TRUE
We can check small_table to ensure that number of columns is less than
10.
tt_tbl_dims(tbl = small_table) %>%
dplyr::filter(.param. == "columns") %>%
test_col_vals_lt(
columns = value,
value = 10
)
#> [1] TRUE
Function ID
12-3
See Also
Other Table Transformers:
get_tt_param(),
tt_string_info(),
tt_summary_stats(),
tt_tbl_colnames(),
tt_time_shift(),
tt_time_slice()
Table Transformer: shift the times of a table
Description
With any table object containing date or date-time columns, these values can
be precisely shifted with tt_time_shift() and specification of the time
shift. We can either provide a string with the time shift components and the
shift direction (like "-4y 10d") or a difftime object (which can be
created via lubridate expressions or by using the base::difftime()
function).
Usage
tt_time_shift(tbl, time_shift = "0y 0m 0d 0H 0M 0S")tt_time_shift(tbl, time_shift = "0y 0m 0d 0H 0M 0S")
Arguments
tbl |
A data table
A table object to be used as input for the transformation. This can be a
data frame, a tibble, a |
time_shift |
Time-shift specification
Either a character-based representation that specifies the time difference
by which all time values in time-based columns will be shifted, or, a
|
Details
The time_shift specification cannot have a higher time granularity than the
least granular time column in the input table. Put in simpler terms, if there
are any date-based based columns (or just a single date-based column) then
the time shifting can only be in terms of years, months, and days. Using a
time_shift specification of "20d 6H" in the presence of any dates will
result in a truncation to "20d". Similarly, a difftime object will be
altered in the same circumstances, however, the object will resolved to an
exact number of days through rounding.
Value
A data frame, a tibble, a tbl_dbi object, or a tbl_spark object
depending on what was provided as tbl.
Examples
Let's use the game_revenue dataset, included in the pointblank package,
as the input table for the first demo. It has entries in the first 21 days of
2015 and we'll move all of the date and date-time values to the beginning of
2021 with the tt_time_shift() function and the "6y" time_shift
specification.
tt_time_shift( tbl = game_revenue, time_shift = "6y" ) #> # A tibble: 2,000 x 11 #> player_id session_id session_start time item_type #> <chr> <chr> <dttm> <dttm> <chr> #> 1 ECPANOIXLZHF896 ECPANOIXLZ~ 2021-01-01 01:31:03 2021-01-01 01:31:27 iap #> 2 ECPANOIXLZHF896 ECPANOIXLZ~ 2021-01-01 01:31:03 2021-01-01 01:36:57 iap #> 3 ECPANOIXLZHF896 ECPANOIXLZ~ 2021-01-01 01:31:03 2021-01-01 01:37:45 iap #> 4 ECPANOIXLZHF896 ECPANOIXLZ~ 2021-01-01 01:31:03 2021-01-01 01:42:33 ad #> 5 ECPANOIXLZHF896 ECPANOIXLZ~ 2021-01-01 11:50:02 2021-01-01 11:55:20 ad #> 6 ECPANOIXLZHF896 ECPANOIXLZ~ 2021-01-01 11:50:02 2021-01-01 12:08:56 ad #> 7 ECPANOIXLZHF896 ECPANOIXLZ~ 2021-01-01 11:50:02 2021-01-01 12:14:08 ad #> 8 ECPANOIXLZHF896 ECPANOIXLZ~ 2021-01-01 11:50:02 2021-01-01 12:21:44 ad #> 9 ECPANOIXLZHF896 ECPANOIXLZ~ 2021-01-01 11:50:02 2021-01-01 12:24:20 ad #> 10 FXWUORGYNJAE271 FXWUORGYNJ~ 2021-01-01 15:17:18 2021-01-01 15:19:36 ad #> # i 1,990 more rows #> # i 6 more variables: item_name <chr>, item_revenue <dbl>, #> # session_duration <dbl>, start_day <date>, acquisition <chr>, country <chr>
Keeping only the date_time and a-f columns of small_table, also
included in the package, shift the times back 2 days and 12 hours with the
"-2d 12H" specification.
small_table %>%
dplyr::select(-date) %>%
tt_time_shift("-2d 12H")
#> # A tibble: 13 x 7
#> date_time a b c d e f
#> <dttm> <int> <chr> <dbl> <dbl> <lgl> <chr>
#> 1 2016-01-01 23:00:00 2 1-bcd-345 3 3423. TRUE high
#> 2 2016-01-01 12:32:00 3 5-egh-163 8 10000. TRUE low
#> 3 2016-01-03 01:32:00 6 8-kdg-938 3 2343. TRUE high
#> 4 2016-01-04 05:23:00 2 5-jdo-903 NA 3892. FALSE mid
#> 5 2016-01-07 00:36:00 8 3-ldm-038 7 284. TRUE low
#> 6 2016-01-08 18:15:00 4 2-dhe-923 4 3291. TRUE mid
#> 7 2016-01-13 06:46:00 7 1-knw-093 3 843. TRUE high
#> 8 2016-01-14 23:27:00 4 5-boe-639 2 1036. FALSE low
#> 9 2016-01-17 16:30:00 3 5-bce-642 9 838. FALSE high
#> 10 2016-01-17 16:30:00 3 5-bce-642 9 838. FALSE high
#> 11 2016-01-24 08:07:00 4 2-dmx-010 7 834. TRUE low
#> 12 2016-01-25 14:51:00 2 7-dmx-010 8 108. FALSE low
#> 13 2016-01-27 23:23:00 1 3-dka-303 NA 2230. TRUE high
Function ID
12-5
See Also
Other Table Transformers:
get_tt_param(),
tt_string_info(),
tt_summary_stats(),
tt_tbl_colnames(),
tt_tbl_dims(),
tt_time_slice()
Table Transformer: slice a table with a slice point on a time column
Description
With any table object containing date, date-time columns, or a mixture
thereof, any one of those columns can be used to effectively slice the data
table in two with a slice_point: and you get to choose which of those
slices you want to keep. The slice point can be defined in several ways. One
method involves using a decimal value between 0 and 1, which defines the
slice point as the time instant somewhere between the earliest time value (at
0) and the latest time value (at 1). Another way of defining the slice
point is by supplying a time value, and the following input types are
accepted: (1) an ISO 8601 formatted time string (as a date or a date-time),
(2) a POSIXct time, or (3) a Date object.
Usage
tt_time_slice( tbl, time_column = NULL, slice_point = 0, keep = c("left", "right"), arrange = FALSE )tt_time_slice( tbl, time_column = NULL, slice_point = 0, keep = c("left", "right"), arrange = FALSE )
Arguments
tbl |
A data table
A table object to be used as input for the transformation. This can be a
data frame, a tibble, a |
time_column |
Column with time data
The time-based column that will be used as a basis for the slicing. If no time column is provided then the first one found will be used. |
slice_point |
The location on the |
keep |
Data slice to keep
Which slice should be kept? The |
arrange |
Arrange data slice by the time data?
Should the slice be arranged by the |
Details
There is the option to arrange the table by the date or date-time values in
the time_column. This ordering is always done in an ascending manner. Any
NA/NULL values in the time_column will result in the corresponding rows
can being removed (no matter which slice is retained).
Value
A data frame, a tibble, a tbl_dbi object, or a tbl_spark object
depending on what was provided as tbl.
Examples
Let's use the game_revenue dataset, included in the pointblank package,
as the input table for the first demo. It has entries in the first 21 days of
2015 and we'll elect to get all of the records where the time values are
strictly for the first 15 days of 2015. The keep argument has a default of
"left" so all rows where the time column is less than
"2015-01-16 00:00:00" will be kept.
tt_time_slice( tbl = game_revenue, time_column = "time", slice_point = "2015-01-16" ) #> # A tibble: 1,208 x 11 #> player_id session_id session_start time item_type #> <chr> <chr> <dttm> <dttm> <chr> #> 1 ECPANOIXLZHF896 ECPANOIXLZ~ 2015-01-01 01:31:03 2015-01-01 01:31:27 iap #> 2 ECPANOIXLZHF896 ECPANOIXLZ~ 2015-01-01 01:31:03 2015-01-01 01:36:57 iap #> 3 ECPANOIXLZHF896 ECPANOIXLZ~ 2015-01-01 01:31:03 2015-01-01 01:37:45 iap #> 4 ECPANOIXLZHF896 ECPANOIXLZ~ 2015-01-01 01:31:03 2015-01-01 01:42:33 ad #> 5 ECPANOIXLZHF896 ECPANOIXLZ~ 2015-01-01 11:50:02 2015-01-01 11:55:20 ad #> 6 ECPANOIXLZHF896 ECPANOIXLZ~ 2015-01-01 11:50:02 2015-01-01 12:08:56 ad #> 7 ECPANOIXLZHF896 ECPANOIXLZ~ 2015-01-01 11:50:02 2015-01-01 12:14:08 ad #> 8 ECPANOIXLZHF896 ECPANOIXLZ~ 2015-01-01 11:50:02 2015-01-01 12:21:44 ad #> 9 ECPANOIXLZHF896 ECPANOIXLZ~ 2015-01-01 11:50:02 2015-01-01 12:24:20 ad #> 10 FXWUORGYNJAE271 FXWUORGYNJ~ 2015-01-01 15:17:18 2015-01-01 15:19:36 ad #> # i 1,198 more rows #> # i 6 more variables: item_name <chr>, item_revenue <dbl>, #> # session_duration <dbl>, start_day <date>, acquisition <chr>, country <chr>
Omit the first 25% of records from small_table, also included in the
package, with a fractional slice_point of 0.25 on the basis of a timeline
that begins at 2016-01-04 11:00:00 and ends at 2016-01-30 11:23:00.
small_table %>%
tt_time_slice(
slice_point = 0.25,
keep = "right"
)
#> # A tibble: 8 x 8
#> date_time date a b c d e f
#> <dttm> <date> <int> <chr> <dbl> <dbl> <lgl> <chr>
#> 1 2016-01-11 06:15:00 2016-01-11 4 2-dhe-923 4 3291. TRUE mid
#> 2 2016-01-15 18:46:00 2016-01-15 7 1-knw-093 3 843. TRUE high
#> 3 2016-01-17 11:27:00 2016-01-17 4 5-boe-639 2 1036. FALSE low
#> 4 2016-01-20 04:30:00 2016-01-20 3 5-bce-642 9 838. FALSE high
#> 5 2016-01-20 04:30:00 2016-01-20 3 5-bce-642 9 838. FALSE high
#> 6 2016-01-26 20:07:00 2016-01-26 4 2-dmx-010 7 834. TRUE low
#> 7 2016-01-28 02:51:00 2016-01-28 2 7-dmx-010 8 108. FALSE low
#> 8 2016-01-30 11:23:00 2016-01-30 1 3-dka-303 NA 2230. TRUE high
Function ID
12-6
See Also
Other Table Transformers:
get_tt_param(),
tt_string_info(),
tt_summary_stats(),
tt_tbl_colnames(),
tt_tbl_dims(),
tt_time_shift()
Perform pointblank validation testing within R Markdown documents
Description
The validate_rmd() function sets up a framework for validation testing
within specialized validation code chunks inside an R Markdown document. To
enable this functionality, validate_rmd() should be called early within an
R Markdown document code chunk (preferably in the setup chunk) to signal
that validation should occur within specific code chunks. The validation code
chunks require the validate = TRUE option to be set. Using pointblank
validation functions on data in these marked code chunks will flag overall
failure if the stop threshold is exceeded anywhere. All errors are reported
in the validation code chunk after rendering the document to HTML, where a
centered status button either indicates success or the number of overall
failures. Clicking the button reveals the otherwise hidden validation
statements and their error messages (if any).
Usage
validate_rmd(summary = TRUE, log_to_file = NULL)validate_rmd(summary = TRUE, log_to_file = NULL)
Arguments
summary |
Include a validation summary
If |
log_to_file |
Log validation results to a file
An option to log errors to a text file. By default, no logging is done but
|
Function ID
1-4
See Also
Other Planning and Prep:
action_levels(),
create_agent(),
create_informant(),
db_tbl(),
draft_validation(),
file_tbl(),
scan_data(),
tbl_get(),
tbl_source(),
tbl_store()
Transform a pointblank agent to a testthat test file
Description
With a pointblank agent, we can write a testthat test file and opt
to place it in the testthat/tests if it is available in the project path
(we can specify an alternate path as well). This works by transforming the
validation steps to a series of expect_*() calls inside individual
testthat::test_that() statements.
A major requirement for using write_testthat_file() on an agent is the
presence of an expression that can retrieve the target table. Typically, we
might supply a table-prep formula, which is a formula that can be invoked to
obtain the target table (e.g., tbl = ~ pointblank::small_table). This
user-supplied statement will be used by write_testthat_file() to generate a
table-loading statement at the top of the new testthat test file so that
the target table is available for each of the testthat::test_that()
statements that follow. If an agent was not created using a table-prep
formula set for the tbl, it can be modified via the set_tbl() function.
Thresholds will be obtained from those applied for the stop state. This can
be set up for a pointblank agent by passing an action_levels object
to the actions argument of create_agent() or the same argument of any
included validation function. If stop thresholds are not available, then a
threshold value of 1 will be used for each generated expect_*() statement
in the resulting testthat test file.
There is no requirement that the agent first undergo interrogation with
interrogate(). However, it may be useful as a dry run to interactively
perform an interrogation on the target data before generating the
testthat test file.
Usage
write_testthat_file( agent, name = NULL, path = NULL, overwrite = FALSE, skips = NULL, quiet = FALSE )write_testthat_file( agent, name = NULL, path = NULL, overwrite = FALSE, skips = NULL, quiet = FALSE )
Arguments
agent |
The pointblank agent object
A pointblank agent object that is commonly created through the use of
the |
name |
Name for generated testthat file
An optional name for for the testhat test file. This should be a name
without extension and without the leading |
path |
File path
A path can be specified here if there shouldn't be an attempt to place the
file in |
overwrite |
Overwrite a previous file of the same name
Should a testthat file of the same name be overwritten? |
skips |
Test skipping
This is an optional vector of test-skipping keywords modeled after the
testthat |
quiet |
Inform (or not) upon file writing
Should the function not inform when the file is written? |
Details
Tests for inactive validation steps will be skipped with a clear message
indicating that the reason for skipping was due to the test not being active.
Any inactive validation steps can be forced into an active state by using the
activate_steps() on an agent (the opposite is possible with the
deactivate_steps() function).
The testthat package comes with a series of skip_on_*() functions which
conveniently cause the test file to be skipped entirely if certain conditions
are met. We can quickly set any number of these at the top of the
testthat test file by supplying keywords as a vector to the skips
option of write_testthat_file(). For instance, setting
skips = c("cran", "windows) will add the testthat skip_on_cran() and
skip_on_os("windows") statements, meaning that the generated test file
won't run on a CRAN system or if the system OS is Windows.
Here is an example of testthat test file output ("test-small_table.R"):
# Generated by pointblank
tbl <- small_table
test_that("column `date_time` exists", {
expect_col_exists(
tbl,
columns = date_time,
threshold = 1
)
})
test_that("values in `c` should be <= `5`", {
expect_col_vals_lte(
tbl,
columns = c,
value = 5,
threshold = 0.25
)
})
This was generated by the following set of R statements:
library(pointblank)
agent <-
create_agent(
tbl = ~ small_table,
actions = action_levels(stop_at = 0.25)
) %>%
col_exists(date_time) %>%
col_vals_lte(c, value = 5)
write_testthat_file(
agent = agent,
name = "small_table",
path = "."
)
Value
Invisibly returns TRUE if the testthat file has been written.
Examples
Creating a testthat file from an agent
Let's walk through a data quality analysis of an extremely small table. It's
actually called small_table and we can find it as a dataset in this
package.
small_table #> # A tibble: 13 x 8 #> date_time date a b c d e f #> <dttm> <date> <int> <chr> <dbl> <dbl> <lgl> <chr> #> 1 2016-01-04 11:00:00 2016-01-04 2 1-bcd-345 3 3423. TRUE high #> 2 2016-01-04 00:32:00 2016-01-04 3 5-egh-163 8 10000. TRUE low #> 3 2016-01-05 13:32:00 2016-01-05 6 8-kdg-938 3 2343. TRUE high #> 4 2016-01-06 17:23:00 2016-01-06 2 5-jdo-903 NA 3892. FALSE mid #> 5 2016-01-09 12:36:00 2016-01-09 8 3-ldm-038 7 284. TRUE low #> 6 2016-01-11 06:15:00 2016-01-11 4 2-dhe-923 4 3291. TRUE mid #> 7 2016-01-15 18:46:00 2016-01-15 7 1-knw-093 3 843. TRUE high #> 8 2016-01-17 11:27:00 2016-01-17 4 5-boe-639 2 1036. FALSE low #> 9 2016-01-20 04:30:00 2016-01-20 3 5-bce-642 9 838. FALSE high #> 10 2016-01-20 04:30:00 2016-01-20 3 5-bce-642 9 838. FALSE high #> 11 2016-01-26 20:07:00 2016-01-26 4 2-dmx-010 7 834. TRUE low #> 12 2016-01-28 02:51:00 2016-01-28 2 7-dmx-010 8 108. FALSE low #> 13 2016-01-30 11:23:00 2016-01-30 1 3-dka-303 NA 2230. TRUE high
Creating an action_levels object is a common workflow step when creating a
pointblank agent. We designate failure thresholds to the warn, stop, and
notify states using action_levels().
al <-
action_levels(
warn_at = 0.10,
stop_at = 0.25,
notify_at = 0.35
)
A pointblank agent object is now created and the al object is provided to
the agent. The static thresholds provided by the al object make reports a
bit more useful after interrogation.
agent <-
create_agent(
tbl = ~ small_table,
label = "An example.",
actions = al
) %>%
col_exists(c(date, date_time)) %>%
col_vals_regex(
b,
regex = "[0-9]-[a-z]{3}-[0-9]{3}"
) %>%
col_vals_gt(d, value = 100) %>%
col_vals_lte(c, value = 5) %>%
interrogate()
This agent and all of the checks can be transformed into a testthat file with
write_testthat_file(). The stop thresholds will be ported over to the
expect_*() functions in the new file.
write_testthat_file( agent = agent, name = "small_table", path = "." )
The above code will generate a file with the name "test-small_table.R". The
path was specified with "." so the file will be placed in the working
directory. If you'd like to easily add this new file to the tests/testthat
directory then path = NULL (the default) will makes this possible (this is
useful during package development).
What's in the new file? This:
# Generated by pointblank
tbl <- small_table
test_that("column `date` exists", {
expect_col_exists(
tbl,
columns = date,
threshold = 1
)
})
test_that("column `date_time` exists", {
expect_col_exists(
tbl,
columns = date_time,
threshold = 1
)
})
test_that("values in `b` should match the regular expression:
`[0-9]-[a-z]{3}-[0-9]{3}`", {
expect_col_vals_regex(
tbl,
columns = b,
regex = "[0-9]-[a-z]{3}-[0-9]{3}",
threshold = 0.25
)
})
test_that("values in `d` should be > `100`", {
expect_col_vals_gt(
tbl,
columns = d,
value = 100,
threshold = 0.25
)
})
test_that("values in `c` should be <= `5`", {
expect_col_vals_lte(
tbl,
columns = c,
value = 5,
threshold = 0.25
)
})
Using an agent stored on disk as a YAML file
An agent on disk as a YAML file can be made into a testthat file. The
"agent-small_table.yml" file is available in the pointblank package
and the path can be obtained with system.file().
yml_file <-
system.file(
"yaml", "agent-small_table.yml",
package = "pointblank"
)
Writing the testthat file into the working directory is much the same as
before but we're reading the agent from disk this time. It's a read and write
combo, really. Again, we are choosing to write the file to the working
directory by using path = ".".
write_testthat_file( agent = yaml_read_agent(yml_file), name = "from_agent_yaml", path = "." )
Function ID
8-5
See Also
Other Post-interrogation:
all_passed(),
get_agent_x_list(),
get_data_extracts(),
get_sundered_data()
Read an agent, informant, multiagent, or table scan from disk
Description
An agent, informant, multiagent, or table scan that has been written to
disk (with x_write_disk()) can be read back into memory with the
x_read_disk() function. For an agent or an informant object that has
been generated in this way, it may not have a data table associated with it
(depending on whether the keep_tbl option was TRUE or FALSE when
writing to disk) but it should still be able to produce reporting (by
printing the agent or informant to the console or using
get_agent_report()/get_informant_report()). An agent will return an
x-list with get_agent_x_list() and yield any available data extracts with
get_data_extracts(). Furthermore, all of an agent's validation steps will
still be present (along with results from the last interrogation).
Usage
x_read_disk(filename, path = NULL, quiet = FALSE)x_read_disk(filename, path = NULL, quiet = FALSE)
Arguments
filename |
File name
The name of a file that was previously written by |
path |
File path
An optional path to the file (combined with |
quiet |
Inform (or not) upon file writing
Should the function not inform when the file is written? |
Details
Should a written-to-disk agent or informant possess a table-prep formula
or a specific in-memory tablewe could use the interrogate() or
incorporate() function again. For a data quality reporting workflow, it
is useful to interrogate() target tables that evolve over time. While the
same validation steps will be used, more can be added before calling
interrogate(). For an information management workflow with an informant
object, using incorporate() will update aspects of the reporting such as
table dimensions, and info snippets/text will be regenerated.
Value
Either a ptblank_agent, ptblank_informant, or a
ptblank_tbl_scan object.
Examples
A: Reading an agent from disk
The process of developing an agent and writing it to disk with the
x_write_disk() function is explained in that function's documentation.
Suppose we have such a written file that's named "agent-small_table.rds",
we could read that to a new agent object with x_read_disk().
agent <- x_read_disk("agent-small_table.rds")
B: Reading an informant from disk
If there is an informant written to disk via x_write_disk() and it's named
"informant-small_table.rds". We could read that to a new informant object
with x_read_disk().
informant <- x_read_disk("informant-small_table.rds")
C: Reading a multiagent from disk
The process of creating a multiagent and writing it to disk with the
x_write_disk() function is shown in that function's documentation. Should
we have such a written file called "multiagent-small_table.rds", we could
read that to a new multiagent object with x_read_disk().
multiagent <- x_read_disk("multiagent-small_table.rds")
D: Reading a table scan from disk
If there is a table scan written to disk via x_write_disk() and it's named
"tbl_scan-storms.rds", we could read it back into R with x_read_disk().
tbl_scan <- x_read_disk("tbl_scan-storms.rds")
Function ID
9-2
See Also
Other Object Ops:
activate_steps(),
deactivate_steps(),
export_report(),
remove_steps(),
set_tbl(),
x_write_disk()
Write an agent, informant, multiagent, or table scan to disk
Description
Writing an agent, informant, multiagent, or even a table scan to disk
with x_write_disk() can be useful for keeping data validation intel or
table information close at hand for later retrieval (with x_read_disk()).
By default, any data table that the agent or informant may have held
before being committed to disk will be expunged (not applicable to any table
scan since they never hold a table object). This behavior can be changed by
setting keep_tbl to TRUE but this only works in the case where the table
is not of the tbl_dbi or the tbl_spark class.
Usage
x_write_disk( x, filename, path = NULL, keep_tbl = FALSE, keep_extracts = FALSE, quiet = FALSE )x_write_disk( x, filename, path = NULL, keep_tbl = FALSE, keep_extracts = FALSE, quiet = FALSE )
Arguments
x |
One of several types of objects
An agent object of class |
filename |
File name
The filename to create on disk for the |
path |
File path
An optional path to which the file should be saved (this is automatically
combined with |
keep_tbl |
Keep data table inside object
An option to keep a data table that is associated with the
agent or informant (which is the case when the agent, for example, is
created using |
keep_extracts |
Keep data extracts inside object
An option to keep any collected extract data for failing rows. Only applies
to agent objects. By default, this is |
quiet |
Inform (or not) upon file writing
Should the function not inform when the file is written? |
Details
It is recommended to set up a table-prep formula so that the agent and
informant can access refreshed data after being read from disk through
x_read_disk(). This can be done initially with the tbl argument of
create_agent()/create_informant() by passing in a table-prep formula or a
function that can obtain the target table when invoked. Alternatively, we can
use the set_tbl() with a similarly crafted tbl expression to ensure that
an agent or informant can retrieve a table at a later time.
Value
Invisibly returns TRUE if the file has been written.
Examples
A: Writing an agent to disk
Let's go through the process of (1) developing an agent with a validation
plan (to be used for the data quality analysis of the small_table
dataset), (2) interrogating the agent with the interrogate() function, and
(3) writing the agent and all its intel to a file.
Creating an action_levels object is a common workflow step when creating a
pointblank agent. We designate failure thresholds to the warn, stop, and
notify states using action_levels().
al <-
action_levels(
warn_at = 0.10,
stop_at = 0.25,
notify_at = 0.35
)
Now, let's create a pointblank agent object and give it the al object
(which serves as a default for all validation steps which can be overridden).
The data will be referenced in the tbl argument with a leading ~.
agent <-
create_agent(
tbl = ~ small_table,
tbl_name = "small_table",
label = "`x_write_disk()`",
actions = al
)
Then, as with any agent object, we can add steps to the validation plan by
using as many validation functions as we want. After that, use
interrogate().
agent <-
agent %>%
col_exists(columns = c(date, date_time)) %>%
col_vals_regex(
columns = b,
regex = "[0-9]-[a-z]{3}-[0-9]{3}"
) %>%
rows_distinct() %>%
col_vals_gt(columns = d, value = 100) %>%
col_vals_lte(columns = c, value = 5) %>%
interrogate()
The agent can be written to a file with the x_write_disk() function.
x_write_disk( agent, filename = "agent-small_table.rds" )
We can read the file back as an agent with the x_read_disk() function and
we'll get all of the intel along with the restored agent.
If you're consistently writing agent reports when periodically checking data,
we could make use of the affix_date() or affix_datetime() depending on
the granularity you need. Here's an example that writes the file with the
format: "<filename>-YYYY-mm-dd_HH-MM-SS.rds".
x_write_disk(
agent,
filename = affix_datetime(
"agent-small_table.rds"
)
)
B: Writing an informant to disk
Let's go through the process of (1) creating an informant object that
minimally describes the small_table dataset, (2) ensuring that data is
captured from the target table using the incorporate() function, and (3)
writing the informant to a file.
Create a pointblank informant object with create_informant() and the
small_table dataset. Use incorporate() so that info snippets are
integrated into the text.
informant <-
create_informant(
tbl = ~ small_table,
tbl_name = "small_table",
label = "`x_write_disk()`"
) %>%
info_snippet(
snippet_name = "high_a",
fn = snip_highest(column = "a")
) %>%
info_snippet(
snippet_name = "low_a",
fn = snip_lowest(column = "a")
) %>%
info_columns(
columns = a,
info = "From {low_a} to {high_a}."
) %>%
info_columns(
columns = starts_with("date"),
info = "Time-based values."
) %>%
info_columns(
columns = date,
info = "The date part of `date_time`."
) %>%
incorporate()
The informant can be written to a file with x_write_disk(). Let's do this
with affix_date() so that the filename has a datestamp.
x_write_disk(
informant,
filename = affix_date(
"informant-small_table.rds"
)
)
We can read the file back into a new informant object (in the same state as
when it was saved) by using x_read_disk().
C: Writing a multiagent to disk
Let's create one more pointblank agent object, provide it with some
validation steps, and interrogate().
agent_b <-
create_agent(
tbl = ~ small_table,
tbl_name = "small_table",
label = "`x_write_disk()`",
actions = al
) %>%
col_vals_gt(
columns = b,
value = g,
na_pass = TRUE,
label = "b > g"
) %>%
col_is_character(
columns = c(b, f),
label = "Verifying character-type columns"
) %>%
interrogate()
Now we can combine the earlier agent object with the newer agent_b to
create a multiagent.
multiagent <- create_multiagent(agent, agent_b)
The multiagent can be written to a file with the x_write_disk() function.
x_write_disk( multiagent, filename = "multiagent-small_table.rds" )
We can read the file back as a multiagent with the x_read_disk() function
and we'll get all of the constituent agents and their associated intel back
as well.
D: Writing a table scan to disk
We can get a report that describes all of the data in the storms dataset.
tbl_scan <- scan_data(tbl = dplyr::storms)
The table scan object can be written to a file with x_write_disk().
x_write_disk( tbl_scan, filename = "tbl_scan-storms.rds" )
Function ID
9-1
See Also
Other Object Ops:
activate_steps(),
deactivate_steps(),
export_report(),
remove_steps(),
set_tbl(),
x_read_disk()
Get an agent from pointblank YAML and interrogate()
Description
The yaml_agent_interrogate() function operates much like the
yaml_read_agent() function (reading a pointblank YAML file and
generating an agent with a validation plan in place). The key difference is
that this function takes things a step further and interrogates the target
table (defined by table-prep formula that is required in the YAML file). The
additional auto-invocation of interrogate() uses the default options of
that function. As with yaml_read_agent() the agent is returned except, this
time, it has intel from the interrogation.
Usage
yaml_agent_interrogate(filename, path = NULL)yaml_agent_interrogate(filename, path = NULL)
Arguments
filename |
File name
The name of the YAML file that contains fields related to an agent. |
path |
#' @param path File path
An optional path to the YAML file (combined with |
Value
A ptblank_agent object.
Examples
There's a YAML file available in the pointblank package that's also
called "agent-small_table.yml". The path for it can be accessed through
system.file():
yml_file_path <-
system.file(
"yaml", "agent-small_table.yml",
package = "pointblank"
)
The YAML file can be read as an agent with a pre-existing validation plan by
using the yaml_read_agent() function.
agent <- yaml_read_agent(filename = yml_file_path) agent
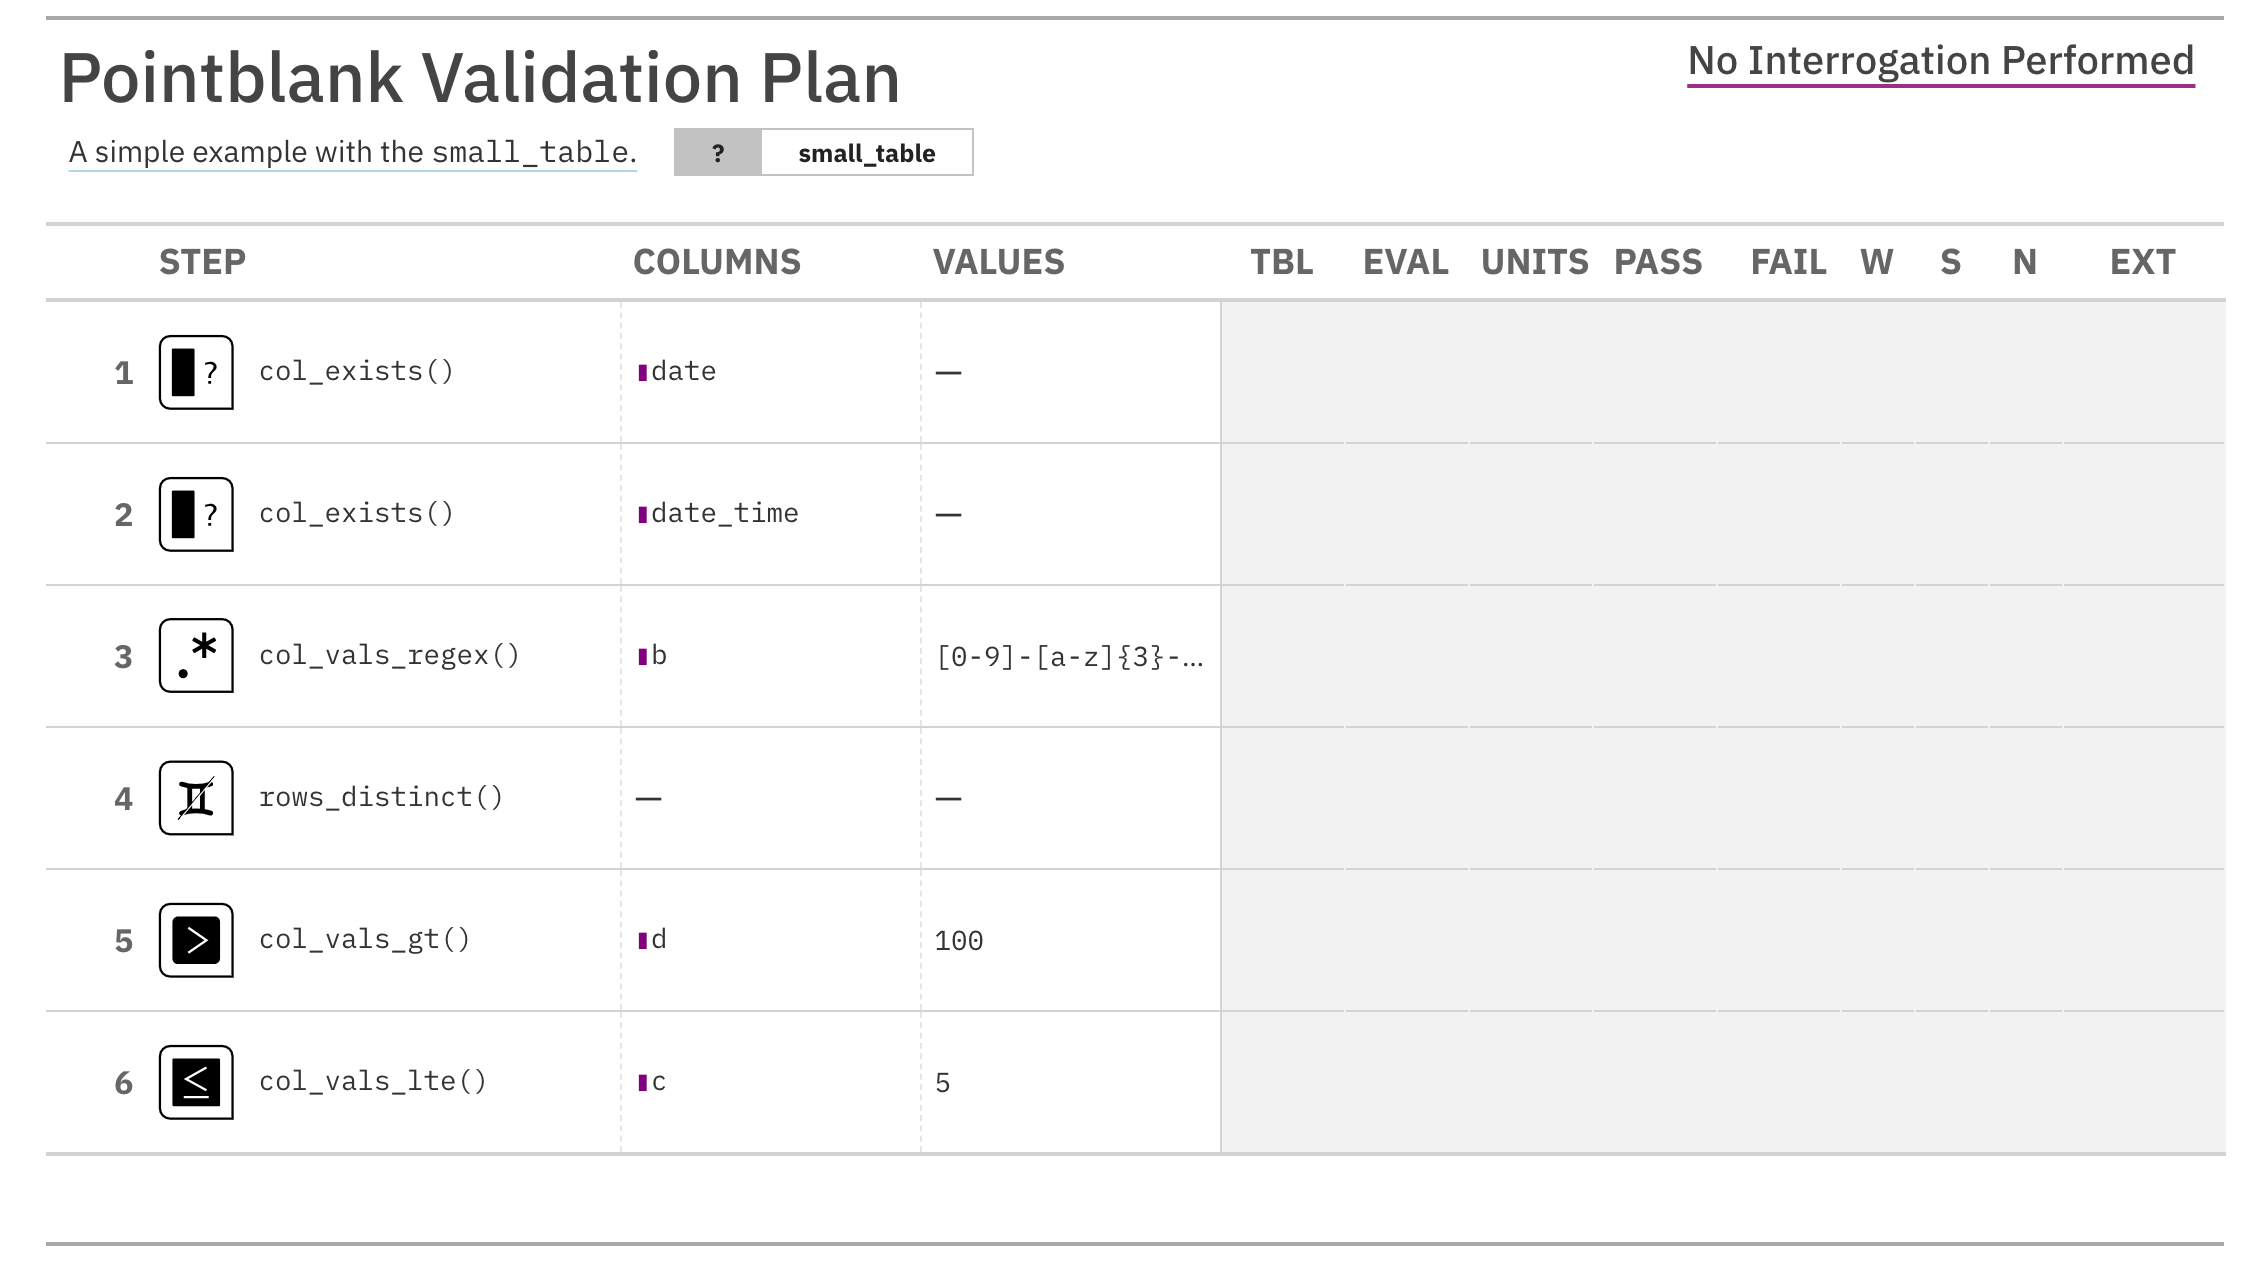
This particular agent is using ~ tbl_source("small_table", "tbl_store.yml")
to source the table-prep from a YAML file that holds a table store (can be
seen using yaml_agent_string(agent = agent)). Let's put that file in the
working directory (the pointblank package has the corresponding YAML
file):
yml_tbl_store_path <-
system.file(
"yaml", "tbl_store.yml",
package = "pointblank"
)
file.copy(from = yml_tbl_store_path, to = ".")
As can be seen from the validation report, no interrogation was yet
performed. Saving an agent to YAML will remove any traces of interrogation
data and serve as a plan for a new interrogation on the same target table. We
can either follow this up with with interrogate() and get an agent with
intel, or, we can interrogate directly from the YAML file with
yaml_agent_interrogate():
agent <- yaml_agent_interrogate(filename = yml_file_path) agent
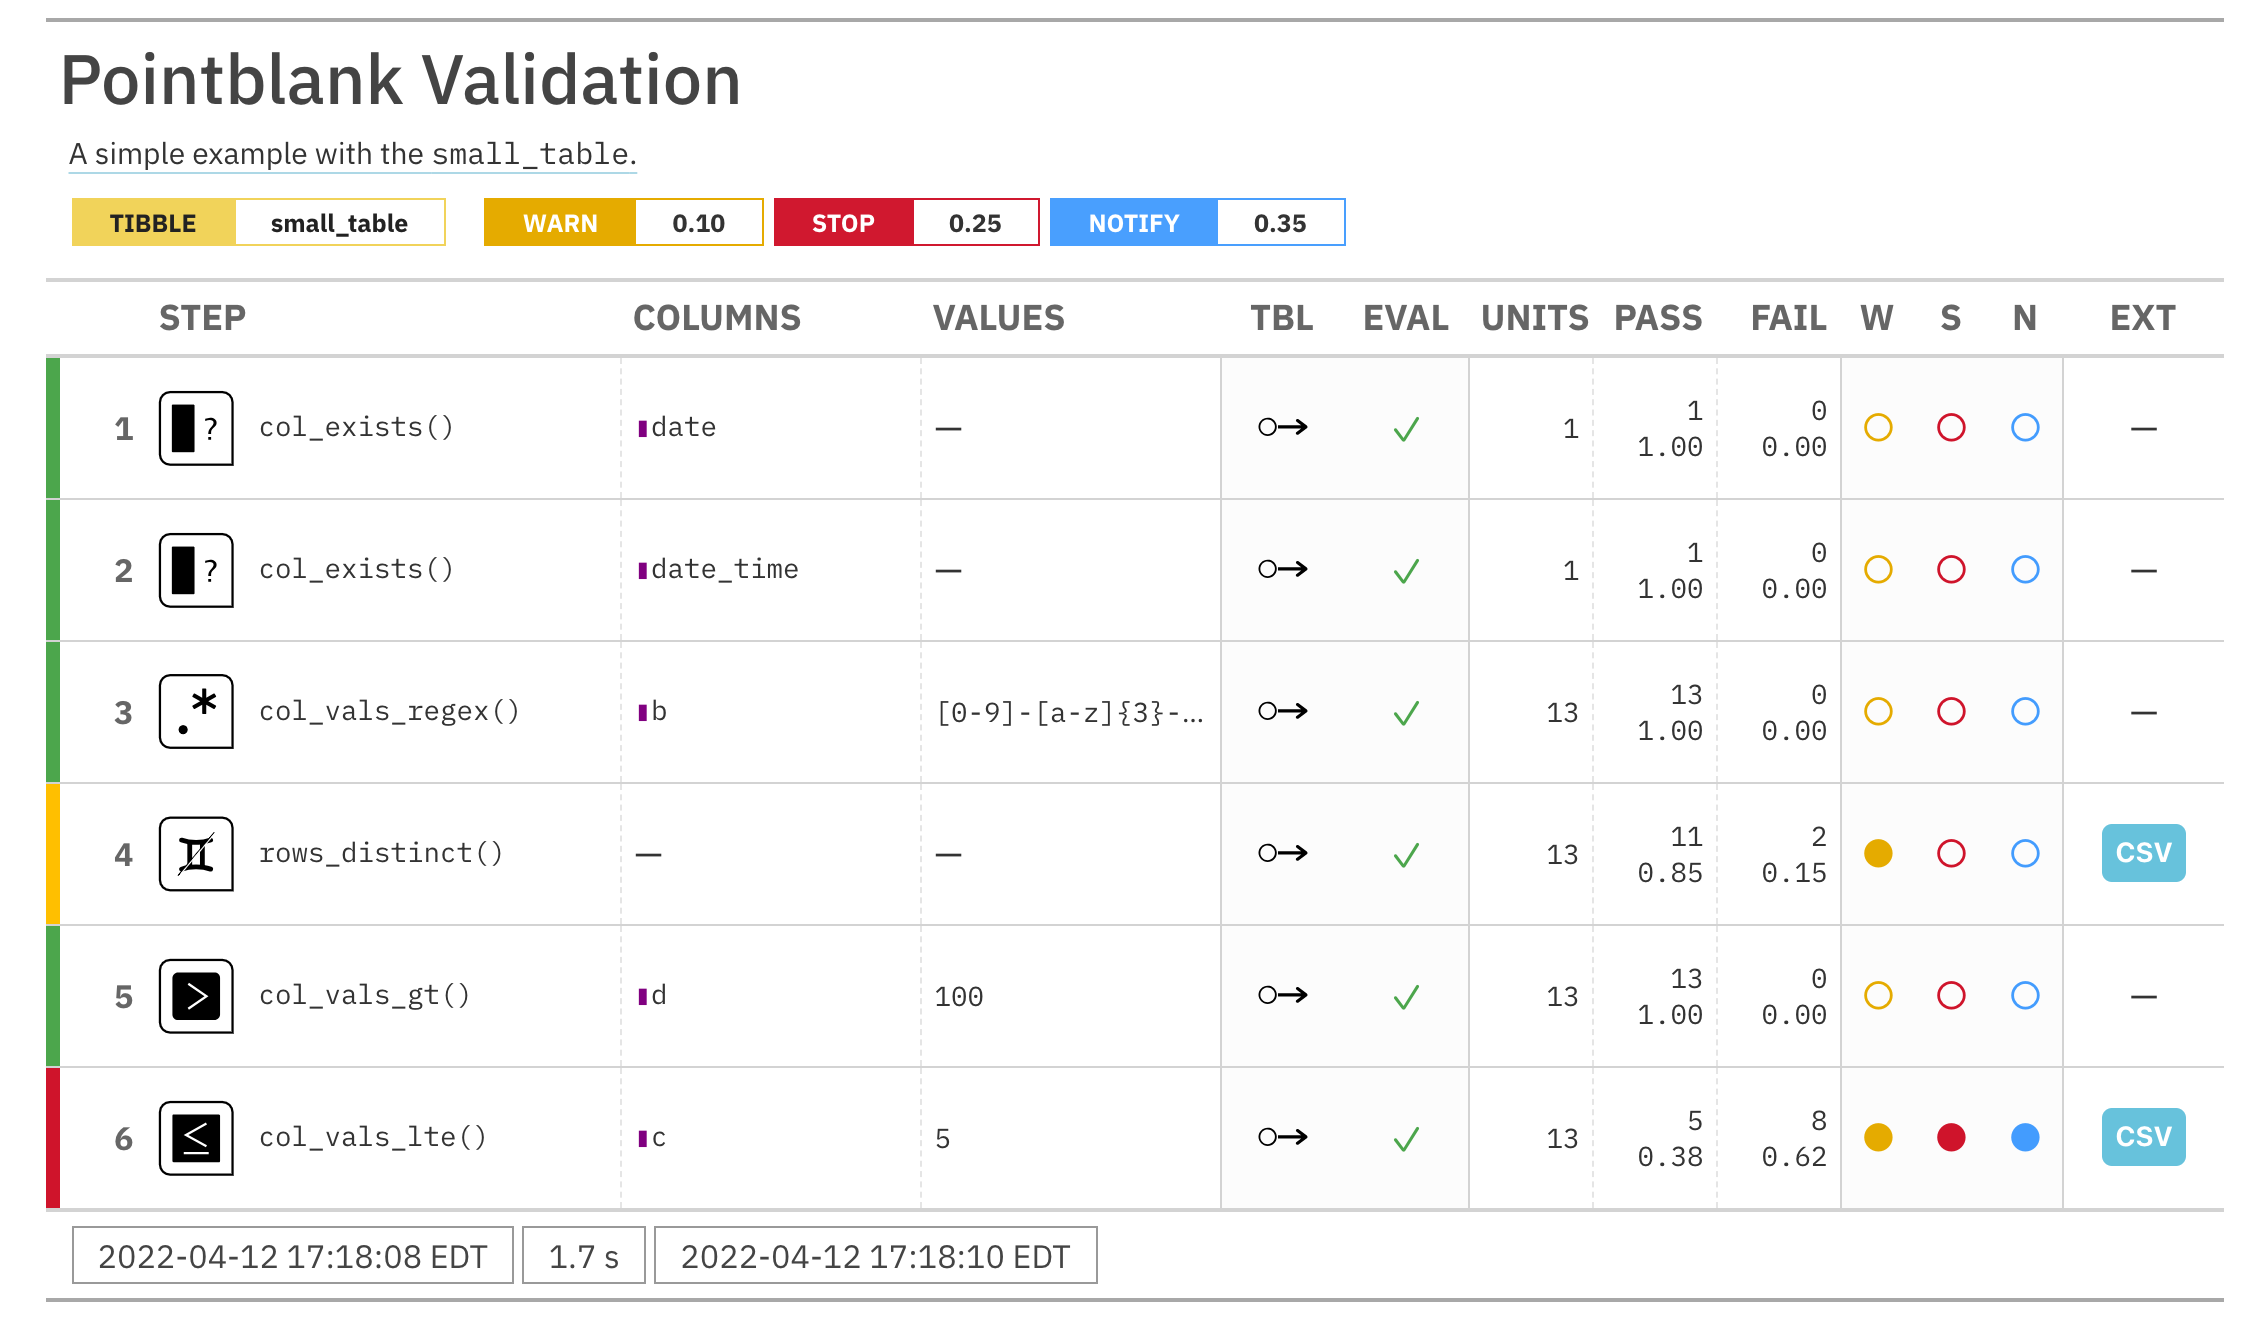
Function ID
11-4
See Also
Other pointblank YAML:
yaml_agent_show_exprs(),
yaml_agent_string(),
yaml_exec(),
yaml_informant_incorporate(),
yaml_read_agent(),
yaml_read_informant(),
yaml_write()
Display validation expressions using pointblank YAML
Description
The yaml_agent_show_exprs() function follows the specifications of a
pointblank YAML file to generate and show the pointblank expressions
for generating the described validation plan. The expressions are shown in
the console, providing an opportunity to copy the statements and extend as
needed. A pointblank YAML file can itself be generated by using the
yaml_write() function with a pre-existing agent, or, it can be carefully
written by hand.
Usage
yaml_agent_show_exprs(filename, path = NULL)yaml_agent_show_exprs(filename, path = NULL)
Arguments
filename |
File name
The name of the YAML file that contains fields related to an agent. |
path |
#' @param path File path
An optional path to the YAML file (combined with |
Examples
Let's create a validation plan for the data quality analysis of the
small_table dataset. We need an agent and its table-prep formula enables
retrieval of the target table.
agent <-
create_agent(
tbl = ~ small_table,
tbl_name = "small_table",
label = "A simple example with the `small_table`.",
actions = action_levels(
warn_at = 0.10,
stop_at = 0.25,
notify_at = 0.35
)
) %>%
col_exists(columns = c(date, date_time)) %>%
col_vals_regex(
columns = b,
regex = "[0-9]-[a-z]{3}-[0-9]{3}"
) %>%
rows_distinct() %>%
col_vals_gt(columns = d, value = 100) %>%
col_vals_lte(columns = c, value = 5)
The agent can be written to a pointblank YAML file with yaml_write().
yaml_write( agent = agent, filename = "agent-small_table.yml" )
At a later time, the YAML file can be read into a new agent with the
yaml_read_agent() function.
agent <- yaml_read_agent(filename = "agent-small_table.yml") agent
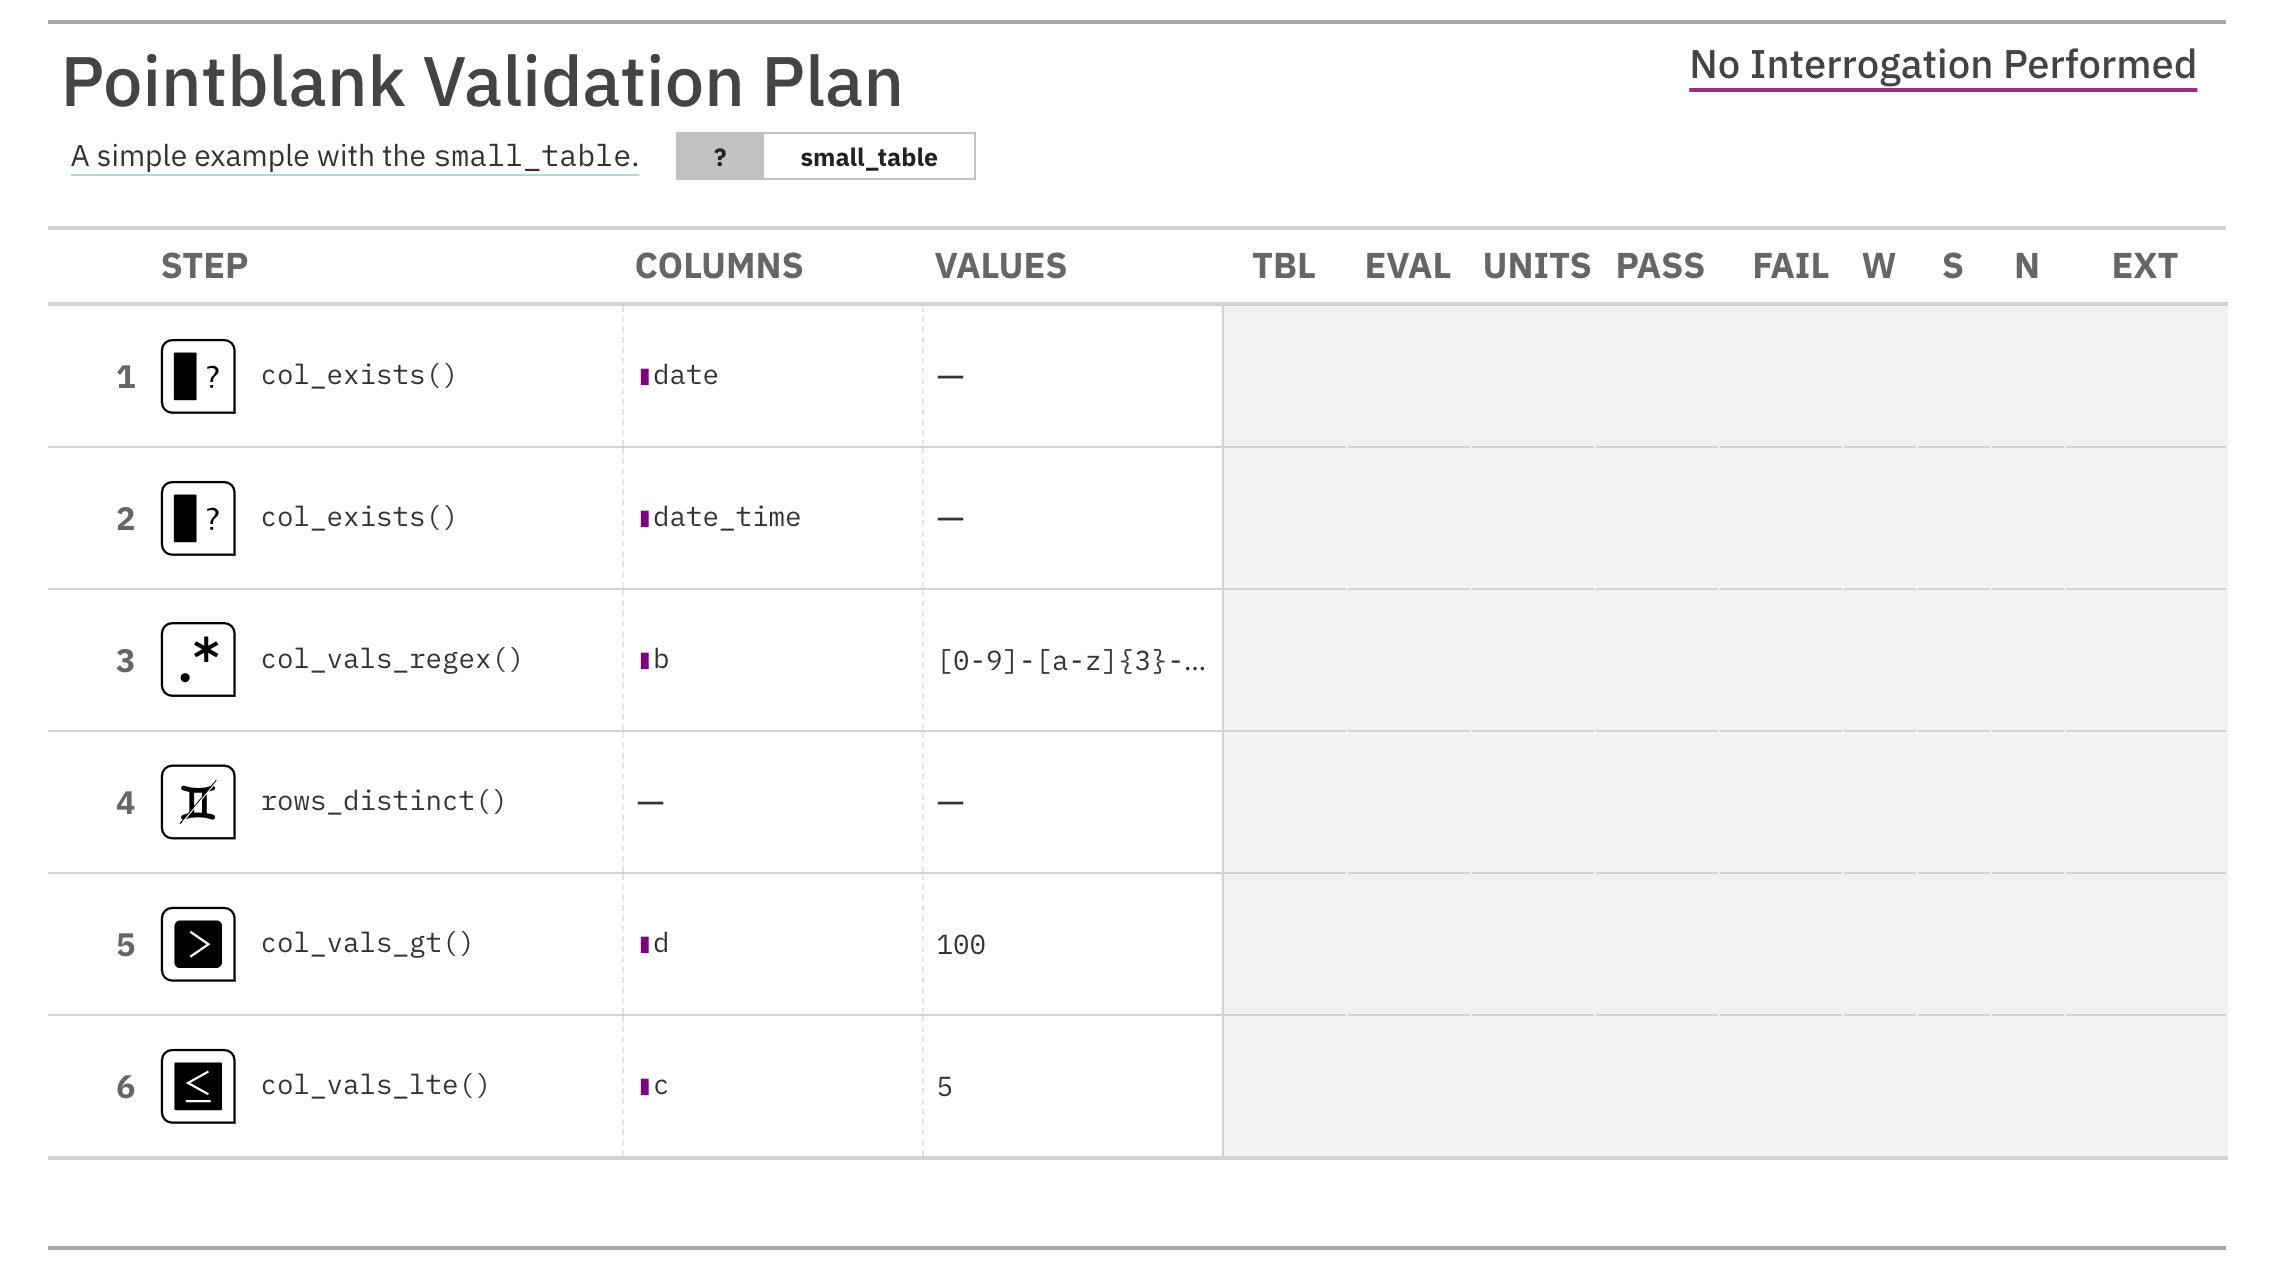
To get a sense of which expressions are being used to generate the new agent,
we can use yaml_agent_show_exprs().
yaml_agent_show_exprs(filename = "agent-small_table.yml")
create_agent(
tbl = ~small_table,
actions = action_levels(
warn_at = 0.1,
stop_at = 0.25,
notify_at = 0.35
),
tbl_name = "small_table",
label = "A simple example with the `small_table`."
) %>%
col_exists(
columns = c(date, date_time)
) %>%
col_vals_regex(
columns = b,
regex = "[0-9]-[a-z]{3}-[0-9]{3}"
) %>%
rows_distinct() %>%
col_vals_gt(
columns = d,
value = 100
) %>%
col_vals_lte(
columns = c,
value = 5
)
Function ID
11-6
See Also
Other pointblank YAML:
yaml_agent_interrogate(),
yaml_agent_string(),
yaml_exec(),
yaml_informant_incorporate(),
yaml_read_agent(),
yaml_read_informant(),
yaml_write()
Display pointblank YAML using an agent or a YAML file
Description
With pointblank YAML, we can serialize an agent's validation plan (with
yaml_write()), read it back later with a new agent (with
yaml_read_agent()), or perform an interrogation on the target data table
directly with the YAML file (with yaml_agent_interrogate()). The
yaml_agent_string() function allows us to inspect the YAML generated by
yaml_write() in the console, giving us a look at the YAML without needing
to open the file directly. Alternatively, we can provide an agent to the
yaml_agent_string() and view the YAML representation of the validation plan
without needing to write the YAML to disk beforehand.
Usage
yaml_agent_string(agent = NULL, filename = NULL, path = NULL, expanded = FALSE)yaml_agent_string(agent = NULL, filename = NULL, path = NULL, expanded = FALSE)
Arguments
agent |
An agent object of class |
filename |
The name of the YAML file that contains fields related to an
agent. If a file name is provided here, then agent object must not be
provided in |
path |
An optional path to the YAML file (combined with |
expanded |
Should the written validation expressions for an agent be
expanded such that tidyselect expressions for columns are evaluated,
yielding a validation function per column? By default, this is |
Value
The yaml string is printed to the console and returned invisibly.
Examples
There's a YAML file available in the pointblank package that's called
"agent-small_table.yml". The path for it can be accessed through
system.file():
yml_file_path <-
system.file(
"yaml", "agent-small_table.yml",
package = "pointblank"
)
We can view the contents of the YAML file in the console with the
yaml_agent_string() function.
yaml_agent_string(filename = yml_file_path)
type: agent
tbl: ~ tbl_source("small_table", "tbl_store.yml")
tbl_name: small_table
label: A simple example with the `small_table`.
lang: en
locale: en
actions:
warn_fraction: 0.1
stop_fraction: 0.25
notify_fraction: 0.35
steps:
- col_exists:
columns: vars(date)
- col_exists:
columns: vars(date_time)
- col_vals_regex:
columns: vars(b)
regex: '[0-9]-[a-z]{3}-[0-9]{3}'
- rows_distinct:
columns: ~
- col_vals_gt:
columns: vars(d)
value: 100.0
- col_vals_lte:
columns: vars(c)
value: 5.0
Incidentally, we can also use yaml_agent_string() to print YAML in the
console when supplying an agent object as the input. This can be useful for
previewing YAML output just before writing it to disk with yaml_write().
Function ID
11-5
See Also
Other pointblank YAML:
yaml_agent_interrogate(),
yaml_agent_show_exprs(),
yaml_exec(),
yaml_informant_incorporate(),
yaml_read_agent(),
yaml_read_informant(),
yaml_write()
Execute all agent and informant YAML tasks
Description
The yaml_exec() function takes all relevant pointblank YAML files in a
directory and executes them. Execution involves interrogation of agents for
YAML agents and incorporation of informants for YAML informants. Under the
hood, this uses yaml_agent_interrogate() and yaml_informant_incorporate()
and then x_write_disk() to save the processed objects to an output
directory. These written artifacts can be read in at any later time with the
x_read_disk() function or the read_disk_multiagent() function. This is
useful when data in the target tables are changing and the periodic testing
of such tables is part of a data quality monitoring plan.
The output RDS files are named according to the object type processed, the
target table, and the date-time of processing. For convenience and
modularity, this setup is ideal when a table store YAML file (typically named
"tbl_store.yml" and produced via the tbl_store() and yaml_write()
workflow) is available in the directory, and when table-prep formulas are
accessed by name through tbl_source().
A typical directory of files set up for execution in this way might have the following contents:
-
a
"tbl_store.yml"file for holding table-prep formulas (created withtbl_store()and written to YAML withyaml_write()) -
one or more YAML agent files to validate tables (ideally using
tbl_source()) -
one or more YAML informant files to provide refreshed metadata on tables (again, using
tbl_source()to reference table preparations is ideal) -
an output folder (default is
"output") to save serialized versions of processed agents and informants
Minimal example files of the aforementioned types can be found in the
pointblank package through the following system.file() calls:
-
system.file("yaml", "agent-small_table.yml", package = "pointblank") -
system.file("yaml", "informant-small_table.yml", package = "pointblank") -
system.file("yaml", "tbl_store.yml", package = "pointblank")
The directory itself can be accessed using system.file("yaml", package = "pointblank").
Usage
yaml_exec( path = NULL, files = NULL, write_to_disk = TRUE, output_path = file.path(path, "output"), keep_tbl = FALSE, keep_extracts = FALSE )yaml_exec( path = NULL, files = NULL, write_to_disk = TRUE, output_path = file.path(path, "output"), keep_tbl = FALSE, keep_extracts = FALSE )
Arguments
path |
The path that contains the YAML files for agents and informants. |
files |
A vector of YAML files to use in the execution workflow. By
default, |
write_to_disk |
Should the execution workflow include a step that writes
output files to disk? This internally calls |
output_path |
The output path for any generated output files. By
default, this will be a subdirectory of the provided |
keep_tbl, keep_extracts
|
For agents, the table may be kept if it is a
data frame object (databases tables will never be pulled for storage) and
extracts, collections of table rows that failed a validation step, may
also be stored. By default, both of these options are set to |
Value
Invisibly returns a named vector of file paths for the input files that were processed; file output paths (for wherever writing occurred) are given as the names.
Function ID
11-8
See Also
Other pointblank YAML:
yaml_agent_interrogate(),
yaml_agent_show_exprs(),
yaml_agent_string(),
yaml_informant_incorporate(),
yaml_read_agent(),
yaml_read_informant(),
yaml_write()
Examples
if (interactive()) { # The 'yaml' directory that is # accessible in the package through # `system.file()` contains the files # 1. `agent-small_table.yml` # 2. `informant-small_table.yml` # 3. `tbl_store.yml` # There are references in YAML files # 1 & 2 to the table store YAML file, # so, they all work together cohesively # Let's process the agent and the # informant YAML files with `yaml_exec()`; # and we'll specify the working directory # as the place where the output RDS files # are written output_dir <- getwd() yaml_exec( path = system.file( "yaml", package = "pointblank" ), output = output_dir ) # This generates two RDS files in the # working directory: one for the agent # and the other for the informant; each # of them are automatically time-stamped # so that periodic execution can be # safely carried out without risk of # overwriting }if (interactive()) { # The 'yaml' directory that is # accessible in the package through # `system.file()` contains the files # 1. `agent-small_table.yml` # 2. `informant-small_table.yml` # 3. `tbl_store.yml` # There are references in YAML files # 1 & 2 to the table store YAML file, # so, they all work together cohesively # Let's process the agent and the # informant YAML files with `yaml_exec()`; # and we'll specify the working directory # as the place where the output RDS files # are written output_dir <- getwd() yaml_exec( path = system.file( "yaml", package = "pointblank" ), output = output_dir ) # This generates two RDS files in the # working directory: one for the agent # and the other for the informant; each # of them are automatically time-stamped # so that periodic execution can be # safely carried out without risk of # overwriting }
Get an informant from pointblank YAML and incorporate()
Description
The yaml_informant_incorporate() function operates much like the
yaml_read_informant() function (reading a pointblank YAML file and
generating an informant with all information in place). The key difference
is that this function takes things a step further and incorporates aspects
from the the target table (defined by table-prep formula that is required in
the YAML file). The additional auto-invocation of incorporate() uses the
default options of that function. As with yaml_read_informant() the
informant is returned except, this time, it has been updated with the latest
information from the target table.
Usage
yaml_informant_incorporate(filename, path = NULL)yaml_informant_incorporate(filename, path = NULL)
Arguments
filename |
File name
The name of the YAML file that contains fields related to an informant. |
path |
File path
An optional path to the YAML file (combined with |
Value
A ptblank_informant object.
Examples
There's a YAML file available in the pointblank package that's called
"informant-small_table.yml". The path for it can be accessed through
system.file():
yml_file_path <-
system.file(
"yaml", "informant-small_table.yml",
package = "pointblank"
)
The YAML file can be read as an informant by using the
yaml_informant_incorporate() function. If you expect metadata to change
with time, it's best to use yaml_informant_incorporate() instead of
yaml_read_informant() since the former will go the extra mile and perform
incorporate() in addition to the reading.
informant <- yaml_informant_incorporate(filename = yml_file_path) informant
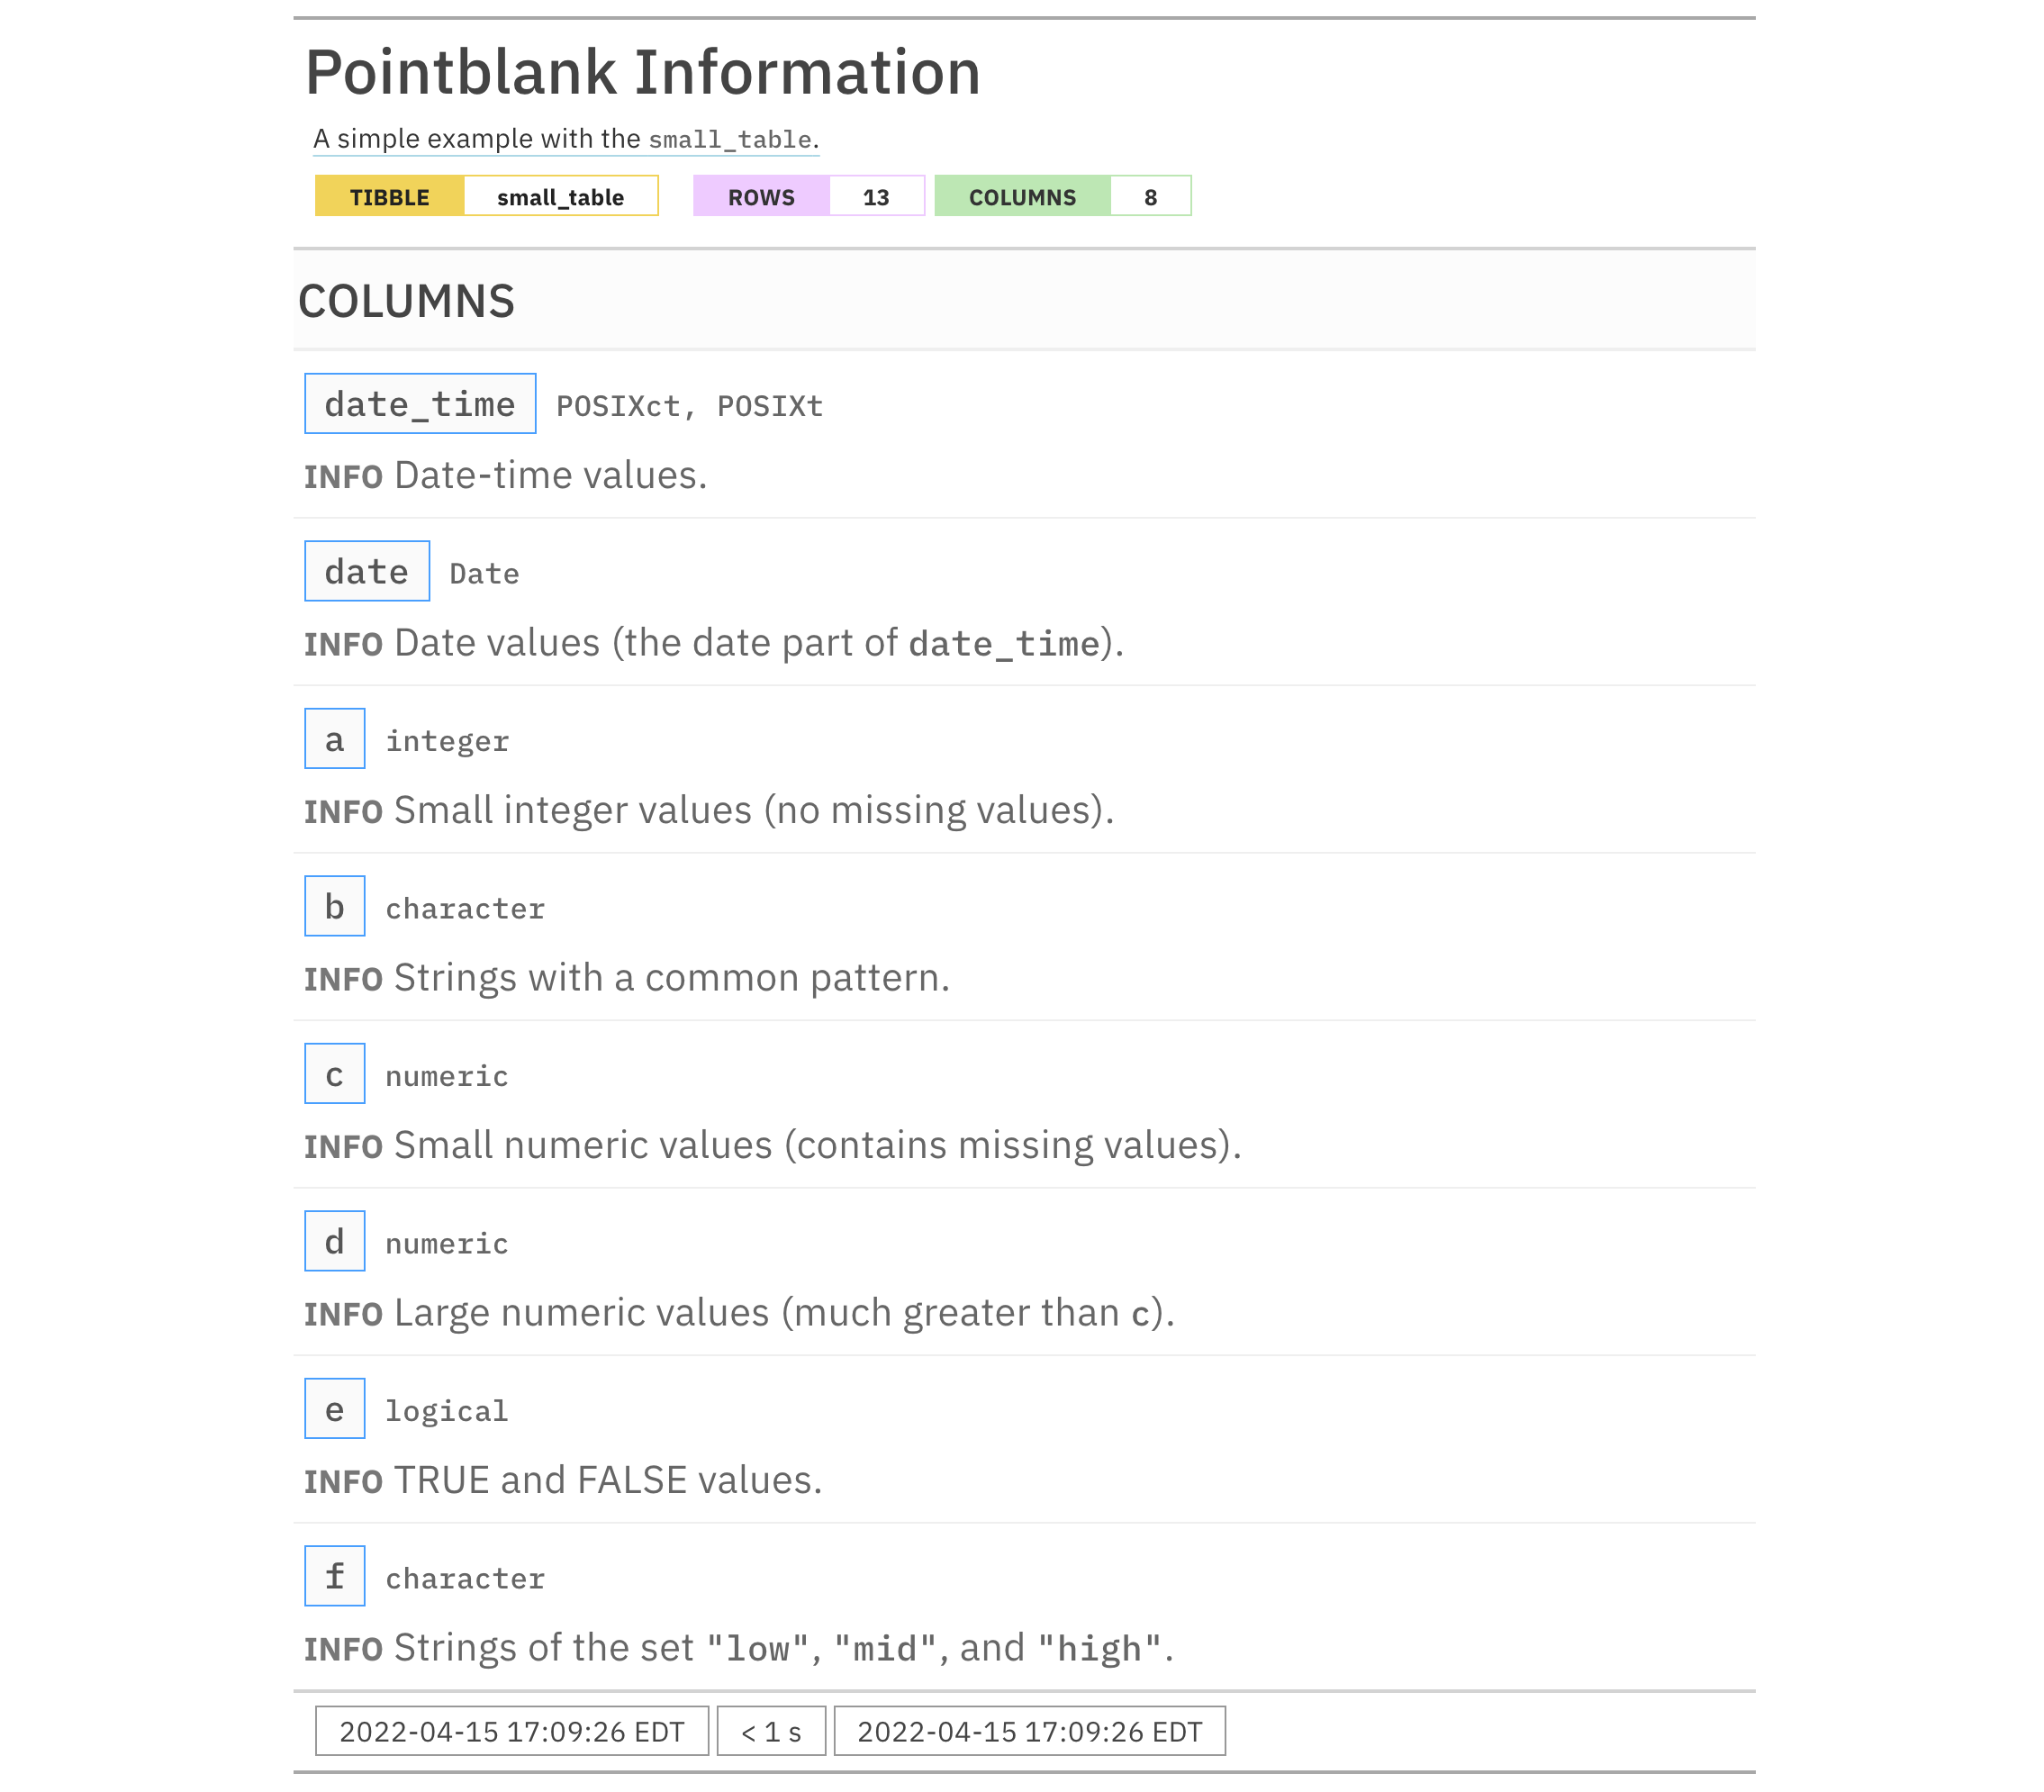
As can be seen from the information report, the available table metadata was restored and reported. If the metadata were to change with time, that would be updated as well.
Function ID
11-7
See Also
Other pointblank YAML:
yaml_agent_interrogate(),
yaml_agent_show_exprs(),
yaml_agent_string(),
yaml_exec(),
yaml_read_agent(),
yaml_read_informant(),
yaml_write()
Read a pointblank YAML file to create an agent object
Description
With yaml_read_agent() we can read a pointblank YAML file that
describes a validation plan to be carried out by an agent (typically
generated by the yaml_write() function. What's returned is a new agent
with that validation plan, ready to interrogate the target table at will
(using the table-prep formula that is set with the tbl argument of
create_agent()). The agent can be given more validation steps if needed
before using interrogate() or taking part in any other agent ops (e.g.,
writing to disk with outputs intact via x_write_disk() or again to
pointblank YAML with yaml_write()).
To get a picture of how yaml_read_agent() is interpreting the validation
plan specified in the pointblank YAML, we can use the
yaml_agent_show_exprs() function. That function shows us (in the console)
the pointblank expressions for generating the described validation plan.
Usage
yaml_read_agent(filename, path = NULL)yaml_read_agent(filename, path = NULL)
Arguments
filename |
File name
The name of the YAML file that contains fields related to an agent. |
path |
File path
An optional path to the YAML file (combined with |
Value
A ptblank_agent object.
Examples
There's a YAML file available in the pointblank package that's also
called "agent-small_table.yml". The path for it can be accessed through
system.file():
yml_file_path <-
system.file(
"yaml", "agent-small_table.yml",
package = "pointblank"
)
The YAML file can be read as an agent with a pre-existing validation plan by
using the yaml_read_agent() function.
agent <- yaml_read_agent(filename = yml_file_path) agent
This particular agent is using ~ tbl_source("small_table", "tbl_store.yml")
to source the table-prep from a YAML file that holds a table store (can be
seen using yaml_agent_string(agent = agent)). Let's put that file in the
working directory (the pointblank package has the corresponding YAML
file):
yml_tbl_store_path <-
system.file(
"yaml", "tbl_store.yml",
package = "pointblank"
)
file.copy(from = yml_tbl_store_path, to = ".")
As can be seen from the validation report, no interrogation was yet
performed. Saving an agent to YAML will remove any traces of interrogation
data and serve as a plan for a new interrogation on the same target table. We
can either follow this up with with interrogate() and get an agent with
intel, or, we can interrogate directly from the YAML file with
yaml_agent_interrogate():
agent <- yaml_agent_interrogate(filename = yml_file_path) agent
Function ID
11-2
See Also
Other pointblank YAML:
yaml_agent_interrogate(),
yaml_agent_show_exprs(),
yaml_agent_string(),
yaml_exec(),
yaml_informant_incorporate(),
yaml_read_informant(),
yaml_write()
Read a pointblank YAML file to create an informant object
Description
With yaml_read_informant() we can read a pointblank YAML file that
describes table information (typically generated by the yaml_write()
function. What's returned is a new informant object with the information
intact. The informant object can be given more information through use of
the info_*() functions.
Usage
yaml_read_informant(filename, path = NULL)yaml_read_informant(filename, path = NULL)
Arguments
filename |
File name
The name of the YAML file that contains fields related to an informant. |
path |
File path
An optional path to the YAML file (combined with |
Value
A ptblank_informant object.
Examples
There's a YAML file available in the pointblank package that's called
"informant-small_table.yml". The path for it can be accessed through
system.file():
yml_file_path <-
system.file(
"yaml", "informant-small_table.yml",
package = "pointblank"
)
The YAML file can be read as an informant by using the
yaml_read_informant() function.
informant <- yaml_read_informant(filename = yml_file_path) informant
As can be seen from the information report, the available table metadata was
restored and reported. If you expect metadata to change with time, it might
be beneficial to use incorporate() to query the target table. Or, we can
perform this querying directly from the YAML file with
yaml_informant_incorporate().
Function ID
11-3
See Also
Other pointblank YAML:
yaml_agent_interrogate(),
yaml_agent_show_exprs(),
yaml_agent_string(),
yaml_exec(),
yaml_informant_incorporate(),
yaml_read_agent(),
yaml_write()
Write pointblank objects to YAML files
Description
With yaml_write() we can take different pointblank objects (these are
the ptblank_agent, ptblank_informant, and tbl_store) and write them to
YAML. With an agent, for example, yaml_write() will write that everything
that is needed to specify an agent and it's validation plan to a YAML file.
With YAML, we can modify the YAML markup if so desired, or, use as is to
create a new agent with the yaml_read_agent() function. That agent will
have a validation plan and is ready to interrogate() the data. We can go a
step further and perform an interrogation directly from the YAML file with
the yaml_agent_interrogate() function. That returns an agent with intel
(having already interrogated the target data table). An informant object
can also be written to YAML with yaml_write().
One requirement for writing an agent or an informant to YAML is that we
need to have a table-prep formula specified (it's an R formula that is used
to read the target table when interrogate() or incorporate() is called).
This option can be set when using create_agent()/create_informant() or
with set_tbl() (useful with an existing agent or informant object).
Usage
yaml_write( ..., .list = list2(...), filename = NULL, path = NULL, expanded = FALSE, quiet = FALSE )yaml_write( ..., .list = list2(...), filename = NULL, path = NULL, expanded = FALSE, quiet = FALSE )
Arguments
... |
Pointblank agents, informants, table stores
Any mix of pointblank objects such as the agent
( |
.list |
Alternative to
Allows for the use of a list as an input alternative to |
filename |
File name
The name of the YAML file to create on disk. It is recommended that either
the |
path |
File path
An optional path to which the YAML file should be saved (combined with
|
expanded |
Expand validation when repeating across multiple columns
Should the written validation expressions for an agent be expanded such
that tidyselect expressions for columns are evaluated, yielding a
validation function per column? By default, this is |
quiet |
Inform (or not) upon file writing
. Should the function not inform when the file is written? |
Value
Invisibly returns TRUE if the YAML file has been written.
Examples
Writing an agent object to a YAML file
Let's go through the process of developing an agent with a validation plan.
We'll use the small_table dataset in the following examples, which will
eventually offload the developed validation plan to a YAML file.
small_table #> # A tibble: 13 x 8 #> date_time date a b c d e f #> <dttm> <date> <int> <chr> <dbl> <dbl> <lgl> <chr> #> 1 2016-01-04 11:00:00 2016-01-04 2 1-bcd-345 3 3423. TRUE high #> 2 2016-01-04 00:32:00 2016-01-04 3 5-egh-163 8 10000. TRUE low #> 3 2016-01-05 13:32:00 2016-01-05 6 8-kdg-938 3 2343. TRUE high #> 4 2016-01-06 17:23:00 2016-01-06 2 5-jdo-903 NA 3892. FALSE mid #> 5 2016-01-09 12:36:00 2016-01-09 8 3-ldm-038 7 284. TRUE low #> 6 2016-01-11 06:15:00 2016-01-11 4 2-dhe-923 4 3291. TRUE mid #> 7 2016-01-15 18:46:00 2016-01-15 7 1-knw-093 3 843. TRUE high #> 8 2016-01-17 11:27:00 2016-01-17 4 5-boe-639 2 1036. FALSE low #> 9 2016-01-20 04:30:00 2016-01-20 3 5-bce-642 9 838. FALSE high #> 10 2016-01-20 04:30:00 2016-01-20 3 5-bce-642 9 838. FALSE high #> 11 2016-01-26 20:07:00 2016-01-26 4 2-dmx-010 7 834. TRUE low #> 12 2016-01-28 02:51:00 2016-01-28 2 7-dmx-010 8 108. FALSE low #> 13 2016-01-30 11:23:00 2016-01-30 1 3-dka-303 NA 2230. TRUE high
Creating an action_levels object is a common workflow step when creating a
pointblank agent. We designate failure thresholds to the warn, stop,
and notify states using action_levels().
al <-
action_levels(
warn_at = 0.10,
stop_at = 0.25,
notify_at = 0.35
)
Now let's create the agent and pass it the al object (which serves as a
default for all validation steps which can be overridden). The data will be
referenced in tbl with a leading ~ and this is a requirement for writing
to YAML since the preparation of the target table must be self contained.
agent <-
create_agent(
tbl = ~ small_table,
tbl_name = "small_table",
label = "A simple example with the `small_table`.",
actions = al
)
Then, as with any agent object, we can add steps to the validation plan by
using as many validation functions as we want.
agent <-
agent %>%
col_exists(columns = c(date, date_time)) %>%
col_vals_regex(
columns = b,
regex = "[0-9]-[a-z]{3}-[0-9]{3}"
) %>%
rows_distinct() %>%
col_vals_gt(columns = d, value = 100) %>%
col_vals_lte(columns = c, value = 5)
The agent can be written to a pointblank-readable YAML file with the
yaml_write() function. Here, we'll use the filename
"agent-small_table.yml" and, after writing, the YAML file will be in the
working directory:
yaml_write(agent, filename = "agent-small_table.yml")
We can view the YAML file in the console with the yaml_agent_string()
function.
yaml_agent_string(filename = "agent-small_table.yml")
type: agent
tbl: ~small_table
tbl_name: small_table
label: A simple example with the `small_table`.
lang: en
locale: en
actions:
warn_fraction: 0.1
stop_fraction: 0.25
notify_fraction: 0.35
steps:
- col_exists:
columns: c(date, date_time)
- col_vals_regex:
columns: c(b)
regex: '[0-9]-[a-z]{3}-[0-9]{3}'
- rows_distinct:
columns: ~
- col_vals_gt:
columns: c(d)
value: 100.0
- col_vals_lte:
columns: c(c)
value: 5.0
Incidentally, we can also use yaml_agent_string() to print YAML in the
console when supplying an agent as the input. This can be useful for
previewing YAML output just before writing it to disk with yaml_write().
Reading an agent object from a YAML file
There's a YAML file available in the pointblank package that's also
called "agent-small_table.yml". The path for it can be accessed through
system.file():
yml_file_path <-
system.file(
"yaml", "agent-small_table.yml",
package = "pointblank"
)
The YAML file can be read as an agent with a pre-existing validation plan by
using the yaml_read_agent() function.
agent <- yaml_read_agent(filename = yml_file_path) agent
This particular agent is using ~ tbl_source("small_table", "tbl_store.yml")
to source the table-prep from a YAML file that holds a table store (can be
seen using yaml_agent_string(agent = agent)). Let's put that file in the
working directory (the pointblank package has the corresponding YAML
file):
yml_tbl_store_path <-
system.file(
"yaml", "tbl_store.yml",
package = "pointblank"
)
file.copy(from = yml_tbl_store_path, to = ".")
As can be seen from the validation report, no interrogation was yet
performed. Saving an agent to YAML will remove any traces of interrogation
data and serve as a plan for a new interrogation on the same target table. We
can either follow this up with with interrogate() and get an agent with
intel, or, we can interrogate directly from the YAML file with
yaml_agent_interrogate():
agent <- yaml_agent_interrogate(filename = yml_file_path) agent
Writing an informant object to a YAML file
Let's walk through how we can generate some useful information for a really
small table. We can create an informant object with create_informant()
and we'll again use the small_table dataset.
informant <-
create_informant(
tbl = ~ small_table,
tbl_name = "small_table",
label = "A simple example with the `small_table`."
)
Then, as with any informant object, we can add info text to the
using as many info_*() functions as we want.
informant <-
informant %>%
info_columns(
columns = a,
info = "In the range of 1 to 10. (SIMPLE)"
) %>%
info_columns(
columns = starts_with("date"),
info = "Time-based values (e.g., `Sys.time()`)."
) %>%
info_columns(
columns = date,
info = "The date part of `date_time`. (CALC)"
)
The informant can be written to a pointblank-readable YAML file with the
yaml_write() function. Here, we'll use the filename
"informant-small_table.yml" and, after writing, the YAML file will be in
the working directory:
yaml_write(informant, filename = "informant-small_table.yml")
We can inspect the YAML file in the working directory and expect to see the following:
type: informant tbl: ~small_table tbl_name: small_table info_label: A simple example with the `small_table`. lang: en locale: en table: name: small_table _columns: 8 _rows: 13.0 _type: tbl_df columns: date_time: _type: POSIXct, POSIXt info: Time-based values (e.g., `Sys.time()`). date: _type: Date info: Time-based values (e.g., `Sys.time()`). The date part of `date_time`. a: _type: integer info: In the range of 1 to 10. (SIMPLE) b: _type: character c: _type: numeric d: _type: numeric e: _type: logical f: _type: character
Reading an informant object from a YAML file
There's a YAML file available in the pointblank package that's also
called "informant-small_table.yml". The path for it can be accessed through
system.file():
yml_file_path <-
system.file(
"yaml", "informant-small_table.yml",
package = "pointblank"
)
The YAML file can be read as an informant by using the
yaml_read_informant() function.
informant <- yaml_read_informant(filename = yml_file_path) informant
As can be seen from the information report, the available table metadata was
restored and reported. If you expect metadata to change with time, it might
be beneficial to use incorporate() to query the target table. Or, we can
perform this querying directly from the YAML file with
yaml_informant_incorporate():
informant <- yaml_informant_incorporate(filename = yml_file_path)
There will be no apparent difference in this particular case since
small_data is a static table with no alterations over time. However,
using yaml_informant_incorporate() is good practice since this refreshing
of data will be important with real-world datasets.
Function ID
11-1
See Also
Other pointblank YAML:
yaml_agent_interrogate(),
yaml_agent_show_exprs(),
yaml_agent_string(),
yaml_exec(),
yaml_informant_incorporate(),
yaml_read_agent(),
yaml_read_informant()